Phantoms of the Theater
Designer: mikevv
Project Time: 1-8 hours
Project Complexity: Hobbyist
Project Cost: $100-$500
Driver Selection
The woofers I chose to use were dual Dayton Audio Classic DC130BS-4 wired in series. These have timbre characteristics similar to those of the treated paper DC160-8 used in the BR-1 kit, and their mounting depth offers more “breathing room” when mounted in-wall. Cost, when purchased in groups of four, is decent and these drivers should remain a staple at Parts Express for years to come. Selecting the Dayton Audio ND20FB-4 for this project was a no-brainer since the Dayton Audio In-Wall Mounting System’s baffle depth measures roughly 12.5 mm. Drill a 1-7/16″ hole and you’re done-except for finishing work, of course. Other benefits to using this tweeter include its non-fatiguing silk dome “character” (kissing cousin to the DC28F-8 used in the BR-1), a 3/4″ diameter that offers superb off-axis response (more on that later), and best of all…a low price.
Enclosure Design
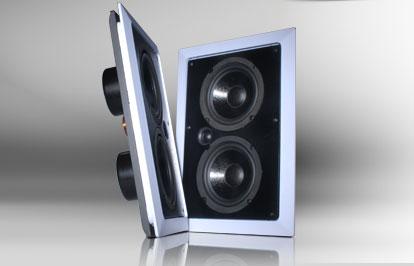
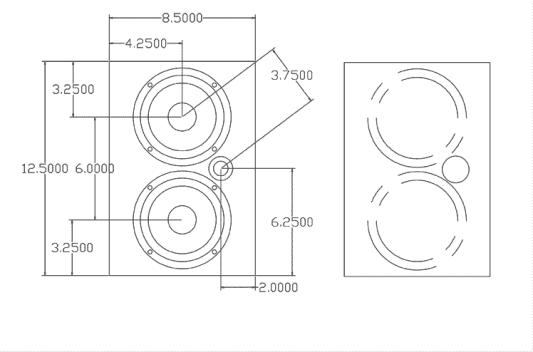
For this enclosure I selected… a wall. Actually, I selected the Dayton Audio IMS-812. The 8-1/2″ x 12-1/2″ baffle provided more than enough room to fit the three drivers, and left space on the backside for mounting crossover components. The IMS-812’s nicest feature is the practical and useful Baffle Replacement and Exchange system (B-REX for short). It’s good, for when you’re not. My first step was to draw everything in AutoCAD. This helped me optimally space the drivers, get a feel for what looks best, and make accurate center-to-center driver measurements for crossover purposes. The tweeter is offset in relation to the two woofers, which also facilitates use of this speaker horizontally as a center channel. Next, I prepared the baffle by masking it with blue painter’s tape to prevent marring the finish and minimize chipping. The relatively small baffle was then secured to a much larger piece of MDF (using wood screws through the baffle screw holes) for easy clamping. I routed a 1/4″ deep recess to flush mount the woofers-a requirement for the grill to fit without obstructing the woofers’ operation. Using the Jasper Jig 400, the closest setting for the initial recess cut is 5-3/4″ and leaves the recess a little large; 5-11/16″ is too small…well, there’s always B-REX. If the Router Buddy is compatible with your plunge router, I would highly recommend you use that instead. You can dial in any diameter between 2″ and 18″ for a perfect fit. The cutout for the woofers should be 4-11/16″ in diameter. A 1-7/16″ drill bit should have been used for the tweeter, but all I could find locally were 1-3/8″ spade drill bits and hole-saws. Using a 1-3/8″ hole saw required some filing, not much though. The final hole diameter should be 26 mm. I’ve seen a nice set of precision digital calipers somewhere for around 25 bucks…
Amplifier/Crossover Configuration
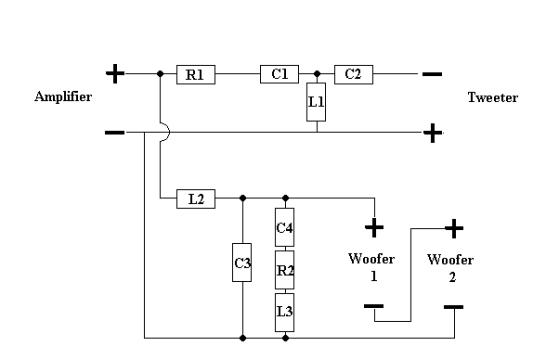
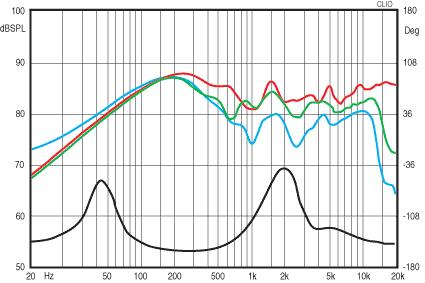
Designing in-wall speakers is a systematic balance of compromises-even more so than conventional speakers. High “Q” drivers are often selected for in-wall use because each speaker is effectively placed into a three cubic foot cabinet once installed. I didn’t want to go that route and sacrifice sound quality; high “Q” drivers are said to bounce around the audio signal rather than directly play it. I was also shooting for a decent power response since most of the listening will be done off-axis once these speakers are installed. This led to experimentation with the midrange tuning. I settled for a sound that was a touch below hot on-axis for a smoother, more neutral off-axis response. Initially, I tried crossing the ND20FB-4 with a 2nd-order electrical high-pass filter (one capacitor in series, one inductor in parallel) that approximated a 4th-order Linkwitz-Riley acoustic slope with a corner frequency of 3,000 Hz. Listening to the tweeter alone, at about 2.83 V, revealed too much “hash” for my taste and I started to worry about overexcursion problems. A third-order electrical high-pass filter (two capacitors in series with one inductor in parallel connected between the capacitors) cleaned up nearly all of the lower-frequency junk. The acoustic slope’s target was that of a 6th-order Linkwitz-Riley alignment but the actual slope is asymmetric and steeper. Polarity of the tweeter was reversed in relation to the woofers. The DC130BS woofers do a lot of work in this design and are called upon to run out to 2,500 Hz before rolling off. A second-order electrical low-pass filter (one inductor in series with a capacitor in parallel) helps to create a fifth-order acoustic slope with a 3,000 Hz corner frequency. In order to make the woofers play nice with the tweeter, a series RLC filter (a resistor, inductor, and capacitor wired in series and placed in parallel with the woofers) was implemented to contour their frequency response. A slightly exaggerated bass emphasis has been built-in for two-channel stereo listening. The electronic high-pass filter built into most home theater receivers will minimize this- most of those are set to about 100 Hz. I would recommend doing this as it also limits the woofers’ excursion, something absolutely needed during movie playback. The crossover components were hot glued to the back of the speaker baffle for installation simplification. Each capacitor used is an electrolytic. I’ll leave the capacitor sound quality debates for someone else to discuss! All off-axis measurements shown were taken with the microphone referenced to the “inside” or tweeter-offset side of the baffle. The measured speaker impedance never went below 6 ohms. No receiver on the market will be overly stressed driving these-even super low cost home-theater-in-a-box receivers.
Enclosure Assembly
All off-axis measurements shown were taken with the microphone referenced to the “inside” or tweeter-offset side of the baffle. The measured speaker impedance never went below 6 ohms. No receiver on the market will be overly stressed driving these-even super low cost home-theater-in-a-box receivers. Mark and cut the drywall according to the template. Remove the cutout section of wall, and inspect for any insulation that may impede your installation. Mount the frame of the in-wall mounting system bottom first, allowing the frame to drop. The top section of the frame should slide right into place. Straighten the frame and tighten the four screws. Connect the speaker wires (observing polarity) and install the baffle by securing it to the frame using the included screws. Because the crossover design is “optimized” for use with a specific driver offset, mounting the speakers vertically for left, right, or surround locations requires the tweeter to be on the inside (e.g. the left speaker would have the tweeter on the right side and the right speaker would have the tweeter on the left side). This configuration will provide the best summation of any stereo pair. The speaker may be turned on its side for use as a center-channel. Horizontal mounting for center channel applications requires the tweeter to be facing up if mounted below a TV or facing down if mounted above a TV.
Conclusion
The little Dayton Audio five-and-a-quarters were able to handle 20 clean watts “free air” before distortion began to set in, which had convinced me they would work fine in a large-volume enclosure-or a wall. I would rate the power handling of these woofers much higher when used with an electronic high-pass filter. Dayton’s ND20FB-4 tweeter is receiving a lot of favorable customer reviews, and for good reason: surprisingly low-distortion performance (provided it’s used correctly) and an ability to play much lower frequencies than the price tag would suggest. I have to admit it was tough at first getting these woofers and tweeters to integrate. I didn’t want more than five components in the crossover from the outset…oh well. The end result is also a little less sensitive than I would have liked but with watts being so cheap it shouldn’t matter. This is especially the case in a home theater environment where I think these speakers will demonstrate their clean, crisp, unadulterated dynamics without a hint of distortion, even at tremendously loud listening levels. Save yourself the high cost of gas and movie theater tickets-the latest flicks look and sound better at home!
About The Designer
Mike Van Den Broek as been an electronics enthusiast all of his life. Mike’s designs reflect a desire to stand out from the crowd, yet draw listeners in with the sound.
Project Parts List
|
Part # |
Description |
Qty |
|
295-302 |
1 |
|
|
275-035 |
Dayton Audio ND20FB-4 Rear-Mount 3/4″ Neodymium Dome Tweeter |
1 |
|
302-522 |
1 |
|
|
260-300 |
1 |
|
|
081-420 |
1 |
|
|
004-5.1 |
Dayton Audio DNR-5.1 5.1 Ohm 10W Precision Audio Grade Resis |
1 |
|
027-328 |
1 |
|
|
027-338 |
1 |
|
|
255-022 |
1 |
|
|
255-054 |
1 |
|
|
027-344 |
1 |
|
|
027-350 |
1 |
|
|
004-6.5 |
Dayton Audio DNR-6.5 6.5 Ohm 10W Precision Audio Grade Resis |
1 |
|
255-048 |
1 |
+ There are no comments
Add yours