Sphericles

Designer: Darren Kuzma
Project Time: 20+ hours
Project Complexity: Professional
Project Cost: $500-$1000
Driver Selection
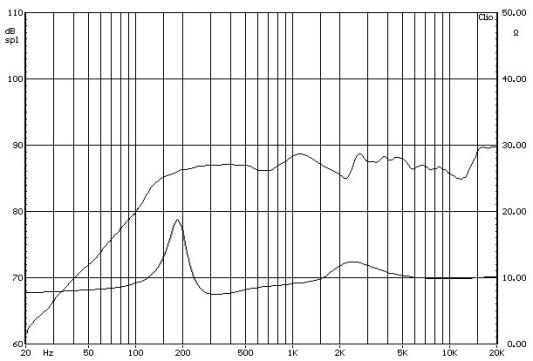
Being that I already knew my enclosure dimensions and volume, the size of midbass drivers I was using was already predestined to be 3″. Within the 3″ driver category, I had several preferences and factors that limited my selection even further: the frame needed to be completely round; the motor needed to be neodymium; and the drivers needed to have a modern, high-tech look. After filtering the selection through these constraints, I only had several possible choices, and I chose the Tang Band W3-1364S 3″ Bamboo cone driver. For my tweeter selection, the only limiting factor I had was that I wanted to stick with either a shielded or neodymium motor. I decided to use the Tang Band 25-1414SC 1″ Titanium dome tweeter because I was curious about its performance, and I thought it was a good aesthetic match for the rest of the drivers. Project Edit: The Tang Band 25-1719S has been substituted due to availability. The crossover remains the same, and the tonal quality should be very similar if not slightly brighter.
Enclosure Design
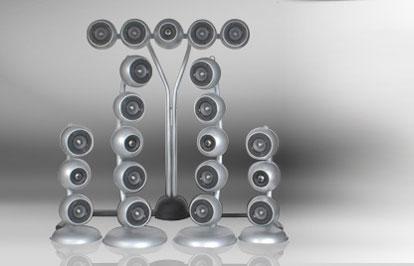
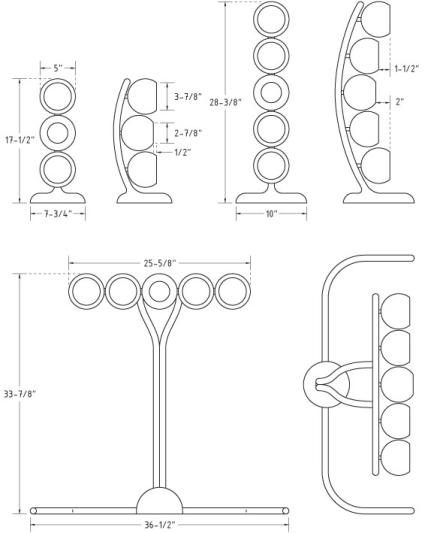
The theme of my enclosure design for this speaker is simple-spheres. I chose them for their visual appeal and the unique design element that they add to the overall look of the speakers and system. The front speakers use five spheres per channel (four woofer spheres and one tweeter sphere per speaker), and the rear speakers use three spheres per channel (two woofer spheres and a tweeter sphere). The overall size and configuration of the LCR speakers was constrained by the dimensions of the television-in this case roughly 28 inches tall. To have room for the supporting base and spheres, the largest practical diameter of the spheres was 5″. Using approximately 1/2″ thick walls yields a net internal volume of roughly .015 cu. ft. (.4 liters) per sphere. Supporting and connecting the spheres are curved steel tubes. The steel tubes provide a very stable support, while at the same allowing all of the wires to be neatly concealed and routed into the speaker base. The base is where the wiring comes together and the crossovers are located.
Amplifier/Crossover Configuration
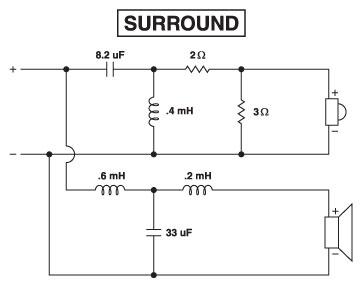
The five pieces of this surround sound system are comprised of two distinct speaker designs. The front soundstage (left, right, and center), share the same basic configuration and rather unconventional crossover design. The tweeter plays quite low, so as to maximize off-axis performance while in the horizontal configuration. Meanwhile, the outermost pair of woofers are used only to fill in the lowest octaves of the speakers’ playback. The outer and inner woofers are wired together in series, yielding a very easy impedance load. The rear surround speakers utilize a much more traditional MTM crossover design. They could use the same upper portion of the design that was used for the fronts, but I wanted to provide an alternate, more traditional design for those that might build and use these as standalone speakers. The crossover is third order acoustic, at approximately 2300 Hz.
Enclosure Assembly
Let’s start with the more conventional part of the construction-the metal support structure for the spheres. This portion was built from materials that are easily found at your local home improvement and discount stores. The main tubes are 3/4″ steel conduit, which I bent into the gentle curves by hand. The support for the center channel was built from the same material, but I used a conduit bender to create the tighter curves that I needed. Attached to the steel supports were small studs made from steel tubing, to which were attached “lighting repair nuts.” I’m not sure of the size, thread count, or pitch of these nuts, but they are the size that is very often used in lamps, light fixtures, and ceiling fans. These are readily available in the lamp repair portion of your hardware store. These nuts and their matching hollow rods are what create the “pass-through” for the wire from the inside of the spheres and into the tubes. The bases of the speakers are built from $2 discount store frying pans with the handles removed. All it took to put everything together was some careful drilling, bending, welding, and bondo-ing. The construction process of the spheres began with trying to figure out what material to construct them from. I did a great deal of research and investigation on possible materials, and ultimately settled on Tuf-Cal. Tuf-Cal is a type of gypsum plaster designed for slush casting, featuring polymer and fiber additives for high strength and chip resistance. While the material itself is fairly inexpensive, it is not easy to find. Expect to pay around $100 to get a hold of some by the time you include shipping and handling charges. In order for the plaster to be cast into the spheres, obviously a mold of some sort was needed. I found the molds online, being sold as candle making molds; they are two-part vacuum formed to 5″ in diameter. To create the driver recesses on both the woofers and the tweeters, I used the plastic vacuum formed protective covers that come on all Tang Band drivers. I simply attached a hollow sprue to the covers, and then duct-taped them into the molds. It sounds like a haphazard process, but it actually worked quite well! The plaster is mixed and worked in pretty much the same way as the plaster of paris you may have used in grade school. Mix roughly one part plaster to one and a half parts water, and you’re on your way! I used a three-part molding process, involving a pour for the “top”, a pour for the “bottom”, and a rotational-molded pour for the “sides.” I found that after about an hour of setting inside the molds, the objects could be removed, the seams cleaned-up, and then dried. Once dry, all that was needed was a few finishing touches. First, I gave the spheres a dip in fiberglass resin to create a durable “shell” that would help smooth out any irregularities, provide scratch-resistance, and provide a great base for painting. Then, I drilled the mounting holes in the back of the spheres and attached the threaded studs. I attached the spheres to the supports, painted the whole thing, and then did the usual speaker prep items like stuffing and wiring.
Conclusion
To answer the first question people are likely to ask-“how do they sound?” The answer is: pretty good. For what amounts to a very small home theater system, the speakers pack an adequate punch and are free from distortion and harshness. They are limited in low end extension and overall loudness, of course, but when mated with a subwoofer, can get to moderate home theater levels without any trouble. For the casual home theater user, these speakers’ sound quality will be more than satisactory. To address the second question people might ask-“were they difficult to build?” I would say: yes and no. There was nothing inherently difficult about any one part of the project; nothing required unusual preciseness or attention-to-detail. However, as a whole, the project seemed difficult, because it involved some unusual DIY disciplines including metalworking, welding, and plaster casting, and required an extreme amount of problem solving, experimentation, and process refinement. I probably spent more time figuring out how to build the speakers than I actually spent building them. Perhaps most importantly, the speakers do not sound at all like what they look like. I don’t think a blindfolded observer would be able to deduce either the configuration of the drivers or the enclosure material. The enclosure shape and material is suitably “dead” to prevent any ringing or odd resonances. When you are dealing with new designs and materials, it is always somewhat of a gamble, and I consider it a success that the speakers don’t impart any of their own characteristics to the sound. Overall, it was an interesting and fun project, and I hope it inspires people to get more creative with their design and construction techniques!
About The Designer
Darren Kuzma has been a speaker building enthusiast for many years, and enjoys creating speakers that are unique and out-of-the-ordinary. His designs combine solid technical design principles with creative shapes, colors, and materials. When asked how he learned about the hobby he said “I’ve learned the most by talking to other speaker builders, reading, doing experiments, and by trial-and-error. There’s nothing like getting your hands dirty, that’s why they call it DIY!”
Project Parts List
|
Part # |
Description |
Qty |
|
264-844 |
1 |
|
|
264-865 |
1 |
|
|
255-234 |
1 |
|
|
255-224 |
1 |
|
|
027-350 |
1 |
|
|
027-426 |
1 |
|
|
004-3 |
Dayton Audio DNR-3.0 3 Ohm 10W Precision Audio Grade Resisto |
1 |
|
004-2 |
Dayton Audio DNR-2.0 2 Ohm 10W Precision Audio Grade Resisto |
1 |
|
266-562 |
1 |
|
|
266-554 |
1 |
|
|
027-428 |
1 |
|
|
027-429 |
1 |
|
|
004-6 |
Dayton Audio DNR-6.0 6 Ohm 10W Precision Audio Grade Resisto |
1 |
+ There are no comments
Add yours