SuperNova Minimus


Designer:
Wogg
Project Category:
Bookshelf Speakers
Project Level:
Intermediate
Project Time:
1-8 Hours
Project Cost:
$100 – $500
Project Description:
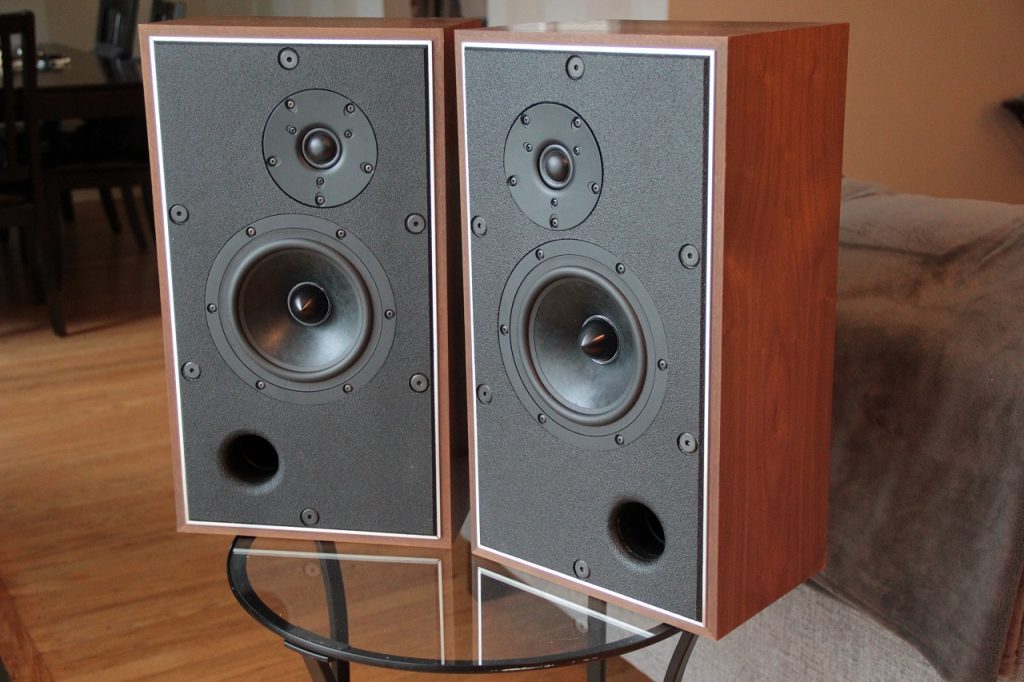
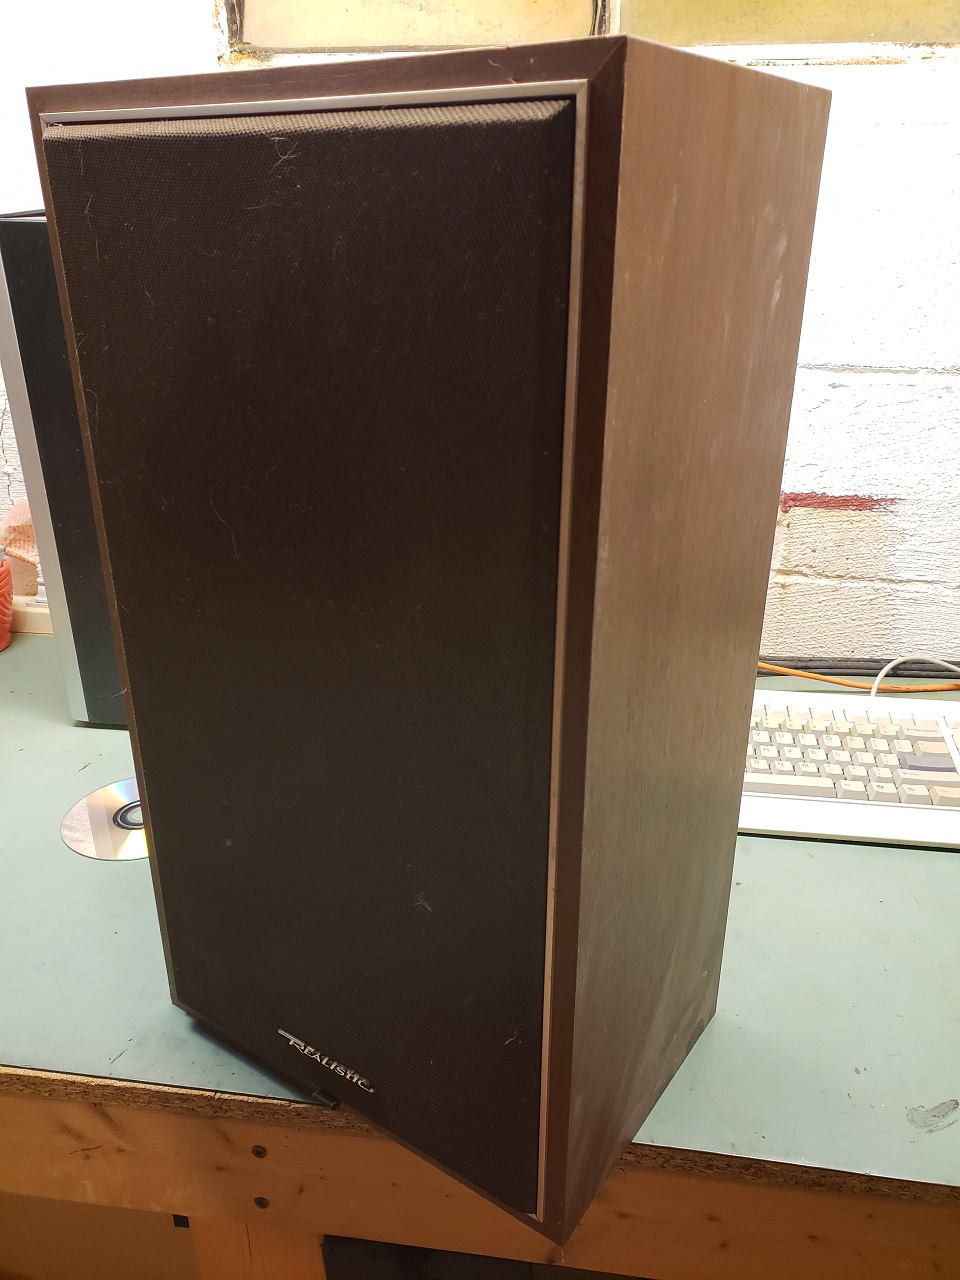
This is a re-build and update of a vintage pair of Realistic Nova 15’s from the mid 80’s. The cabinets have been in my family since they were new and in really good shape, but the woofer surrounds were rotted and needed replaced. Modern drivers and a proper crossover will make these vintage speakers shine.
Design Goals:
The main purpose of this build was to revitalize the original cabinets to a classic 2 way speaker with excellent characteristics in an updated vintage format. This will be accomplished with a simple crossover circuit utilizing only 5 parts, dictated by a DIY competition InDIYana 2019.
Driver Selection:
The Peerless DX25BG60-4 tweeters (264-1478) were chosen for their robust build including double magnets and a rear chamber for a low Fs. The 1 1/8” diameter dome is able to perform to 2kHz and below and will mate with a larger mid-bass easily.
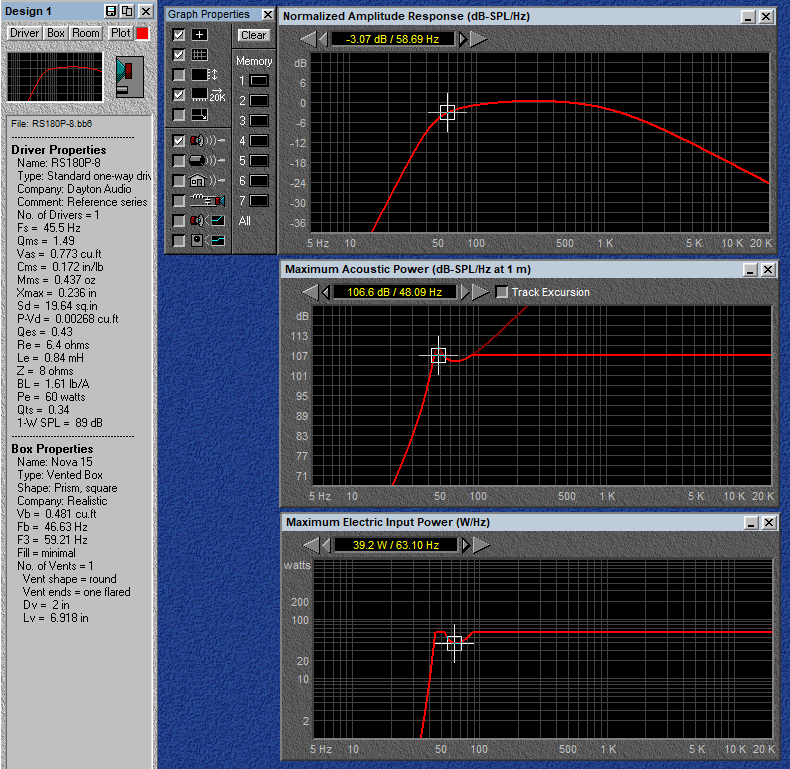
The Dayton RS180P-8 (295-365) was chosen for the mid-bass due to its well controlled high frequency roll off and low distortion. Some modeling using the Dayton files processed for baffle simulation with response modeler and WinPCD tested well with a simple crossover.
A ported alignment for the RS180P-8n in just under ½ cubic foot worked well, with only a minor Xmax limit under the 60W thermal limit. Bass box predicted an F3 of just under 60Hz, matching the original Nova 15 specification.
Enclosure Design:
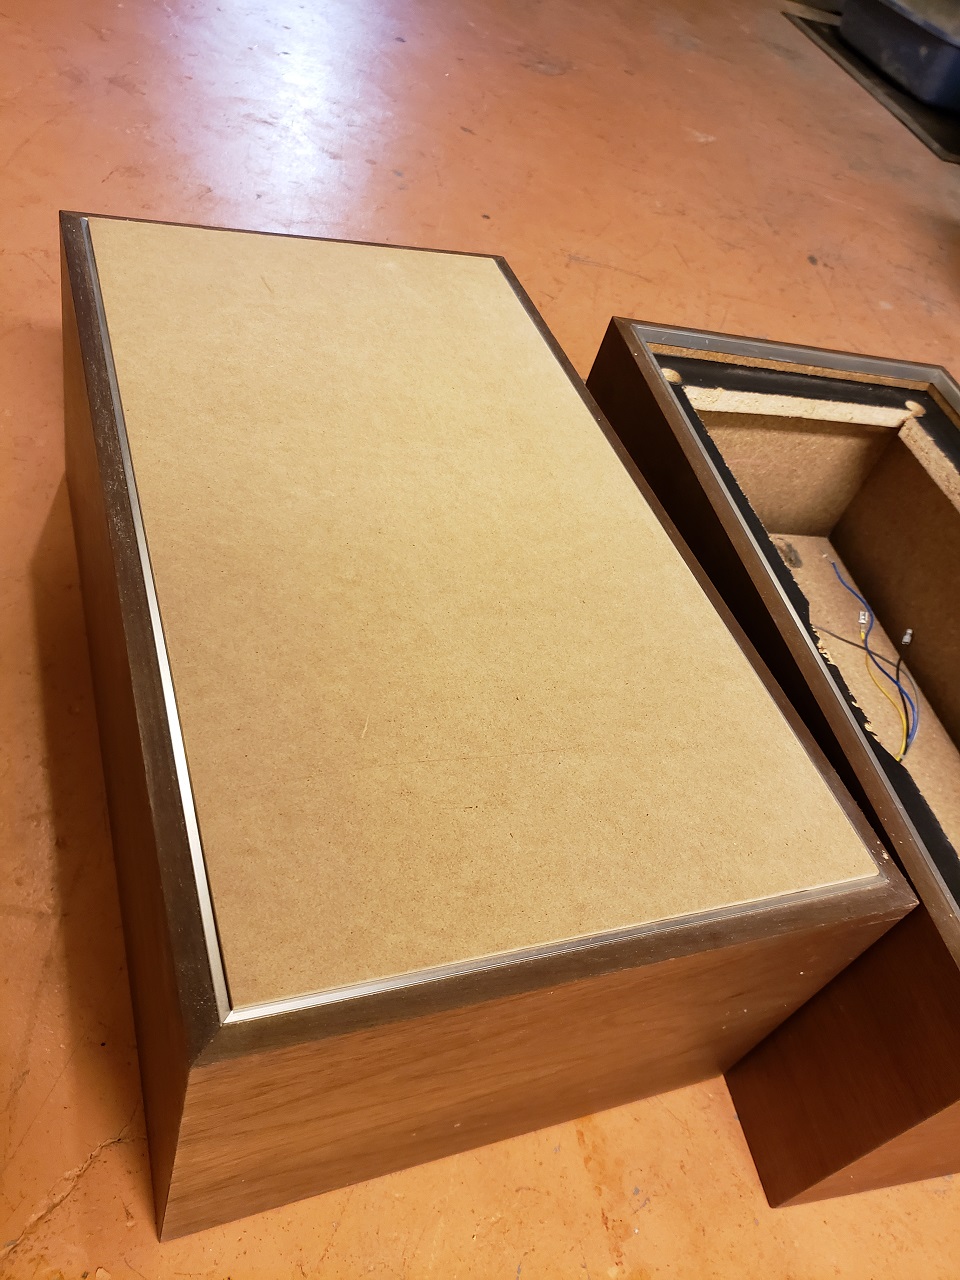
The Realistic cabinets were originally equipped with a plastic framed grille that inset just over ½” in behind an aluminum trim ring. After removing the original drivers, I simply used a reciprocating saw to remove the original 5/8” particle board baffle. A lip of just over an inch wide was left for mounting a new baffle.
The new drivers were laid out, and cut into a ¾” MDF baffle board. This board, with a small chamfer to blend with the original aesthetic would be installed removably to allow redesigns later.
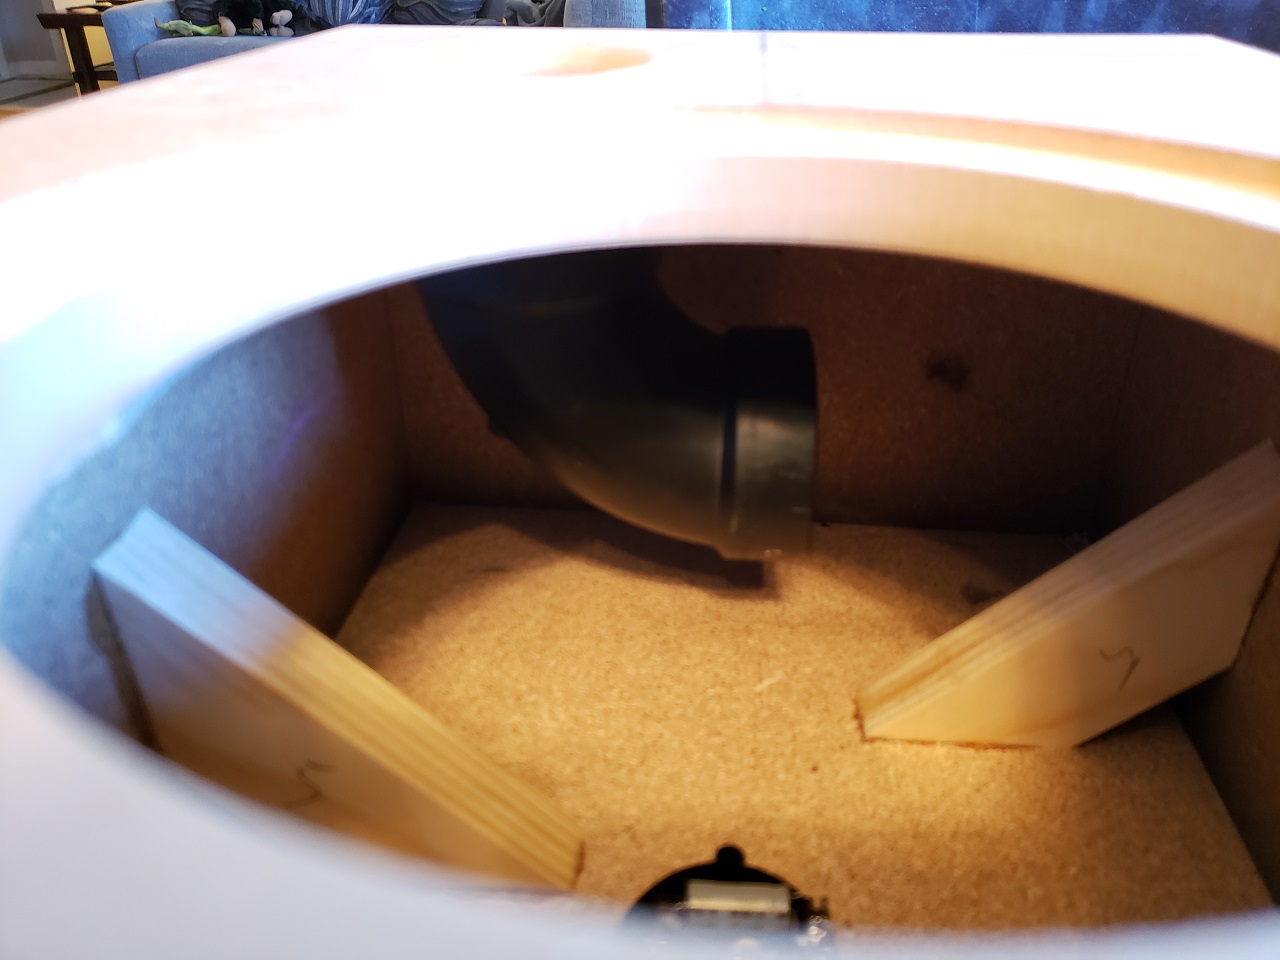
The port design will use a 2” internal diameter PVC port with a 90 degree slow sweep elbow to allow extension for lower tuning as needed.
Enclosure Assembly:
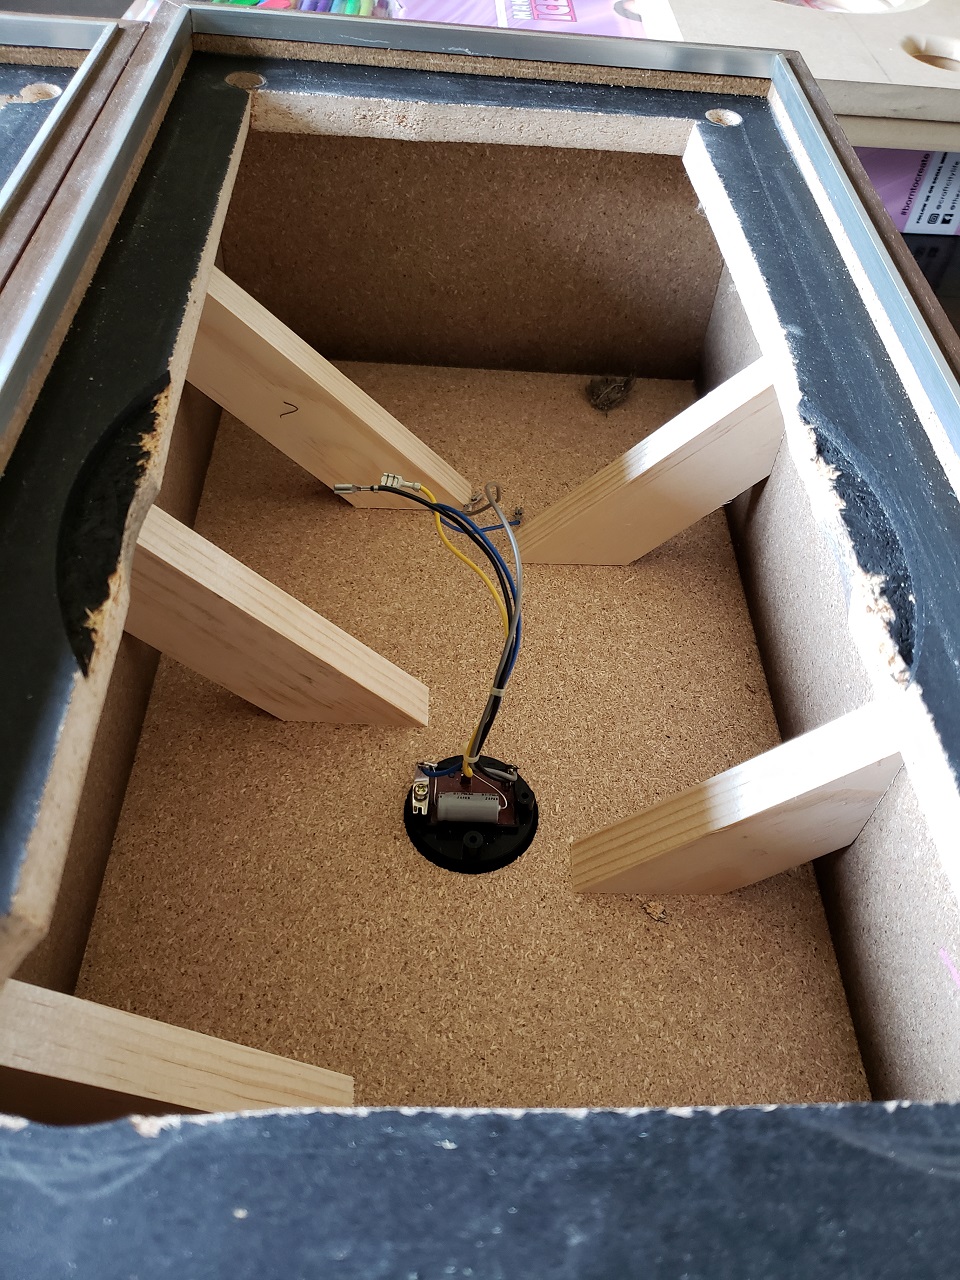
The original enclosure was made from ½” stock, which is pretty weak by modern standards. To compensate, 45 degree braces joined the sides and back for extra rigidity. This tightened up the cabinet walls and reduced resonances for the finished speaker.
The baffle was routed to flush mount all drivers and drilled to mount to threaded inserts installed in the original baffle wood.
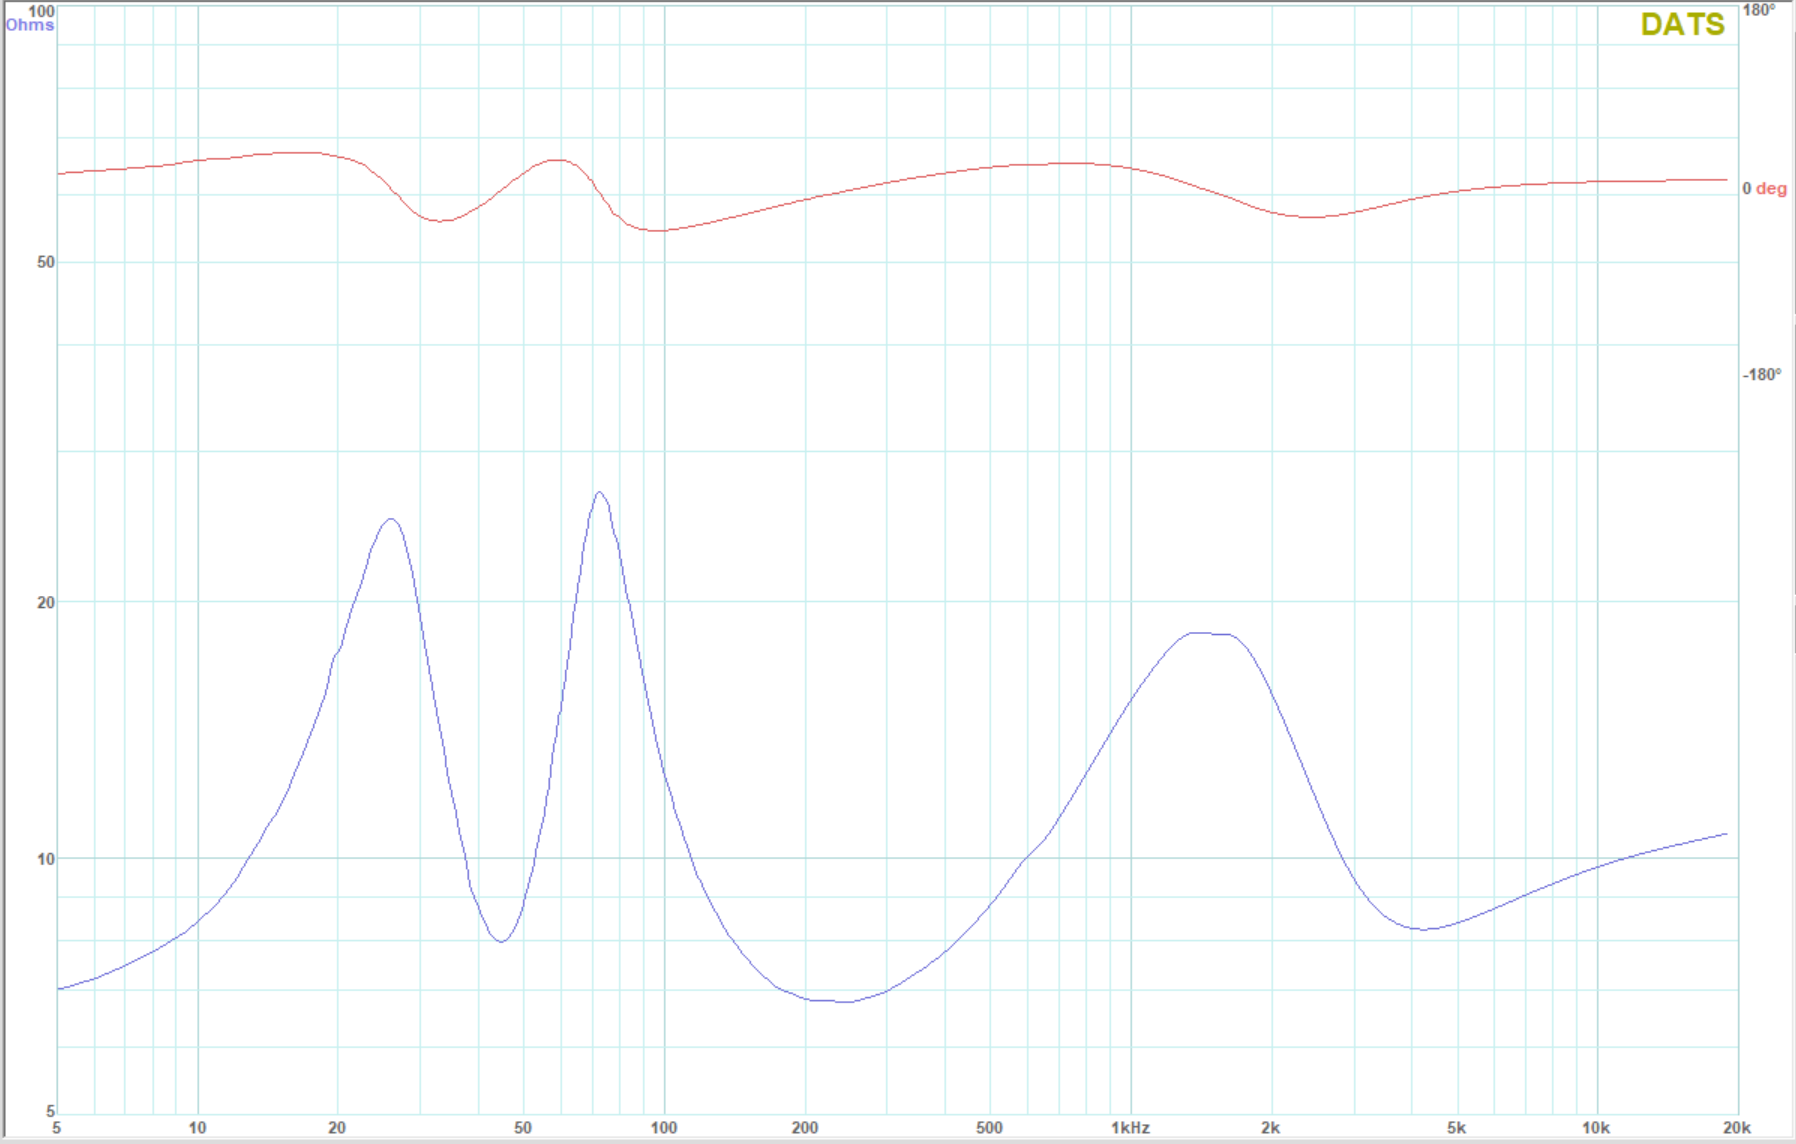
With the test baffle in place, the tuning was verified using DATS as 45Hz without any extension of the port past the 90 degree elbow.
This was installed without finish to capture measurement data to design the crossover circuit.
After the crossover design was finalized, a Duratex finish was rolled on to contrast with the original walnut veneer of the Realistics. The connection terminals were upgraded to allow connection with banana plugs.
Crossover Design:
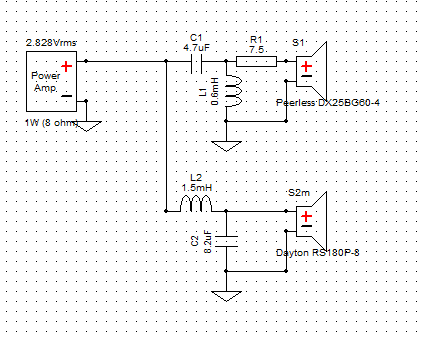
The crossover was designed using measurement data from the speakers themselves. Measurements were captured using an iMM6 into a laptop computer using ARTA software. These were exported and processed as FRD files. The impedance data was saved using DATS as ZMA files. Using these, the crossover was designed using WinPCD.
The design was limited to a total of 5 parts, just enough for an electrical 2nd order filter on both the woofer and tweeter with a single resistor to level match the tweeter to the woofer sensitivity.
The design took 2 iterations of parts to land on a flat response for use in open space on a stand, fully compensating for the baffle step loss in the low frequencies. The first attempt was done without close mic measurements, and missed the bass by not adequately compensating for baffle step.
Each design iteration was confirmed with quasi-anechoic gated measurements including a reverse polarity test on the tweeter. If the phase alignment is correct with the woofer and tweeter, reversing the polarity will cause a deep dip in response at the crossover frequency indicating the drivers are in alignment and cancelling each other at the measurement point.
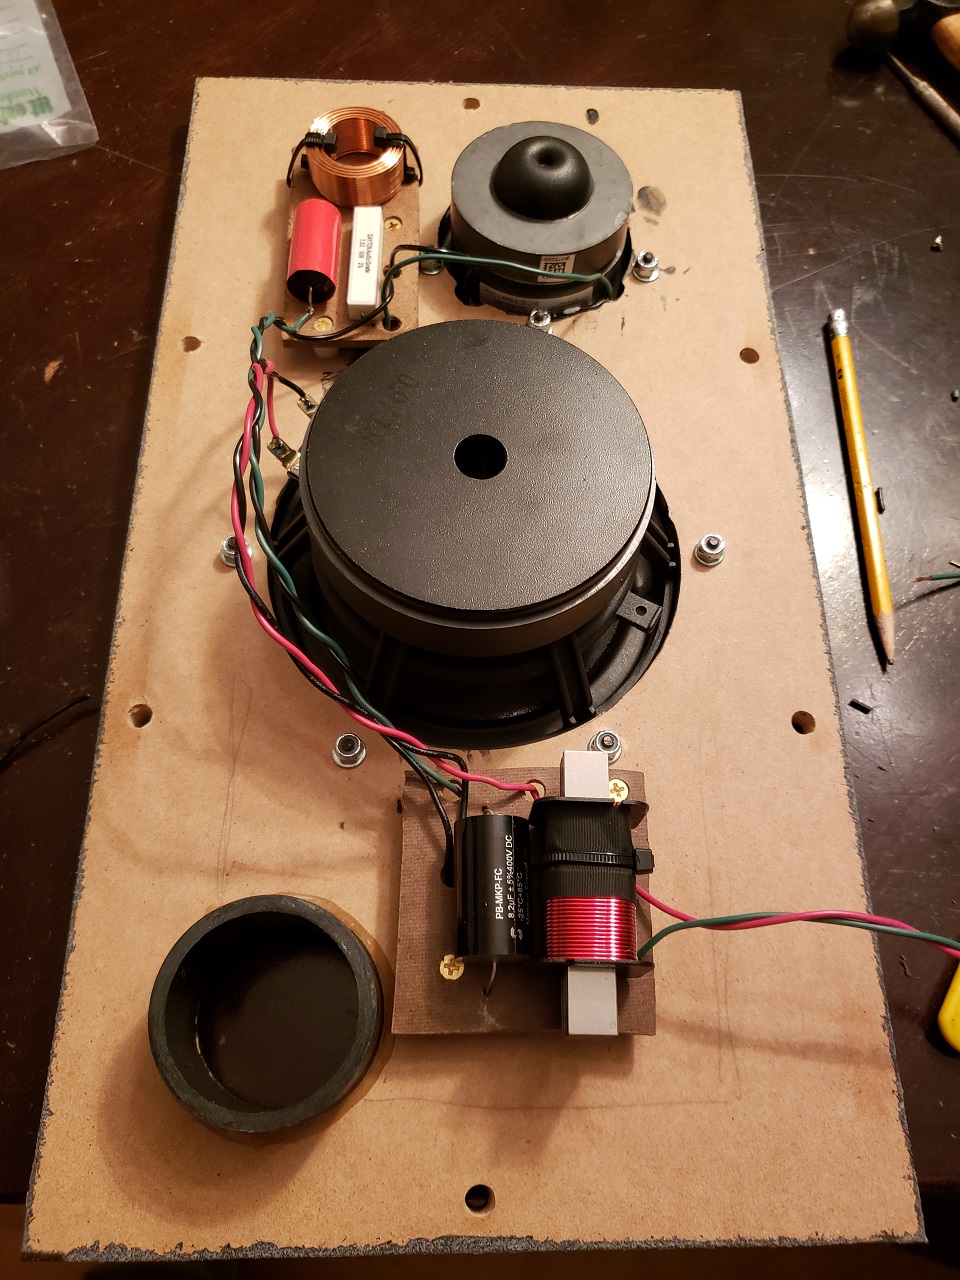
After proving the crossover in prototype, the parts were laid out on 2 individual boards and mounted to the removable baffles.
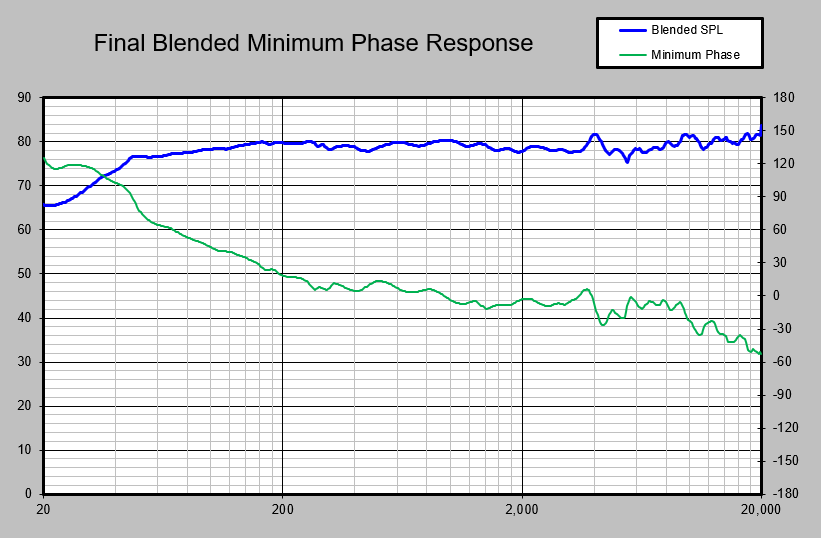
The final system was verified with a DATS impedance measurement and an updated mic measurement, blended with close mic measurements of the woofer and port under 300Hz.
The final frequency response is +-3dB from 40 to 20kHz. The bass alignment is similar to an extended bass shelf, where the 40-60Hz response is toward the bottom of the response tolerance. The system impedance is an easy 8 ohm load for any amplifier.
Tips & Tricks:
The best results can be had by using actual measurement data from the speakers to design the crossover and ensure the frequency response and phase matches properly.
When updating vintage cabinets, take care to add bracing as sufficient thickness on the walls is not likely. When adding a removeable baffle, mount the crossover board to the baffle itself to keep everything on a single removable piece. In my case, I had to split the tweeter and woofer filters to separate boards to get them to fit in the cut out area.
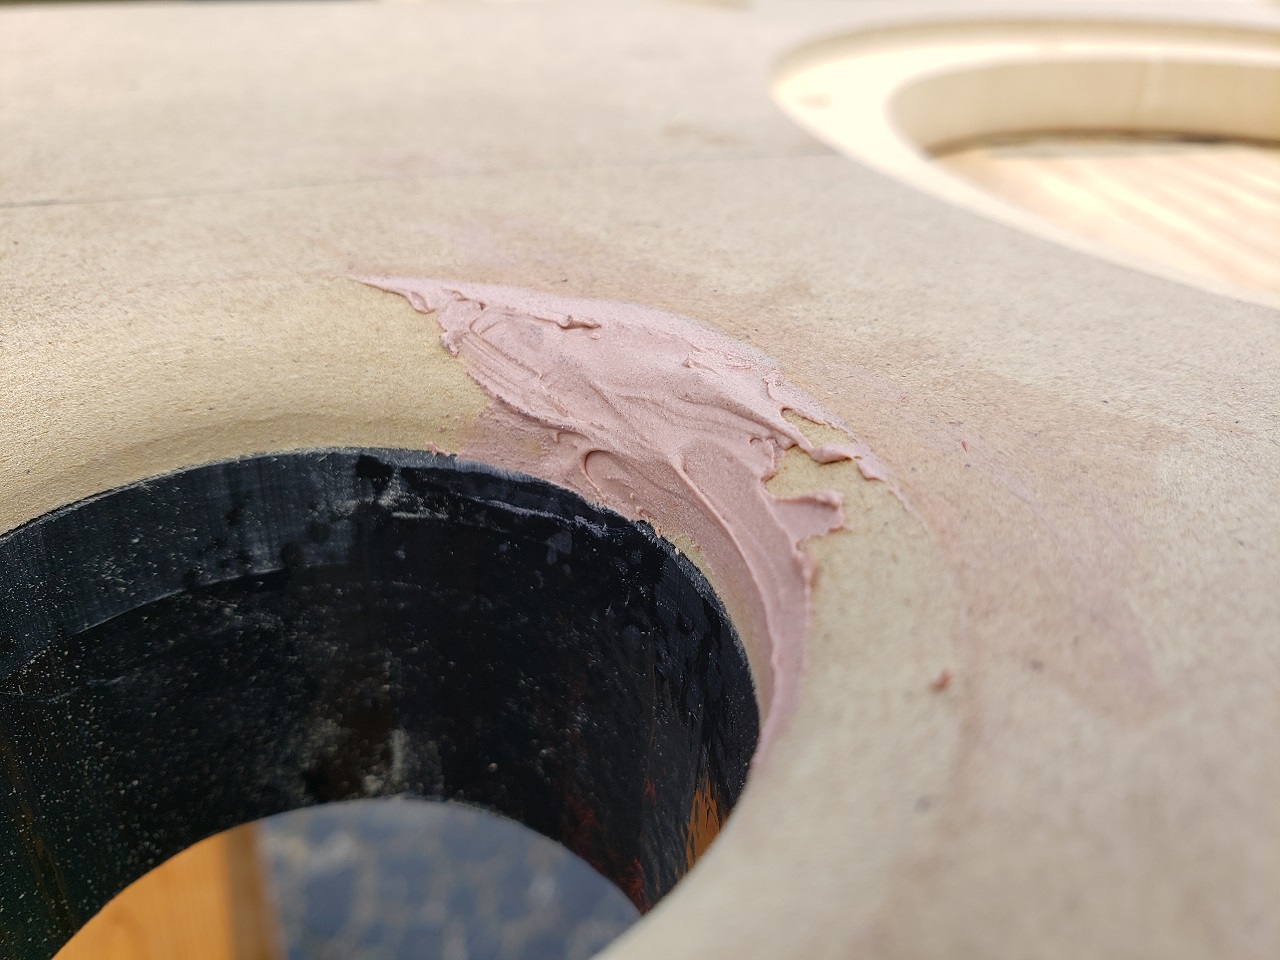
When flush trimming with a router, make sure the surface the bearing is riding against is stable. My port tube slipped, causing a dig into the baffle with the router that ended up having to be fixed with Bondo and a re-route.
Conclusion:
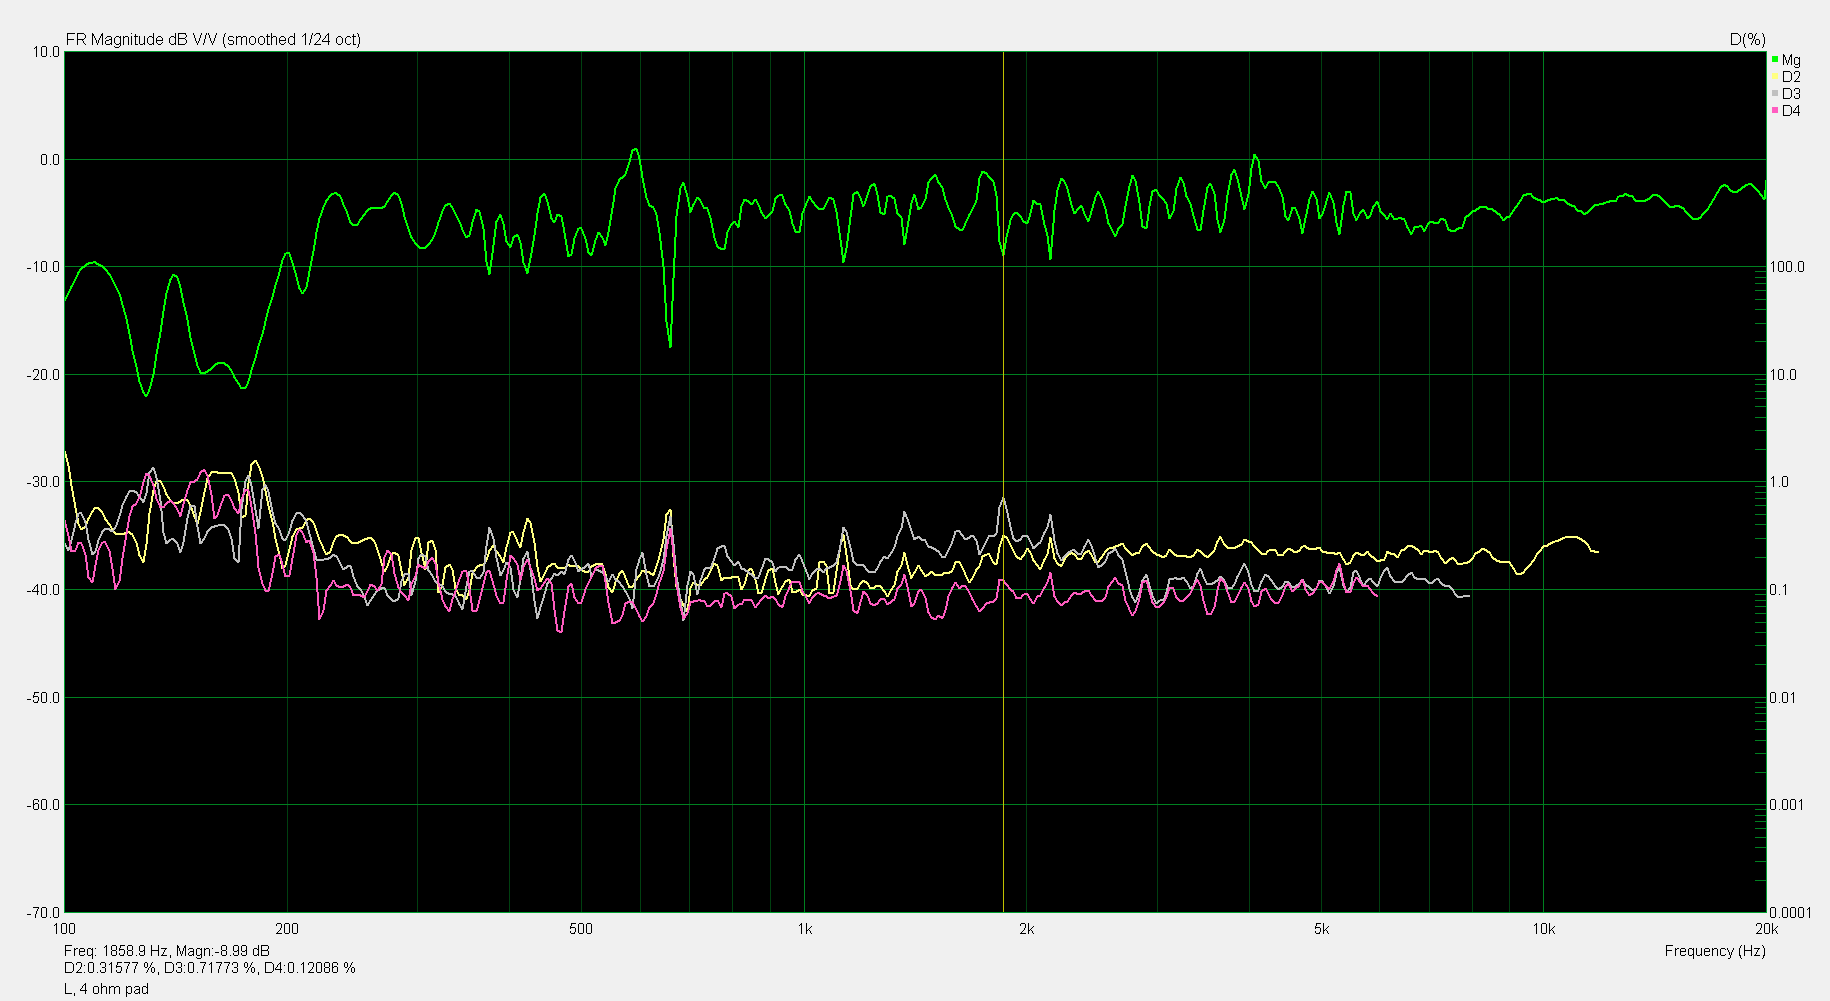
Ultimately these are extremely detailed and enjoyable to listen to. The final product is flat within +-3dB from 40Hz to 20kHz with well under 1% distortion from 100 to 20kHZ, often near 0.1%.
The final design is subjectively slightly soft in the bass, and benefit from placements within 2 feet from a wall or corner. The midrange and treble are strong, accurate and low distortion. This gives excellent imaging and detail and would be well suited for use as a studio monitor where critical views of listening material are required.
About the Designer:
Paul Graves is an experienced electronics engineer and an active DIY speaker enthusiast.
Project Parts List:
|
Part # |
Description |
Qty |
|
295-365 |
Dayton Audio RS180P-8 7″ Reference Paper Woofer 8 Ohm |
1 |
|
264-1478 |
Peerless DX25BG60-04 1″ Silk Dome Tweeter 4 Ohm |
1 |
|
257-552 |
Dayton Audio 1.5mH 18 AWG I Core Inductor Crossover Coil |
1 |
|
027-564 |
Solen 8.2uF 400V Polypropylene Capacitor |
1 |
|
027-114 |
Audyn Cap Q4 4.7uF 400V MKP Metalized Polypropylene Foil Crossover Capacitor |
1 |
|
257-040 |
Dayton Audio 0.60mH 20 AWG Air Core Inductor Crossover Coil |
1 |
|
004-7.5 |
Dayton Audio DNR-7.5 7.5 Ohm 10W Precision Audio Grade Resistor |
1 |
Wonderful write-up, wonderful outcome. Incredible response you managed to get with just 5 parts. This is one of the better examples here. Thank you for sharing.
From a fellow recycler / rebuilder of classic audio equipment (including Realistic Minimus 7s), kudos on creating a textbook example of a retro-meets-modern loudspeaker. The front panel finishing is gorgeous, a nice compliment to the original style of the 80’s wood cabinet, and the craftsmanship and design appear to be meticulous throughout. Nice job!
Outstanding finish! That Duratex coating has a phat look that makes these speakers look extra fine!
Well done sir! My father has piles of great old speakers like your Realistic Novas. JBLs, Pioneers, KEFs, and other no-names w/ blown drivers but all with decent, workable cabs.
Each set could be awesome again following this level of detail of your process.
Thanks for the detailed post!