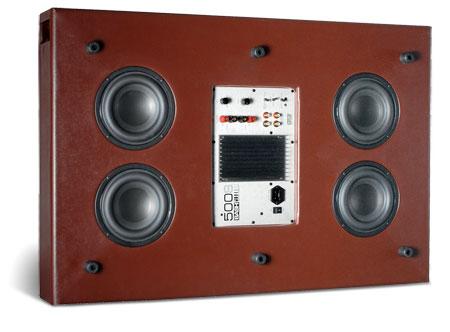
The Boogieman
Designer: Darren Kuzma
Project Time: 8-20 hours
Project Complexity: Hobbyist
Project Cost: $500-$1000
Driver Selection
The key to making a subwoofer small and stealthy is in the drivers. With traditional 12″ and 15″ drivers, the physical diameter and depth of the frame limits the options for how small the enclosure can be. Luckily, we live in an age where there is a large selection of small, high-performance subwoofer drivers. Tang Band has been leading the charge in this field by creating a number of high-performance small subwoofers based on impressive neodymium motors. The W6-1139SG was one of their first such drivers, and has been a DIY favorite since it was released. With a great combination of a small diameter, shallow mounting depth, high power handling, and long excursion; it provided me the flexibility to create an unobtrusive and powerful subwoofer.
Enclosure Design
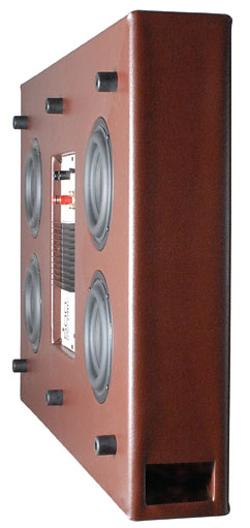
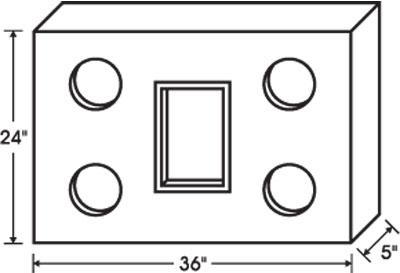
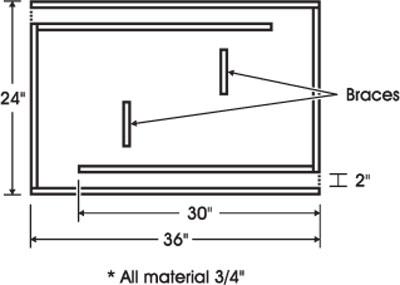
Since half of the goal of this project was to be able to match the output of a full-size sub, I knew that I would need to use a ported enclosure to achieve the necessary low-end extension. Likewise, I could tell from some quick modeling that a single driver wasn’t going to be able to match the sheer output capabilities of a full-size sub. So, I started to look at how many drivers it would take to get the output I needed, while at the same time providing a healthy amplifier load and keeping the enclosure volume small. It turns out that four of the W6-1139SGs in a series/parallel wiring configuration provides an excellent balance between output and enclosure size, while still providing a 4 ohm load for the amplifier. The second half of my design goal was to make the subwoofer physically narrow and compact so it could slide underneath a couch or bed. I began to contemplate what the possibilities were with my given drivers. The main advantage of the W6-1139SG compared to other subwoofers is its shallow mounting depth, so I figured that this is where I needed to steer my design. Needing only about 4″ of clearance behind the frame, I could in theory create a finished subwoofer that was only 5″ thick. Luckily, even four ported W6-1139SGs still only require anywhere from 1.0 to 2.0 cu. ft. to get some good bass extension out of them. Planning on a 5″ thick cabinet built from 3/4″ MDF, this leaves 3-1/2″ of internal cabinet width. So, doing themath and shooting for a net volume of about 1.2 cu. ft. not including space taken by the ports, we can see that we need about 750 cu. in. of internal surface area for our “thin” subwoofer. So, the external dimensions can be in any configuration that works for your situation: 29″ x 29″, 24″ x 36″, 12″ x 74″, or any variation in-between. For my design I chose a 24″ x 36″ size, which will fit handily under a loveseat of mine. One difficulty in working with small, long-excursion drivers is the port situation. They are difficult to tune because of the long port lengths that are needed to support the high port airspeeds that they can create. For example, in a standard cube with our four W6-1139SGs, we would need roughly a 4″ diameter by 24″ long port- that’s tough to fit in a 14″ enclosure! So, the wide, flat design actually makes the tuning of our sub a little easier. I am using twin slot ports, which run the length of the cabinet and are 2″ wide. We have essentially two 2″ wide, 3-1/2″ tall, and 30″ long rectangular ports, which result in a tuning of roughly 29 Hz.
Amplifier/Crossover Configuration
The selection of amplifiers for this project was dictated by several needs: 250-500 watts of power, a shallow mounting depth, and a thermally efficient design. The 300 and 500 watt BASH amps both fit this bill perfectly. I chose to use the 500 watt version for it’s extra heatsinking and additional headroom. The 300 watt version would probably work just as well in most situations, but if you are looking for the absolute maximum performance, I’d recommend spending the extra bucks for the 500 watt amp. I spent a good deal of time modeling and tweaking the “bass boost” on the amplifier, trying to get every bit of performance out of the design. However, in the end, my custom tweaked resistors and capacitors provided almost the identical boost to the stock settings. So, I wouldn’t recommend trying to bother with changing this-the stock amplifier has a slight boost of a couple dB in the upper 30 Hz range that provides a nice thump.
Enclosure Assembly
Not to make light of the woodworking aspects of this project, but this subwoofer enclosure was honestly one of the easiest cabinets I’ve built in a long time. Of course, it may have something to do with the fact that I only had to build one (aren’t subwoofers and center channels great!), and that since this is designed to go under furniture there was no tricky veneering or finishing. I opted to wrap the finished cabinet with a marine vinyl that I picked up at a local fabric store. Since this is designed to be a hidden speaker, raw MDF, spray paint, or rolled on paint would definitely suffice! Part of the simplicity of the design was that the majority of the cuts for this cabinet were 3-1/2″ wide strips of MDF that I cut on my table saw. As long as you set your fence once and make all of your rips at the same time, the cabinet should turn out near perfect- regardless of whether your fence is off by a smidgen. The strips were later cut to length on a miter saw, ensuring accurate and square cuts. The main top and bottom panels of the cabinet were simple 24″ by 36″ rectangles cut from 3/4″ MDF. I will admit that I cheated a bit on this part, and just bought two 2′ x 4′ MDF “handy panels” and made one cut to get them down to size. I don’t necessarily trust the width of these pre-cut sheets; but as long as you are smart about it and aware of their potential inaccuracy, it is easy to correct for by adjusting the length of your other dimensions. OK, I might as well take this opportunity to admit that I am lazy when it comes to cutting down full sheets of MDF, and I will look for any opportunity to avoid doing so! The only portion of the construction that was somewhat more involved was creating the driver and amplifier cutouts. The woofer cutouts were no big deal, and could be made with either a circle jig or a sabre saw. I chose to recess the frames ever so slightly for more floor clearance and for the cosmetics of it, but it is not necessary. In fact, be careful not to recess by more than about 1/8″ or so, or else you will infringe on your clearance behind the woofers. The amplifier mounting recess was created by cutting a through-hole to fit around the amplifier in the outer panel, with a second piece of 3/4″ MDF behind that cut to the “normal” size for the plate amp.
Conclusion
If I’m being honest here, I will be the first to admit that this design doesn’t LOOK like much. There’s nothing glamorous about a 6″ tall brown rectangle. However, the proof is in the performance, and this design really packs a punch! Everyone who heard the design was amazed at the amount of bass this subwoofer puts out- and not just for its size. I am honest to-goodness proud of this design, and it 100% met my initial design goals and surpassed even my expectations. The beauty of this project is in its simplicity and flexibility to be used many different ways. The enclosure can be stood up against a wall behind a piece of furniture, can be used down-firing under a couch or bed, or can be up-fired if clearance is very limited. A long, narrow version would be perfect for sliding behind a couch with an angled back. The possible uses are limited only by your imagination! Sound quality-wise, this subwoofer is very clean and not boomy at all if set up correctly. Plus, if used in a downfiring configuration, the sub adds a nice visceral shake to the floor that makes it even more fun. If you are looking to try to create a stealthy subwoofer, then you can’t go wrong with a project like this using the Tang Band W6-1139SG.
About The Designer
During the daytime, Darren Kuzma is a mild-mannered product manager, handling the everyday business of making sure Parts Express has the best speaker building offerings and the most in-depth information available. At night, the DIYer in him comes out, and he spends most of his time working on projects, fixing things around the house, cooking, and keeping up with the speaker building community. He’s been building speakers for many years, and says “I learned the most by talking to other speaker builders, reading, doing experiments, and by trial-and-error. There’s nothing like getting your hands dirty, that’s why they call it DIY!”
Project Parts List
|
Part # |
Description |
Qty |
|
264-832 |
1 |
|
|
300-752 |
1 |
|
|
260-774 |
1 |
|
|
110-170 |
1 |
Very cool, and what I would need for my small listening space. I have a futon couch, so it won’t fit under it, but there is plenty of space behind it. If I built it tapered, I would have to change the port lengths, being that they would be of different area’s verses 3.5×2 in you box, correct? Would two different size ports mess up the tuning? I’d like to keep it simple.
Did you model the W6-1139SIF? I has 1.5mm less Xmas, but is nearly half the price.