The Cube


Designer: GOC4U
Project Time: 1-8 hours
Project Complexity: Hobbyist
Project Cost: $100-$500
Overview
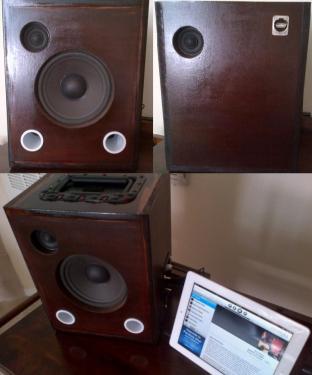
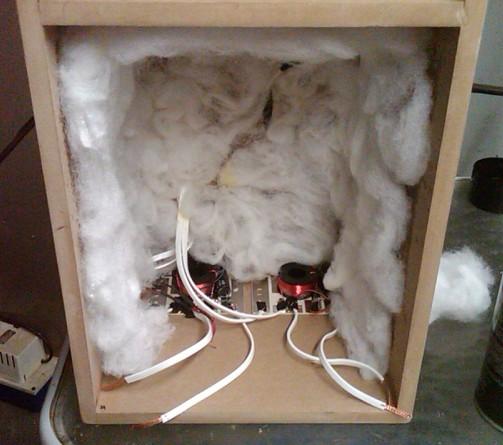
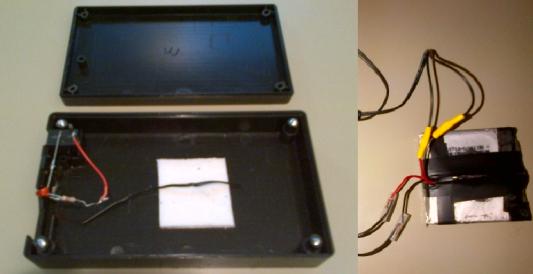
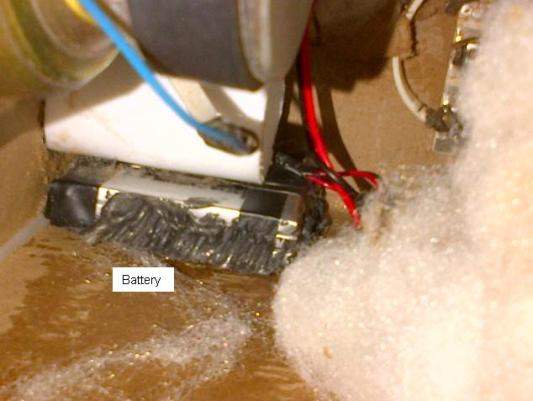
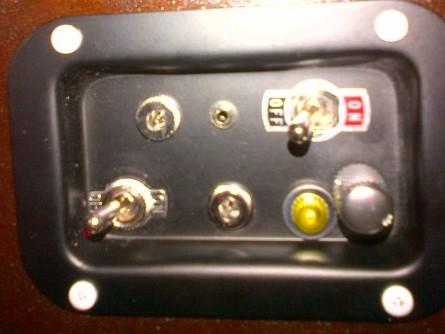
Driver Selection: Approximately 7in Altec Lansing woofer and two Tang Band W2-852SH 2″ Drivers. What I really liked about the Altec Lansing woofer was it had dual voice coils. Enclosure Design: 1/2″ MDF. I tried to keep the box and port size very similar in size to what the original enclosure was. The finish is a dark mahogany stain with clear coat of polyurethane. One woofer and one mid/tweeter was mounted on the front and one mid/tweeter was mounted on the back. Crossover: I used a set of pre-assembled high pass crossovers. These particular crossovers run full range on the low pass and 5000Hz on the high pass. Typically they would be used for small 2 way surround sound speakers. I decided to swap out the capacitor with a 100uF to get the crossover frequency to approximately 350Hz. Since I did not have any specs on the woofer I also decided to pad the drivers a bit. I ended up with -3db of padding. Connecting the high / low pass sections to the speakers is pretty straightforward. The left and right high pass goes to each mid/tweeter. The woofer has dual voice coils so the left and right low pass sections go to each voice coil. Battery: I used a 4500maH Lithium Ion rechargeable Battery. The typical application would be for powering and testing CCTV equipment in the field. The battery comes in a project box with a on/off switch and an indicator light. All we want is the battery. Remove the four screws to open the box and remove the battery. The leads are a little fragile once you get the battery out use some electrical tape around the stress points. Schematic- I tried a few different amps and ended up with the Dayton Audio DTA-2. It had the widest voltage range and battery life. Step 1: Create two Positive / Negative sets of leads of the battery. The first set will go directly to the 2.1mm jack for charging. The ground for the second set will go to the ground on the DTA-2 board. The positive lead will first go to the “off” terminal on the main switch. A second positive lead will run from the “On” terminal on the main switch back to the positive 12V on the DTA-2 board. The goal here is to isolate the battery circuit. When the main switch is in the off position and an external power supply is connected to the 2.5mm jack no current should flow to the battery. It is recommended in this step to use a voltage meter to ensure current is not flowing to the battery. Step 2: Connecting the 2.5mm jack. The Positive and Negative leads from the 2.5mm jack go directly to the DTA-2 board. Important: When using an external power supply you need to make sure the main switch is on the OFF POSITION. The volume potentiometer will control on/off. Step 3: Connecting the indicator light. The ground from the light gets spliced to the ground of the battery. The positive lead gets spliced to the main switch positive lead. When the main switch is turned on the light should come on. Step 4: Connecting the 3.5mm jack: There are 3 tabs on the panel mount jack. Ground, left and right. Solider on 3 leads and connect the corresponding leads to a male stereo jack. Step 5: Adding USB. You could use a 7805 regulator to step down 12V to 5V. If you want this to work with newer phones you will also need to create the correct voltage at the D+ and D- lines. The other disadvantage is the 7805 throws off a good amount of heat, ie. Don’t glue it down with hot glue. I choose to sacrifice an old 12V car USB charger. These generate much less heat than the 7805 and you can test it before hand to make sure it works with your phone. Once you have it apart solider on a positive and negative lead. The negative lead goes to the 12V DC ground and the positive lead goes to the “off” terminal on the USB switch. A second lead will run from the USB switch “on” position terminal to the positive lead on the car charger. Last step is to connect a patch cable (type A to type B) from the car charger to the panel mount jack. Conclusion: Super smooth sound and portable. Can’t really ask for much more. Getting 8+ hours of play back on a full charge. Parts List: 2 toggle switches, 2.1mm jack, 2.5mm jack, 12V indicator light, 3.5mm panel mount jack, 3.5mm male plug, 3 1/2 x 5 1/8 connector dish, recessed spring loaded handle, lithium-ion battery and DTA-2 amplifier.
+ There are no comments
Add yours