The Drake

Designer: Darren Kuzma
Project Time: 1-8 hours
Project Complexity: Hobbyist
Project Cost: $500-$1000
Driver Selection
A top-notch subwoofer system requires a careful balancing of the amplifier, driver, and enclosure. If one of the three variables is out of line with the others, you will either be wasting performance potential, or will be putting the amp or driver at risk of being damaged. So, it is important to consider the system as a whole instead of focusing on one particular component in the design. The driver that I selected is the new Dayton Reference Series 12″ High Output Subwoofer, model# RSS315HO-4. This subwoofer features a low-distortion motor system, 4-layer voice coil, has lots of venting, and has a stiff suspension for the best mechanical and thermal power handling. Being the designer of this driver, I know that it is perfect for our desired small enclosure/high-power amplifier combo. While at first glance, this excursion seems somewhat low, in a small enclosure it can still handle around 800 watts of amplifier power before exceeding XMAX. Seeing as we know that the driver has a high thermal power handling limit, and that mechanically it can handle a significant amount of power, the Dayton HPSA-1000 1000- watt subwoofer amp immediately comes to mind. In addition to the amp’s raw power, the parametric EQ will allow us to custom tailor the low-end response; some “bass boost” will be necessary with our small enclosure to achieve the desired low-frequency extension. • Project edit: The original HPSA-1000 amplifier is undergoing an update and is currently unavailable. For the mean time, until we receive stock of the updated amplifier, the rack mountable Dayton Audio SA1000 Subwoofer Amplifier is recommended.
Enclosure Design
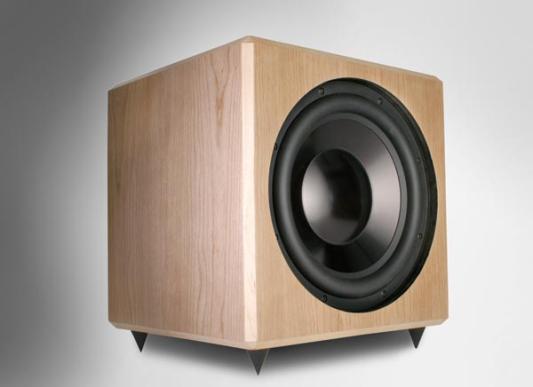
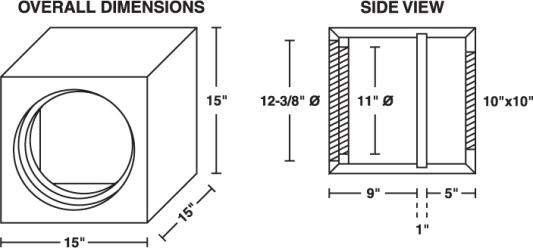
When it comes to subwoofers, by far the most important aspect of the enclosure design is the net woofer volume, which will be determined by the desired bass alignment and extension. In our design, we will use a small .65 cu. ft. sealed enclosure to minimize the physical size and at the same time allow us to take full advantage of the subwoofer amplifier’s power. The overall dimensions or proportions of the enclosure are insignifi cant at low frequencies, so the shape of the box is not important. Due to my personal preference for geometric objects, I chose to make this subwoofer a cube. While on the outside, it appears as a pretty standard 15″ cube, it does have a few things going on in the inside that are different from what is normally seen. It uses 1″ thick material throughout, which was chosen to maximize the rigidity and weight of the cabinet. (Keeping the weight of the cabinet high will help to minimize the vibrations of the entire enclosure, which robs acoustic energy.) I chose to use MDF to subdivide the enclosure into two parts, one for woofer airspace and one for the amp. I knew that the pressures inside the cabinet would be extreme at high excursions, so much so that even the best plate amp would have difficulty not allowing air to leak around the controls and inputs. Also, the front baffle is 2″ thick, which allows the woofer to be recessed 1″ into the front of the cabinet. This was done for aesthetic purposes, and is not necessary to the performance of the system.
Amplifier/Crossover Configuration
As I mentioned earlier, to get the best bass extension, we need to do a little tweaking to the subwoofer amplifier. For most applications where the low-pass crossover is desired to be below 100 Hz, I recommend enabling the notch filter jumper that is located near the center top edge of the sub amp’s preamp board. This jumper will turn on a notch filter that is centered around 55 Hz and about 5 dB deep. This is helpful for eliminating a humped response that is a result of the acoustic high-pass and electronic low-pass filters operating in close proximity. To get the maximum extension at the low end, we can use the parametric EQ built into the amp. From experimentation, I found that having the EQ frequency set to about 22 Hz, the Q set to about .3, and the boost gain set to the maximum will provide an anechoically flat response down to about 27 Hz. To achieve my desired high-frequency crossover point of 80 Hz, I found that the crossover knob should be set at about the 10:00 position. We have to remember that the acoustic cutoff is very dependent on the EQ settings and the frequency response of the woofer itself, and in most cases will end up somewhere between the lowest 30 Hz setting and the midway point of 105 Hz.
Enclosure Assembly
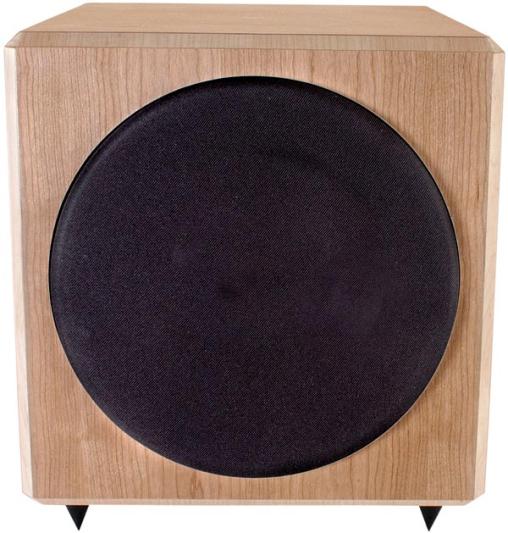
In essence, this cabinet is a 15″ external cube, and the assembly can be done many different ways. For my construction, I knew from the outset I was going to be chamfering and veneering the cabinet, so I chose to make all of the joints 45degrees miters with biscuits. From a purely technical standpoint, this method is good because it provides a lot of gluing surface area and therefore high joint strength. But, this also allowed me to get smooth surfaces for the faces of the cabinets without any need for sanding or filling end-grain MDF. In addition, the lack of metal fasteners eliminated any worries of destroying my expensive 45 degree router bit in the chamfering process. As I mentioned, the 2″ thick front baffle is one of the unique features of this cabinet, which was made by laminating two pieces of 1″ MDF together. But, before I did the final glue-up, I cut and machined the two pieces separately. The outer piece got a round cutout that would become the recess for the driver; the inner piece got a cutout for the woofer through-hole. Once these two were assembled, I had a perfect driver recess with a minimum of fuss. The divider was dadoed into the top, bottom, and side panels of the cabinet, which allows it to not only separate the airspace, but also provide substantial bracing. The grill frame was cut with a Jasper Circle Jig out of 1″ MDF, is an approximately 1/2″ wide ring, and has a 3/8″ roundover on the outside edge. This was painted black, grill cloth was attached, and I added magnetic grill guides to allow it to “stick” to the driver mounting hardware. Band-It Cherry veneer with Maple accents was applied with standard contact cement and finished with gloss polyuret
Conclusion
When finished, this sub weighs in at a beefy 70 pounds, and is extremely solid looking and feeling. From my power testing of the design, it turns out that the 1000 watt amp is nearly perfect for this system, and runs out of power right as the woofer is running out of excursion. The soft clip circuitry in the amplifier kicks in very gracefully, so we get very little distortion even at the extreme limits of output, which is about 108 dB. As can be seen in the graph, with the proper adjustments this sub can have a flat frequency response from 30 Hz to 75 Hz with 3 dB down points of 28 Hz and 80 Hz. This very flat response is very impressive on test tones, but will probably need some adjustment for a fl at in-room response. Once this is done, the subwoofer nearly disappears, and can blend in with just about any main speaker. Thanks to the low-distortion of the driver and good amplifier headroom, this subwoofer sounds very clean and tight, but will still perform well on ultra-low-frequency content. All in all, this is a very nice all-around subwoofer that is compact, looks great, and sounds great!
About The Designer
During the daytime, Darren Kuzma is a mild-mannered product manager, handling the everyday business of making sure Parts Express has the best speaker building offerings and the most in-depth information available. At night, the DIYer in him comes out, and he spends most of his time working on projects, fixing things around the house, cooking, and keeping up with the speaker building community. He’s been building speakers for many years, and says “I learned the most by talking to other speaker builders, reading, doing experiments, and by trial-and-error. There’s nothing like getting your hands dirty, that’s why they call it DIY!”
Project Parts List
|
Part # |
Description |
Qty |
|
295-466 |
1 |
|
|
300-811 |
1 |
|
|
240-717 |
1 |
|
|
260-050 |
1 |
|
|
260-317 |
1 |
|
|
260-542 |
1 |
|
|
260-335 |
1 |
|
|
260-776 |
1 |
|
|
329-045 |
1 |
+ There are no comments
Add yours