The Small Batch

Designer:
Keith Etheredge
Project Category:
Bookshelf Speakers
Project Level:
Intermediate
Project Time:
8-20 Hours
Project Cost:
$100 – $500
Project Description:
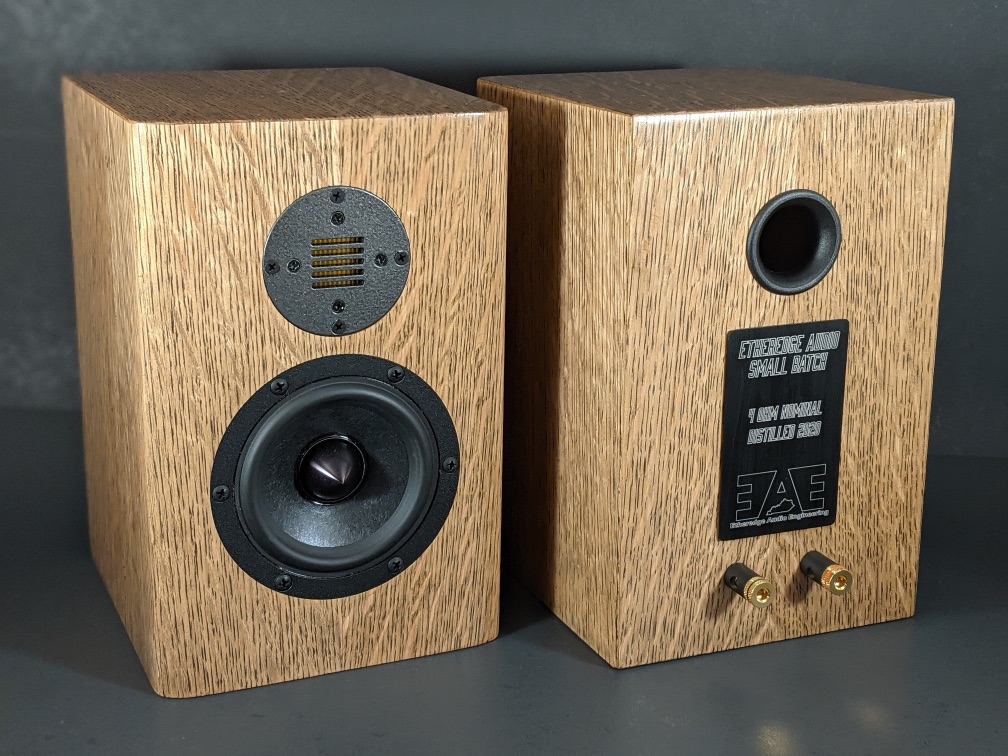
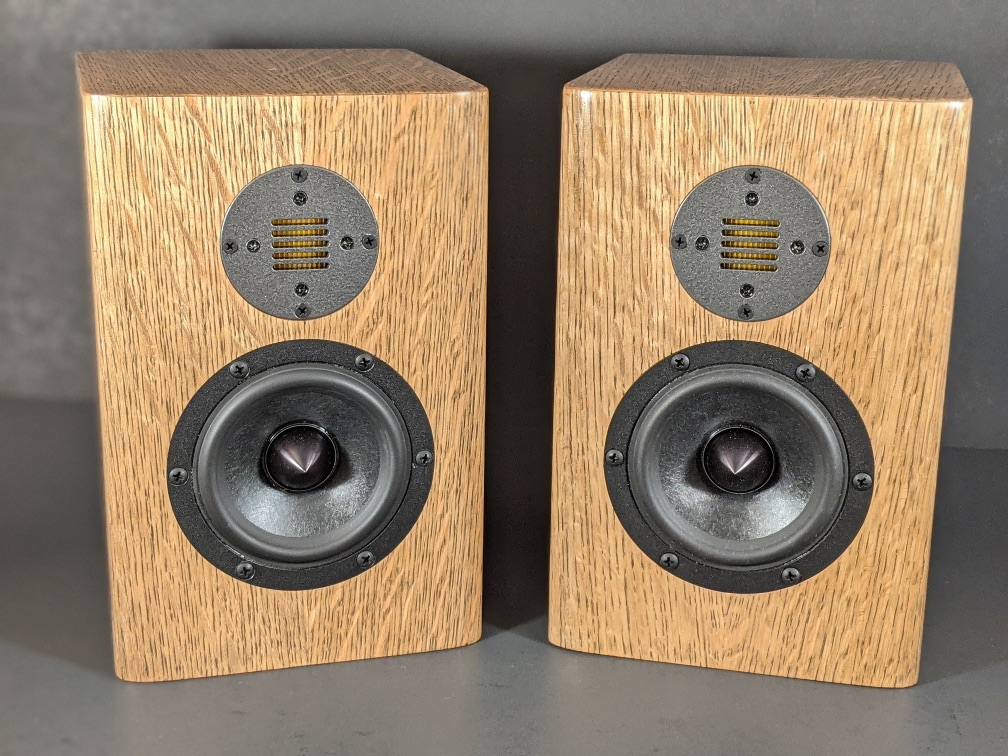
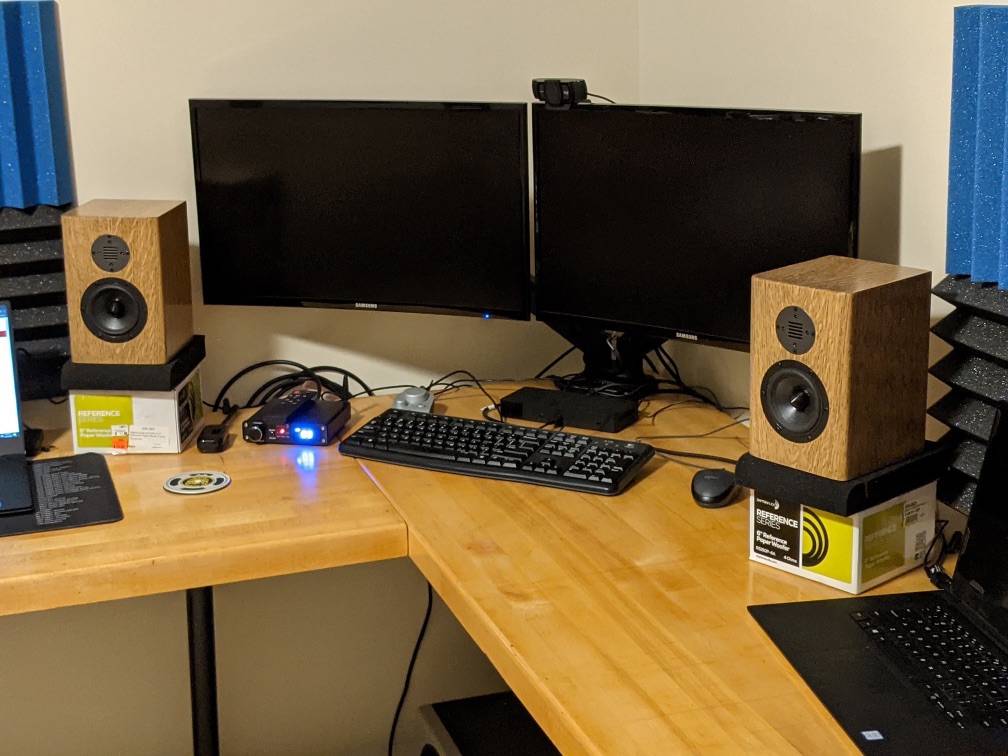
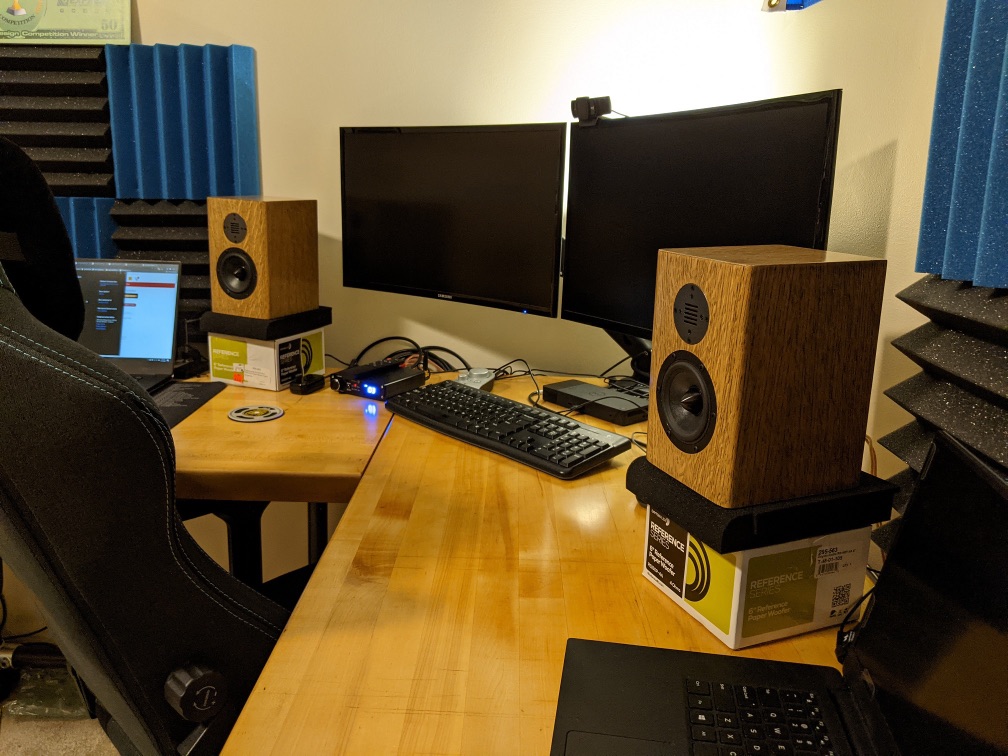
The Small Batch is a vented desktop two-way made for my home office. The design and title are meant to evoke the spirit of small batch bourbon by the limited quantity (only one set made thus far), high quality (both in sound and fit/finish), and the veneer itself (a white quarter sawn oak to match a new bourbon barrel).
Design Goals:
This design has the usual goal these days… to make something physically small without also sounding small. These should be enjoyable for listening by themselves. I also wanted to have a design ready if a friend ever asked me to make them a small set of speakers. I didn’t have a target F3, or a response shape in mind. I simply chose to vent the cabinets to get the most out of the little four inch RS100P-4 woofer.
Driver Selection:
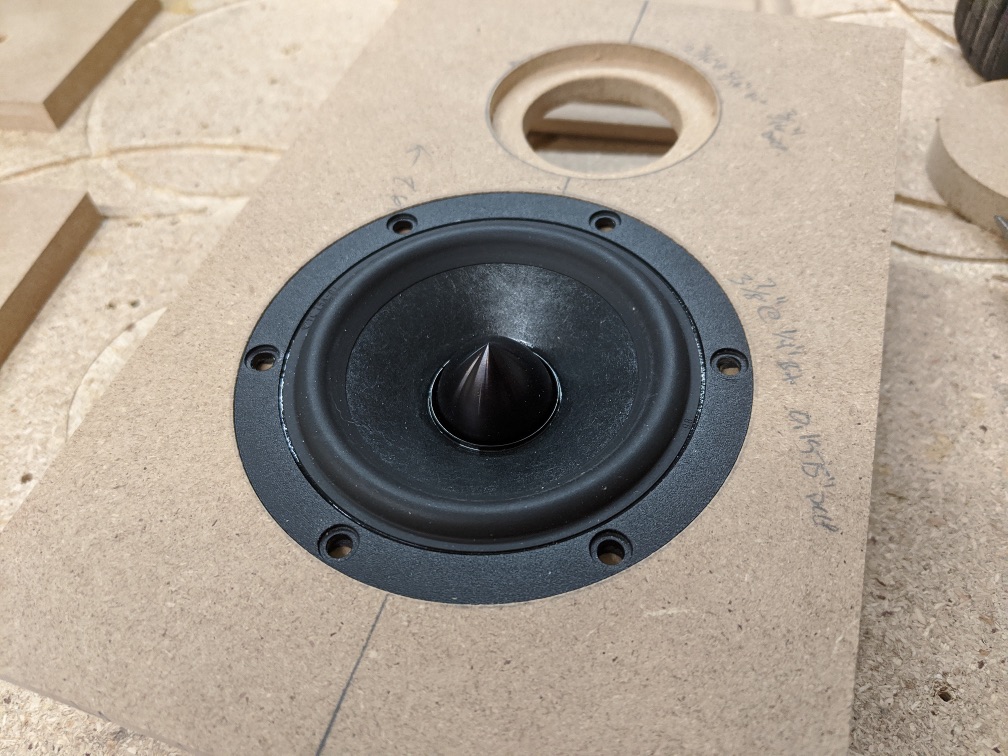
I chose the Dayton Audio RS100P-4 paper woofer and Dayton Audio AMT Mini-8 Air Motion Transformer for this project. I had wanted to try the AMT driver, and it has a natural roll-off starting around 6 kHz. That meant I needed a small woofer that was capable of cleanly playing that high to meet it. The RS100P-4 fit the bill as it plays cleanly out to 10K with a very benign, almost non-existent breakup mode.
Enclosure Design:
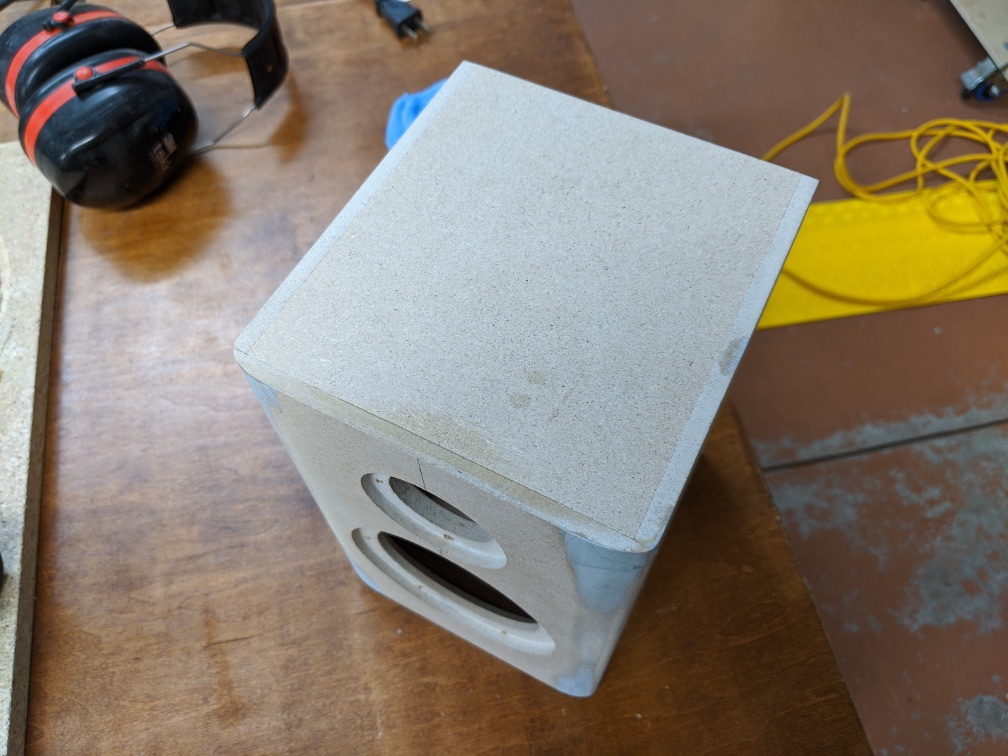
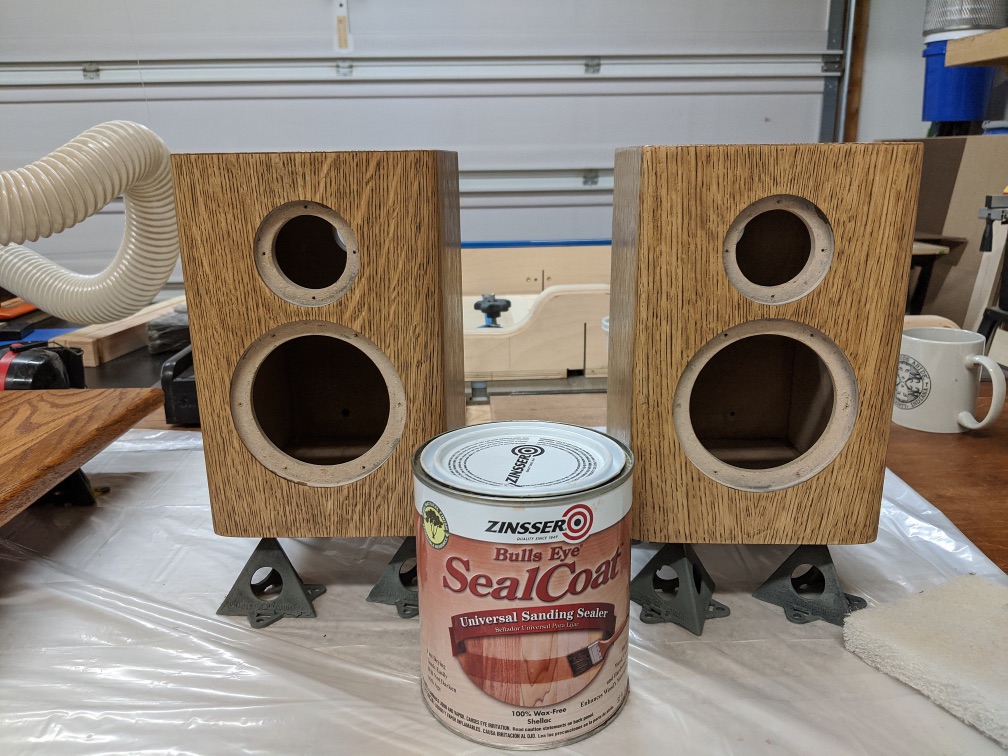
The enclosure design for these speakers is very basic. The external dimensions are 8.5” high x 5.5” wide x 6” deep, giving an internal volume of just over 0.09 cuft. All panels are ½” MDF with no added bracing on the inside. The front vertical edges have a small thumbnail bit round-over profile on them just to experiment, but the profile is essentially between a ¼” and 3/8” radius round-over. The cabinets use a 1×4” vent tube for an Fb of ~72Hz, and a predicted F3 of 67Hz.
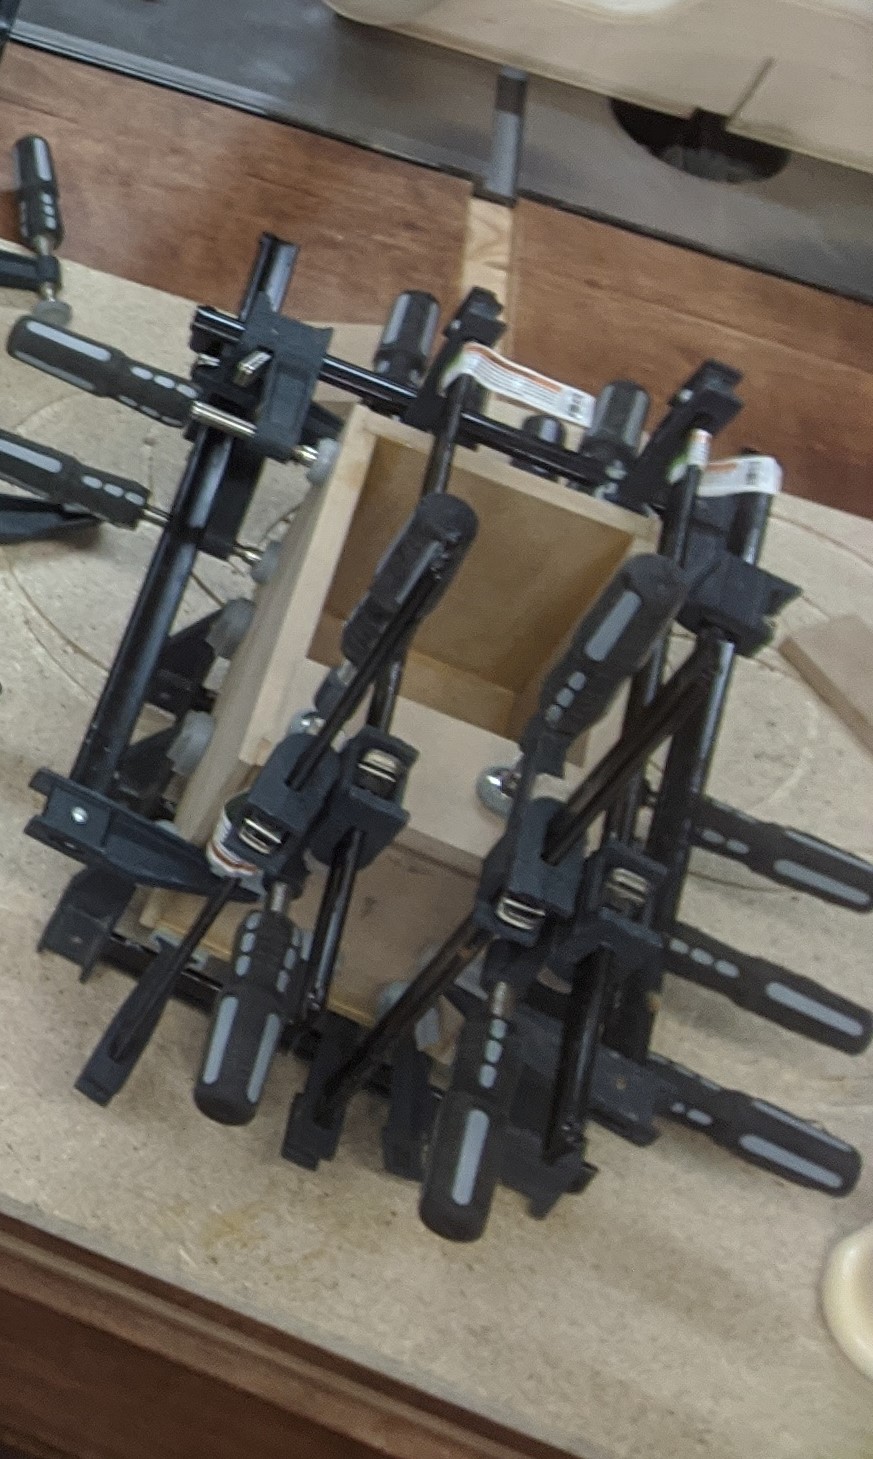
Enclosure Assembly:
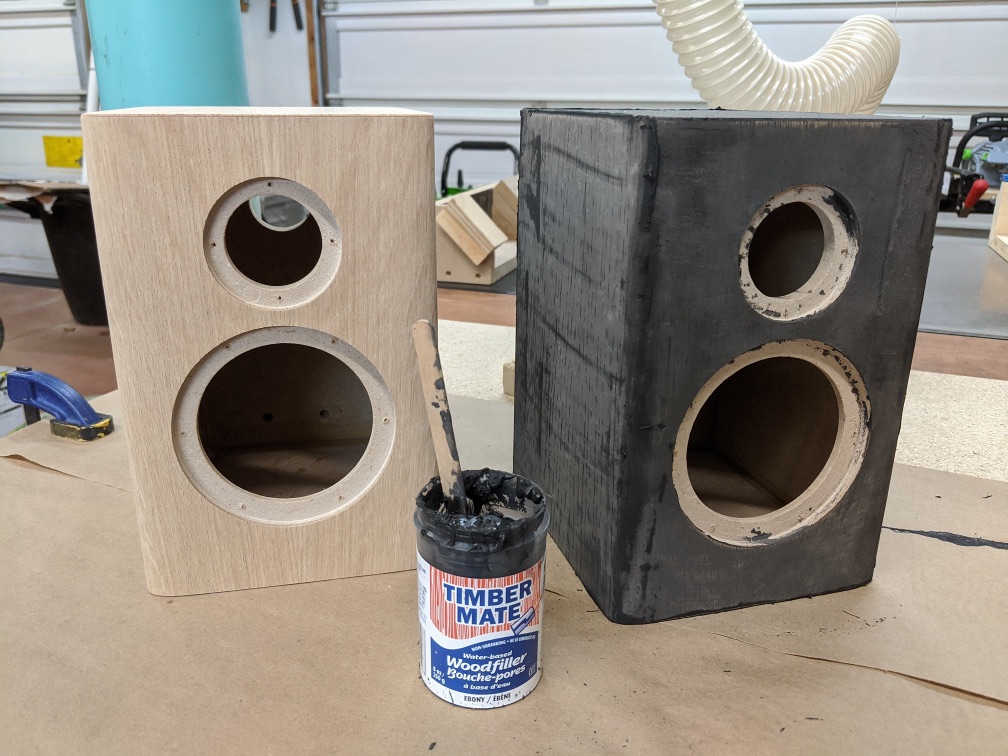
The cabinets were assembled using rabbets on all sides except the front. This rabbet design gives a little shelf for the pieces to sit against and provides an easy way to make a 90 degree angle during glue-up. I also allow ~1/16” overhang on the outsides of the pieces for flush trimming with a router later. Once the main body of the cabinet is glued together, I glue the front baffle into place. The baffle has a rabbet around the whole perimeter which gets fine-tuned by hand sanding. The point is to make sure the full thickness part of the baffle fits snugly in between the other pieces of the cabinet. That’s good for glue up and good for making sure your driver alignment is perfect in the final assembly. Just like the other cabinet parts, there’s some extra material included on the baffle edges to let the router flush trim this face after glue-up. The drivers were flush mounted, and a simple hole was included to surface mount the 1×4 port. I experimented with trying to flush mount that port too, but the rim of the port is too thin, and it looks better sitting on the surface.
The veneer is quartersawn white oak to stick with the bourbon theme (in case you didn’t know… all bourbon is barreled in new charred white oak barrels to age). In order to really make the design pop and avoid an overly traditional “brown stained oak” finish, I used a technique from Woodworker’s Source (https://www.youtube.com/watch?v=U2GM_hZW1LA). This called for timbermate ebony grain filler and Zinsser dewaxed shellac and it turned out AMAZING! Highly recommended.
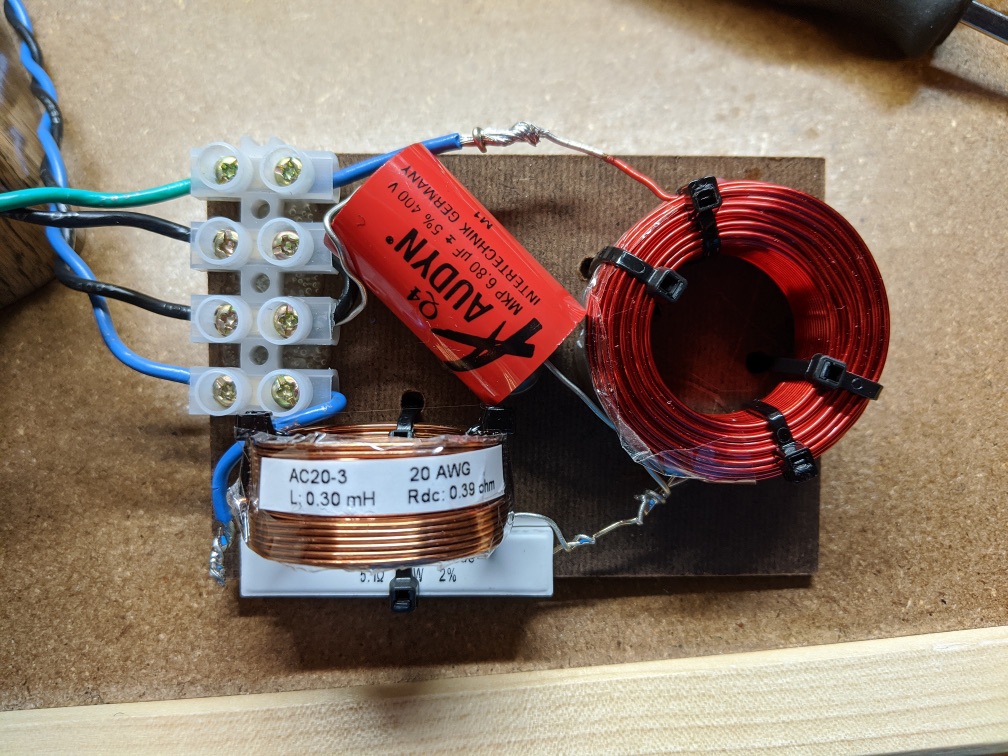
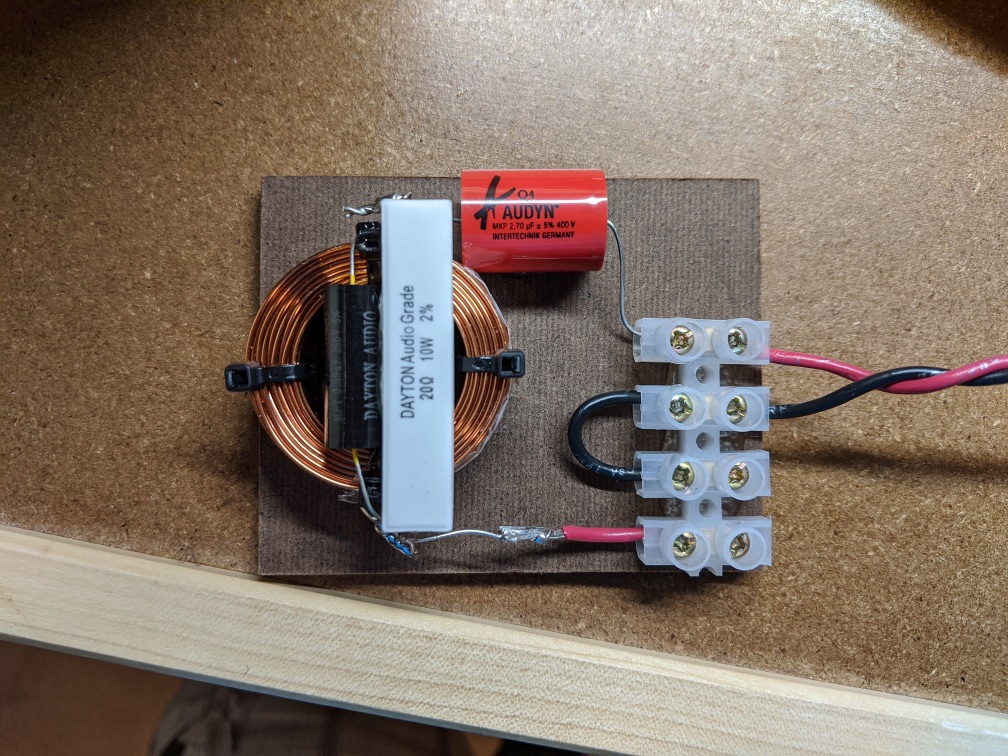
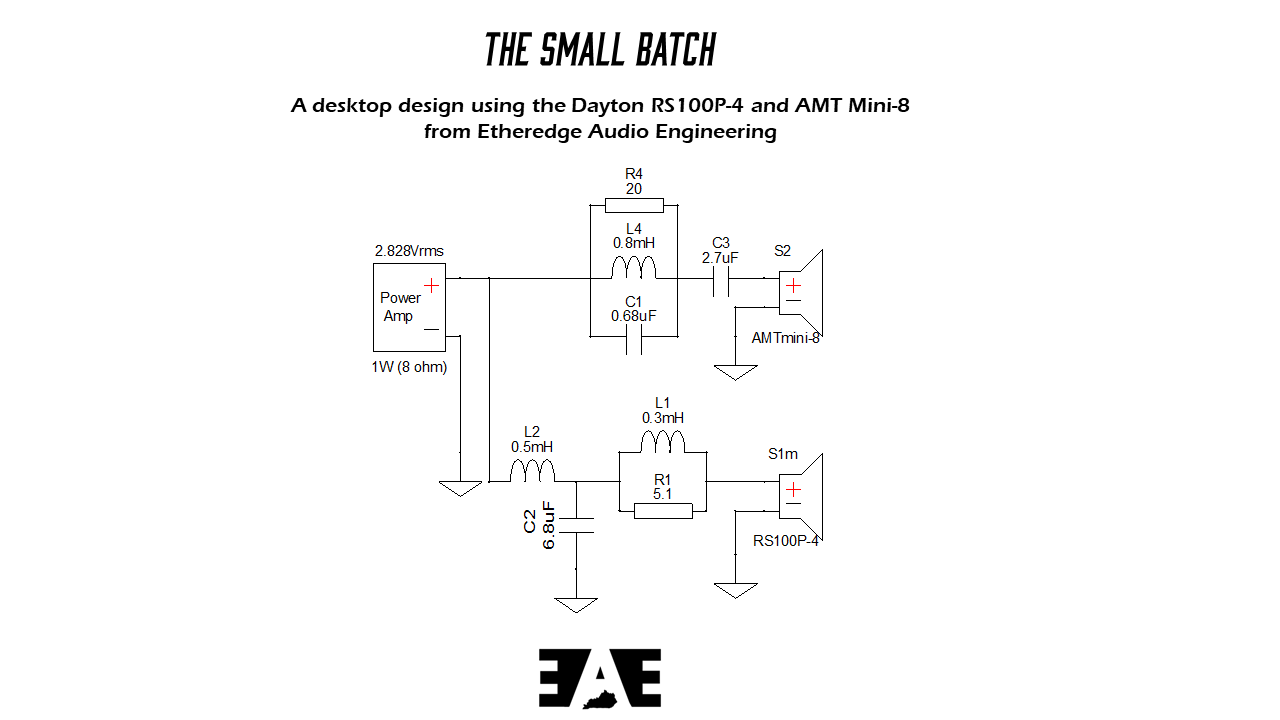
Crossover Design:
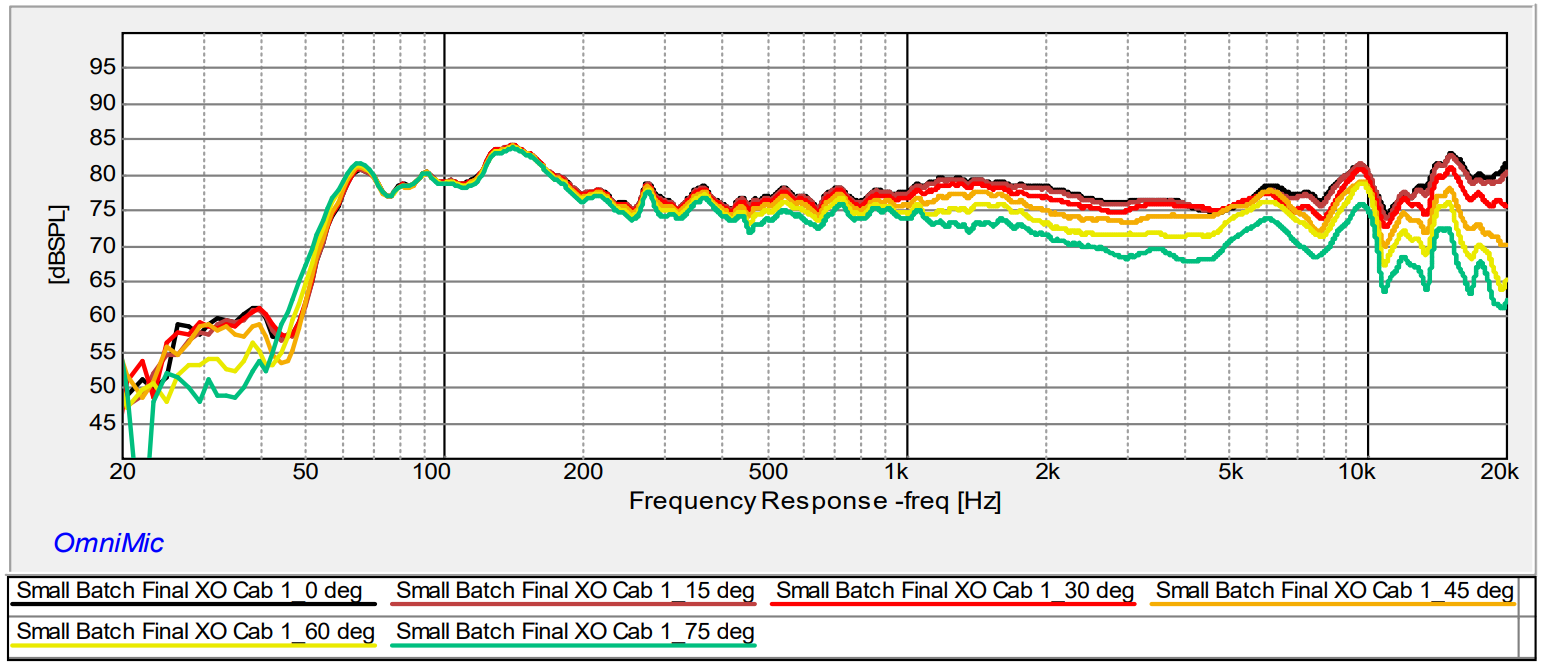
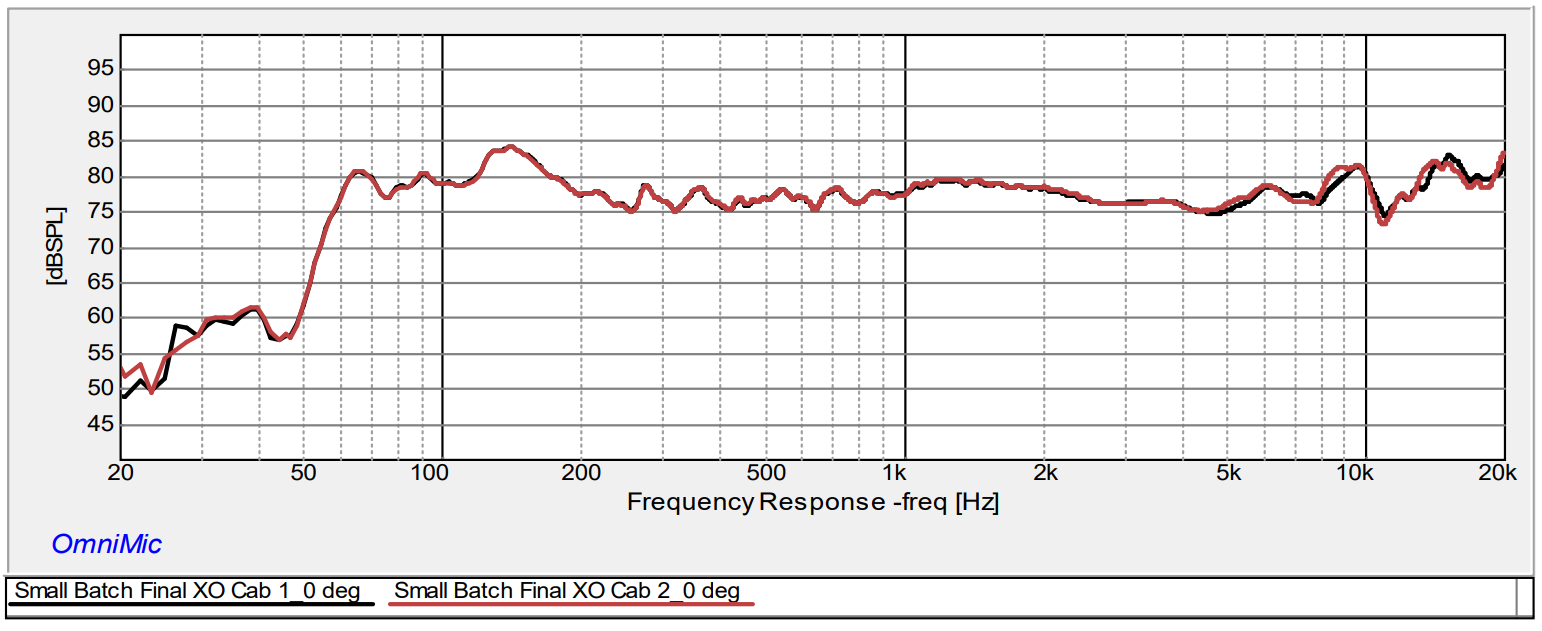
The crossover design for this speaker was more troublesome than I expected. I just spent more time than I planned to find the best phase alignment between the two drivers. The final XO point is ~4.6 kHz, with a 1st order filter on the tweeter, and a damped 3rd order filter on the woofer. The natural roll-off of the AMT Mini-8 meant I didn’t have to do much with it except a rather wide Q notch filter to contour the response a bit, but I still included a 2.7 uF capacitor to protect it from any low frequency input. The overall response of that driver was a bit more ragged than I would have liked, but it doesn’t sound as peaky as the frequency response measurement would imply.
Tips & Tricks:
The AMT Mini-8 is hard to flush mount if you veneer after you cut your baffle holes like I do. The tiny flush trim bit I use to trim veneer has an 1/8” tall pilot which still isn’t shallow enough to cut the veneer back and reveal the correct size hole. To address this, I made the flush mount hole for the AMT much deeper than I needed and used extra gasket tape to bolster the faceplate back to flush.
Also – The faceplate for the AMT Mini-8 is nice… but it has a silver reveal cut on the edge that just didn’t work with my design aesthetic. I used Rustoleum Matte Hammered Black spray paint to give it a makeover and I think it looks a lot better.
Conclusion:
All in all, these were a fun design to put together. They sound nice and have decent low frequency extension for a tiny desktop design. The white oak veneer with black grain filler turned out amazing and saved me from that overly “traditional” brown stained finish while still allowing the drivers to pop and add extra visual appeal. I hope you enjoyed reading about them.
About the Designer:
Keith is a mechanical engineer by day, group fitness instructor by night, and an overzealous DIY speaker designer when he should be sleeping. He is always looking to try different techniques with each build, and deeply enjoys sharing designs, tips, and good stories with the speaker building community.
Project Parts List:
|
Part # |
Description |
Qty |
|
295-369 |
Dayton Audio RS100P-4 4″ Reference Paper Woofer 4 Ohm |
2 |
|
275-095 |
Dayton Audio AMT Mini-8 Air Motion Transformer Tweeter 8 Ohm |
2 |
|
091-1250 |
Parts Express Binding Post Banana Jack with 1″ Thread 2 Pair Black Gold |
2 |
|
004-20 |
Dayton Audio DNR-20 20 Ohm 10W Precision Audio Grade Resistor |
2 |
|
004-5.1 |
Dayton Audio DNR-5.1 5.1 Ohm 10W Precision Audio Grade Resistor |
2 |
|
257-822 |
Dayton Audio 0.80mH 18 AWG Perfect Layer Inductor Crossover Coil |
2 |
|
257-028 |
Dayton Audio 0.30mH 20 AWG Air Core Inductor Crossover Coil |
2 |
|
257-816 |
Dayton Audio 0.50mH 18 AWG Perfect Layer Inductor Crossover Coil |
2 |
|
027-408 |
Dayton Audio DMPC-0.68 0.68uF 250V Polypropylene Capacitor |
2 |
|
027-416 |
Dayton Audio DMPC-2.7 2.7uF 250V Polypropylene Capacitor |
2 |
|
027-424 |
Dayton Audio DMPC-6.8 6.8uF 250V Polypropylene Capacitor |
2 |
|
260-470 |
Speaker Cabinet Port Tube 1″ ID x 4″ L Flared |
2 |
I love the RS-100 and have used it only in point source. I may use your design because I have been interested in the AMT tweeter for some time.
I have spare RS100-8 drivers lying around. What would need to be changed in the cross over for these 8 Ohm drivers to work? Thank you!