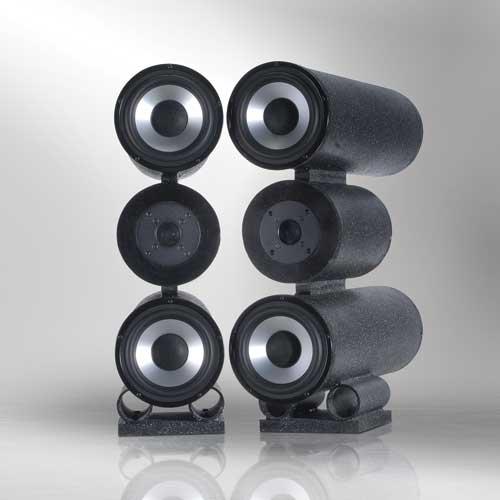
Totally Tubular

Designer: mikevv
Project Time: 8-20 hours
Project Complexity: Professional
Project Cost: $100-$500
Driver Selection
My basic concept for the cabinet construction was to use 6″ nominal inner diameter PVC. The tubular cabinet design dictated the use of a woofer that would have a mounting cutout of 6″ or smaller. Due to the fact that I wouldn’t be able to create a substantial internal volume with this approach, I started modeling woofers to see what could be achieved in terms of low-end with the limited volume available. Dayton DA175-8: I was surprised to learn that the Dayton DA175-8 would be able to achieve an F3 of less than 50 Hz when loaded in a 6″ diameter by 20″ long PVC tube enclosure. This driver also exhibits low distortion and a relatively flat frequency response up to 1800 Hz. In order to decrease distortion and also raise sensitivity and power handling, I decided to use two woofers wired in parallel. The color I had chosen for the cabinets contrasted nicely with these very attractive aluminum-cone drivers, so their pleasing appearance was a bonus. Dayton RS28A-4: Needing a tweeter with roughly 91dB sensitivity and the ability to acoustically crossover below 2 kHz (due to the center-to-center distance between the PVC “modules”), the RS28A-4 was a natural selection. This driver also exhibits low distortion in the targeted high frequency pass band, and exhibits a flat frequency response. As a side benefit, the look of the driver (with the dome being hidden behind its protective screen) complemented the aesthetics of the overall cabinet design.
Enclosure Design
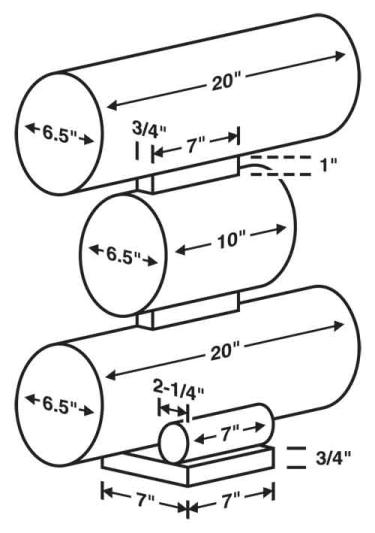
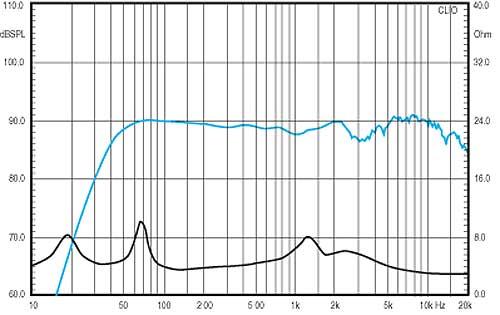
Although the project design is fairly unconventional, I was determined to complete it within a week-including time for glue to cure and paint to dry. Finding 6″ I.D. Schedule 40 PVC was not difficult, and it is typically available in 10″ sections for a reasonable price. I purchased a 4 ft. x 8 ft. sheet of 3/4″ MDF for the enclosure end caps and standoffs, although the required parts could probably be obtained from a smaller 2 ft. by 4 ft. sheet. Also required: #10-32 x 2″ long machine screws with nuts and washers (get at least 40), #10-32 T-nuts, an 8 oz. bottle of Gorilla Glue, paint, and a scrap 4 ft. section of 2″ x 4″ stud to align the three tubes while the Gorilla Glue cures. The Model 200 Jasper Circle Jig and a router are the easiest way to cleanly and accurately cut the end caps. I chose adjustable 1-3/8″ diameter port tubes for the woofer modules, with a tube length of 8″ achieving an enclosure tuning frequency of 40 Hz and yielding an F3 of 50 Hz. This may not be optimum for maximum low end extension, but seems to be the best trade-off in terms of group delay, and vent air noise (the only noticeable air noise would occur at 20 Hz with power levels of 100 watts RMS per cabinet). This tuning frequency also provided a moderate 2 dB boost in bass response.
Amplifier/Crossover Configuration
I intended to use a 3rd-order Butterworth alignment on the woofers in order to solve the vertical lobing issues with this design, and suppress break-up as much as possible. With the center-to-center distance being 7-1/4″ (adding in the 3/4″ MDF strips), the maximum acoustic crossover point from the woofers to the tweeter would have to be 1875 Hz. For the woofers, the electrical filter is actually 2nd-order with a conjugate network. The acoustic roll-off is close to a 3rd-order Butterworth alignment. On the tweeter side, a 3rd-order electrical filter and L-pad are used to achieve an acoustic 4th-order Linkwitz-Riley roll-off with the actual acoustic crossover point of both drivers being 1500 Hz. The tweeters have their polarity reversed relative to the woofers in order to tilt their radiation pattern upwards.
Enclosure Assembly
I started construction by cutting the PVC tube into a total of four 20″ sections. For the tweeter/crossover modules, I chose to use 10″ sections, of which two were needed. 1″ wide by 7″ long strips of the 3/4″ MDF support the weight of the assembled tubes, as I wasn’t keen on the idea of the tubes being connected at only one point. The strips provide ample support to the enclosures and prevent side-to-side rocking. Next, the enclosure end caps-the easiest (and safest) method is to start with the outer diameter. Since I am using material cut out of the MDF, I have to add the diameter of the spiral-upcut bit (1/4″) of the router to both sides of the diameter (6-1/2″ for the PVC diameter). I also add 1/16″ for wiggle room and set the circle jig to 7-1/16″. Now, this is important: DO NOT complete the cut! I left about a 1/2″ section on both sides so that I could cut out the center of each cap for the relevant woofer mounting hole, port, binding post terminal cup, or for the tweeter recess and cutout. Go back and cut the remaining section to remove the end cap from the sheet, and file it to round. The next step in the construction process is the determination of where screw and wire holes will reside on the PVC and MDF strips, marking the locations, and drilling them with the appropriately sized bit. Test fit the pieces, using the screws to align the adjacent MDF strips and PVC tubes. Glue and clamp the end caps to their appropriate modules (except for the rear cap of the tweeter tube module.more on that later), and let the bond cure for at least 5 hours. Next, apply glue to both sides of the MDF strips, run the screws (with washer attached) and speaker wire from the woofer module, through the MDF strip, and into the tweeter module (the screw head inside of one tube and screw nut on the inside of the connected tube), then secure everything with the screw nut. Without tightening the screws and nuts completely just yet, do the same for the other side of the tweeter tube section. To get everything to align vertically, place 2″ x 4″ boards along the outer edges of the tubes (so that they are touching all of the tubes at the same time) and clamp the boards together, though not tightly yet. Go back and tighten the screws that are holding the tubes and MDF strips together, and then tighten the clamps again. The glue should cure for at least six hours. Remember how the rear of the tweeter module was left open? This is where the crossovers go. Construct eight small standoffs from scrap MDF, cutting sections just large enough to install the T-nut, and glue them in their respective places. One standoff holds the tweeter crossover inside the module, one holds the woofers’ crossover, and two secure the rear of the tweeter panel, which holds the binding post terminal cup. This will allow access to the crossovers if it is required. With assembly complete, time to move on to finishing. The first step is to remove and smooth out the excess glue. The glue is easy to remove from the bare PVC, and to sand where it builds up. After that, lightly sand all of the parts to roughen them up for paint. Since Fleck Stone is used as the exterior treatment, a base coat of the same color is needed. Apply the Fleck Stone over the base coat, allow it to dry completely, and apply a clear coat to protect the Fleck Stone. Mounting these speakers to a stand is a matter of personal preference-I made a stand adapter using a 7″ x 7″ MDF plate with two scrap 2″ diameter PVC pipes.
Conclusion
These speakers are impressive in terms of accuracy, imaging, and openness. The bass response is great for small to midsize rooms, considering the rather small piston area of the woofers. The woofers and tweeter integrate at the acoustic crossover point quite admirably with no audible effects of strain on the tweeter, and no grunge apparent from the woofers. Much like studio monitors, their excellent sound quality reveals the true nature of a recording. One important note: the speakers’ optimum performance is achieved when used in conjunction with 24″ stands.
About The Designer
Most people know me as Mike V, one of the many moderators on the Tech Talk Message Board. I’ve been a customer of Parts Express since I was 16 and have worked here at Parts Express since 2004. I tinker with anything that has an electrical circuit, to include: cell phones, computers, speakers, and cars.
Project Parts List
|
Part # |
Description |
Qty |
|
295-335 |
1 |
|
|
275-130 |
1 |
|
|
266-315 |
1 |
|
|
266-822 |
1 |
|
|
027-348 |
1 |
|
|
027-328 |
1 |
|
|
027-248 |
1 |
|
|
027-256 |
1 |
|
|
027-258 |
1 |
|
|
004-3 |
Dayton Audio DNR-3.0 3 Ohm 10W Precision Audio Grade Resisto |
1 |
|
004-1 |
Dayton Audio DNR-1.0 1 Ohm 10W Precision Audio Grade Resisto |
1 |
|
004-5.1 |
Dayton Audio DNR-5.1 5.1 Ohm 10W Precision Audio Grade Resis |
1 |
|
260-388 |
1 |
|
|
260-516 |
1 |
|
|
081-435 |
1 |
|
|
260-311 |
1 |
|
|
1 |
+ There are no comments
Add yours