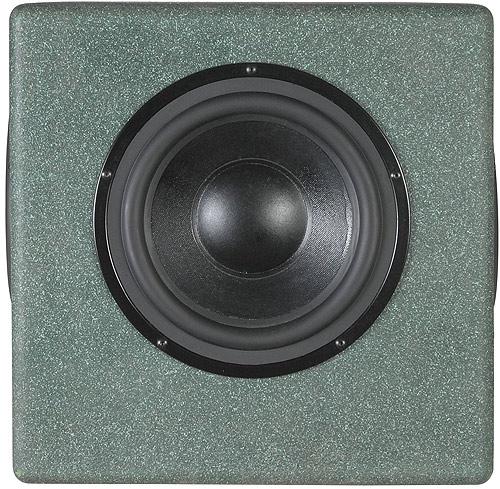
The Triska Sub


Designer: Shawn Adams
Project Time: 1-8 hours
Project Complexity: Hobbyist
Project Cost: $100-$500
Driver Selection
I chose the Dayton Loudspeaker 8″ Shielded DVC sub (#295- 480) because it met my two criteria perfectly: it would fit in a smallish box and has a very attractive price tag. It also seemed like a good idea because there is an available matching passive radiator (#295-492) at a nice low price. On this project, I used a Dayton Loudspeaker (#300-784) 70 watt plate amp-it has just the right amount of power for this particular driver in this application.
Enclosure Design
After a bit of deliberation, I decided that I would tread in some new territory and try to design a passive radiator system. I’ve gotten into a habit of building sealed, ported, ported, sealed speakers and just for the thrills, a sealed sub. It’s getting old and not much of a challenge. I did some research on the web and figured out in which direction I would venture. The passive radiator idea is basically a ported enclosure, only it trades a column of air (the port) for an equally massive diaphram. Simple enough. But where to start? I did some further research on the web and found a spreadsheet that took simple info about the system and the parameters of the radiator. In a millisecond you have a starting point for determining how much mass to add to the radiators. I also found the equations for figuring out the mass requirements at another website-http://www. diysubwoofers.org/prd/-which confirmed my earlier results. Then came a three hour session with WinISD. If you don’t have this program in your arsenal yet, shame on you! Get it and you will never regret it. I plugged and chugged the numbers and did a lot of tweaking to find a response curve I could live with. It’s a good thing the sub I had been modeling liked it too, or else there were going to be issues. It has an F3 of around 40 Hz and a F10 around 31 Hz. The rolloff is steep but it all works out well in the end. The amount of added mass turned out to be 46 to 50 grams per radiator. The passives have an M5 threaded hole to adjust mass by way of a bolt, nuts, and washers. Just make sure you add weight in this range. It’s the best compromise between system power handling and frequency response I have found so far. Once you are satisfied with the mass tuning, grab a bottle of Loctite and secure the threads. This is a vibration rich environment, and without threadlocker the whole package will eventually come loose and start buzzing like mad. The gross volume I ended up with is .88 cubic feet. By the time you figure in the volume displaced by the active driver and the passive radiators, I estimate the net volume somewhere in the vicinity of .80 cubic feet. Not overly compact, but not huge by any means. I like to have something to prop up my feet under my desk so this might be just the ticket. The 13″ cube dimension came as a bit of a surprise when I was figuring out the cut list. I am hoping that if someone replicates this sub they aren’t afraid of the number 13. Ah, sounds like I’m onto something here! A person who is afraid of the number 13 is a triskaidekaphobic. A bit of a mouthful so I shortened it to Triska. A name is born!
Enclosure Assembly
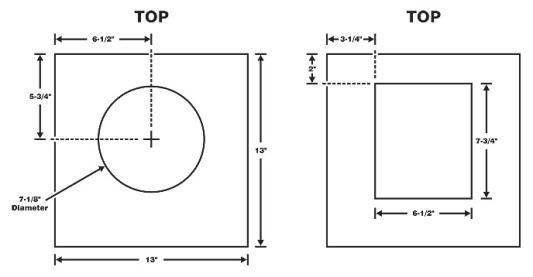
Did I say I wanted cheap? Yep! What I didn’t mention was I wanted it to be easy, easy, easy to construct. This being a cube box (13″ per side finished), it can’t get much easier than this. It only took ten minutes to cut the side panels and glue them together. I like to use corner clamps in conjunction with a couple of straps-the corner clamps let me get the tops and bottoms of the joints right where I want them and then I place a strap clamp in the middle. Let this dry for a couple of hours and get ready to cut some holes for the active driver and passive radiators. Oh yeah, the amp too! If you want to get all fancy and do a nice round over on the driver and radiator cut outs, you can do this before you assemble the panels. It really doesn’t make too much of a difference on this project as there is enough window space in the baskets for free breathing. The cutouts for the driver and the radiators are all 7-1/8″ diameter. Use a jigsaw, a router with a Jasper Circle Jig, or as I use, the Sears Craftsman Circle Cutting Jig for their routers. It works like a charm. Lay the now dry side panel assembly on its side, and measure from the upper left hand corner of the panel that is on top. Your center of the cutout is 5″ down and 6-1/2″ over from this upper left hand corner. This will position the driver in the center of the cube on a vertical axis and slightly off center on a horizontal axis. Make the same cuts on the two adjacent sides. The side opposite the active driver is where the plate amp will be mounted. When this cutout is done you can attach the top and bottom pieces, and then clamp until the glue sets. I did a 1/2″ roundover on the edges of the box. Finish the exterior as you see fit. I like PlastiKote’s FleckStone paint as it has some texture to it, and it’s quite durable and low maintenance-plus it hides touch-up and small blemishes well. You are now ready to install your components. Be sure to wire up the active driver voice coils in parallel: positive to positive, negative to negative. Set everything in place and make sure you have a good seal with all the components. You are now ready to enjoy The Triska Sub. Once the break-in is finished, you should have a useable extension to 31 Hz.
Conclusion
“The sub behaves very well if it is about a foot and a half from the adjacent walls. This gives the best response and the most bass output, without a lot of blooming. Since it is a very nearfield application in my instance, the bass has tons of slam. I can buzz windows throughout my entire house with this little sub! I have pressed it into HT service as a test and I can say it did a nice job. Just be careful of soundtracks with a lot of infrasonic passages- the bottom end is shored up nicely but won’t hande the depth charges in U-571 at high levels. The sub just won’t like it. Overall, I’m very happy with the sound and physical appearance of The Triska Sub. It’s kind of a shame to stick it under my desk, as good as it looks!
About The Designer
Shawn Adams, better known on the PE Tech Talk board as ShawnA, has been building and modifying speakers for sixteen years. With dozens of projects behind him, and enough parts on hand for several dozen more, he anticipates achieving total domination of the DIY speaker hobby within eighteen months. An experienced graphics designer by day, his motivation for designing and building speakers comes from listening to systems at big-box retailers and leaving with the confidence he can do it better- for less money. His DIY mantra: “Do what you want to do, and make sure you have fun doing it!”
Project Parts List
|
Part # |
Description |
Qty |
|
295-480 |
1 |
|
|
295-492 |
1 |
|
|
300-784 |
1 |
|
|
260-516 |
1 |
I have been using this sub for 4-5 years now and other than having to replace the amp once it is a great sub.