Udique

Designer:
John H
Project Category:
Bookshelf Speakers
Project Level:
Intermediate
Project Time:
8-20 Hours
Project Cost:
$100 – $500
Project Description:
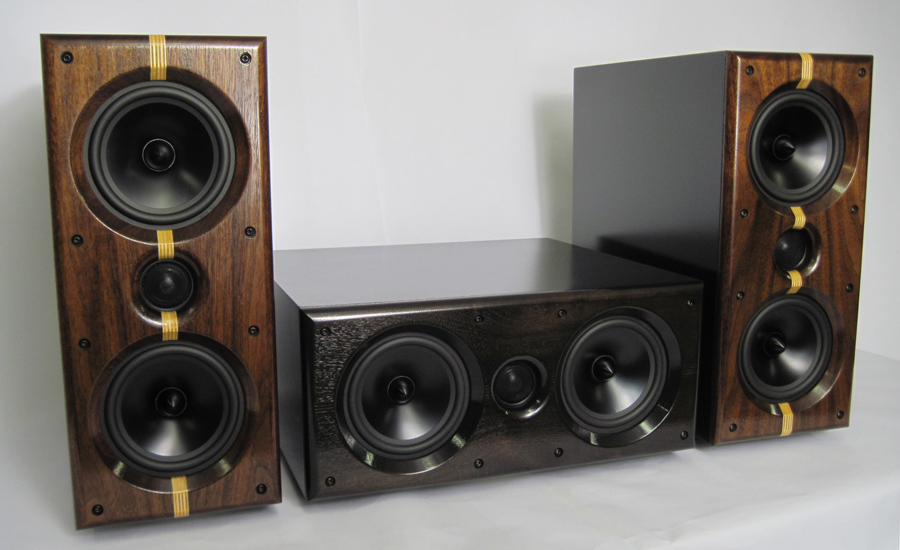
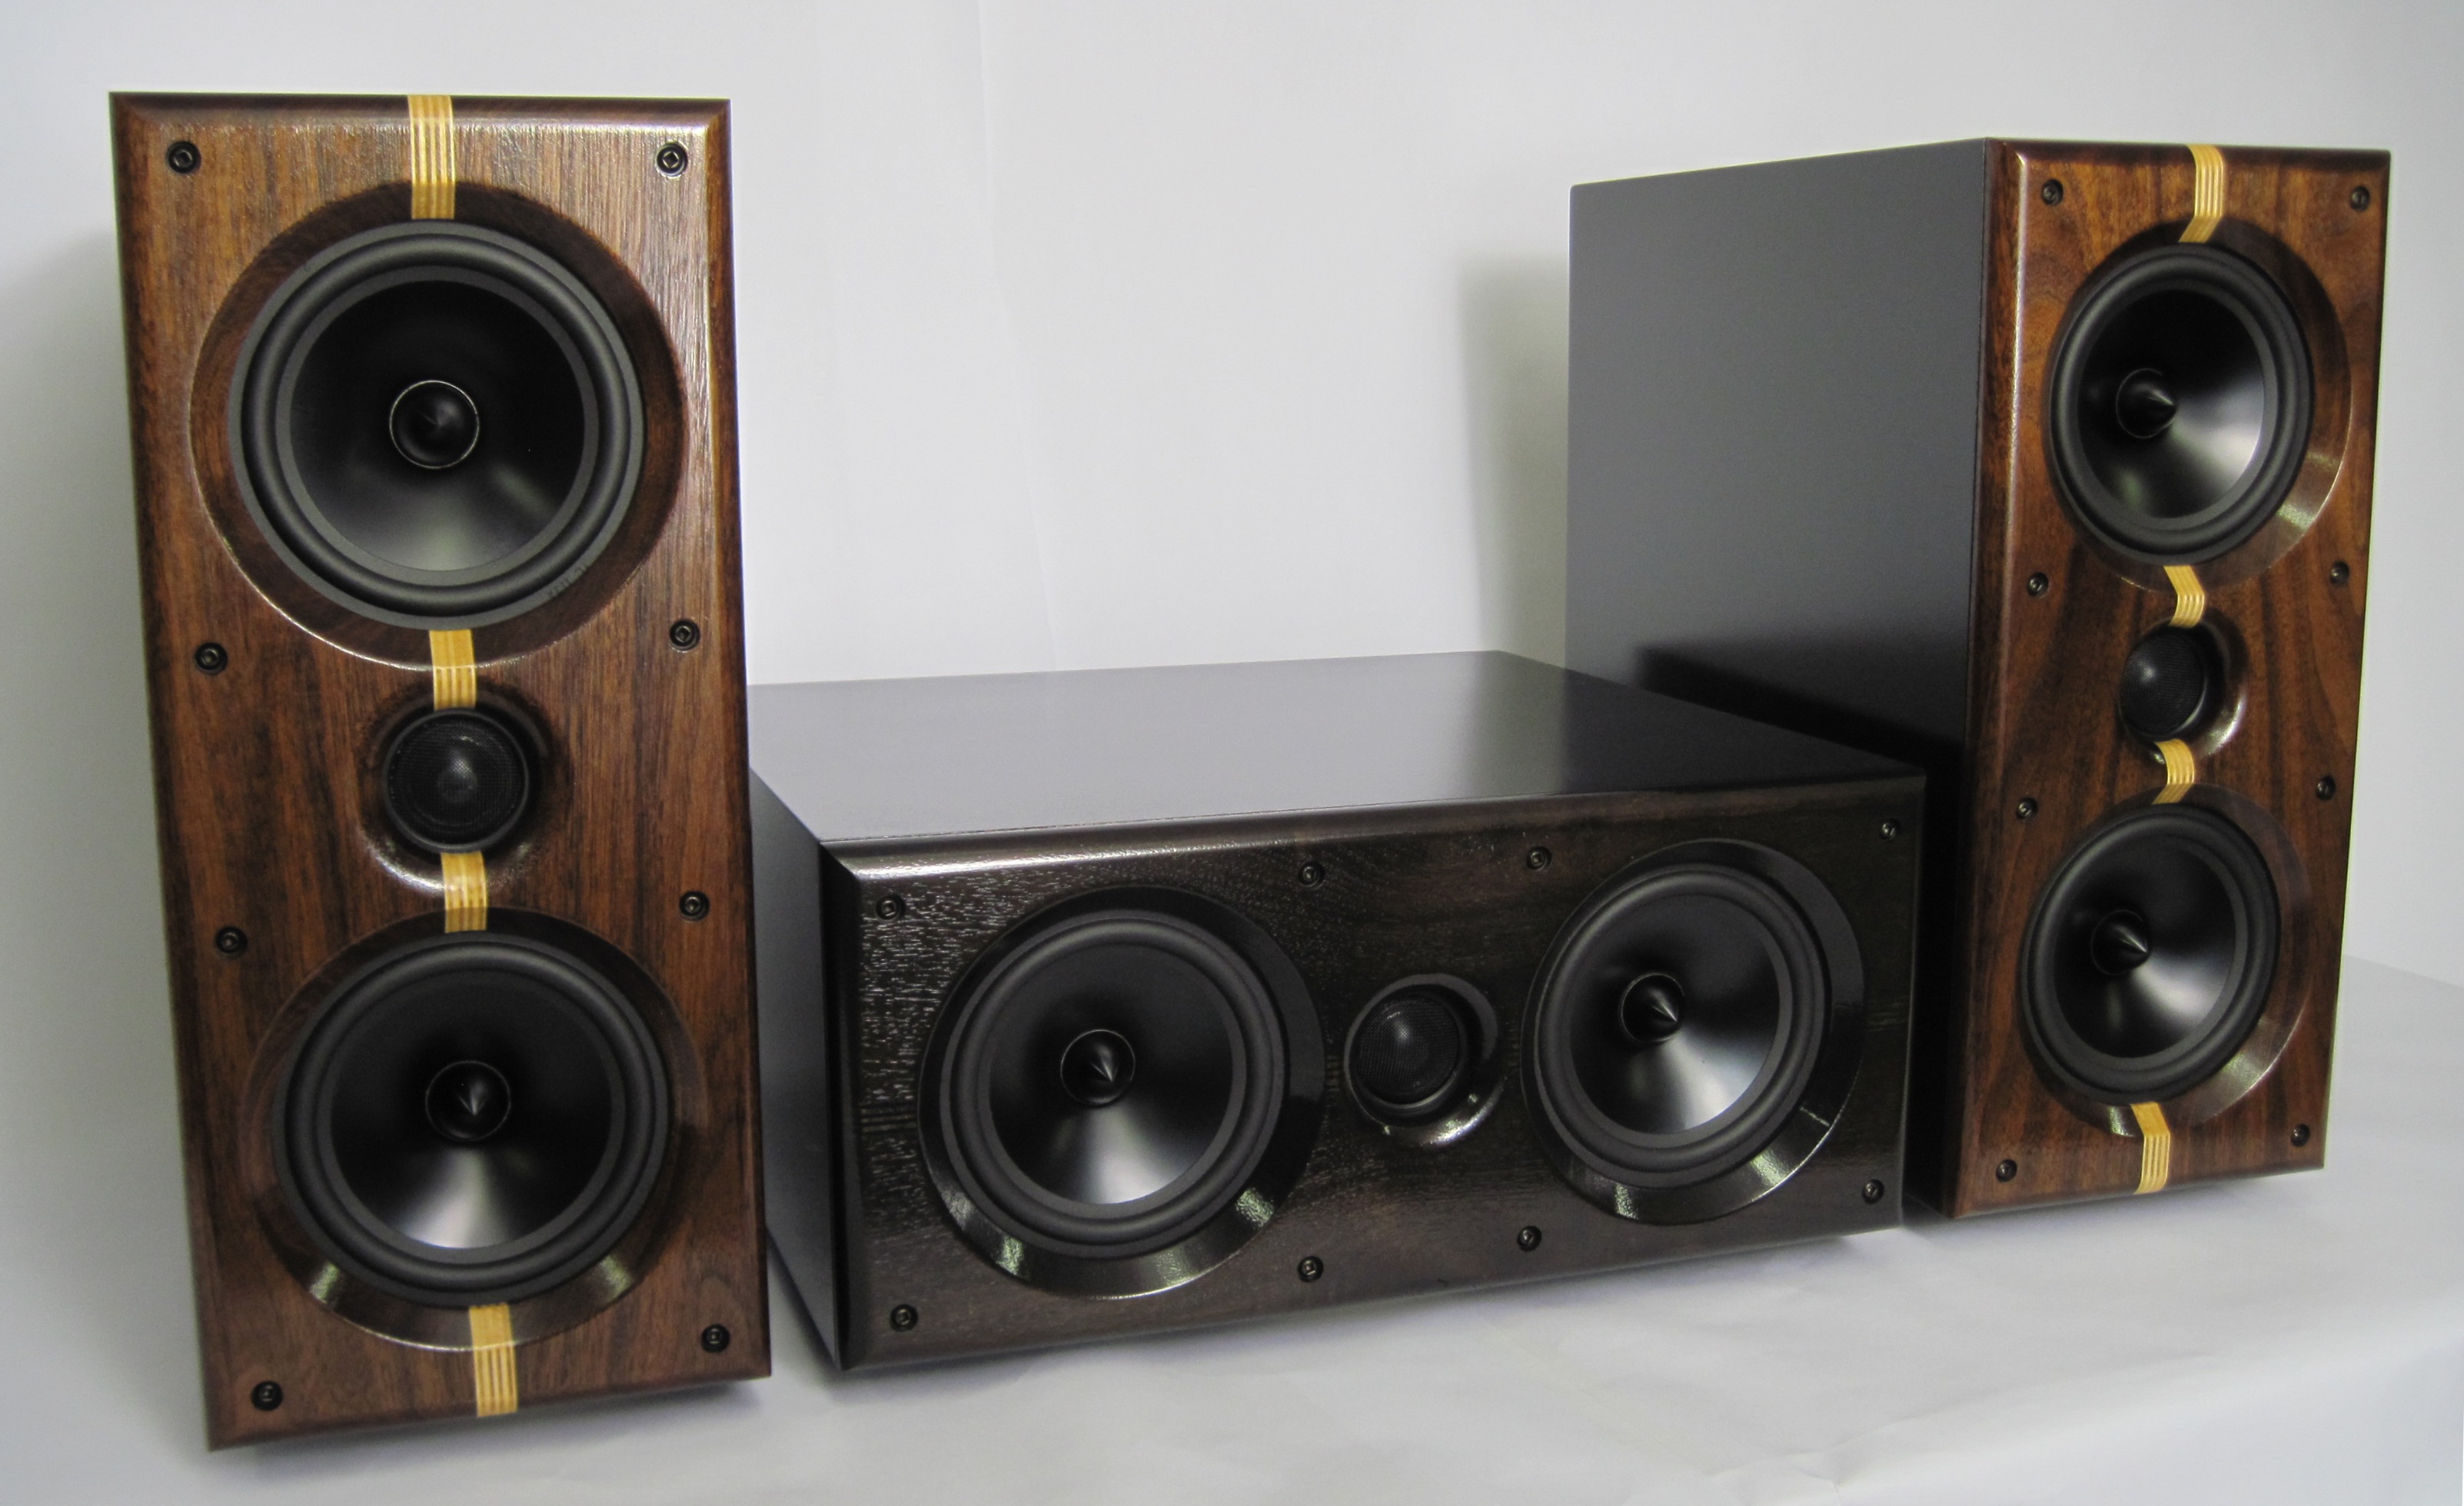
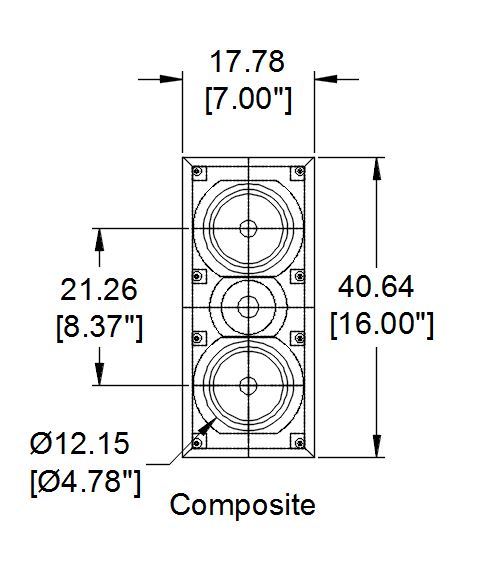
This project is a horizontal MTM center channel design that can also be used as vertical main speakers. This design has two crossovers, one for stand mounts, and one for locations like a center channel near boundaries like walls, corners, and screens.
Design Goals:
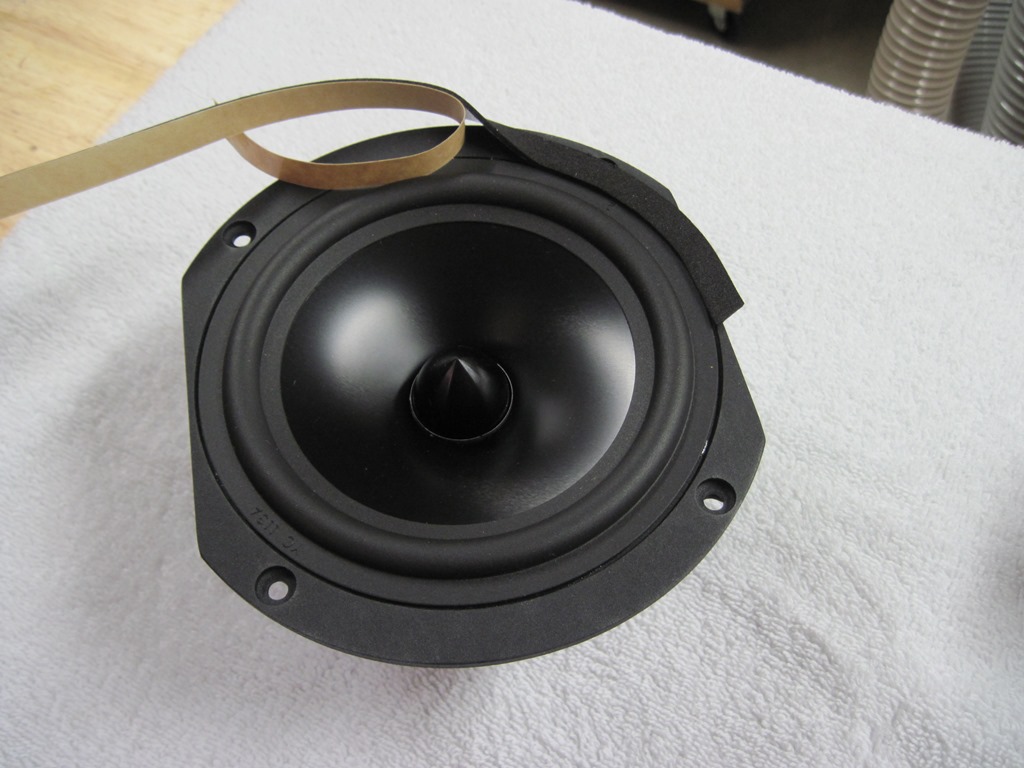
The goal of this design is to make a center channel speaker that can also be used as a main speaker. To improve off axis performance truncated frame drivers are used to get the driver spacing as close as possible. The truncated frame drivers are difficult to flush mount so the drivers are rear mounted.
Driver Selection:
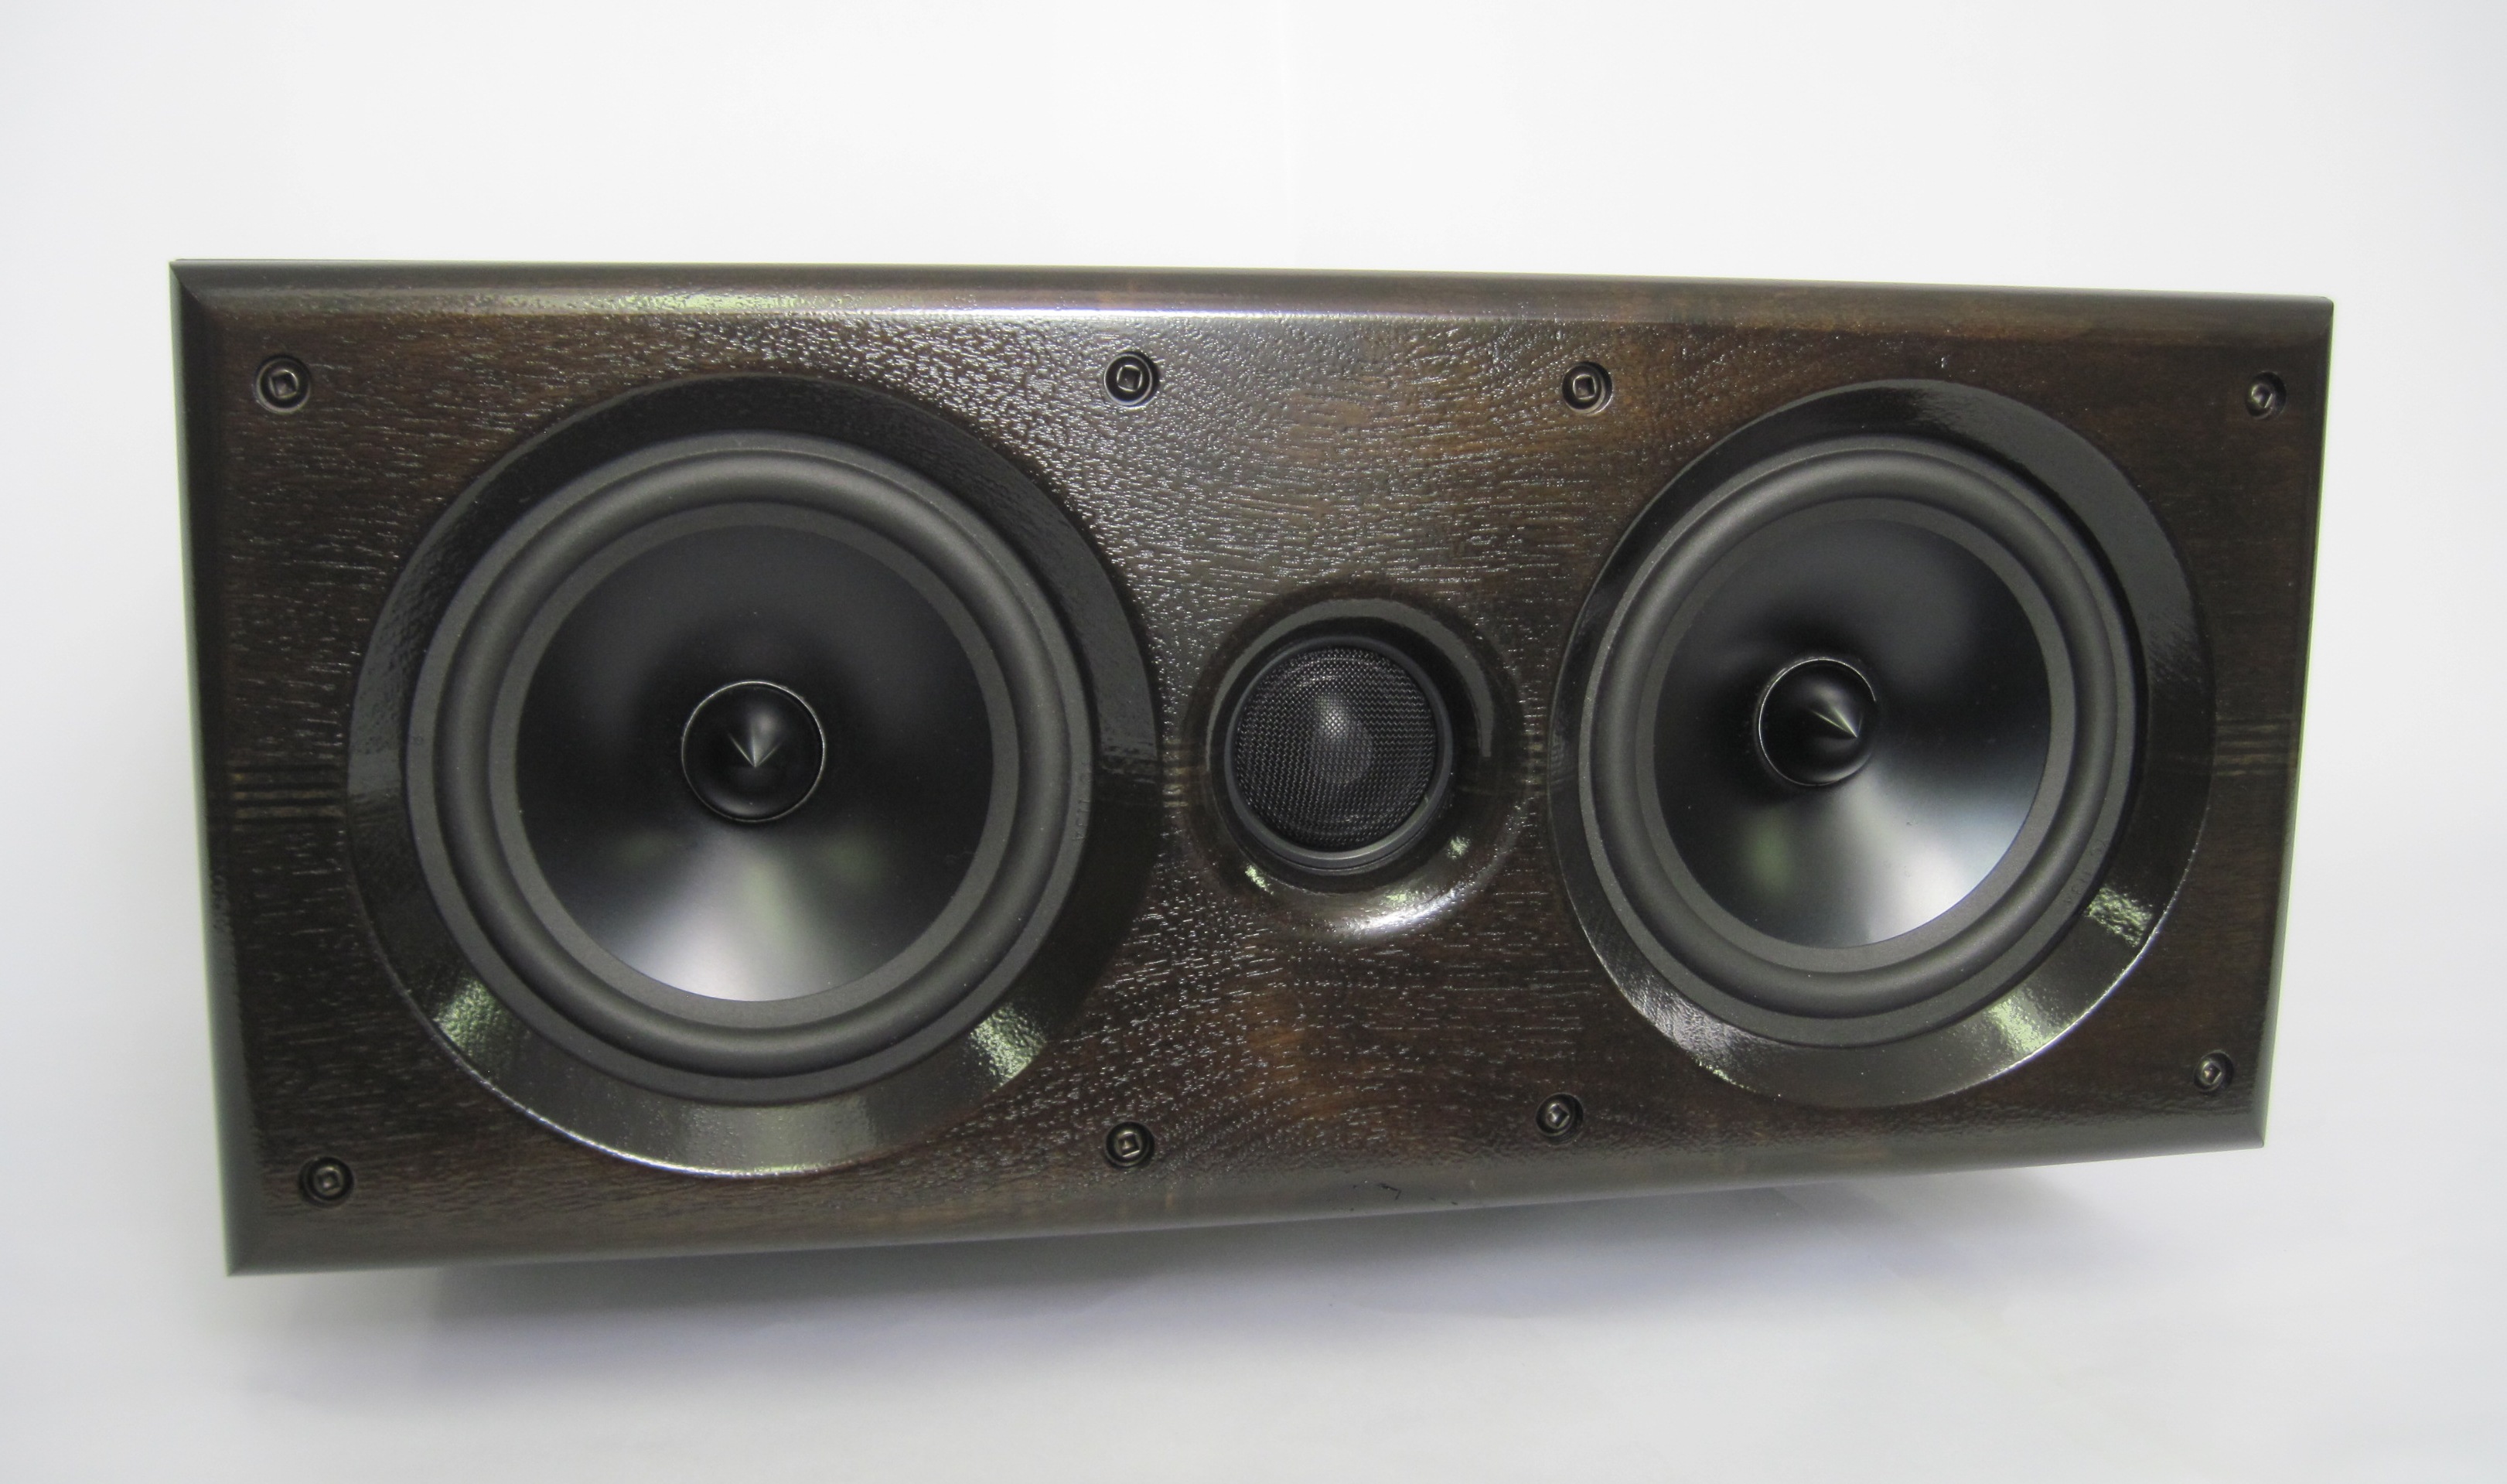
The drivers are the Dayton RS150T-8 woofer, and the Dayton RS26A aluminum dome tweeter.
The RS28A tweeter is used as it can be crossed below 2,000 Hz. The dual RS150T-8 will be able to reach 100 dB with less than 10 watts.
Parts Used:
Udique stand mount pair
275-130 Dayton Audio RS28A-4 1-1/8″ Aluminum Dome Tweeter 2
275-138 Dayton Audio RS28TF Truncated Faceplate for RS Tweeters 2
295-342 Dayton Audio RS150T-8 6″ Reference Woofer Truncated Frame 4
260-387 Speaker Cabinet Port Tube 2″ ID Adjustable 2
260-311 Gold Banana 5-Way Binding Post Round Recessed Speaker Terminal Cup 2
260-317 Acousta-Stuf Polyfill Speaker Cabinet Sound Damping Material 1 lb. Bag 1
Crossover, Udique stand mount pair
004-2.7 Dayton Audio DNR-2.7 2.7 Ohm 10W Precision Audio Grade Resistor 2
004-2.4 Dayton Audio DNR-2.4 2.4 Ohm 10W Precision Audio Grade Resistor 2
027-429 Dayton Audio DMPC-7.5 7.5uF 250V Polypropylene Capacitor 2
255-028 Jantzen 1832 0.30mH 20 AWG Air Core Inductor 2
255-256 Jantzen Audio 1.3mH 18 AWG Air Core Inductor Crossover Coil 2
027-440 Dayton Audio DMPC-30 30uF 250V Polypropylene Capacitor 2
Description, Udique Center channel & corner placement
275-130 Dayton Audio RS28A-4 1-1/8″ Aluminum Dome Tweeter 1
275-138 Dayton Audio RS28TF Truncated Faceplate for RS Tweeters 1
295-342 Dayton Audio RS150T-8 6″ Reference Woofer Truncated Frame 2
260-387 Speaker Cabinet Port Tube 2″ ID Adjustable 1
260-311 Gold Banana 5-Way Binding Post Round Recessed Speaker Terminal Cup 1
260-317 Acousta-Stuf Polyfill Speaker Cabinet Sound Damping Material 1 lb. Bag 1
Crossover, Udique Center channel & corner placement
027-429 Dayton Audio DMPC-7.5 7.5uF 250V Polypropylene Capacitor 1
255-028 Jantzen 1832 0.30mH 20 AWG Air Core Inductor 1
255-250 Jantzen Audio 1.0mH 18 AWG Air Core Inductor Crossover Coil 1
027-440 Dayton Audio DMPC-30 30uF 250V Polypropylene Capacitor 1
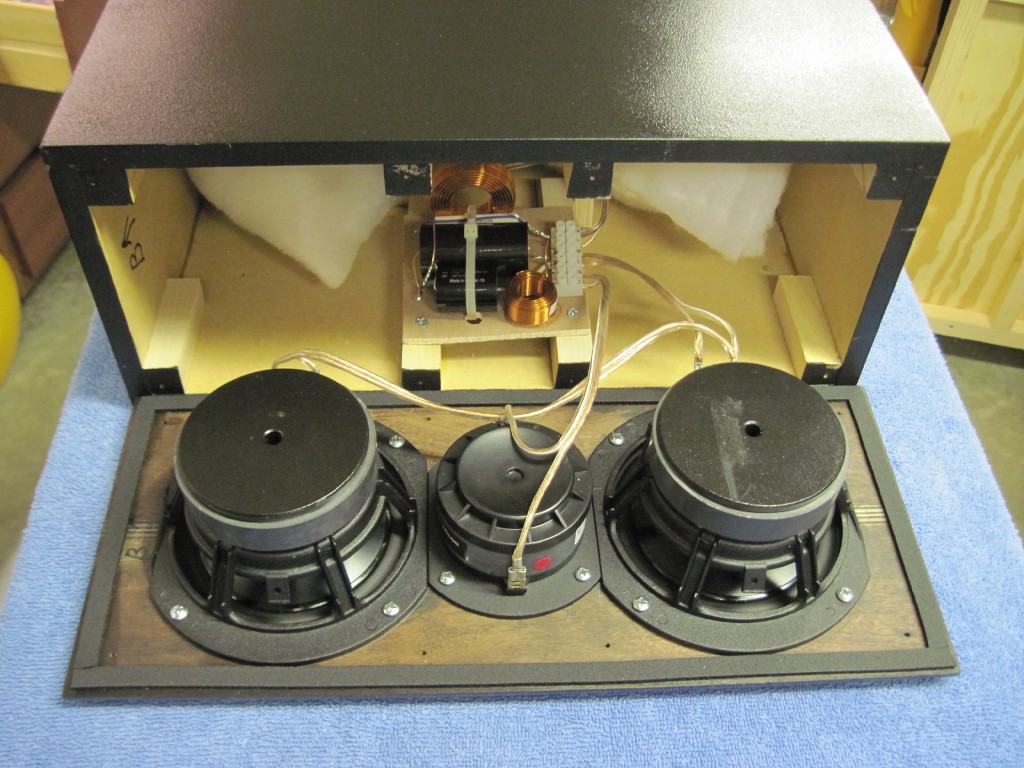
Enclosure Design:
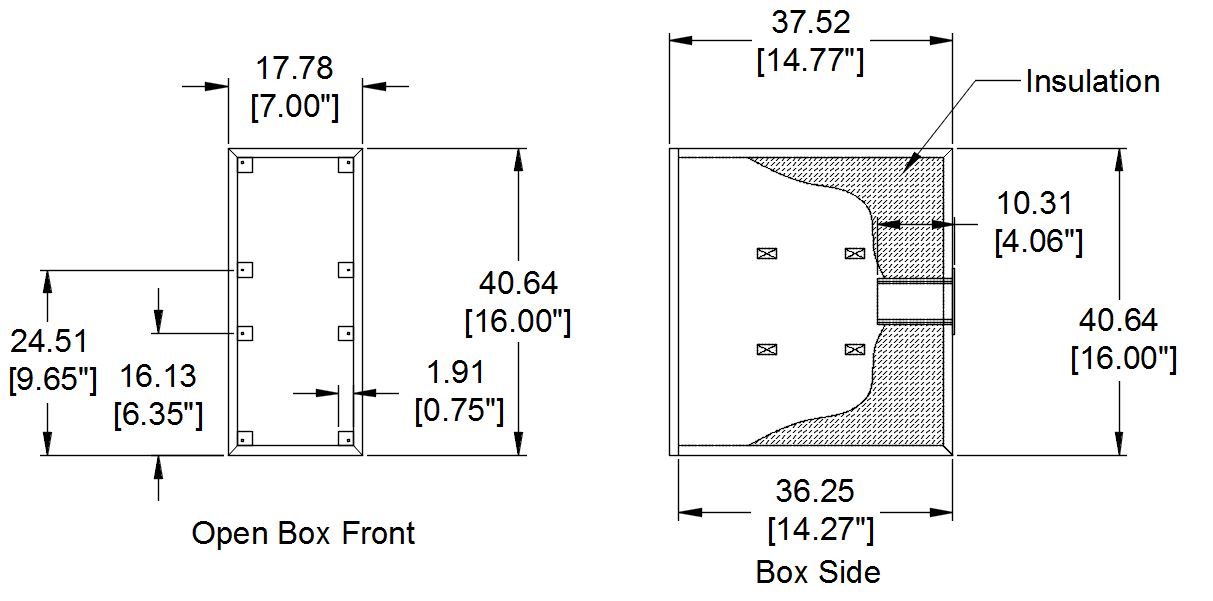
The design is a 20 liter volume ½ inch MDF box with a removable front baffle. This project had a “not to exceed” width of 7 inches for a specific location. This necessitated the use of ½ inch MDF for the sides to fit the RS150T frames. Future builders should consider ¾ inch MDF for the sides and increasing the baffle width to 7 ½ inches. The ½ inch MDF enclosure uses multiple side to side post braces.
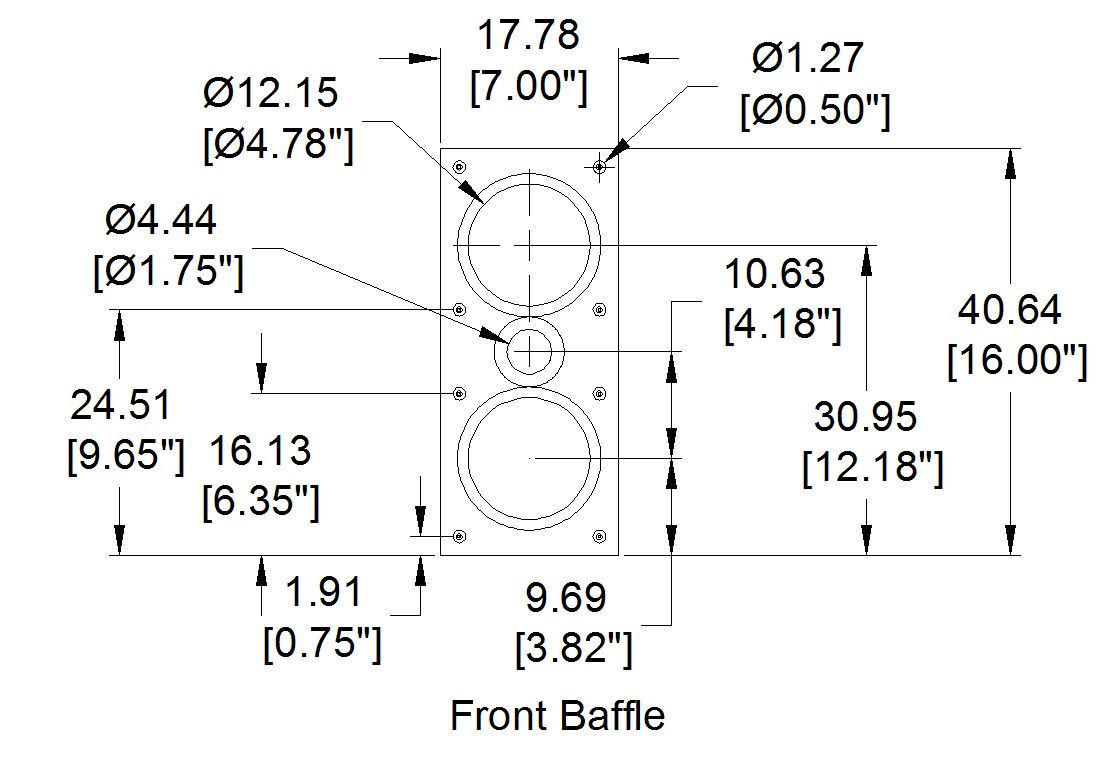
The front baffle is 7.0 inches wide by 16 inches high. The front baffle has a 1/2 inch round over on all sides. Recess mounting the truncated frames would be difficult so all the drivers are rear mounted on a ½ inch thick front baffle. The tweeter opening has ½ inch round over. The woofer opening has a 3/8 inch 45 degree chamfer or it can use a ½ inch round over as well. The box is 14.77 inches deep.
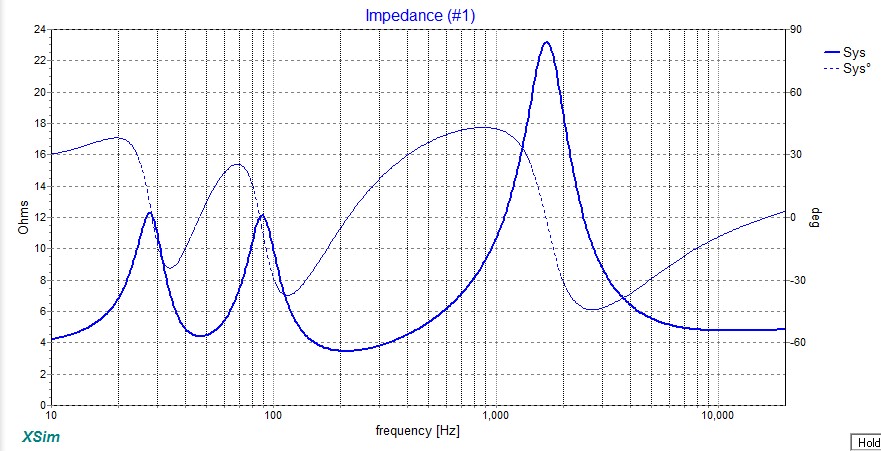
The port is a Dayton adjustable 2 inch port mounted on the back of the cabinet. The port outer sleeve is completely closed and glued to the inner tube. The tubes are cut to 4 inches in length. This gives a box tuning of 47 Hz, and a F3 of 52.
Where a rear port would be a problem the box can be sealed. The volume can be decreased to as little as 10 liters by reducing the box depth. The F3 will be between 98 Hz and 93 Hz.
Enclosure Assembly:
The box is cut with 45 degree angles for all the corner joints except the front baffle. The 45 degree joints while more difficult to cut, eliminate the joint ghosting through the paint or veneer.
Here are a few steps/ tips that might help with the assembly
1. Add baffle mounting blocks and any braces before trimming the front baffle to fit. If you are veneering add the veneer to the outside of the cabinet or several layers of tape to approximate the thickness of the veneer.
2. Cut front baffle oversize and temporally secure it to the cabinet box with 2-3 small dabs of hot glue.
3. Route the baffle flush with the edge of the cabinet. This matches the cabinet to the baffle. Don’t remove the baffle from the cabinet yet.
4. With the square edged baffle, layout and mark the driver holes and the baffle mounting screw locations.
5. With a 1/16th inch bit, drill pilot holes for the baffle mounting screws through the baffle and into the mounting blocks.
6. Route the ½ inch round over on the front baffle.
7. Remove the front baffle by cutting through the hot glue spots with a thin blade putty knife. Mark the baffle to each box so it can be attached in the same position after cutting the driver holes and finishing.
8. Measure the drivers before determining the driver opening diameters.
9. Use C clamps to hold the drivers centered in the openings to mark the mounting holes
10. The drivers need to be sealed to the baffle with gaskets
To enable the ½ inch round-over to be added to the tweeter opening, temporarily secure scrap wood to the back of the baffle before drilling the 1 3/4 inch hole for the tweeter. The extra thickness will allow the router bushing to ride on MDF to cut the round-over at the full ½ inch depth.
The woofer opening receive a chamfer or a round over. To secure the baffle to the cabinet use a cap head wood screw with a washer or use a black pocket screw. Adjust the screw recess opening diameter in the baffle face to fit the washer or pocket screw head.
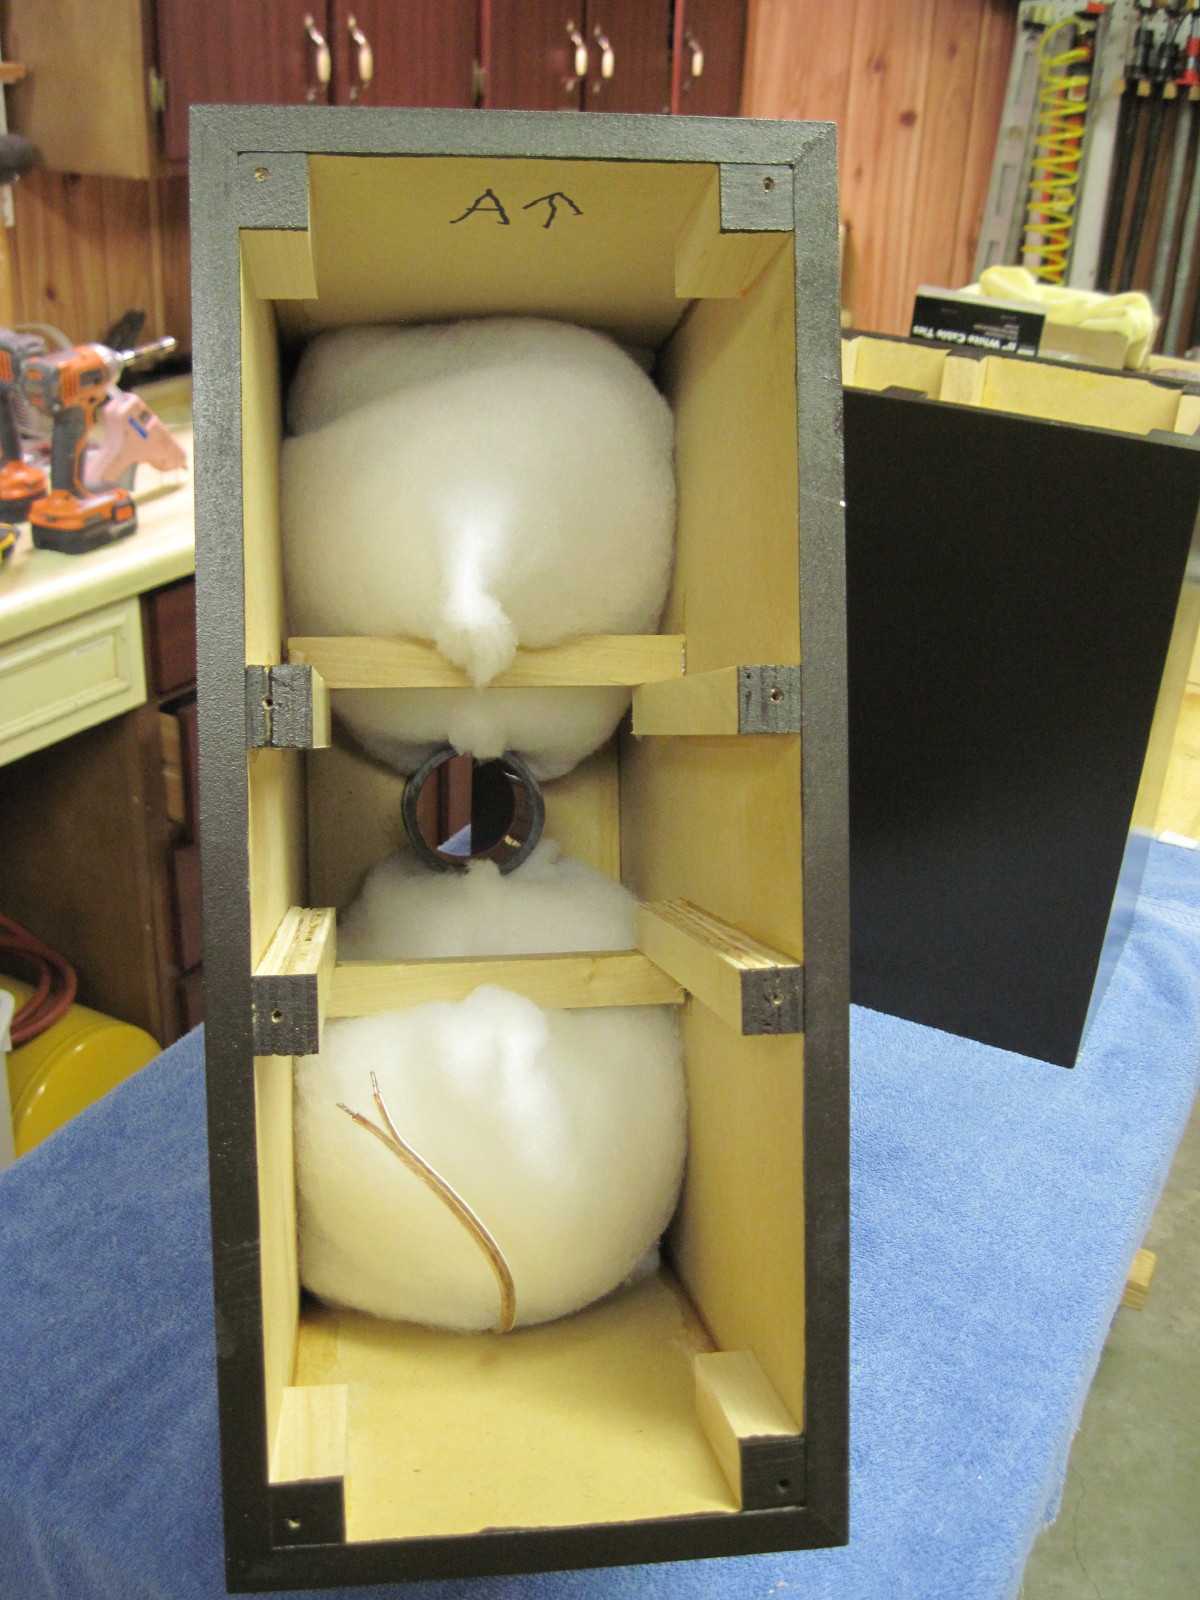
Insulate the box interior with 8 oz. of insulation (fiberglass or Fiberfill). Take care not to block the woofer rear vent or the port opening. I like to make pillows with poly batting then stuff them with insulation.
Mount the crossover on a board and screw to the bottom of the cabinet.
Crossover Design:
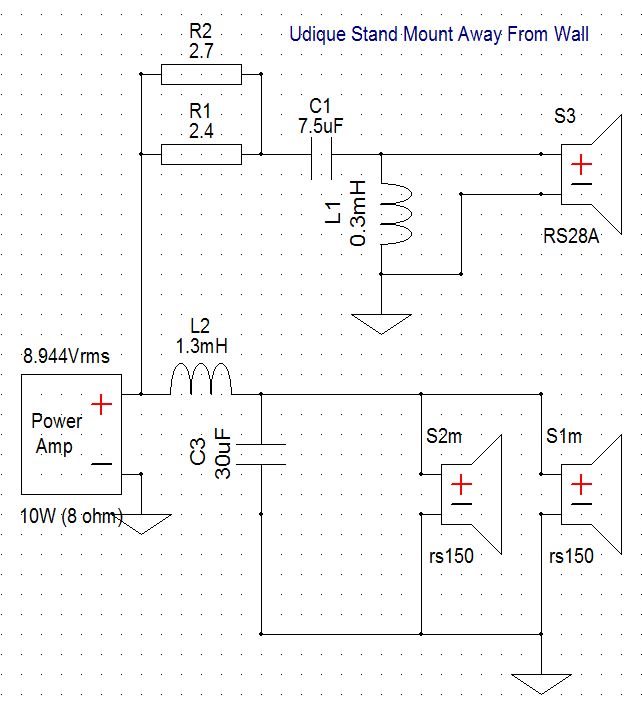
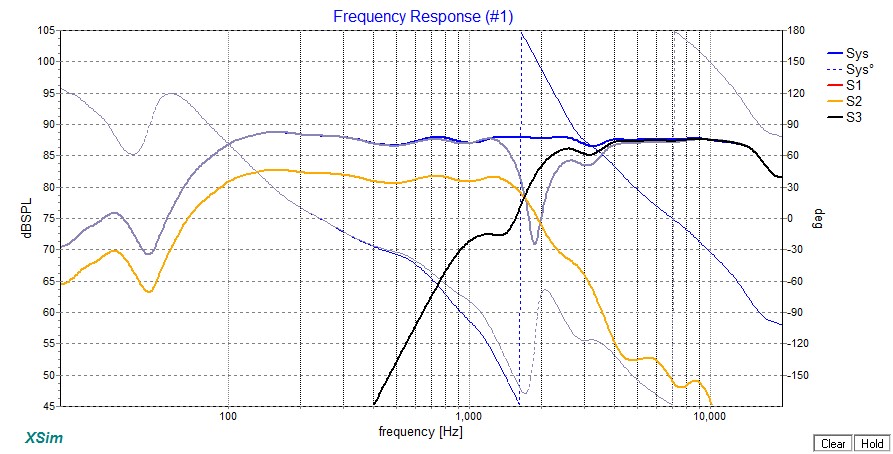
The crossover is a parallel configuration. After several iterations, the final crossovers are 4th order slopes with a crossover point of about 1,800 Hz. The horizontal center channel off axis performance with the speaker above or below a screen is good out to about 20 degrees off axis.
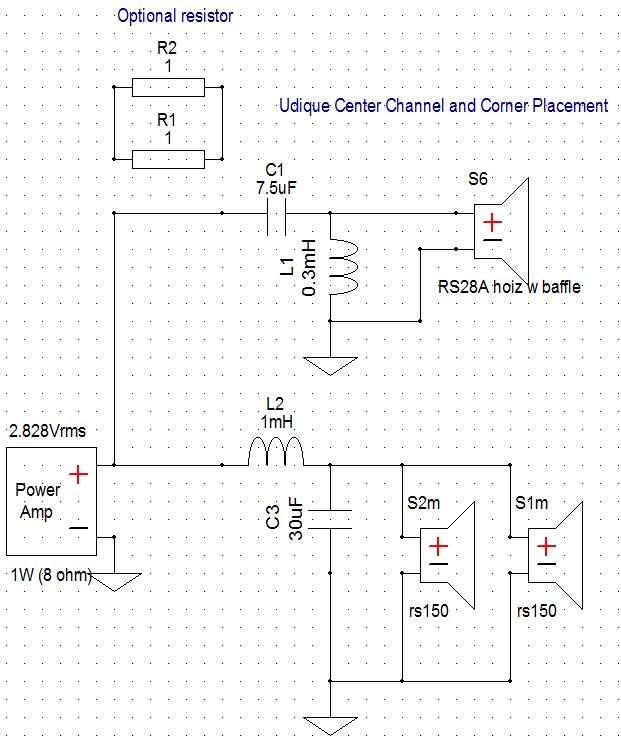
The crossover has two versions one for mounting the speakers on a stand away from a wall and another for mounting in a horizontal center channel location or vertically near a corner wall, screen, or corner.
For power handling the padding resistors on the tweeter are wired in parallel to give 1.3 ohms and 20 watts.
As the RS tweeters can vary in sensitivity. The center channel & corner placement crossover can have an optional 0.5 ohm resistor added if the sound is too bright.
Tips & Tricks:
Plug the rear port with a sock when the port is within 3 inches of a wall.
Conclusion:
The RS28A tweeter and RS150 is a nice sounding combination. The MTM has the power handling to fill most rooms. This speaker will be a good fit for most home theater systems.
About the Designer:
John is a member of the Speaker Building Design Team
Project Parts List
Can I use as a woofers Dayton Audio DC130B-8 instead of RS150T? Can use the same crossover for center channel?
Sorry the DC130 is not going to work with these crossovers.
Will dayton crossover work? What frequency will you recommend? For example: http://www.parts-express.com/dayton-audio-xo2w-25k-2-way-speaker-crossover-2500-hz–260-142
Alex I think you will be disappointed with a stock x-o. Why not drop into the Tech Talk Forum http://techtalk.parts-express.com/forum/tech-talk-forum?2-Tech-Talk-Forum= If you can describe what you want and your budget you will get more more options
Hi John, if I were to use this design, but want to add a 10″ woofer to make a 3 way system for extended bass response. What would you recommend as far as a 3rd crossover to cut the 6″ woofers off at the 100 hz mark and let the 10 woofer take over from there?
Sealing the cabinet will give a natural roll of at about 100 Hz. Without a complete redesign, I’d seal the cabinet and use a plate amp to power the 10 incher. With a plate amp you can adjust the woofer gain and low pass frequency. As an alternative you could use a Rolls or other electronic 2-way crossover.
Hi John,
I am looking for a woodworking hobbyist who is looking to delve into the audio world with a shelf top Bluetooth audio speaker. Through some research I believe I have the components chosen that I would like to use, I am just looking for some assistance on the appropriate dimensions for the driver(s) in the enclosure. I am willing to compensate you for your time. Please let me know if you are interested. Thank you!
Chris that’s not what I’m interested in right now. However, if you drop into Tech Talk forum http://techtalk.parts-express.com/forum/tech-talk-forum?2-Tech-Talk-Forum= I’m sure you will find some well qualified perople who might be interested. Good luck!
I love these!
How deep are the bass? Would they fill a normalbig livingroom?
The bass is about 50 Hz which works well for left right mains in a home theater. As subwoofer should be use for the lower octave. These have good sensitivity and would fill 15 by 20 living room. A extra large version is available that goes down to 45 Hz. Note the tweeters are only available on the used market.