Tiny Tym


Designer: Johnny Richards
Project Level
Intermediate
Project Time
8-20 Hours
Project Cost
$100-$500
Project Description
TinyTym (little speaker using Tymphany drivers) is a semi-portable, multimedia-friendly small monitor utilizing high end components and capable of better than average bass extension from a small woofer.
Design Goals
I wanted to create an easy-to-build small monitor that offers excellent portability (all you need is a smart phone and a 110-120V outlet to begin using it), high fidelity, and an ability to withstand some punishment.
Driver Selection
I considered a half dozen different, small woofers for this project – most did not model on the low-end congruent with my design goals. The Peerless 4″ offers a unique set of T/S parameters (see Enclosure design) that definitely fit the criteria. Additionally, it offers a poly cone with a smooth, controlled response out high enough that any tweeter will be comfortable playing along.
However, I have always wanted to use the Vifa (now Tymphany) XT19 in a build, but the desire, the means and the opportunity have never crossed paths before now. I am glad I chose this tweeter – it is extremely well built, and even includes an undocumented copper pole piece cap. This is lacking on the big brother (XT25) variants, incidentally. Until I unpacked the little Tymphany (it is going to take a long time to get used to the fact that Vifa is no longer), I had no idea of the extra copper in the motor. I believe that simple copper cap elevates this $38 tweeter into a class of its own, imho.
Enclosure Design
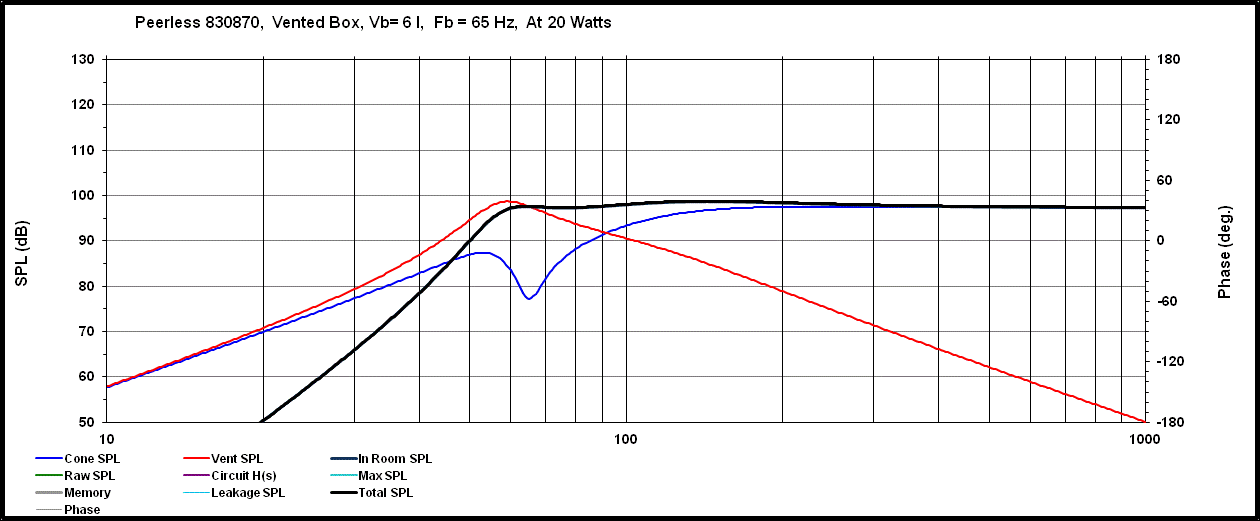
One of the primary concerns with small woofered systems that attempt to achieve usable bass extension is that of lack of displacement. As a general rule, small woofered systems are ported in order to reach below 100 hz – it is a rare small driver (under 5″) that is capable of sub-100Hz bass in a sealed enclosure.
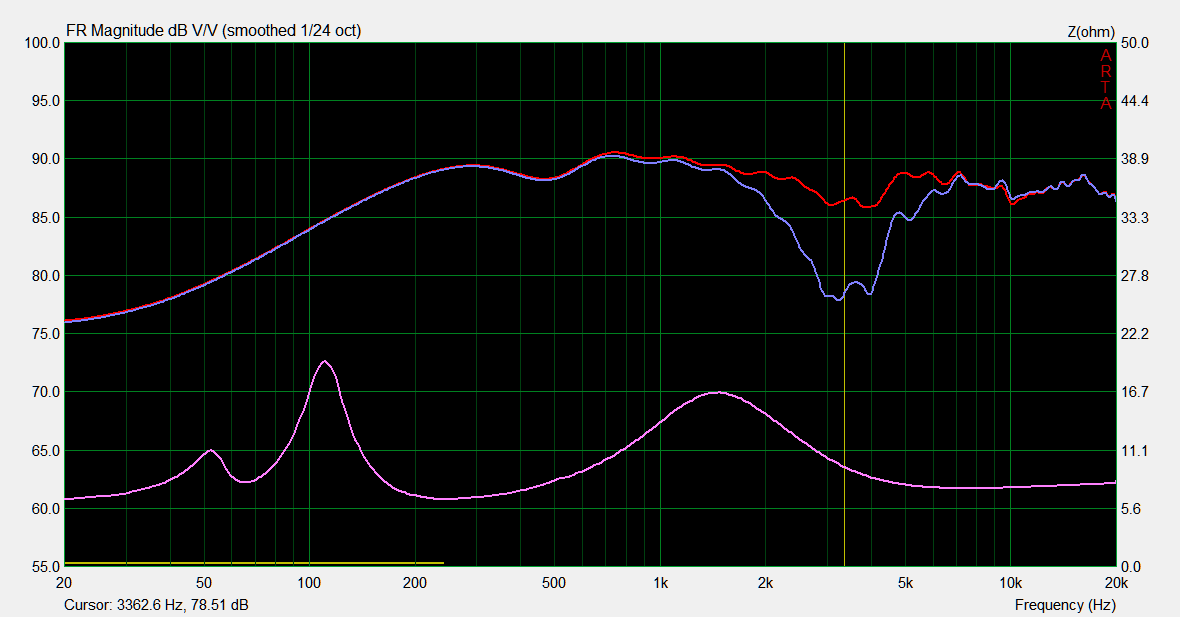
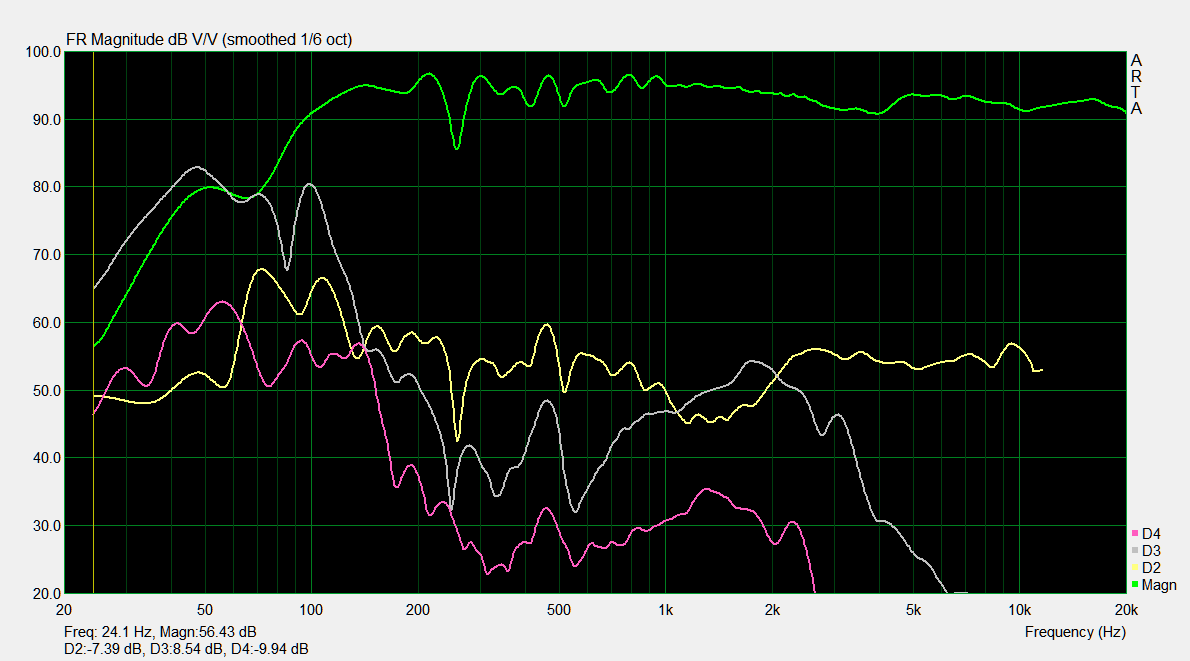
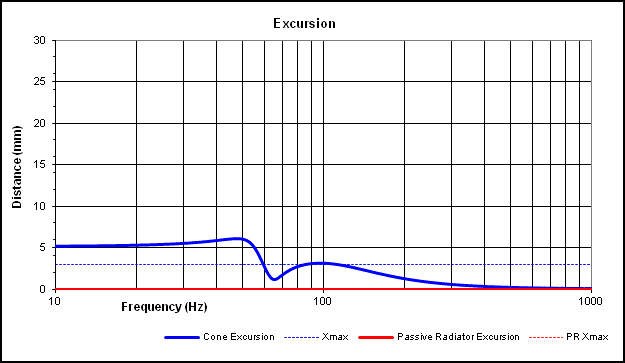
In most vented alignments, cone control below tuning is almost non-existent – often the cone excursion exceeds mechanical limits with mere milliwatts of input. In this particular alignment, however, cone control is much better. Looking at the excursion chart, you can see excursion below Fb more closely resembles that of a sealed alignment – yet looking at the frequency chart, you can see extension well below what a sealed enclosure offers. The tradeoff is a relatively large enclosure (in this case, six liters for a 4″ driver). I believe 55Hz extension with that level of cone control below tuning is well worth the large enclosure.
Additionally, before the low end roll-off there is a slight spectral tilt emphasizing the region between 65 and 150Hz. It is only about a db, but it is wide enough to “color” the sound. In this case, the coloration can be desirable – or at least usable – as it will tend to emphasize the apparent bass, and add just a little liveliness to kick drums and bass guitar.
However, it does require a particular type of T/S parameters to pull off this type of alignment. I have found a Q of 0.55 – 0.65 and a low Vas to be suitable. The Peerless used in this system offers a measured Q of 0.55 and a Vas of 2.2L. Traditional wisdom would dictate use in a sealed enclosure – and perhaps relegating it to strict midrange usage – however as is shown with the models, this is actually an excellent candidate for a vented system – perhaps a better candidate than many woofers advertised as being “optimized” for vented systems.
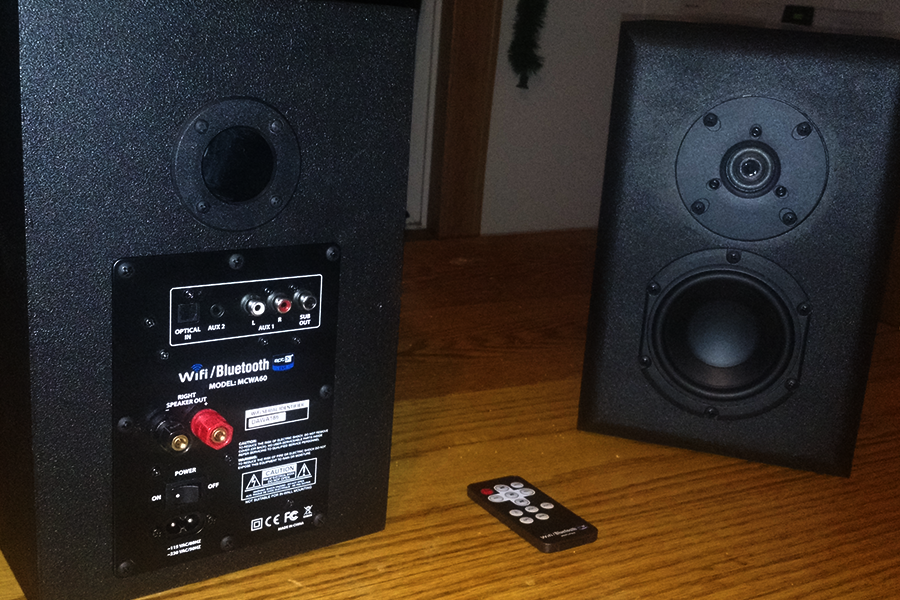
With an F3/6/10 of 55/52/48hz it yields a far wider range than most 4″ woofers, and when coupled with the excellent cone control to well below tuning it can be played loud enough to be reasonably satisfying running without requiring additional augmentation in the form of a subwoofer. However, since I incorporated the Dayton Audio “all-in-one” amplifier – adding that subwoofer will be pretty easy. The Dayton amp also has a lower response limit of 45Hz (according to the literature), which offers yet another element of control to the woofer. The amplifier will only output 15-20 watts into the 8 ohm load it is being presented with so the woofer will be protected 3 ways: cone control, frequency response of amp, and output level of amp. This design is reasonably well protected from the volume knob bandits!
It is particularly satisfying listening to a small speaker with an unexpectedly big footprint. At the various DIY gatherings I have attended, the small speakers generate a lot of buzz time and time again – usually when they are able to pull off an acceptable level of “grunt” from such a small driver and cabinet.
Enclosure Assembly
I elected to use the Denovo 0.23cubic foot knockdown cabinets for expediency sake. After cutting your driver openings, simply follow the instructions found on the Parts Express website for assembly. Depending on what glue you use, you can have the cabinets completely finished in a matter of two days… enter Duratex. Duratex is my go-to finish these days, and it fits in with the “rugged” requirement, as well. Of course, that it is cured hard as a rock after just a few days at room temperature doesn’t hurt – who doesn’t like a little extra time to spend listening?
The Denovo are a pretty good option for time/table-saw challenged people, by the way. Not a wide selection of sizes, but definitely some options there!
There are a lot of tutorials for applying Duratex, but I feel the best one out there is found on the Midwest Audio Club Youtube channel at: https://www.youtube.com/channel/UCw2q2gTZ7EZwW63Kk8TqUzA/videos
It’s in there, there is also a lot of other good stuff to be seen (and heard) on that channel!
The only addition I made to the flat packs was to implement a 3/4″ round-over on all four edges of the baffle. The flat packs ship with a 1/2″ round-over only on the sides, not the top and bottom. If you elect to build these and do not perform the additional round-over step – it is not the end of the world. There will be some slightly more peaking due to the different diffraction signature, but otherwise will be similarly voiced. These are pretty laid-back as-is, so a little extra on-axis energy will not be a deal breaker.
Crossover Design
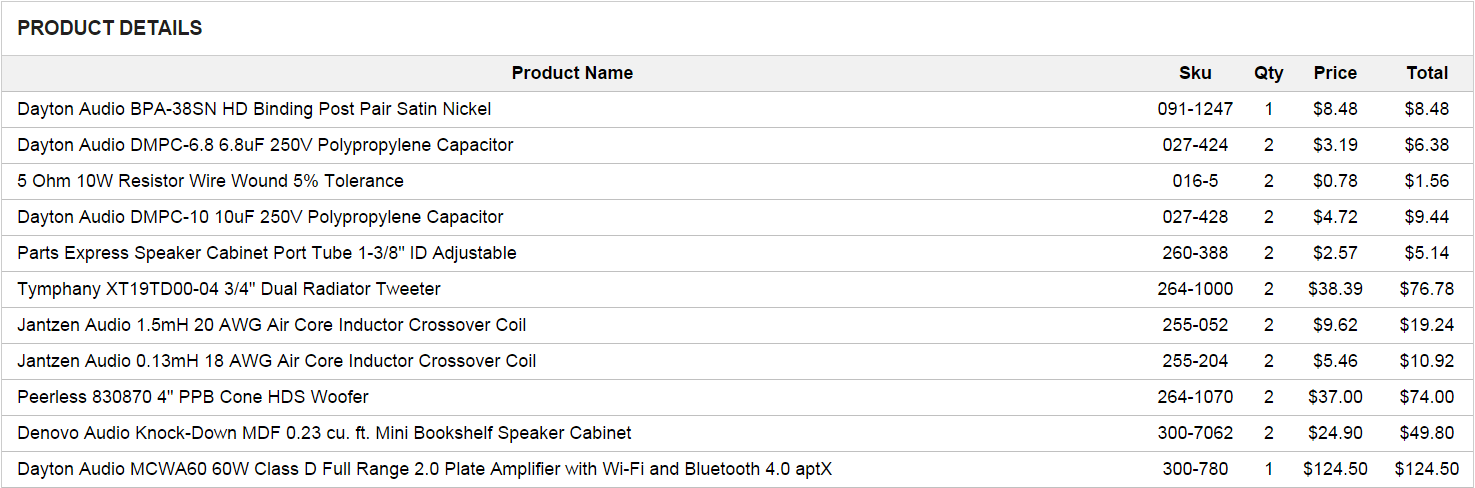
Ahh… the crossover. After some contemplation, I elected to use as simple a network as I could while still maintaining protection on the tweeter and keeping response under control. I believe I achieved those goals, and used only five parts in total.
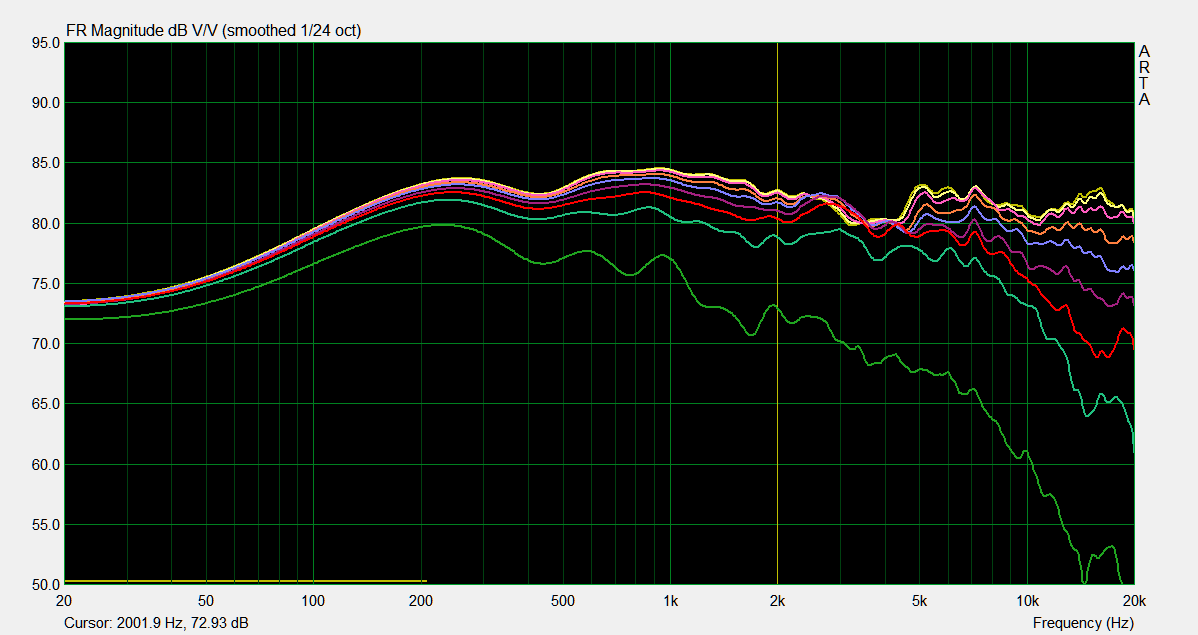
It uses nominally 4th order L/R slopes, but in reality they are actually “slope flexible”, or perhaps “slope agnostic”. I deliberately voiced these with a downward spectral tilt. One reason being because I prefer it and another reason being, because in all likelihood, these are going to end up in a pretty reflective environment (a computer desktop) and that stuff bouncing off of monitors and hard surface desks can really bring a “flat” speaker into the “bright” range in a hurry.
Of course, tailoring the response after placement is 100% acceptable and even encouraged – designers can only make rough guesses at the potential installation of their speakers and in this case, I envisioned a typical desktop environment. Do not ever be afraid of the EQ sliders! Even a basic treble control will offer amazing flexibility in tailoring a system to your preferences!
The impedance is extremely benign, with Zmin and Zmax of 6.5 and 20 Ohms respectively, with only a moderate mid-to-tweeter “swing”. Additionally, the impedance phase is maintained within +/-30 degrees – except at 135Hz where it swings all the way to dangerous -35 degrees at 11.5 ohms (nah, not really – pretty safe). Long story short, do not worry about any amplifier driving these speakers. It is a true 8 ohm speaker – and that is actually pretty rare these days.
If you find these to be too laid back for your preference, switching the 5 ohm resistor to a 4 ohm or even a 3 ohm will not drastically alter too much. I would imagine the equalizer to be a better approach, but of course changing the tweeter padding is perfectly ok. However, changing much beyond that will start interfering with the overall voicing of the speaker and I can’t really guarantee results.
Conclusion
OK, so if you throw in the little multi-media Dayton Audio amp and buy the knockdowns instead of cutting your own, you start to see a little decline in absolute value. Sound quality is good, but the $400 price tag to duplicate mine as-is is not easily justified unless one has a specific need (seriously though, who doesn’t want to simplify their PC sound system?). However, if you do not include the amplifier in the BOM and are willing to cut your own cabinets – these are an honest, high value small speaker. Easy to build, easy to listen to all day, and capable of taking some abuse – what’s not to like?
About the Designer
https://www.parts-express.com/speaker_building_design_team
Heard these at Iowa 2015 and just sat with my mouth open. Kicking speakers +1.
I got to hear these in Iowa this past weekend, very impressive little monitors! The volume control was definitely not controlled and they were put through their paces, they held up well.
These are very nice. The choice of the small HDS and XT19 was excellent, two drivers that perform excellently.
Any ideas for a new amp! That one is not available any more.
Hello
These look very interesting indeed: could you please let me know the port length? Also, I can’t get the tweeters in Australia, but I have a spare pair of VIFA BC25TG15s, which (according to the Tymphany website) have almost identical frequency response. Do you think they might work with your design?
Thank you
Geoff