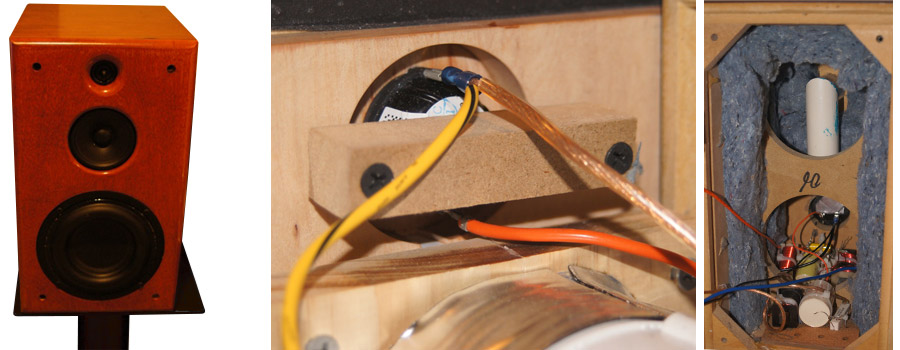
Hafnium
Designer: Scott Sehlin
Project Time: 8-20 Hours
Project Complexity: Intermediate
Project Cost: $100-$500
Project Description
This project really got started when my younger son said “I miss those orange wood speakers”. They were a pair of Ellis 1801’s that I used to use as a reference, but have since passed on to someone else as I have plenty of speakers around these days. What he really meant was that he preferred that look to the painted speakers (most of them black). I had a pair of Parts Express Cherry 0.375 cabinets left from another project that I had parted out to sell the woofers. My first thought was that I could do a variation of my Matrix MT (blue pill) using some Fountek FW-146’s as the woofers. In the long run, I just couldn’t get excited about that – but fortunately a more interesting idea emerged.
Design Goals
These speakers are designed to reproduce the full musical spectrum of a much larger speaker. The necessary limitation is that they are inefficient, so they need a fair amount of power and can’t play very loud in a large space. Hafnium is best suited for smaller rooms or nearfield applications.
Driver Selection
Tang Band W5-1138SMF
Vifa TC9FD-18-08
Vifa OT19NC00-04
See below for full parts list. All drivers, crossover components, and cabinets can be purchased at Parts Express.
Enclosure Design
In keeping with the “Orange Wood” theme, we thought that a solid wood baffle roughly matching the cherry PE cabinets would be the way to go. There was some complexity to getting this done. The OT19 is really very easy to work with. I decided to go with a 1/2″ roundover after cutting the requisite 1 1/8″ through hole. The rear is then brought to the level where the roundover starts using a rabbeting bit.
The TC9 has an oddly shaped frame, so I thought it would be a good idea to rear mount those as well. I decided to go for a 1/4″ depth for that. I also needed an enclosure for the mid. The woofer requires a 3″ diameter through hole to rear mount. On the back of the baffle, I rabbeted that out to 4″ diameter, which happens to be the OD of 3″ pvc couplings. I bought a couple of those, along with end caps that would insert into the couplings and that also had screw-in plugs – so we were all set on that front.
The trick with the little Tang Band sub is that in order to get the bass out of it that it is capable of, you either need a high excursion passive radiator or a high l-to-d ratio port. There isn’t a lot of room for a big port in the PE box, so my temporary solution is an L-shaped port with only a 1 3/8″ ID and 10″ total length. This gives a tuning frequency of 35 Hz, which models to an F3 of 31 Hz. I haven’t heard any unpleasant sounds from the ports under typical listening conditions. I have left the ports removable in case a better option emerges.
The cabinets are lined with R-9 Ultratouch Denim Insulation.
Enclosure Assembly
I think I had generally good ideas with respect to the hardwood baffle, but not necessarily the woodworking skills to back them up, so I enliisted the help of TJ (takitaj) from Maine and his CNC, who was able to turn out very nice baffles for these in a matter of days.
Crossover Design
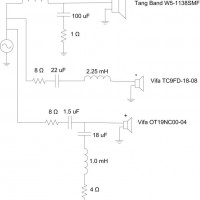
The TC9 is a very wide range driver, which I thought I would take advantage of by using shallow crossover slopes. My target crossover points were 2nd order Linkwitz-Riley at 300 Hz and 3000 Hz. Another constraint is that the box is small enough that fitting in a 20+ component crossover would be difficult. Fortunately, as I started simulating, it became apparent that I wouldn’t need that many components to get a reasonable crossover. The final count is 11, which is surprisingly low for a 3 way… It could have been even less, but the OT-19 seemed to need a notch filter to control its resonant frequency peak.
Conclusion
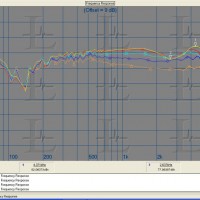
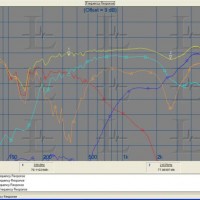
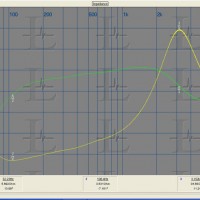
The on axis response is flat to +/- 2 dB from the lower limit of my gated measurement accuracy (200-300 Hz) out to at least 20 kHz. The reverse nulls indicate crossover points of approximately 340 Hz and 2.6 kHz with reasonable phase tracking. The main deviations from linearity are a dip around the mid-tweeter crossover followed by a slight peak centered at around 4.3 kHz. The off-axis plot shows these features smoothing out off-axis and no significant beaming or flaring anywhere else – which one might hope for with small drivers in very close proximity. The impedance dips to around 3.5 ohms at 100 Hz, but is only below 5 ohms from 80 Hz to 200 Hz. This plot indicates a port tuning frequency of 32.5 Hz.
These speakers have been fun to listen to these during crossover development and even now that they are finalized. They do things that a speaker that size (or cost) shouldn’t be able to do. There are some trade-offs that come with a project like this. There will be some SPL limitations that come along with a 5″ woofer tuned in the 30’s by a 1 3/8″ port – but these are sufficiently inefficient that it will take a substantial amp to expose those limitations. If you can live with their limitations, there is an awful lot to offer here for the size and cost.
Tips & Tricks
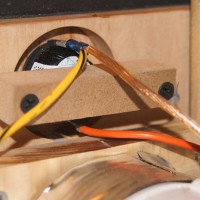
I included a few internal photos. Trying to squeeze a 3-way design into this small enclosure presented a number of challenges. Many components are where they are because that is the only way they would fit. Pushing the limits is a significant part of what makes DIY fun.
About the Designer
Scott has been fiddling with audio since a childhood that included taking apart and trying to improve old radios. His interests in science and music, along with the support of the DIY community were instrumental in Scott getting into designing and building his own speakers. Scott did not bring a lot of woodworking skills into the hobby, so you will notice that a lot of his designs utilize pre-built or flat pack enclosures.
Project Parts List
|
Part # |
Description |
Qty |
|
264-1122 |
2 |
|
|
264-1062 |
2 |
|
|
264-917 |
2 |
|
|
266-558 |
2 |
|
|
266-556 |
2 |
|
|
266-550 |
2 |
|
|
027-360 |
2 |
|
|
027-940 |
2 |
|
|
027-434 |
2 |
|
|
027-412 |
2 |
|
|
004-8 |
Dayton Audio DNR-8.0 8 Ohm 10W Precision Audio Grade Resistor |
4 |
|
004-4 |
Dayton Audio DNR-4.0 4 Ohm 10W Precision Audio Grade Resistor |
2 |

Looks like a great design Scott. I’m thinking about building these using my own cabinet cut from 3/4″ MDF. Apologies if I’m missing something but where can I find cabinet dims, volume, etc? Thanks in advance
The cabinet is Parts Express 302-712. Baffle is 8″ wide by 14″ tall by 1″ thick. Cabinet depth is 10.5″ (external) including the baffle. This gives an approximate volume of 0.38 cu. ft. (there is a 3/4″ mdf brace running parallel to the baffle about halfway between the baffle and rear cabinet wall.
I ran out of pictures to attach, but the detailed baffle layout can be found by searching for “Hafnium” in the Tech Talk forum speaker project gallery.