Dayton/Audax Piano Finish MTM
Designer: Mike Rootz
Project Time: 20+ hours
Project Complexity: Professional
Project Cost: $500-$1000
Enclosure Design
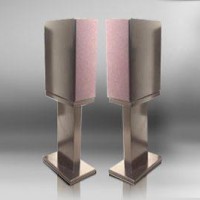
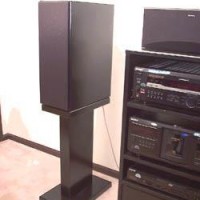
I used 3/4″ MDF for the boxes. I did not use internal bracing but I glued two pieces together to achieve 1 ½” thickness for both the front and back panels. I lined the boxes except the front panel with carpet padding. I mounted the Dayton crossover to the back panel and used a high quality, 14 gage wire to connect the drivers to the crossover. The matching “I” beam style stands were made out of 3/4″ MDF. I laminated (glued) 4 pieces together for the uprights and two pieces together for the top and bottoms. The top of the stand is the same size as the bottom of the speaker and has a matching beveled 45 degree edge. The Bottom piece is 1″ bigger in width and depth than the top piece to add stability. The speakers and stands were finished by filling all cracks, joints and blemishes with wood filler then sanded. Then six coats of sealer were applied followed by four coats of black gloss enamel. The finish turned out really great and no lines showed through the paint. My wife made the grills for me out of 1/4″ Masonite painted black and covered with grill cloth. She made the grills BEFORE I painted the speakers. She glued the grill cloth to the masonite with spray adhesive and then secured the grills to the speakers with speaker grill mounting hardware. The internal dimensions of the speakers are 7.5″ W X 13″ D X 19.5″ T The stands were 22″ tall and the base of the stands were 1 inch larger in width and depth than the top plate to add stability. (The builder supplied a convenient Excel spreadsheet cutting quide) About Piano Finish You can put a really nice finish on MDF. Here is a description of the proceedure I used for obtaining a high gloss black piano finish. I must warn you that in order to obtain a really nice, gloss black, painted finish, you will have to spent quite a bit of time and effort. The actual time in applying the spray paint is nothing compared to the time it takes to prep the surface for the paint. A satin black finish is more forgiving because it doesn’t show all the mistakes. I used a professional spray gun and compressor to paint my speakers but I have heard that a few cans of Krylon brand spray paint does a pretty good job. I use Sherman Williams gloss black “All Surface” Oil based enamel (NOT latex enamel) and their quick drying oil based sanding sealer. To finish MDF, you will have to sand the entire surface with 220 grit paper then fill all holes and joinery lines with wood filler. The trick is not to over do it with the wood filler. All you need to do is press the wood filler into the cracks and holes to fill them. You do not need to apply a big clump of filler over the things you are trying to cover, Then you will need to sand those holes and joint lines starting with 150 grit and working you way down to 400 grit paper with an orbital sander starting from the center of the panel working your way out past the edge of the panel. If you do it correctly, you will not feel a bump when running your finger over the surface. Sanding is the most critical step. Everything has to be perfectly smooth! Remember this: If you can feel it- you will see it. The next step, you will need to apply at least 4-6 coats of sanding sealer to the entire surface. The idea is to build up many coats of sealer so you can sand the surface down to very smooth. If you can spray it on then apply those 4-5 coats right on top of each other without sanding in between. If you are applying the sanding sealer by brush you have to make sure you do not get any lumps or brush hairs stuck to the surface and you may have to lightly sand in between coats. If you are routing the edges of the boxes make sure you put several extra coats on the routed edges to seal the edges. After you have applied your 4-6 coats of sanding sealer you will need to sand the entire surface BY HAND using a hand sanding block starting with 300 grit and working your way down to 400 and up to 600 grit if you really want a good finish. When you have the entire surface perfectly smooth, then you will need to clean the sanded surface with a damp cloth if you used oil based sealer. (Mineral spirits may goober up the surface on oil based sealers). After you clean the surface you will then have to use tack cloth to remove any dust. Now you are ready to paint the boxes!! You will need to apply 3-4 coats of paint. The first one should be so light that you should be able to see the unpainted MDF under it. Wait 30 minutes and apply 2-3 more light coats while waiting 30 minutes in between each coat. The trick is to apply several thin coats to keep the paint from running. The best thing is to practice on some prepared MDF surfaces BEFORE you paint the real speakers. You will get a few dust bumps from dust settling on the surface while your painting. I constructed a small paint booth out of plastic sheeting, fans and furnace filters. It worked fine and I did not have any dust bumps. I hope I haven’t scared you off with the complexity of applying a piano finish to MDF. It was a lot of work but it was very much worth it.
Conclusion
The sound of the speakers is very good. Very good at mid base reproduction such as the sax and stringed instruments. High end sounds such as symbols and tinkling type instruments are very good and natural sounding. The speakers also provide a surprising amount of base for the size of the woofers.
About The Designer
Special thanks to Mike Rootz from St Louis for supplying this great project. Mike works as as a Systems Integration Specialist. He has a BS in computer science. He is a skin diver and enjoys outdoor activities such as fishing and boating. He is married and a Christian.


+ There are no comments
Add yours