
Tenacious 3
- ?
- ?
- ?
- ?
Designer:
mzisserson
Project Category:
Tower Speakers
Project Level:
Beginner
Project Time:
8-20 Hours
Project Cost:
$100 – $500
Project Description:
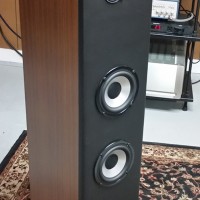
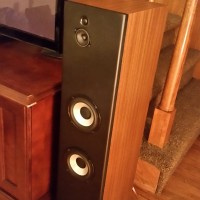
The Tenacious 3 is a budget loudspeaker with not-so-budget sound, that anyone can build with a few simple tools, aimed to maximize performance in a small foot-print. Utilizing the Denovo “Knock-down” 1.16 cubic-foot cabinet, the T3 fits where any stand-mounted loudspeaker will yet allows for the performance of a 3-way, tower loudspeaker.
Design Goals:
When I found out I was going to be part of the Parts Express Design Team, my first thought was how to give back to not only to the DIY loudspeaker community and Parts Express, but also to the newcomers who are looking to enter the hobby.
The Tenacious 3 (T3) had to be easy to build, offer very high performance for the dollar, and set an example of what is possible in the DIY world when one applies a little tenacity. Many times, newcomers on a tight budget are limited to modest, 2-way, stand-mount loudspeakers. The T3 had to offer a different option. A small-footprint tower loudspeaker that would fit just about anywhere a stand-mounted bookshelf loudspeaker would clearly was the glaring resolution. It also must be a simple to build as possible. Luckily, Parts Express carries an easy to build pre-cut cabinet to get the design going.
Taking advantage of a tower loudspeaker was paramount in this design and not simply building a bookshelf loudspeaker in a big box. This meant having high quality, strong bass response. To achieve this, the T3 needed to utilize a large, or multiple small woofers to increase power handling and sensitivity. Having the extra cabinet space also allows for a sub-enclosure which is required by most dedicated midrange drivers.
The T3s also had to capitalize on the advantages of a 3-way loudspeaker. Some of the largest advantages include, but are not limited to, using the drivers well within their wide radiating patterns, lowering distortion by taking the midrange out of the woofers, using a small-format or non-dome type tweeter, and removing the worry about having a woofer (or woofers) that have a smooth top end.
Finally, they had to be easy to build and finish. Typically a 3-way tower loudspeaker can be intimidating due to complexities like treating cabinet resonance, building a sub-enclosure for the midrange, handling large panels though the building process, and even finishing the large enclosure or crossover. The T3 addresses all of these concerns with simple, yet effective solutions.
Driver Selection:
The Tenacious 3 is anchored by a pair Dayton Audio DA-135 5.25” woofers. High value and good looks were part of the criteria since and to make the build easy, counter-sinking was not an option. Alone, a driver that does not have to be countersunk in order to look good AND performs well narrowed the field of what can be used.
While the DA line is well-respected, yet the DA-135 does not get much love. Its larger sibling is a strong woofer, and it’s smaller sibling a great mid-woofer. This middle-child offers strong bass performance, especially in pairs, though it does not extend as deep as its big brother. Conversely, the DA-135 possesses decent top-band performance, but not as good as its little brother. Yet the awkward middle child fit the bill perfectly for the T3 based on its physical size, and the ability to play to a solid 40Hz in-room when used in pairs. Further, top-end response was not a concern since the midrange will be taking over before it becomes a concern for the DA135s. All factors combined, the DA-135 is used in the T3 within a range that allows it to perform as ideal as possible; which is a great advantage of a 3-way loudspeaker when selecting budget drivers.
The midrange will be covered by a lil’ gem: The Visaton FRS5X. The FRS5X has good sensitivity, simply requires a 2” hole for mounting, and like the original FRS5 has an extended, flat response with vanishingly low distortion. Using a small midrange makes enclosure tuning a breeze and simplifies the sub-enclosure requirement which keeps the build difficulty low.
The top octaves will be covered by the Dayton Audio ND16FA 5/8” tweeter. This tweeter was selected for its simple mounting requirement, extremely wide dispersion, smooth response, and low distortion. The ND16 is a proven performer and has found its way into the DIY world countless designs. Standing on the shoulders of the FRS5X, the ND16 will be crossed over fairly high which will help leverage its greatest strengths.
Enclosure Design:
The cabinet for the Tenacious 3 is the Denovo 1.16 cubic-foot “knock-down” tower loudspeaker enclosure kit from Parts Express. This well machined and braced enclosure that is made from 0.75 inch medium density fiberboard (MDF) arrives as a flat-packed unit that assembles easily and fits together snug. A definite win.
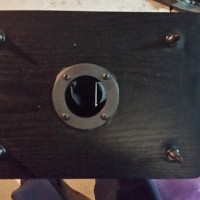
From there it is up to the designer to use its space and form to make it a loudspeaker. In the case of the T3s, I chose a vented alignment which is tuned to 34Hz using a two inch diameter, by five inch in length port. This port is available from Parts Express so no tricky PVC port work is required. The port is bottom-mounted which I prefer for several reasons including coupling with the floor and diffusion of any midrange or port resonance that may find its way through the tube inside the cabinet.
Inside the cabinet is lined on three sides in strategic locations with Sonic Barrier and stuffed with and total of two-thirds of a pound of Acousta-stuf. The cabinet stands tall on spikes as well to give some breathing room. All is not lost if you have high-pile carpet and are worried about blocking the port: Any local home improvement store has odd ceramic tiles lying around. Just grab a pair to put under the speakers and you are ready to roll.
The bass tuning was chosen to maximize transient response while preserving as much depth as possible. I have found this tuning to exist somewhere a hair under maximally flat for the DA-135, but not so deep it starts to create more problems than it solves. The overarching goal: As much symmetry as possible through the entire range of the loudspeaker starting from the bottom-up.
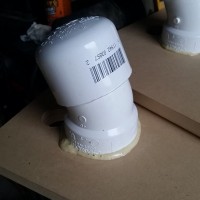
A creative and simple solution needed to be had for the mid-range enclosure. Toying with many ideas, the one that stuck was a 22.5 degree “Street” PVC elbow with a PVC cap at the non-flared end. This provides an un-even enclosure which disallows standing waves to form. I also dampened the inside with HVAC perma-gum dampening which acts both as a sealant and a non-hardening dampening material. Parts Express “Calk Gasket” material is the same stuff and works just as well. A small fist-full of Acousta-Stuf rounds off the mid-enclosure.
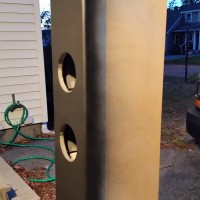
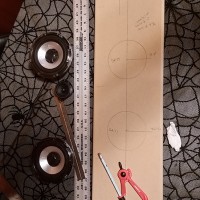
The position of the drivers including the offset off the midrange and tweeter helps to idealize the diffraction signature and crossover points. A large part of the design was to eliminate the need for a router or milling of any sorts. Easy tools are all that is required. After drawing the driver positions directly onto the enclosure using a ruler and compass, a drill with an inexpensive Forstner bit set took care of the midrange and tweeter holes, and a jigsaw the woofer and port holes.
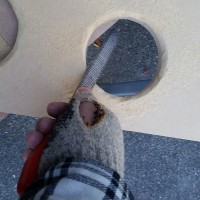
Chamfering or rounding-over the back-side of the midrange and woofer holes is usually a must when building a loudspeaker. Since a router could not be used, I grabbed a rasp, roughed-out rounds on the back-side of the midrange and woofer holes then sanded them smooth. As stated so eloquently by one of the most ingenious and resourceful people I know, despite the fact he never graduated high-school, “If it looks stupid and it works, it ain’t stupid”! Talk about tenacity…
Enclosure Assembly:
Parts Express provides a wonderfully detailed drawing via Sketchup for assembling the Denovo 1.16 cubic-foot flat-pack enclosure so there will not be much focus on that detail. With only the rear CNC machined, some care is needed to make sure all aligns well, however it is small-beans to deal with in comparison to building an enclosure of this quality from the ground-up.
All of the placement of the drivers on the baffle were optimized ahead of time then drawn with a compass, a square, and a ruler right on the baffle itself
Once the holes were cut/drilled in the baffle, a round-over was put on the rear of the woofer cutouts and midrange cutout as described above. At this point, the baffle is still not attached to the enclosure. This is also the time the bottom of the enclosure received it’s hole for the port, and four, one-half inch holes for the floor spike keepers. Like the baffle, all positions were drawn right on the bottoms before cutting/drilling.
The midrange enclosure, as mentioned, is a PVC 22.5 degree elbow which is flared at one end. This is long enough to provide the required breathing space for the FRS5X and wide enough to afford room for the cut-out through plus the round-over on the rear of the front baffle for the midrange.
For assembly: First, use some expanding polyurethane glue to secure the flared end in place over the midrange cutout. It is heavy enough not to “float” as the glue expands. Once dry, I drilled a hole for the wiring to pass through, pressed in some rope-calk to dampen the hard, plastic “tink”. Some PVC glue took care of securing the cap to the end of the elbow and that is all there is to the midrange enclosure save a small fist-full of Acousta-stuf during final assembly.
Despite the quality of the Denovo 1.16 cubic-foot cabinet, I noticed the sides were a hair proud. Nothing to really worry about but good enough to easily catch your finger nail when running perpendicular to it along the seams between the braces, top, and bottom. For good measure, the expanding glue was used to attach the baffle to assure no air-leaks or vibration points.
The final trick-shot is mounting the FRS5X. A 2” hole is all that is required to mount this from the front, though rear-mounting seems to be what it was designed for. Using the rope-calk, I ran a bead around the edge of the driver’s frame and after feeding the wiring through the midrange enclosure gently pressed it in place. A low torque setting on the drill/driver combined with a slow speed evenly seats it. There will be squeeze-out from the gasket confirming a very good seal that is easily trimmed away with a precision model knife… (wait, that’s a fancy tool. I promised none of them)I mean a razor knife.
Knock in the ND16 *carefully*, mount/hook up the crossover internally through the DA135 cutouts, split 1/3lb. of Acousta-stuf between the bottom of each cabinet around the port (not restricting the port in any way) and the top of the cabinet above the midrange enclosure, attach some speaker wire and hit play!
Crossover Design:
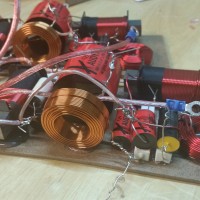
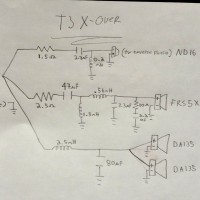
If all of the loose ends and details are tied up during the initial design phase of a speaker, designing the crossover is fairly straight forward. Aside from the filter networks, I am not a huge fan of using contour, notch, and compensation circuits unless planned ahead of time since crossovers only reduce, not add. Unless we are talking in terms cost, then they add! My hand got forced into using a Zobel network, a type of filter that flattens the impedance after the driver resonance due to inductive rise, on the midrange. Otherwise the crossovers for the T3’s are very straight forward with the approximate crossover points being 450Hz and 4000Hz.
The T3 is a 4 ohm nominal speaker. The minima is 3.48ohms at 128Hz, nearly resistive, making my “8 ohm only” fifteen year old pioneer home theater receiver perfectly content while driving them with movies and music alike. The rest of the range it is a safe load too, which remains easy enough for just about anything to drive.
All filters were targeted as 2nd order Linkwitz-Riley. It is generally accepted that “2LR” type filters are a nice balance of performance vs. complexity. The Zobel network adds a small capacitor and resistor to the tail of the midrange. There is a resistor in front of the midrange and tweeter to help level-match those drivers to the woofers once the baffle step was accounted for. Since the T3 is a 3-way loudspeaker, the crossover has about five more components than a typical 2-way loudspeaker. It is not necessarily more complex, just a little bigger and since this design is about a little tenacity going a long way, I say bring it on!
Tips & Tricks:
Here are some things that will make the build-life easier.
Mount the binding posts before securing the port, unless you have a fourth joint in your arms, even then it will be sketchy.
Gently solder a long length (48” or so) of wire to the ND 16s then throw them into freezer for about ½ hour before knocking them in. This will not hurt the tweeter and make the already tight fit seem a little less hairy when smashing the tweeter with a beating device.
If there is any place there may be a hankering to upgrade, it should be the 47uF capacitor in the midrange. To keep it budget friendly I put in the $2 cap, not the Auydn $12 cap.
Take your time! It is the one free thing we get as a DIY-er. Any loudspeaker you build can potentially last decades, make it worthwhile even if it is just a stepping-stone to a larger, more complex build.
Lastly, weather screws, binding post hardware, or the inserts for the spiked feet it is not necessary to tighten more than firm hand-tight plus ¼ turn. A rule of thumb I have developed over many-a-year of ruining many-a-thing.
Conclusion:
The Tenacious 3 turned out to be a budget loudspeaker with a not-so-budget sound. Hitting the design goals always brings a sense of real accomplishment.
Challenging myself to capitalize on all of the advantages of a small footprint floor-standing loudspeaker that can offer an different option to a modest stand mount 2-way, a 3-way loudspeaker with the least build complexity as possible, all while keeping it all budget conscience was a lot of fun. There is a certain gratification to watching people’s hair stand on end when they are moved by a hand-full of entry-level drivers that is unique to a tenacious budget build. I am thankful to Parts Express for inspiring me to dig deep and stretch my knowledge.
About the Designer:
Michael Zisserson started tinkering with speakers at 13 years old and by 18 he was building replicas of famous loudspeakers. During this time, he grew his audio knowledge working for a local Hi-Fi audio store. In 2004, Michael graduated from New England Tech. with a degree in Electronics Engineering Technology while managing a retail audio/video store called Cambridge Soundworks. Through the years, Michael kept studying loudspeaker design, became a reviewer for Stereomojo online and continues to design and build loudspeakers whenever he is not adventuring with his family. Speaker building and listening to music with local audio enthusiasts occupy most of Michael’s leisure time, but as filler he also enjoys hiking/geocaching, survival training/camping, reading, and home improvement.
Parts Used:
295-330 DA 135 5.25″ Dayton Woofer 4 $21.54
292-640 FRS 5X-8 2″ Visaton full range 2 $11.08
275-025 ND16FA-6 Dayton Tweeter 2 $9.64
300-7066 Denovo 1.16CF cabinet 2 $65.74
260-387 2″ Adjustable Port Tube 2 $3.18
091-1250 Black/Gold binding post 2 pair 1 $14.49
240-730 1/2″ super cabinet spikes 2 $5.60
260-520 1/2″ Sonic Barrier 2 $9.97
260-317 Acousta-Stuf 1lb 1 $11.50
260-400 12″ speaker caulk 72pcs. 1 $9.50
266-556 2.5mH Inductor 2 $9.79
266-552 1.5mH Inductor 2 $7.98
266-806 0.2mH Inductor 2 $4.85
255-232 0.56 mH Inductor 2 $8.03
027-358 80uF NPE cap 2 $1.98
027-352 47uF NPE cap 2 $1.45
027-111 2.7uF Cap 2 $2.18
027-110 2.2uF Cap 2 $2.04
027-112 3.3uF cap 2 $2.25
004-10 LI 10R0 Resistor 2 $1.38
004-2.4 LI 2R4 Resistor 2 $1.38
004-1 R5 LI 1R5 Resistor 2 $1.38
Other Some wire, a few screws,ect… 1 $50.00

Hi mzisserson,
I liked your design and planning to do this build, being a total newbie the one thing that scares me is the placement of the drivers. Having read a lot online i see that the Speaker box volume is very critical.
and since i am not seeing the location of the drivers in the project description a bit scared that i might screw that up.
TIA
Ind
Seems it does not show the e-mail. Mzisserson (at) yahoo (dot) com.
Hi! Thanks. Sometimes a little gets lost in translation… I drew them directly onto the baffle in a way to show fancy CAD stuff is not required which is in one of the pics. If you e-mail me as above,I will send you a more detailed drawing of placement and support with whatever you need during the build! I look forward to see what you think.
Warmest,
Michael
Hi Michael,
thanks for the quick response looking forward to the detailed plans so that i can start, can please send it to my “ind7601@gmail.com”.
also a top photo of the crossover will also help show the configuration .
TIA
You have mail!