The Saffrons
Designer: IronWinner
Project Time: 1-8 hours
Project Complexity: Hobbyist
Project Cost: $500-$1001
Driver Selection
Being that the Peerless 830656 5-1/4″ SDS woofer was the specified Iron Driver and at least one pair was to be used in the entry, the way I see it there are only a few options. A 2-way would be simple and you could manage a little better tweeter for a nice small nearfield or a very bass-anemic bookshelf. An MTM would improve the efficiency and low end, but the tweeter has to go down a notch due to cost constraints. This option is quite viable and could yield a very nice speaker, but I personally have an aversion to loading an air space with more than one driver operating at the same frequency. I also don’t care for the aesthetics of an MTM, so that’s right out. I could try to find a cheap woofer of a larger diameter, but as we were on the ragged edge of quality vs. cost already, any larger, inexpensive woofer was only going to add deeper distortion. This pretty much leaves a 3-way (or 2.5-way or whatever the kids are calling it these days) using two of the Peerless woofers and cheap tweeter in two enclosures, one for the low frequency driver and one for the mid and tweeter. Luckily, the Vifa BC25TG15-04 tweeter is a very good performer on the cheap.
Enclosure Design
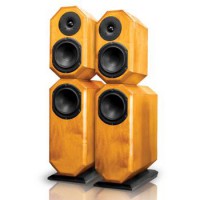
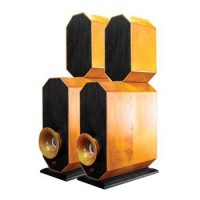
The enclosures are all 3/4″ hard maple with poplar backs. I stained the enclosures with Saffron Yellow, a custom color designed by my wife Keeli using water-based aniline dyes, and then sprayed them with Ace rattle can lacquer. The enclosures’ shape was chosen to add a little aesthetic flair as well as break up the diffraction profile. As long as the volumes are maintained, rectangular enclosures should be quite adequate. I personally cannot bring myself to use sheet goods in the construction of my speakers, even though I do understand their inherently good speaker qualities. Just call me a hardwood snob! A large vented enclosure is loaded with one of the two Peerless 830656 woofers. The enclosure is 7″ wide x 16″ high x 13-1/2″ deep and has an internal volume of 13.5 liters. The vent is 6-1/2″ long, 2″ diameter PVC flared on both ends with an orifice. “Orificing” the port is a concept I have been using to tune my enclosures in an attempt to more accurately control the air cushion behind the driver. A typical 1-1/2″ PVC port that is 5″ long will yield a very similar tuning. The upper enclosure houses the second Peerless 830656 and the tweeter. The Peerless driver carries the mid duties, with the box providing the high pass. I’m not as concerned with where this driver comes up on the low end as I am in keeping the midrange nice and tight in the crossover region. This enclosure is 7″ wide x 12-5/16″ high x 7-1/2″ deep, and has an internal volume of 4.4 liters. The construction of the boxes is fairly straightforward, though a bit too lengthy to document here. I am currently trying to get a full photo essay up on the Parts Express Techtalk Forum. The main issue is related to following a rather unforgiving sequence of steps that when executed makes things fairly simple. The joints at the center were designed so that they were tangential to the driver while the others were built on a 45° angle. The corner angles could all easily be 45° if you choose. All of the interior walls are covered with felt moving pad material. Being a furniture builder, I have many of these blue moving blankets from Northern Tool and they are cheap enough. I used spray contact cement to adhere the blanket to walls. Then each box is stuffed to about 60% with seat cushion padding and a layer of hollow fill fluff. I found the seat cushion material at a local fabric store and it fit the bill perfectly. It is a stiff, springy material available in 1-1/2″ thick sheets. The sheets can be glued together with spray adhesive and then attached to the walls so there is no chance of it flopping around. The truncated Peerless woofers allow for a 7″ wide enclosure that is 28″ tall and 13-1/2″ deep overall. There are many options for the base that are left to the builder.
Amplifier/Crossover Configuration
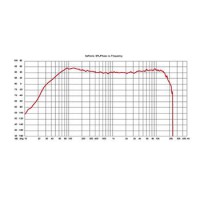
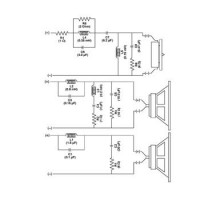
The low frequency woofer is allowed to dig just about as deep as it can without falling apart, and the mid-woofer is choked down on the low end by the enclosure volume. The LF woofer is rolled off about 1-1/2 octaves before the mid-woofer so as to allow the mid to cross to the tweeter without any influence of the LF woofer getting in the way. The crossover point is 2,500 Hz. The crossover is built in two sections, with the crossover for the woofers in the bottom enclosure and the tweeter’s in the upper enclosure. The crossovers are built on 1/8″ Lexan (don’t try plexi as it will crack). Frequency response is quite flat on a 25° listening axis, with a 5 db hump at 100 Hz and a 2 db smile between 1,000 Hz and 5,000 Hz. The on-axis measurements show an approximately 2 db rise on the top end. The impedance is decent, with a nominal 6 ohms and quite benign phase response.
Conclusion
No one was more surprised than I by the abilities of this design. Everything comes together very nicely. The bass may be a bit weak when placed far out from the walls, but corner-loaded at 14″ off the rear wall and 30″ from the side walls the bass is quite substantial. The soundstage is wide and the imaging very tight. The Saffrons lend themselves to stereo as well as HT duties, and a matching center channel shouldn’t be too daunting a task.
About The Designer
I grew up with an affinity for mechanical things and how they work, so it’s no surprise that I would follow in my father’s footsteps and become an engineer. After many years of successes and frustrations, it was time to go back to my passion, furniture. My father and I had built a shop, and in 2001 I took the leap into self-proprietorship; with the help of an incredible and supportive wife, that is what I have done for the last 11 years. About 5 years ago I found the speaker boards and a new passion arose. Well, not really a new passion, as I had often sketched what I thought would be cool speakers as early as high school. The Iron Driver Design Competition was a great chance to determine whether or not I had as good a hand on this discipline as I thought I had. I’m feeling pretty good about it!
Project Parts List
|
Part # |
Description |
Qty |
|
264-1040 |
1 |
|
|
264-1078 |
1 |
|
|
004-6 |
Dayton Audio DNR-6.0 6 Ohm 10W Precision Audio Grade Resisto |
1 |
|
004-1 |
Dayton Audio DNR-1.0 1 Ohm 10W Precision Audio Grade Resisto |
1 |
|
004-10 |
Dayton Audio DNR-10 10 Ohm 10W Precision Audio Grade Resisto |
1 |
|
004-2 |
Dayton Audio DNR-2.0 2 Ohm 10W Precision Audio Grade Resisto |
1 |
|
027-400 |
1 |
|
|
027-436 |
1 |
|
|
027-462 |
1 |
|
|
027-421 |
1 |
|
|
027-428 |
1 |
|
|
027-418 |
1 |
|
|
027-427 |
1 |
|
|
027-406 |
1 |
|
|
255-052 |
1 |
|
|
255-040 |
1 |
|
|
255-028 |
1 |
|
|
255-030 |
1 |
|
|
255-022 |
1 |


do u have a bigger clearer picture of the crossover for the speakers the one uploades is to small to read