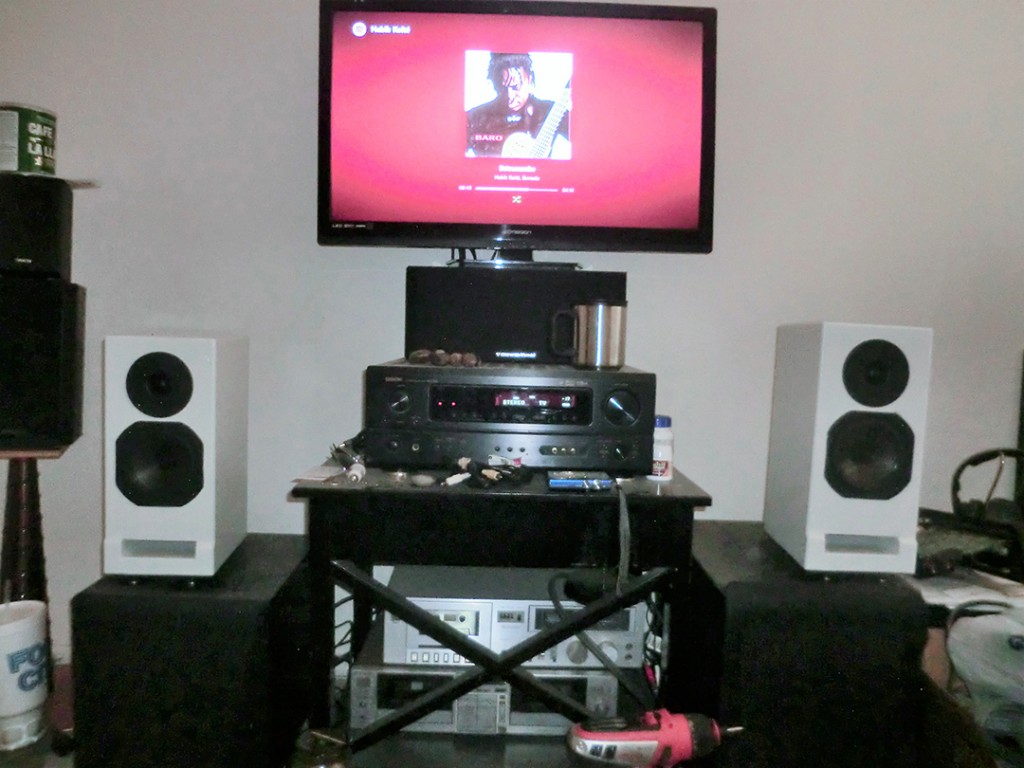
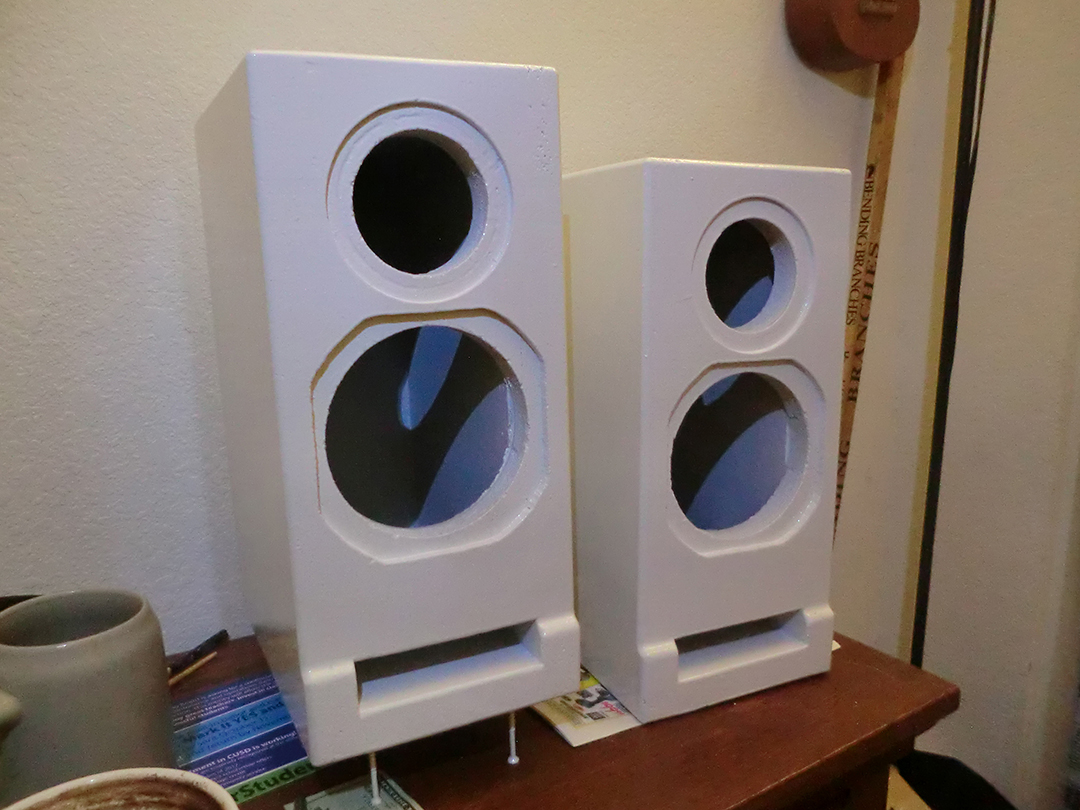
Alpina II’s


Designer:
ds1919
Project Category:
Loudspeakers/Cabinets
Project Level:
Intermediate
Project Time:
8-20 Hours
Project Cost:
$100 – $500
Project Description:
These
Design Goals:
I wanted to design and build a pair of speakers for my bedroom that were larger than most regular sized “bookshelves”, so I could have good bass extension, as well as superb clarity, detail, and crispness. I like these smaller 5″ and 5 1/4″ drivers for this purpose. I also wanted a fairly simple build and low cost.
Driver Selection:
The Audax HM130Z10 8ohm midbass drivers actually found me, so I based my box designs and tweeter choice around this driver. I chose the Peerless by Tymphany D27TG35-06 1″ Silk Dome Tweeter (Part # 264-1022). Specs showed that it is within a dB or so of the woofer, even at 6ohms.
Enclosure Design:
This was the tricky part. I had scavenged two identical pieces of 1 1/8″ thick particle board (I know, not the best for enclosures, but they were free) from a work site. Since I only had so much to work with, I was lucky to find the Audax midbass units at a great price because with them I could maximize the materials (in other words, I could use nearly all of each slab of wood) and have a great sounding speaker and great looking too. I used WinISD to design the box. The port is tuned to 83Hz.
Enclosure Assembly:
Assembly was straightforward, I used liquid nails all around to glue the front, top, back, bottom and then port length to one of the sides, brad nailed in a few places, then proceeded to do the other side. I routered with a flush trim bit to get the ends surfaced, then a small quarter round trim bit to round out the sides. Jasper jig the recess the tweeters, but freehanded the recesses for the midbass, since they are an odd shape. I found a brand new hole saw set at a local pawn shop (yey) at a steal of a price, and two of the hole saws were exactly what I needed for the cutouts for the drivers (double yey).
Since the material is large grain particle board (subfloor grade material), I spent a lot of time puttying and filling the coarse surfaces and spent a lot of time sanding until I got everything smooth.
After everything was super smooth, using down to 3000 grit paper on my sander, I applied Minwax wood sealer to seal the wood from absorbing the primer and paint coats. I gave 4 coats of primer and 8 coats of Alpine White paint, sanding between each coat. All the puttying, filling, sanding, painting etc was the longest part of the process.
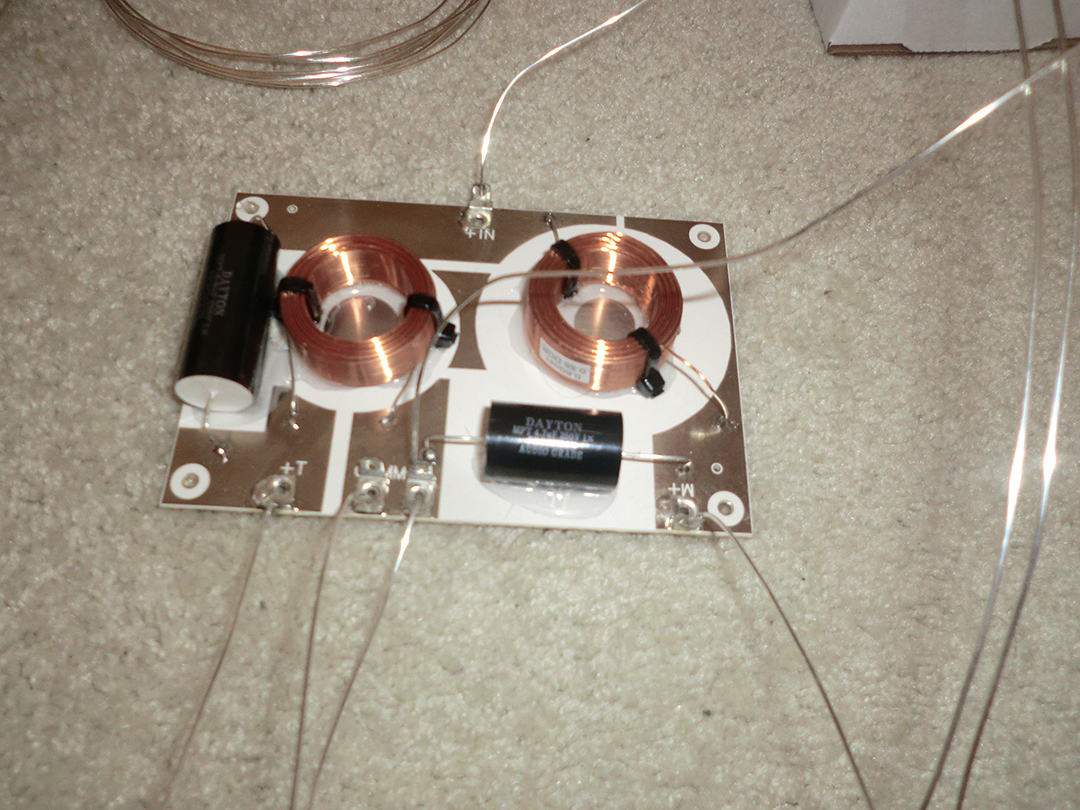
I mounted the crossovers directly behind the tweeters as there was plenty of room and would not cause any hindrance in the port area. I also used a 12″ x 10″ x 1″ piece of foam for each enclosure for dampening.
Crossover Design:
Looking at the spec sheets, which was the only way I have to derive any calculations from, I wanted to cross the drivers over at 1000Hz. But that is too low for the tweeters, so I settled for 3k Hz. I chose second order for simplicity and also space constraints. I used PE components all the way – caps, coils, boards. I used Cardas 4% silver solder, and some very interesting hookup wire.
Tips & Tricks:
Tips Tricks and Lessons Learned:
As much as I like the idea of using these Audax drivers, I’ll most likely go with “round” frames next time so I can make the project simpler. There are many good drivers out there with round frames.
The Indonesian Milspec wire is NOT insulated, so I had to apply a rubber sealer on each strand, which took lots of time to dry and vent off. I’ll use insulated wire after this….
If you notice, the box at the port area is extended out. I did that for cosmetics, and also I didnt want to cut the wood off. That made it difficult to router and Jasper jig and so I will not do that again also!
Whenever changing paints or from primer to paint, clean the entire paint gun and cup!! Doh!!!
The midbass drivers, after all the paint that was applied, were REALLY tight to get into their respective recesses. I routered them at such close tolerances that I had to use a block of wood and hammer to get them to seat. I did not fully understand just how much real-estate paint and primer will take up until after the fact. In the future, I will make the recesses a little larger (cut over the line traces).
Last tip I learned, I think I want to make the enclosures and crossovers so that I can experiment with different xover values and be able to remove them and change them. This project was a one shot deal because I simply cannot remove the drivers without breaking something. I got lucky because they do sound great, but could they sound greater?
Conclusion:
I must admit I actually spent more money than I had anticipated, on the drivers, the other components, but I felt I would be short changing myself if I did not go for the extra expense. I also spent way more time prepping and finishing the enclosures, but it was truly and entirely worth every minute, and every step. They look amazing. I was more proud of the enclosure build than the rest of the speaker project because I had never used a professional paint sprayer with car paints, and mixing hardeners and reactors and thinners and then applying the paint etc. It was really easy, and the local automotive paint store was extremely helpful in that department.
About the Designer:
I’ve been building speakers since 1984, when I was just a teenager. I’ve been more interested in the sound of the speakers than the enclosure aesthetics itself. While I’ve used laminates and wood veneers, I’ve never painted until now. It was fun and a major education to another level of speaker design.
Project Parts List:
|
Part # |
Description |
Qty |
|
264-1022 |
Peerless by Tymphany D27TG35-06 1″ Silk Dome Tweeter |
1 |
|
257-040 |
Dayton Audio 0.60mH 20 AWG Air Core Inductor Crossover Coil |
1 |
|
257-034 |
Dayton Audio 0.45mH 20 AWG Air Core Inductor Crossover Coil |
1 |
|
027-230 |
Dayton Audio PMPC-4.7 4.7uF 250V Precision Audio Capacitor |
1 |
|
027-238 |
Dayton Audio PMPC-6.8 6.8uF 250V Precision Audio Capacitor |
1 |
|
027-202 |
Dayton Audio PMPC-0.22 0.22uF 250V Precision Audio Capacitor |
1 |
|
260-130 |
Crossover PC Board 2-Way 12 dB |
1 |
|
240-668 |
Dayton Audio DSS2-SN Satin Nickel Speaker Spike Set 4 Pcs. |
1 |
|
091-624 |
Dayton Audio BPP-SN Premium Binding Post Pair Satin Nickel |
1 |
|
091-600 |
Dayton Audio SBPP-SI Binding Post Plate Silver Anodized |
1 |
|
365-255 |
Jasper Circle Jig Model 400 |
1 |
+ There are no comments
Add yours