Bar-Gain soundbar + sub


Designer:
Wolf
Project Category:
Bookshelf Speakers
Project Level:
Intermediate
Project Time:
20+ Hours
Project Cost:
$100 – $500
Project Description:
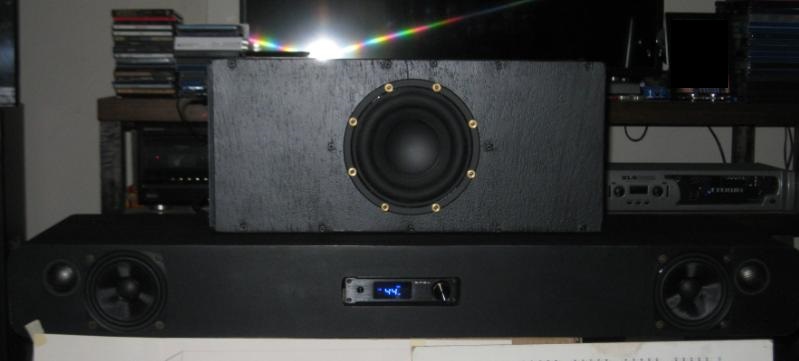
I was asked to build a soundbar for a coworker, and he has given me permission for a full posting of details of the project I built for him. I also included a small subwoofer that I built quite a while ago. This is to be placed under the flat screen TVs of this day and age, with the sub adjacent on the floor.
Design Goals:
I wanted to make this relatively easy to build.
I wanted to make it fairly inexpensive to save on cost.
I also wanted to make it scalable in size with features that can be added or omitted.
It needed to be unobtrusive, and low-profile, solid construction feel, and a durable easy finish- all this while using 4″ midbasses since most bars have 2-3″ drivers.
And lastly, I wanted to make it fairly high sensitivity (85dB+) for use with a small amp module of my choice that would be installed front and center in the bar.
This needs to have really good off-axis response for a versatile experience in multiple seating positions.
Driver Selection:
Since the amplifier goes hand in hand with this kind of design, I needed a 4 ohm midbass for more power from most modules. I chose the SMSL Q5 Pro (230-210) since it had a built in DAC for decoding whatever the hookup, as well as a remote control as most soundbars include. 50W x 2 at 4 ohms fit the bill, and SMSL has a reputation for good sounding gear.
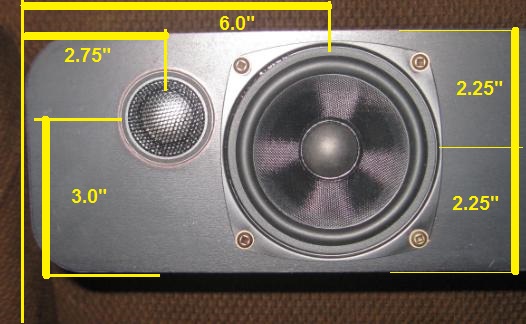
So, a 4″ midbass, highish sensitivity, well behaved response, inexpensive cost, and an unobtrusive look for no grill requirement led me to the Dayton Audio PC105-4 (295-158). The pincushion frame is a combination flush/surface mount that looks good solo. With a sensitivity just over 90dB, they filled the need. I knew I’d have some loss in a soundbar position, but until measuring them I didn’t know what to expect to lose, and this gave me enough headroom that I’d likely still meet the sensitivity requirement.
Since the recipient listened to a lot of techno, dubstep, rock and metal, I wanted a low-cost small 1″ metal dome tweeter with enough sensitivity to keep up with the midbass. An additional grill would be welcome since small children might be present once in a while. This led me to the Dayton Audio AN25Ti-4 (275-115).
The subwoofer consists of the venerable Tang Band W6-1139SI (264-832), but the W6-1139SIF (264-919) could be used for fewer dollars. I just had already built this with the SI model. The Dayton Audio SA70 (300-784) 70W plate amp is used on the sub.
The SMSL has a subwoofer output, and the SA70 has a signal sensing auto-on feature, so the plate comes on when the bar is engaged. Simple and easy.
Enclosure Design:
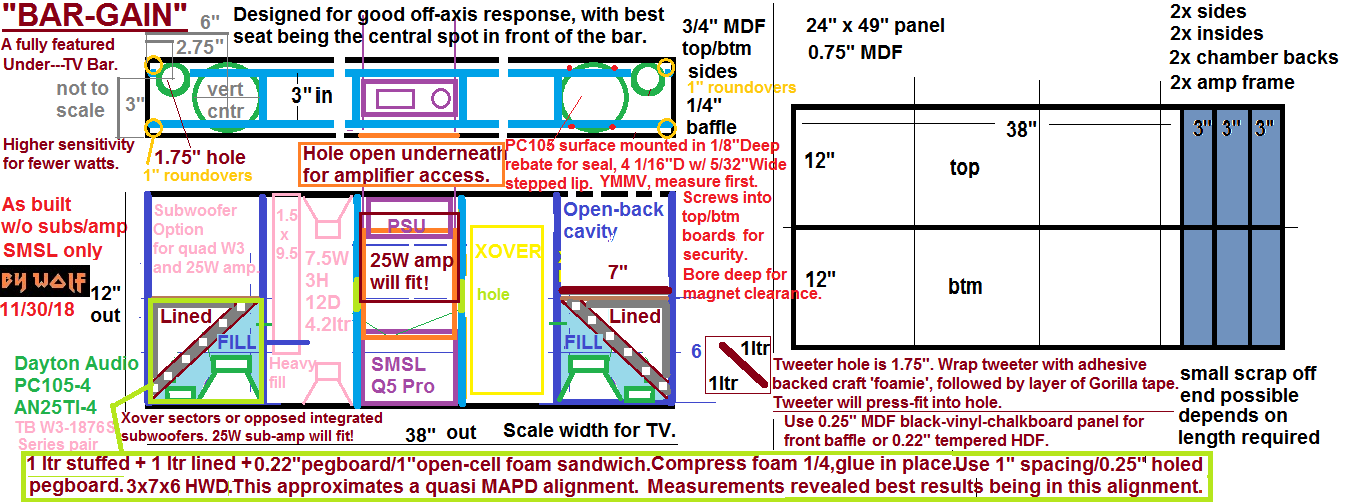
I wanted to make this wunderbar ‘under-bar’ as simple, low profile, understated, and inexpensive as possible to construct. I managed to use one 2′ x 4′ (49″) 3/4″ MDF handipanel, and only a few minor pieces of scrap 3/4″ MDF to make the main chassis. My coworker’s TV required a 12″ x 38″ bar top surface, and I was able to get a 12″ x 39″ bar made from the single board. Within this basic framework, a lot is possible. You could actually make a full 5 channels with the drivers used, and still have room for a pair of dual-opposed 3″ ported subwoofers; but an HTR would then be required, and additionally a sub amp to power them all. Of course shorter overall length is also a possibility if the TV or location is smaller, and the 3″ integrated subwoofers are not needed.
So, chassis is figured out. Box alignment time…
This ended up being a bit more difficult than expected. The Fs is higher to yield a higher sensitivity driver, granted, but it also does not like to be used in pretty much anything over 2 liters according to the simulation, because it will unload in both vented and sealed boxes with relatively low power input. An aperiodic looked better to a point, but then still unloaded down low. This is all whilst trying to get some bass response in any shape or form below 100Hz. Since the Fs is 101/102Hz range, this proved to be a difficult balance. These PC105-4 are likely okay in a 2 ltr sealed box as well as what I used, but I wanted improvement in the damping of the driver in hopes to get a little more low end.
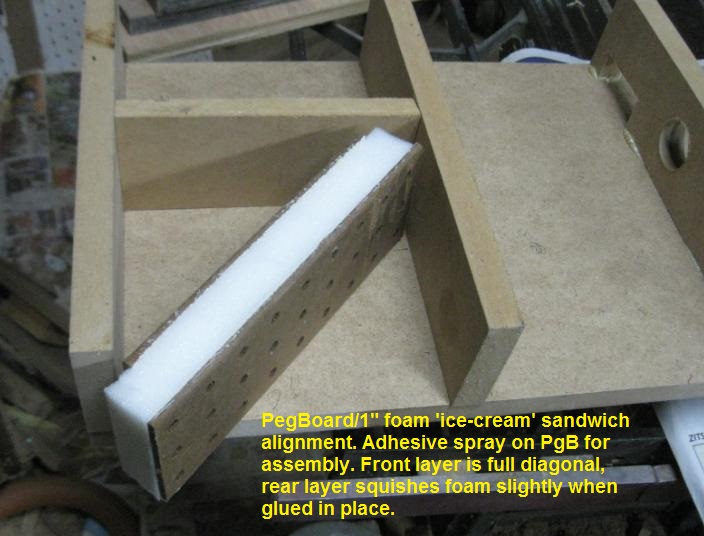
DCR boxes are complicated with 3 ports, and they really had no modeled benefit. So, I tried something not much seen nowadays similar to the MAPD of Northcreek fame. Multi Chamber Aperiodic Damping. I made some assumptions about how many holes in a pegboard panel I could fit in the 2 ltr box with the pegboard across it diagonally, at 1 liter a piece. Apparently, my math was wrong, and the model did not match the measured impedance I got as a result. Even so- the result I got was a welcome surprise, with a lot more damping of the driver’s resonance, and no chance to unload in the ‘pretty much’ sealed box unlike the Aperiodic box still did.
The subwoofer is a vented 0.4ft^3 box vented to about 30Hz, minimal stuffing.
Another option:
The integrated 3″ woofer pairs modeled well in a 4.2 ltr stuffed box with the right tuned port.
Enclosure Assembly:
More or less- I sliced the board right down the middle lengthwise to make the top/bottom, and then 3x 3″ wide boards off the end of each of those 2 boards that would be the 6 internal verticals. 2 to either side of the SMSL, and 2 to either side of the left and right channels at the ends. 3″ internal height allowed for the size requirement as well as the low-profile goal. It also allowed the 4″ drivers to be screwed to the top and bottom panels for a good mounting. This meant that the baffle needed to be thin to allow the 4″ drivers to still breathe easily. I obviously would not be able to scallop the rear of the baffle were I to use a thicker substrate, so this was a necessity. Where needed, 3/4″ MDF supports and braces are required to keep the thin material from flexing, resonating, or just actually being too thin in a region where thicker is required.
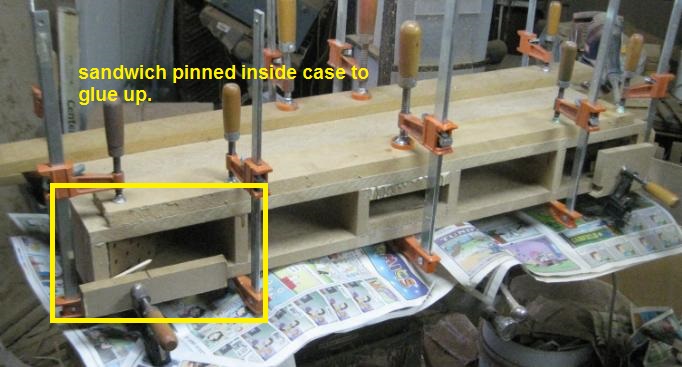
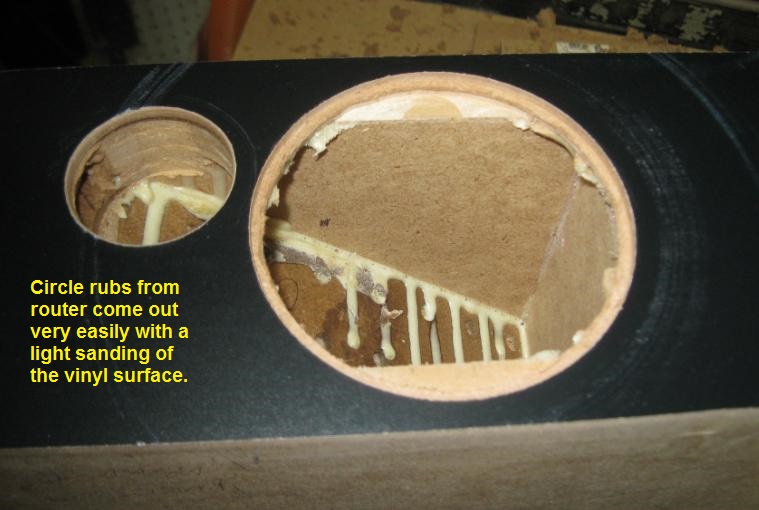
So- this will likely forever live in infamy as the ‘ice-cream-sandwich’ dual-chambered-aperiodic box. I used adhesive spray on the pegboard only, and applied the pegboard to either side of the 1″ foam. The front piece is full diagonal length, while the rear is 1″ shorter in length, and all pieces are full 3″ wide. After I applied glue and clamped the lower board and wall supports, I laid glue where the sandwich boards would go, and compressed the foam by about a 0.25″ to get it into position. Holding this in place by clamp and shim, I applied the glue to the top of the sandwich boards, added the L-shaped 1″ thick foam in the rear chamber, and glued the top-panel on. I did have to clean glue out of some of the holes later, but this was relatively easy to do. The front 1 ltr section is filled with cotton balls.
The box is all biscuited construction with MDF and polyurethane glue. The front to rear edges were rounded at a 1″ radius. The baffle is black faux-chalkboard vinyl coated MDF from a local hardware. The rest is rolled on Duratex.
Tweeter mounts in a 1.75″ hole. Wrap perimeter with adhesive-backed craft ‘foamie’ or gasket tape, then a layer of Gorilla Tape, and it will press fit into the hole. There is a piece of 3/4″ MDF behind the tweeters for this purpose.
Midbass is a 4 1/16″ hole, with a 1/8″ deep rebate of about 5/32″ width. This pincushion frame has a step in it like many older 4″ pincushion drivers, and the step is what the gasket is adhered to as well as the surround installed in the recess on the front that it makes.
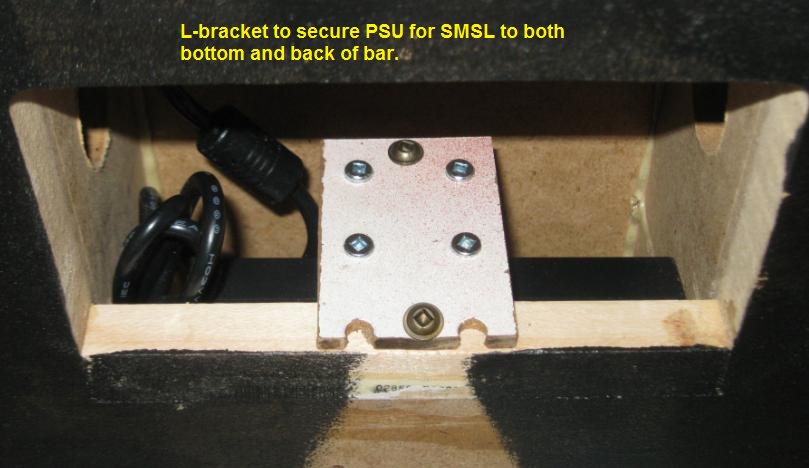
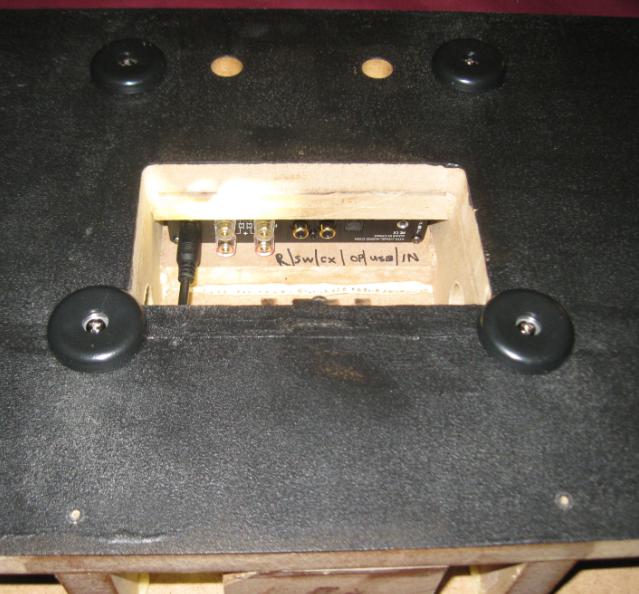
I left an open spot in the bottom for easy connection to the SMSL, and there is a pass through in the rear for the cables to route out the back easily. 2 screws in the bottom push against an HDF plate under the SMSL to ‘set-screw’ the amp in place in its slot and not allow movement. The PSU is installed in the aft central location, under an L-bracket.
I used 8 feet on the bottom so there is no flex in the length of the cabinet.
Unobtrusive, durable, and done! Please see graphic for full dimensions of the Bar-Gain.
The subwoofer was built from 0.5″ plywood with a single U-brace. The dimensions are that of a long box with the driver in the side, the amp on the one end, and the rounded port exit on the other. External dimensions are 20″ long, 7.5″ deep, and 8.75″ high with a 1.5″ diameter x 10.5″ long port.
Should you want to include the dual opposed Tang Band W3-1876S 3″ subwoofers (264-909, not shown) and omit the separate subwoofer module, their chambers should be 4.2 ltrs stuffed with a 1.5″ diameter x 9.5″ long port for 2 of the 1876 woofers. This is internally 7.5″ wide with the same 3″ internal height and 12″ depth. A separate plate amp or sub amp would be required here.
Crossover Design:
Once I got the structure completed, I installed the drivers and made my measurements, using the SMSL as the amp for the job as it would be used in the end. I measured at a long distance of 10′, aimed directly in the middle of the bar to optimize for best off-axis performance. The bar was atop my entertainment center in front of my mounted flat panel for these measurements.
The AN25 measured with a tilted-flat response, and the large top-end dip shown in the spec sheet was not as wide or deep measured here in situ. This wouldn’t be hard at all to flatten out.
The PC105 response however, was plagued by floor bounce in the 500-1kHz area, and I’d have to see if it as really an issue in reality. The breakup is mild and easily tamed.
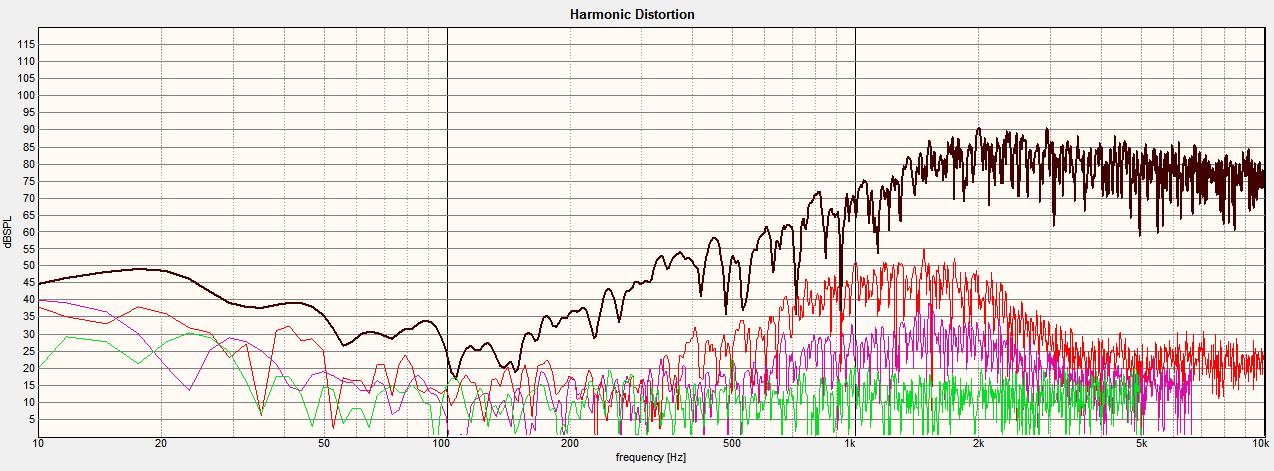
I also took HD sweeps of the tweeter and midbass to see if anything should be avoided in the xover. The AN25 HD sweep revealed that it should not be given a xover below about 2.6kHz, as that is where the HD2 rose above the -40dB from reference mark. Unfortunately, the first tweeter measured higher HD than the other, so it is possible that other units will have this difference as well, and I chose a xover area that accommodated both units. The PC105-4 HD sweep really showed nothing I was overly concerned about.
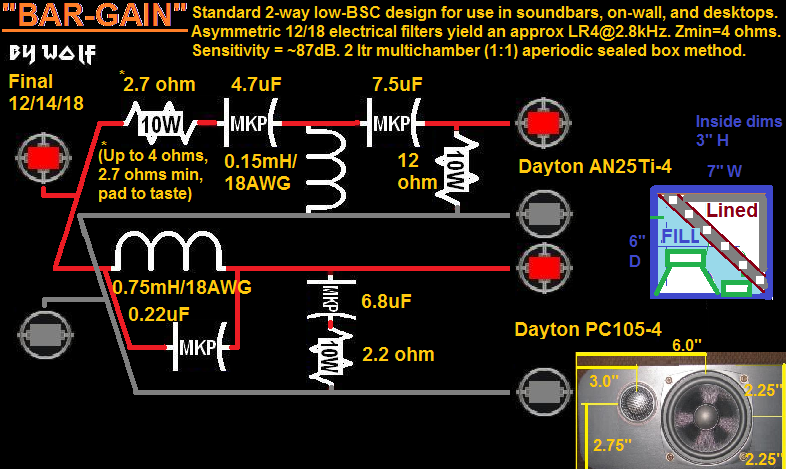
I did 2 sims after measuring, using the Passive Crossover Designer Excel sheet from Jeff Bagby. One was to see what counteracting the possible floor-bounce would do to the sound, and the other shooting for a best-fit flat response with the xover at about 2.8kHz with an in-phase summation. While the sim approximates an LR4 crossover, the midbass rolls off a bit more shallow, and that helps in the off-axis response.
I did not like the compensating design at all, nor did I find the vocal range murky, so I believe the dips are just floor-bounce related and an artifact of the measurement process here. I only had to adjust the series resistor on the tweeter a bit to make them balance out. I’m including a resistance range for experimentation here as different rooms, interiors, and the use of this project may be susceptible to different requirements. 2.7 ohms is the lowest I would go in value, and not go above 4 ohms to keep it from becoming dull. The 2.7 might be heard as bright in some situations, but it does lend well to speech or dialog intelligibility in movies or maybe helps for those with hearing impairment. I feel 2.7-3.3 ohms is the optimal range for my particular living room. Zmin is 4 ohms, so be aware of this if switching amplifiers for this design.
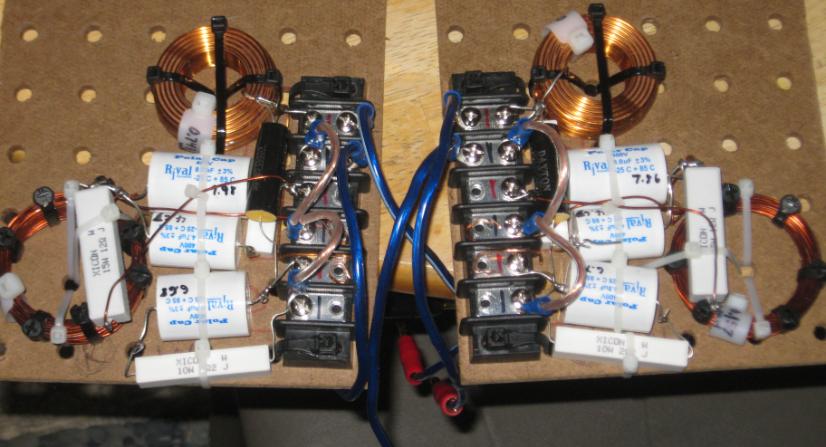
The crossover uses 9 parts per channel, and most are small in value for lower cost. I used a 6-point barrier strip for the connections, but a 2 point (amp)and 4 point (drivers) pair per crossover board might actually be easier to do.
While neither of these are state of the art world-class low-HD drivers, their use in this xover/application is pleasant and does as intended. They do sound better than I was expecting.
According to the sim, there is a decent reverse null at the central position, as well as decent phase alignment and summation. In front of the L/R channel, the phase locks in in simulation. Beyond the area of the bar, it still sounds good and has a distinct left and right image, so the dispersion works as it should relating the sim to reality. This was the main goal being it a soundbar, and not unlike that of a horizontal center channel for home theater, that it give really good off-axis response.
The subwoofer’s active xover was set at 2 notches left of 12-noon, and the gain at one notch right of 12-noon for best blending with the Bar-Gain, IMO. Higher xover made the speech of some actors chesty in blend with the bar. The output was overwhelming above this gain setting and drowned out the bar.
Since I did not build the integrated 3″ subwoofer version, this would have to be dialed in level and xover by the end user. I have however used those units, and they are quite capable little boogers.
Tips & Tricks:
Being that some TVs are heavy, I felt including the 6 vertical uprights was best, as well as the sway-brace inside the front baffle to keep it vertical. The L/R chamber back-walls also help in this regard. The 8 feet prevent sag in the middle of the bar, as well as support the corners. This will therefore support the multiple types of stands that newer TVs include.
The real wood square-dowel brace in the bottom panel is an absolute must if you have the hole in the bottom cut for access to the amp’s rear panel and use MDF for construction. It was literally too weak in the aft half of the center portion that rigidity and strength was sacrificed. The front half by contrast has 1.5″ thick upper and lower panels surrounding the SMSL. I later added another vertical brace behind the SMSL PSU to further strengthen the area from top to bottom, and I needed a place to mount the other end of the L-bracket to hold it in place. This vertical rear brace does not fill the entire area, and the cables for input to the SMSL will either pass through the remaining openings, or underneath and in through the bottom access hole.
When cutting the holes for the 4″ midbasses, GO SLOW! 1/4″ MDF tends to give more than 3/4″ when routing. I recommend cutting the rebate first, then drill a hole and use a jigsaw to cut the through hole.
Since this is a thin front baffle, and the internal height is compromised, the inside top and bottom will need relieved to allow the midbass’ magnet to enter the box.
Conclusion:
I’m very pleased with this setup. The sensitivity is about 87dB from what I can tell, and that makes the amp not have to work that hard. The SMSL seems to have a much higher noise floor when used above 50 on the volume dial, and 60 is maximum. Most usage had the volume in the 20-30 range, and it does default to 20 on next power cycle. With 4 inputs the versatility is nice, and the remote is a really nice touch.
Optical from TV, coax from DVD/Blu-Ray/game console, USB from the home network, and a Bluetooth-dongle attached to the 3.5mm input make this a pretty impressive and versatile unit.
The PC105-4 is a nice sounding unit, and lower range piano especially sounds good and clear on these. The Xmax is kept in check even at higher levels in this alignment as well. The AN25Ti-4 is likely the weak-link of this project, but it does the job and does not sound bad as used.
In listening, I found I had one more tweak to make. The cavities where I installed the crossovers had a tendency to resonate or ring in the lower vocal range. I ended up stuffing these chambers as well to mitigate the issue. After that, this sounds very good to me!
About the Designer:
Wolf has been into the speaker-building hobby since circa 1997, and has amassed an immense number of projects since his entry. This is only one in his vast repertoire. He has a very understanding wife who puts up with him, and daughter of age 6. Vowing never to fully grow up, he uses his spare time in the pursuit of all things audio, as well as posting often on PE TechTalk.
Project Parts List:
+ There are no comments
Add yours