Latus1

Designer: John Hollander
Project Time: 20+ hours
Project Complexity: Intermediate
Project Cost: $100-$500
Project Description
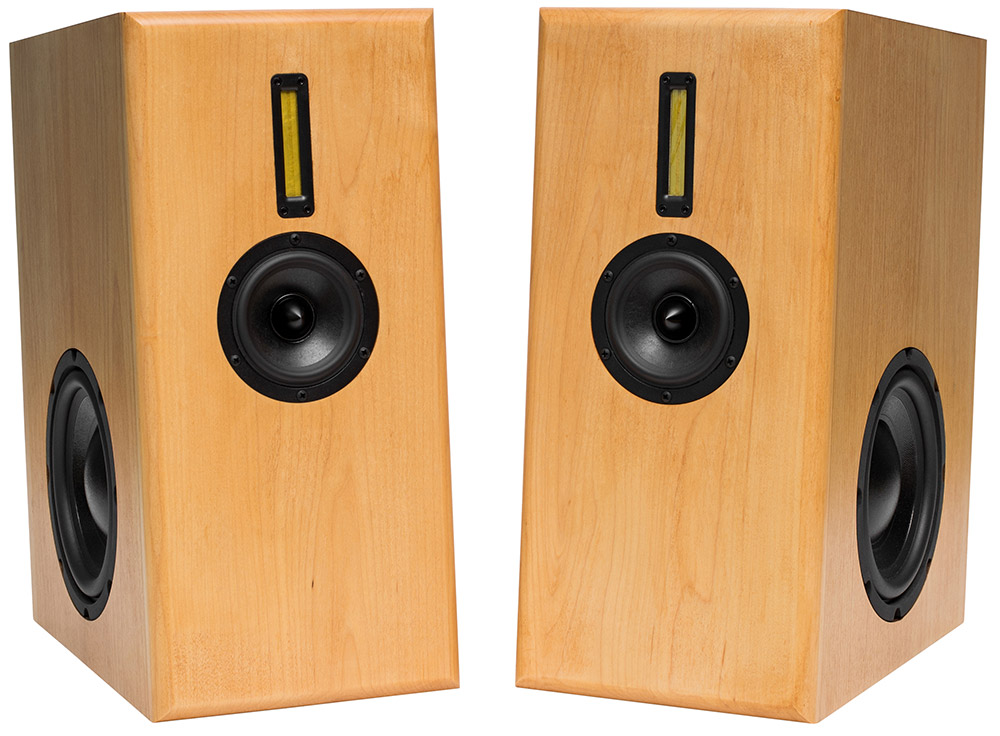
This project is a 14 liter, .5 cubic foot, 3-way stand mount speaker with a side woofer.
Design Goals
The goal of this design is make a small, full range speaker that could reach below 40Hz so a subwoofer would not be required. Additionally the cost for the drivers should be below $200 for the pair.
Driver Selection
The drivers are the Dayton Audio PTMini-6 Planar Tweeter 6 Ohm, 275-083, Dayton Audio RS100P-8 4″ Reference Paper Midwoofer 8 Ohm, 295-359, Dayton Audio DCS165-4 6-1/2″ Classic Subwoofer 4 Ohm, 295-198.
The design stated with selecting the mid-range that could play up high to meet the PTMini-6 planar tweeter. The woofer was selected to get the lowest F3 in the remaining volume.
The PTMini-6 planar tweeter is used as a super tweeter with response from 7,000 to 20,000 Hz. The RS100P-8 carries the midrange from 300 Hz. The DCS165-4 extends down to an F3 of 36 Hz in a box tuned to 39 Hz.
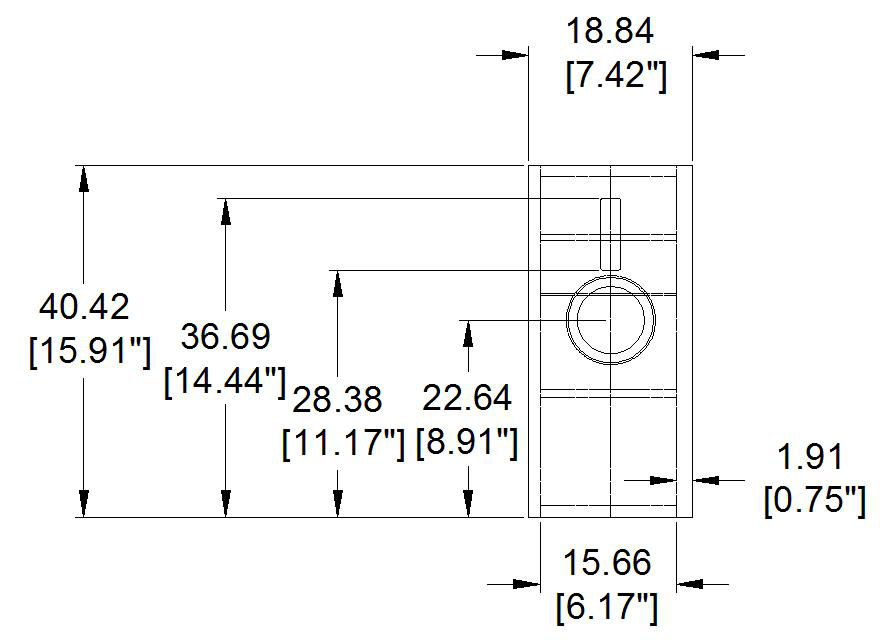
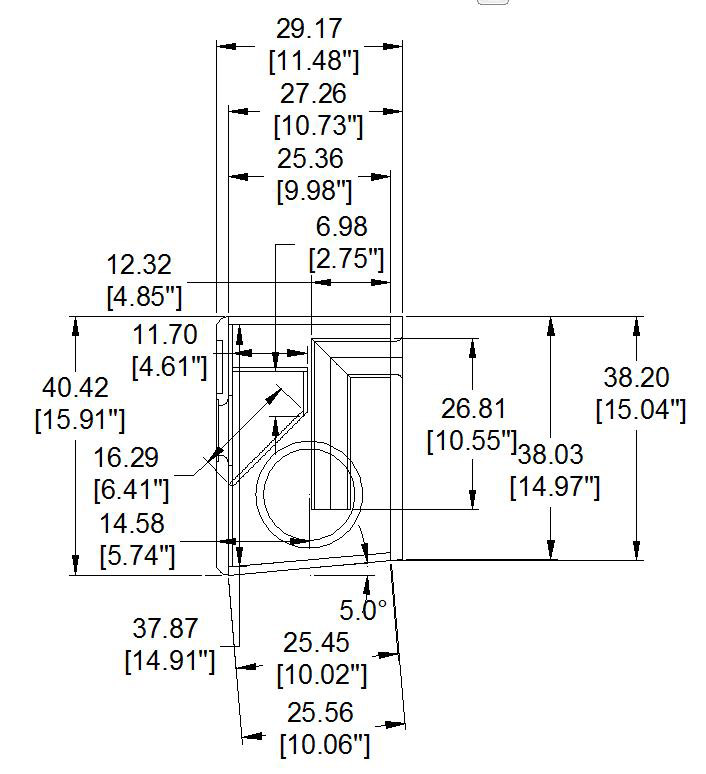
Enclosure Design
The design concept was to create a minimalistic front baffle. This meant trying a side woofer in a stand mounted design and a rear firing port. The front baffle is 7.42 inches wide by 15.9 inches high with a ½ inch round over. The enclosure is mostly ½ inch MDF with ¾ inch MDF for the woofer sides and the cabinet back. The original design utilizes a maple front baffle and cabinet back with a ¼ inch wood plate to mount the hardwood front baffle.
The enclosure volume is limited to .5 cubic feet or 14.2 liters. The midrange enclosure is 2 liters with the rest of the volume dedicated to the woofer and port. For tuning purposes the volume for the woofer is 10.3 liters. The port is 2 inch PVC with a ½ round over exit flare.
Enclosure Assembly
When cutting out the wood remember there are left hand and right hand versions. You have to mirror the dimensions to create the left hand and right hand pieces. You are welcome to change to all ¾ inch MDF and enlarge the front baffle by ¼ inch to make this easier.
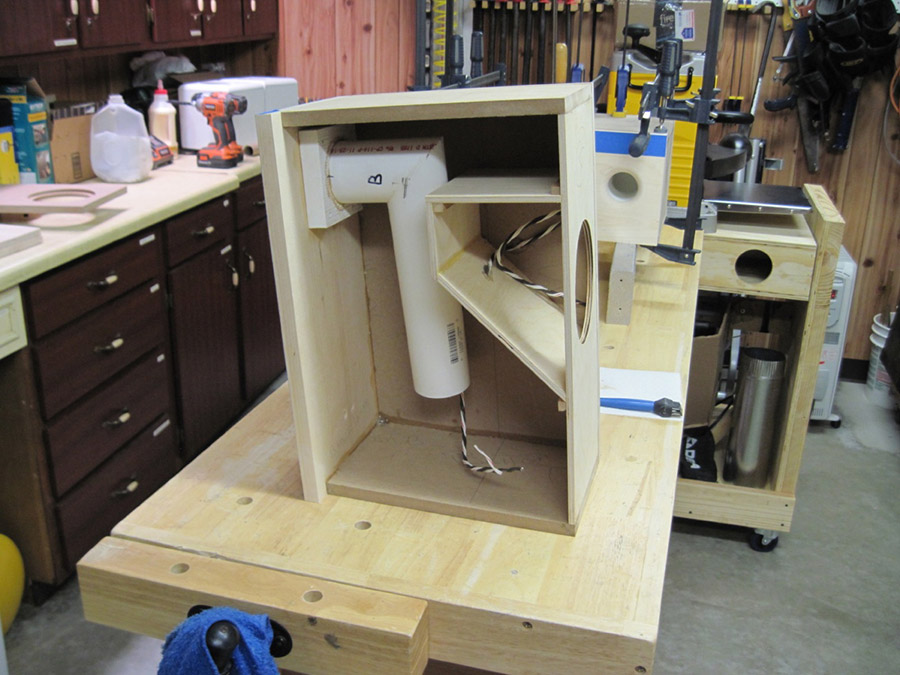
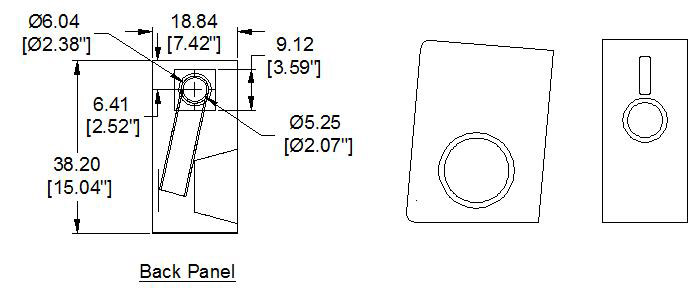
The port tube is made from 2 inch PVC pipe that is cut on a miter saw. To hold the PVC for cutting, use a c-clamp between the inside and outside of the pipe to create a handle.
Notice the port tube is tilted away from the woofer. Fabricate a mounting block that the 2 inch PVC slips into. Glue the port in the mounting block such that there is about 1/2inch between the end of the port and the side wall. If you screw the port mounting block to the back panel the port assembly can be remove for painting before final assembly.
Fabricate the port and mount it to the rear panel before assembling the box. The port round over is made by drilling a center hole then routing the hole flush with a bottom bearing flush trimming bit with the port tube in place. The round over is added after that again with the tube in place.
Glue in the sub baffle and midrange enclosure. Add the mid-range and tweeter wiring through the mid-range enclosure and seal. Glue a wedge between the back of the mid-range enclosure and the port tube. Add the woofer side panel and let the MDF dry for a week before trimming and sanding.
Fabricate the baffle oversize if you are using veneer on the outside of the box. Trim the baffle flush once the veneer is in place.
For the PTMini-6 planar tweeter; you may need to sand the sides so they fit into the recessed wood cutouts; drill out the mounting holes to fit standard screws; carefully bend down the leads to fit through a hole into the mid enclosure.
If using a solid wood baffle glue the center 1/3 of the baffle and around the woofer opening. After finishing, install the tweeter and wiring and use press in place/ fingertip caulk to seal the wire opening into the mid chamber from the front baffle. Stuff the mid chamber with poly, fiberglass, or other insulation to a density similar to building wall insulation. Use ¼ inch poly batting on top of the insulation to keep fibers away from the RS100P. Use gasket tape behind the mid –range and woofer.
Mount the crossover on the panel behind the woofer. The woofer chamber is lined with egg crate foam with about 1 inch of poly batting around the port tube and over the crossover board.
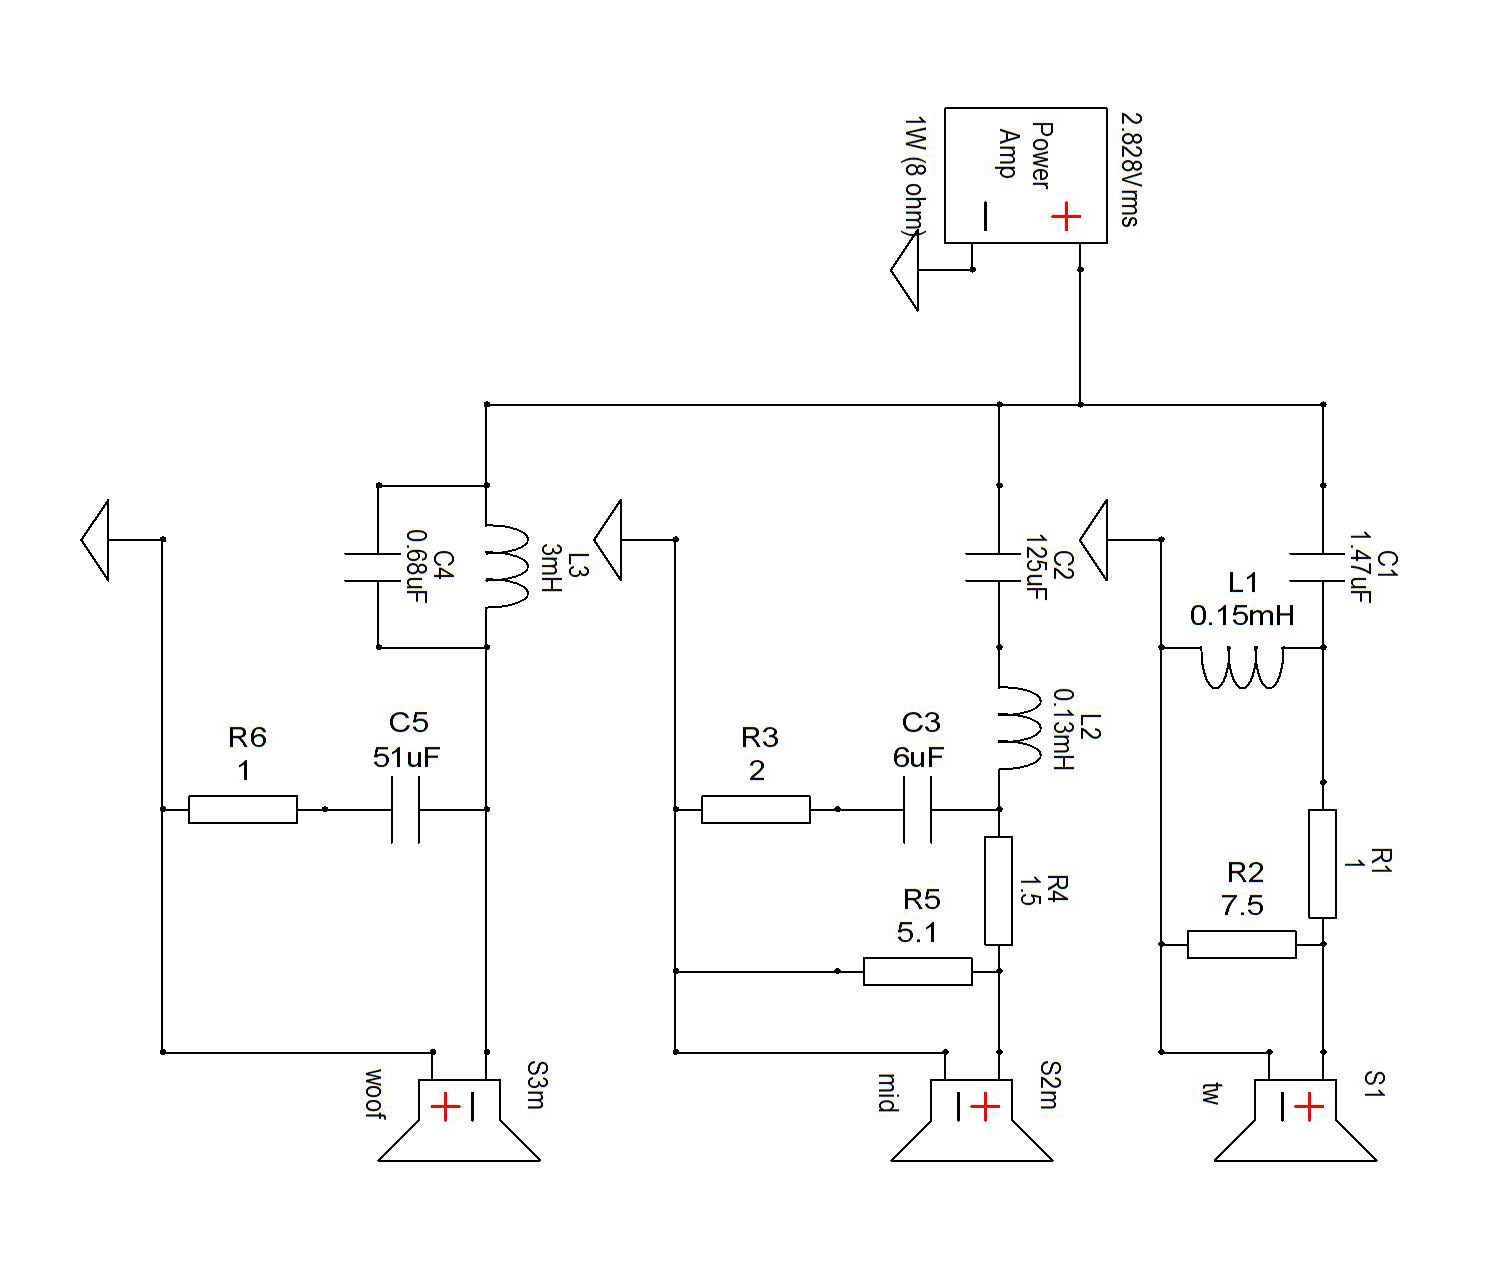
Crossover Design
This design is for a maximum of 100dB, which meant for power handling the mid needed to crossed above 200 Hz.
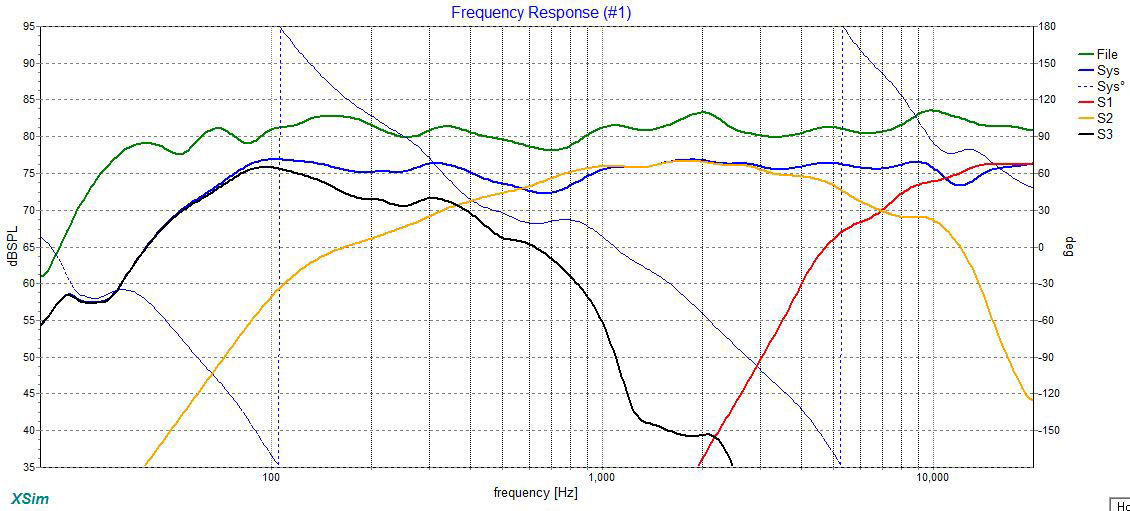
The crossover is a parallel configuration. The woofer to mid uses LR2 slopes, with a tank on the woofer to push down the break up. The tweeter to mid uses third order Butterworth slopes.
The large 125 uF and 51 uF capacitors are electrolytic. A poly bypass capacitor can be added in parallel with these capacitors. The other capacitors are poly. The 3 mH inductor is steel laminate core with a DCR value of 0.400 or less ohms. The 0.15 mH and .13 mH inductors are 18 or 20 gage air core with a DRC value of less than 0.350 ohms.
If the tweeter sounds a bit hot, replace the 1.47 uF capacitor with a 1.2 uF capacitor.
Conclusion
It’s an interesting design that is nice to look at and listen to. This design took second place at 2015 MWAF in the under $200 category.
Tips & Tricks
With side mounted woofers position the speakers so the woofers are not facing each other.
The design is flat off axis toward the woofers. So for critical listening consider turning the speakers in such that the listener can see a small piece of the side woofer.
About the Designer
John is a former engineering designer who uses speaker building as his creative outlet. When he’s not building speakers you can find John playing volleyball and fishing.
Project Parts List
|
Part # |
Description |
Qty |
|
275-083 |
2 |
|
|
295-359 |
2 |
|
|
295-198 |
2 |
|
|
266-558 |
2 |
|
|
266-802 |
2 |
|
|
255-022 |
Jantzen Audio 0.15mH 20 AWG Air Core Inductor Crossover Coil |
2 |
|
027-418 |
4 |
|
|
027-408 |
2 |
|
|
027-412 |
2 |
|
|
027-354 |
2 |
|
|
027-362 |
2 |
|
|
027-406 |
2 |
|
|
004-1 |
Dayton Audio DNR-1.0 1 Ohm 10W Precision Audio Grade Resistor |
2 |
|
004-1.2 |
Dayton Audio DNR-1.2 1.2 Ohm 10W Precision Audio Grade Resistor |
2 |
|
004-1.5 |
Dayton Audio DNR-1.5 1.5 Ohm 10W Precision Audio Grade Resistor |
2 |
|
004-2 |
Dayton Audio DNR-2.0 2 Ohm 10W Precision Audio Grade Resistor |
2 |
|
004-5.1 |
Dayton Audio DNR-5.1 5.1 Ohm 10W Precision Audio Grade Resistor |
2 |
|
004-7.5 |
Dayton Audio DNR-7.5 7.5 Ohm 10W Precision Audio Grade Resistor |
2 |
They a simply gorgeous.
Is the tweeter capacitor correct? The diagram says 1.47 and your list says .47 I am a newbie so I am want to be sure. Love the design.
Bob, use the 1.5 uF capacitor on the tweeters. The 0.47 uf capacitor can be used in parallel with the 125 uF electrolytic capacitor as a by pass capacitor. You are correct that the drawing is not clear. The page 3 and 10 of the PDF file shown here
http://techtalk.parts-express.com/forum/speaker-project-gallery/67410-latus1?247950-Latus1=
matches the parts to each driver.
John H
This is a neat project and I’d like to consider emulating for myself. However I’d be placing these on a bookshelf and have concerns about the woofer placement given that. Have you considered any plans for modifying for a front-mount woofer and port? Or would moving the port to the front be a viable option without other impact?