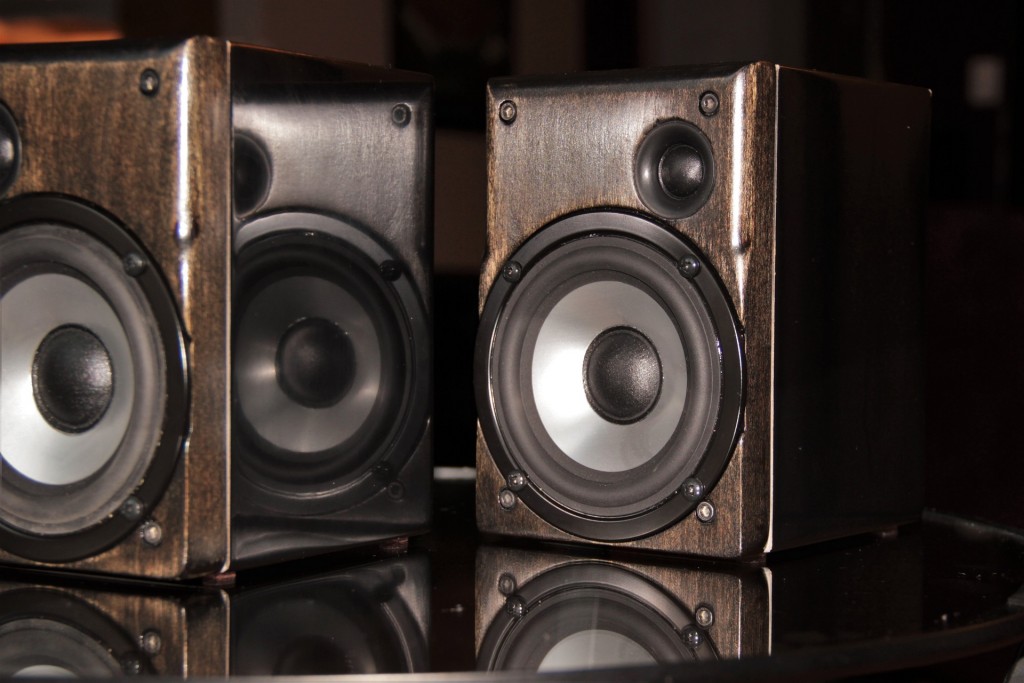
MicroSat


Designer:
Wogg
Project Category:
Bookshelf Speakers
Project Level:
Intermediate
Project Time:
8-20 Hours
Project Cost:
Under $100
Project Description:
Compact 2 way satellite speakers for use with a subwoofer.
Design Goals:
The primary goal for this design is to provide accurate +-3dB response from 20kHz down to 100Hz. The primary purpose was not to be a stand alone full range speaker, but to pair with a subwoofer to handle all content below 100Hz, specifically my Indy 8 powered sub. This had to be done in a compact enclosure to fit as easily as possible into a tight room. The design was intended to use against a wall with minimal response adjustments, but also be able to operate on a stand without losing too much mid-bass. Aesthetically the design had to look as good as I could make it with a hybrid real hardwood dark stain and gloss black combination.
Driver Selection:
Targeting the Denovo mini speaker knock down cabinets available from Parts Express gave me an enclosure volume to work with. Many woofer models were ran in the small enclosure, ultimately the DA115-8 was chosen for a good sealed alignment that will get close to 100Hz when assembled. The ND16FA-6 tweeter was chosen for the top end due to its smooth response and compact installation footprint
Enclosure Design:
I lack a table saw to accurately make suck small dimension cuts, making the CNC pre-cut panels of the Denovo cabinet an easy design. Assembly is much easier and more accurate without dealing with my typical 1/16″ minimum tolerance on cuts. The baffle was made separately, both due to the outside diameter of the DA115 being too large to accommodate the round over on the provided baffle, and in order to use a natural wood finish for the completed project. The DA115-8 woofer models with a nearly ideal Qtc of 0.697 and a F3 of 124Hz in the tiny 0.04 cu ft box.
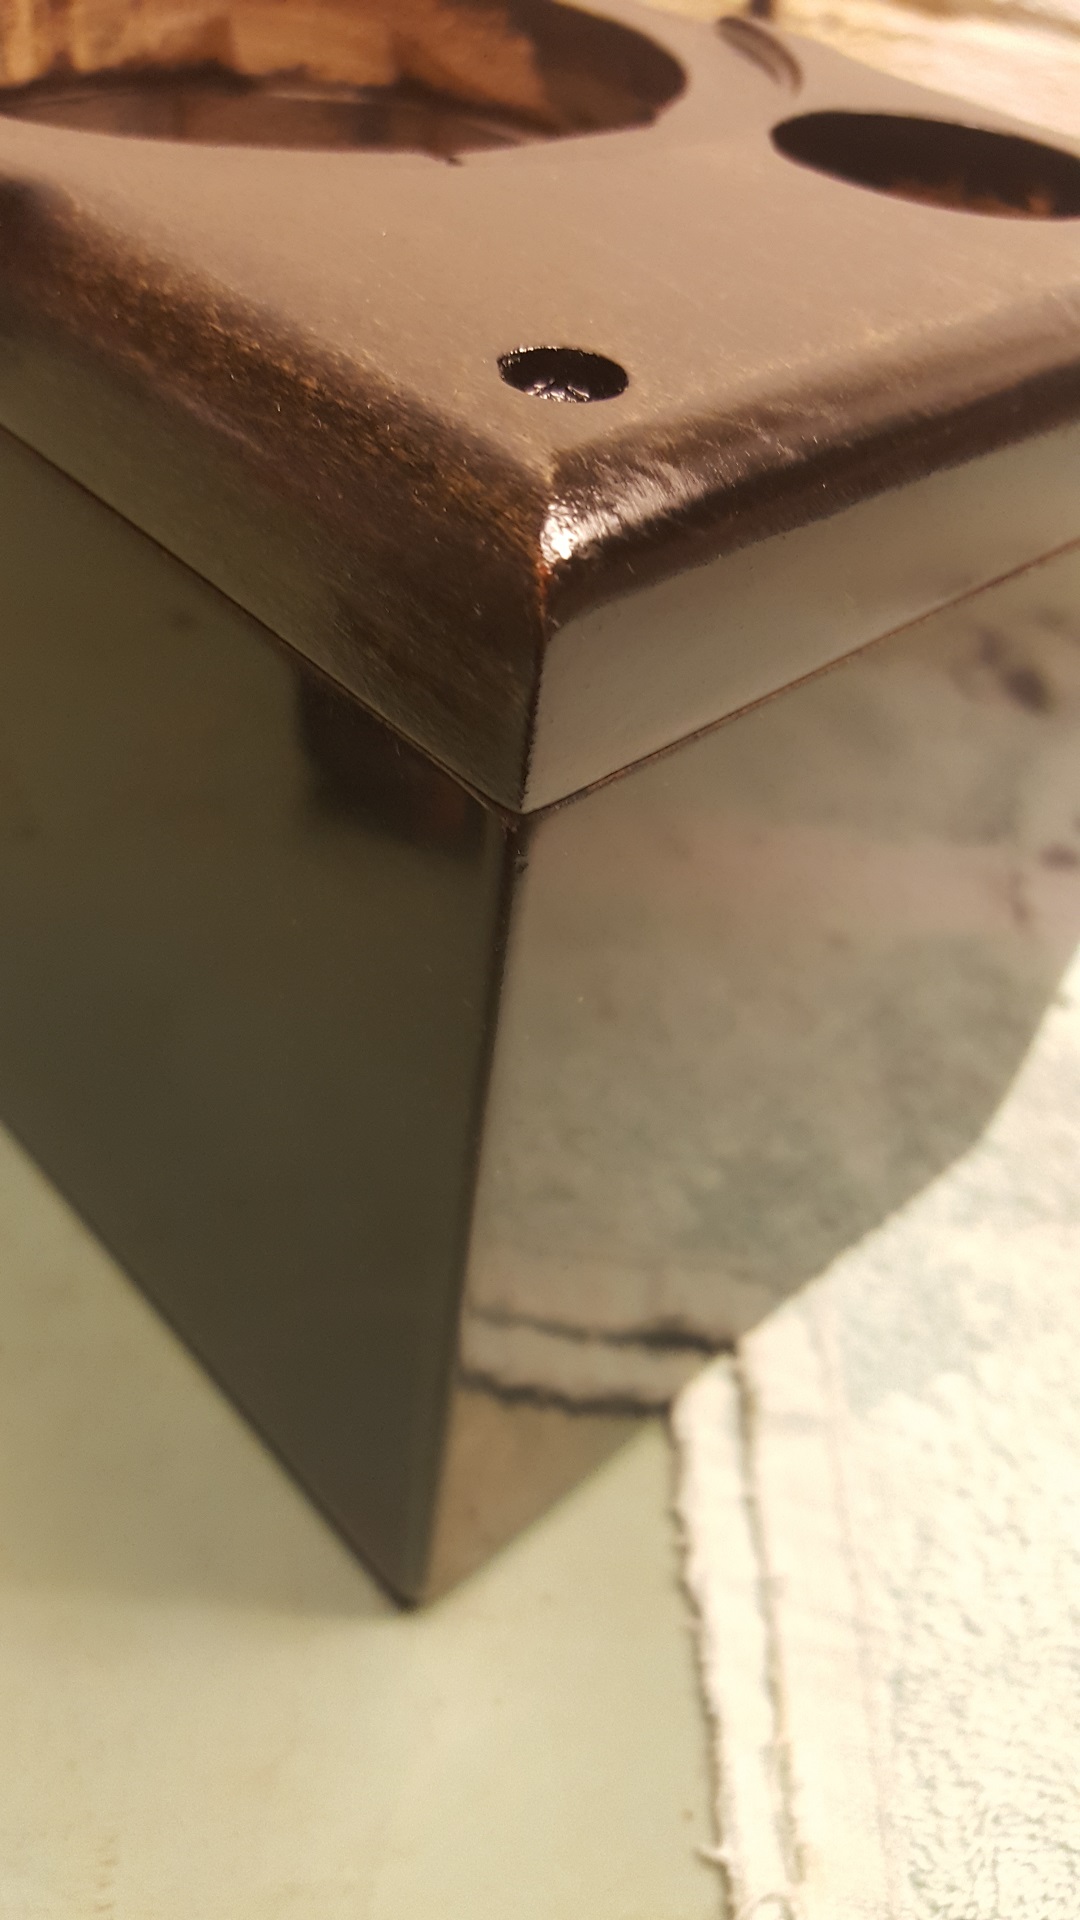
Enclosure Assembly:
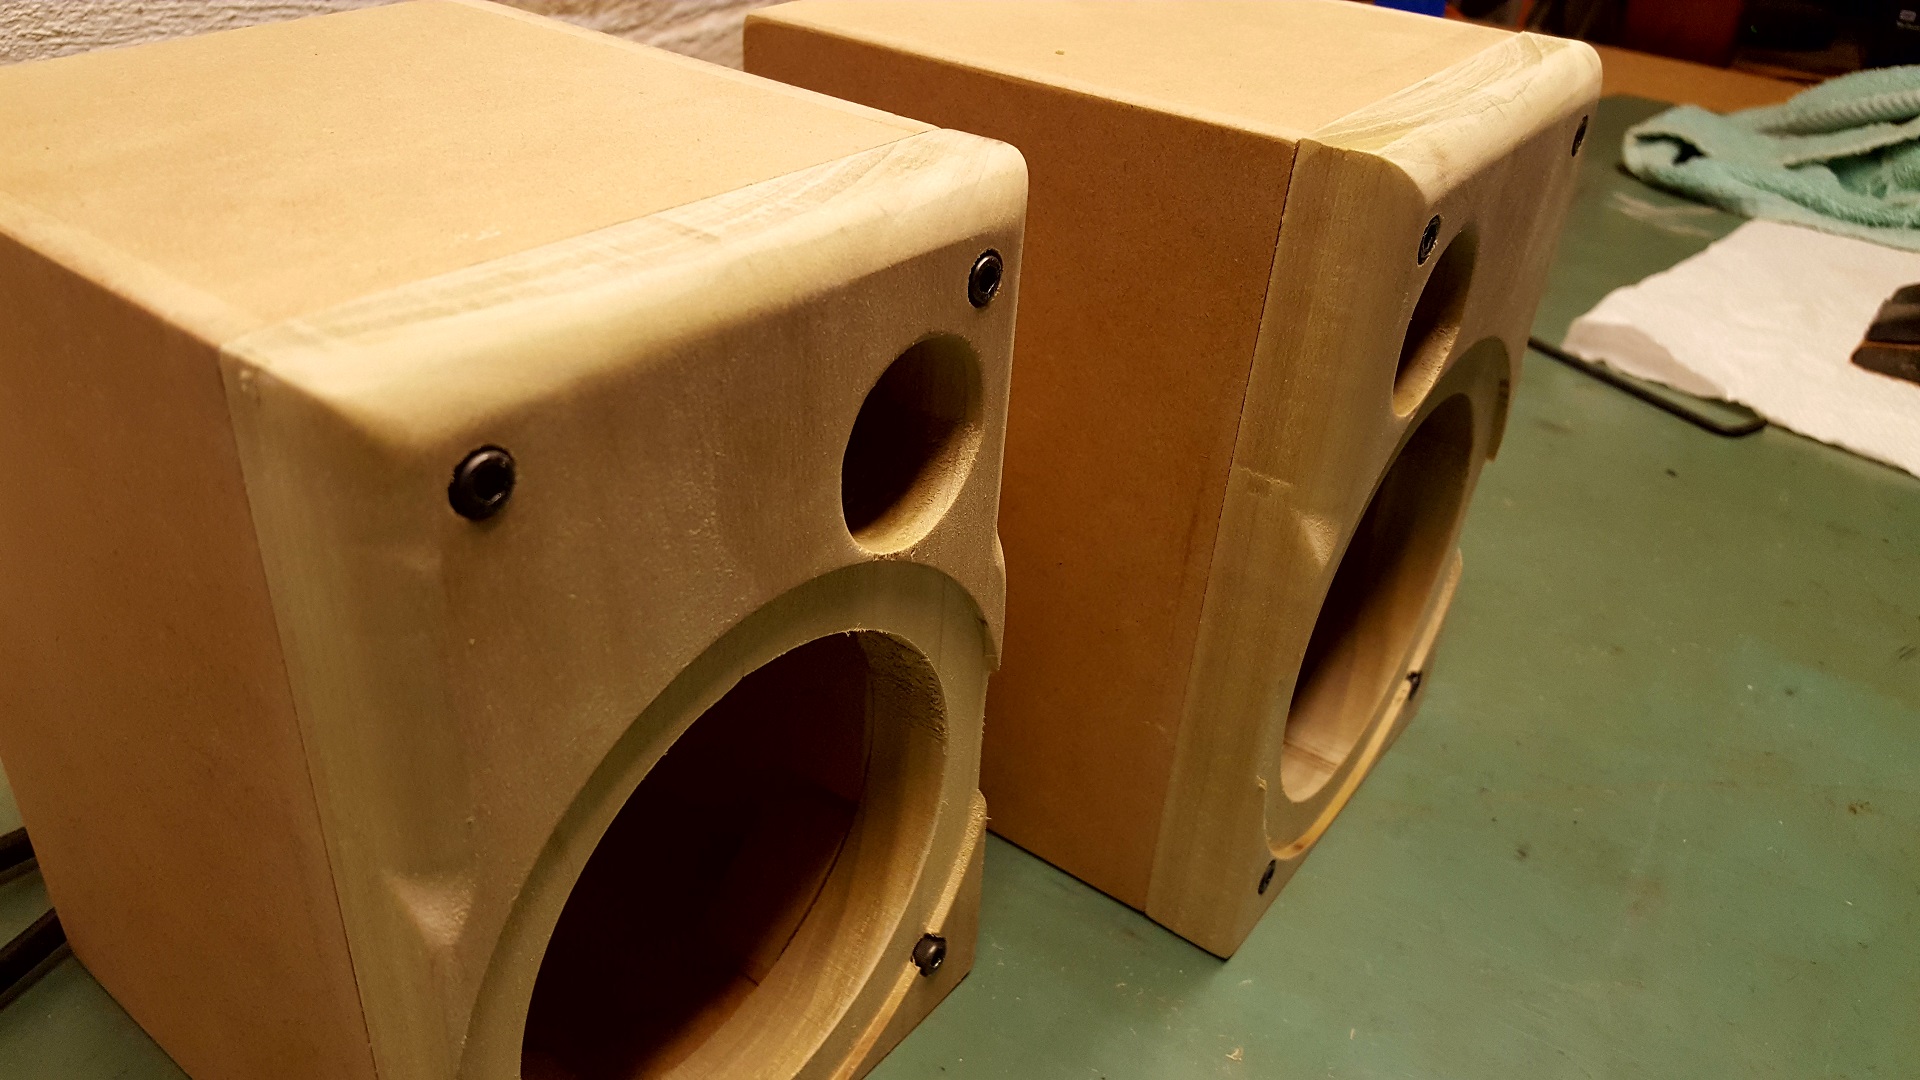
The Denovo box was remarkably easy to glue up. Simply applying Titebond glue and using painters tape to hold it all together to dry was sufficient to get the box together without gaps. Clamps would cut down a little tolerance wiggle from the joints, but were not required. The baffle was intended to be removable, so a set of 45 degree corners were glued in flush with the baffle edge in order to accommodate threaded inserts. The threaded inserts were installed right in the corner meeting points of the cabinet edges and the 45 degree corners.
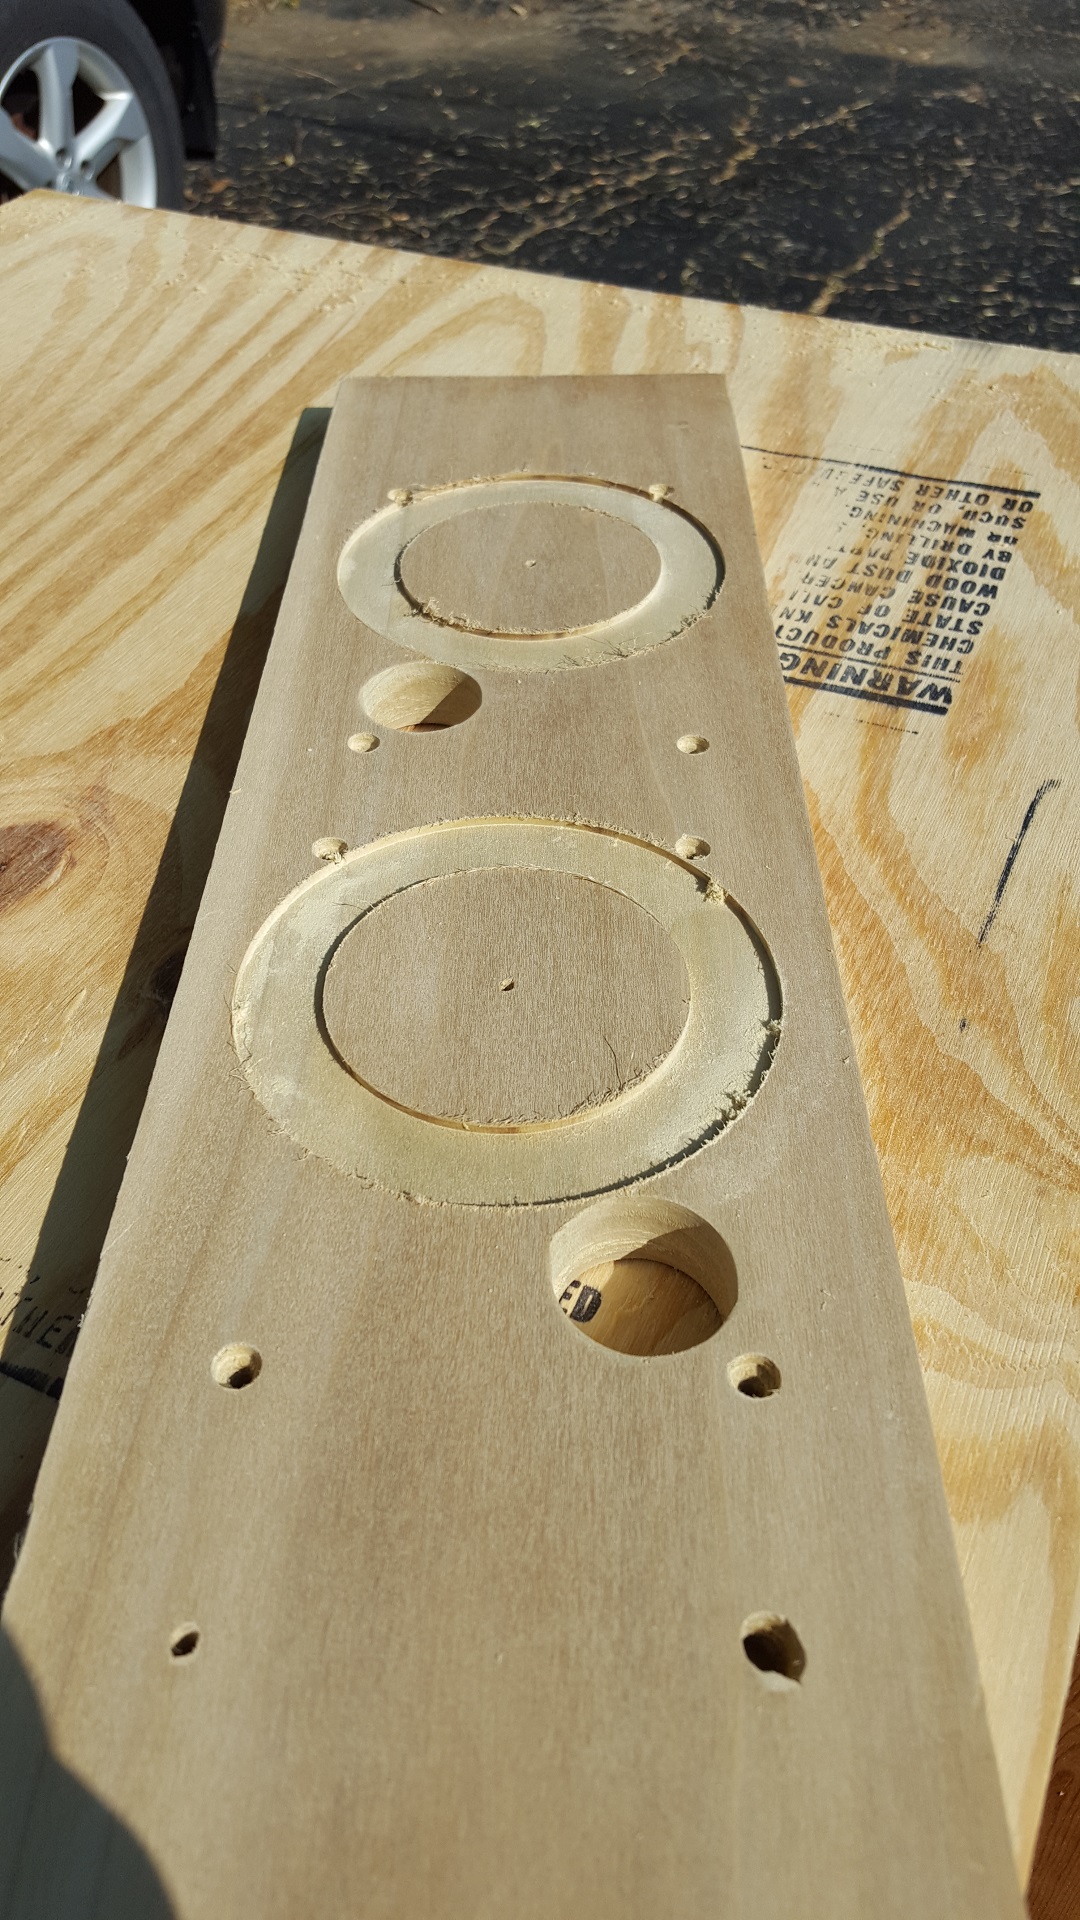
The baffle was made from a poplar board. I used some machine screws that I cut and grinded to a point to provide reference holes for the mounting bolts. Using an outline of the cabinet, I measured and marked the center points for the woofer and tweeter.
The woofer and tweeter holes were cut on the full length board, since it was easier to swing a Jasper jig around on more board than the tiny cut baffles. The tweeter hole was made with a 1.25” forstner bit on a drill press. The bit is actually slightly small for the ND16 tweeters, necessitating a little bit of work opening the hole. A 1/2” disk sanding attachment on a drill will do the job with minimal deformation of the round hole if you’re careful. The board was long enough to accommodate a single screw up on the baffle when the drill press grabbed the board and ruined one of the mounting holes. With the holes cut, the boards were rough cut just over sized to the cabinet and bolted on.
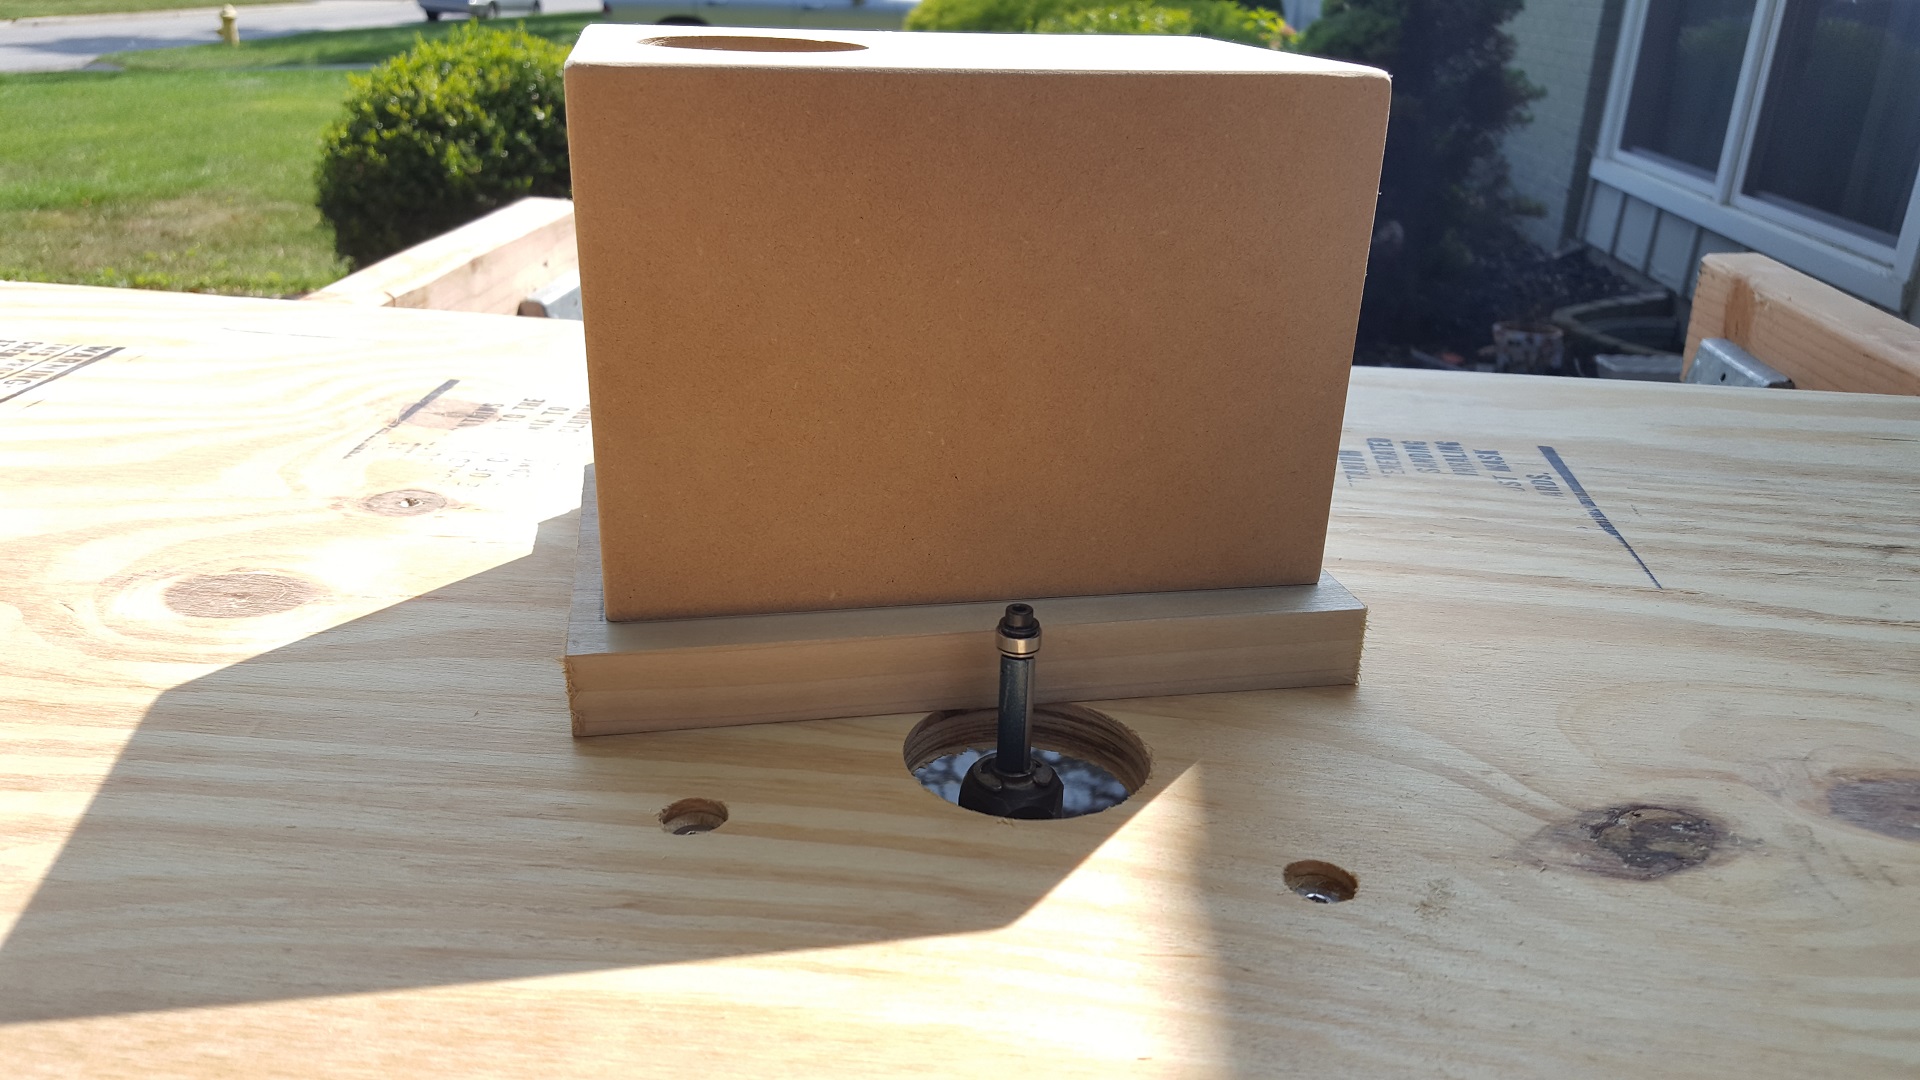
I made a router table with a simple 1/2” plywood board drilled to fit my hand held router from underneath. A flush trim bit was used to cut the baffles to match the cabinet dimension.
Pro tip: don’t leave as much wood as I did when doing this, and use a higher quality spiral flush trim it. You’ll get much smoother corners that way. A 1/2” round-over was applied to the front baffle, but could not extend to the woofer area, so a fence board was clamped in place to stop the router at a consistent spot on both baffles.
Once together, the drivers were test fit and some breathing room was opened behind the woofer using a simple hand rasp and files.
The finish is in 2 parts. The MDF cabinets were primed, painted, wet-sanded, and polished to a gloss black. I had never done a wet sanded gloss black finish before, so this was a learning experience. It took several rounds of paint and sanding to quit sanding through and into the primer again.
The Poplar baffles are stained a deep expresso and finished with a semi-gloss poly. The finishing part took quite some time, as I had not tackled these types of finishes before. Ultimately it took about 4 rounds of finishing, sanding back down, refinishing, and repeating the whole process to get a satisfactory result.
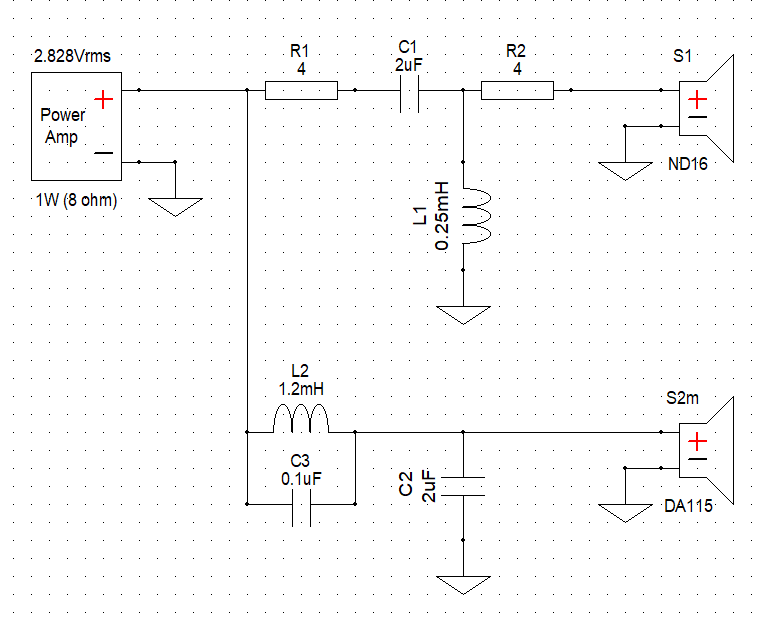
Crossover Design:
The crossover was planned using the Dayton FRD and ZMA files before the drivers were even purchased. Using free tools including Response Modeler, WinPCD, and XSim the speakers were modeled with a 2 way 2nd order electrical filter plus a notch filter on the woofer to suppress the breakup of the aluminum cone. The tweeter padding was added both before and after the filter, I found that adjusting values on both sides allowed me to better match the phase between the drivers.
Once the cabinets were finished, the drivers were installed and tested using a breadboard version of the crossover outside of the cabinet and measured with ARTA. The rear of the cabinet was left with a hole waiting for the terminal cup, but this would affect the low end primarily leaving the crossover region of 3-4kHz unaffected for measurement. The actual measurements led to a minor tweak to the capacitor values and padding resistors to bring the response within to my +-3dB requirement and improve the reverse null measurement that indicates the phase is well aligned between woofer and tweeter.
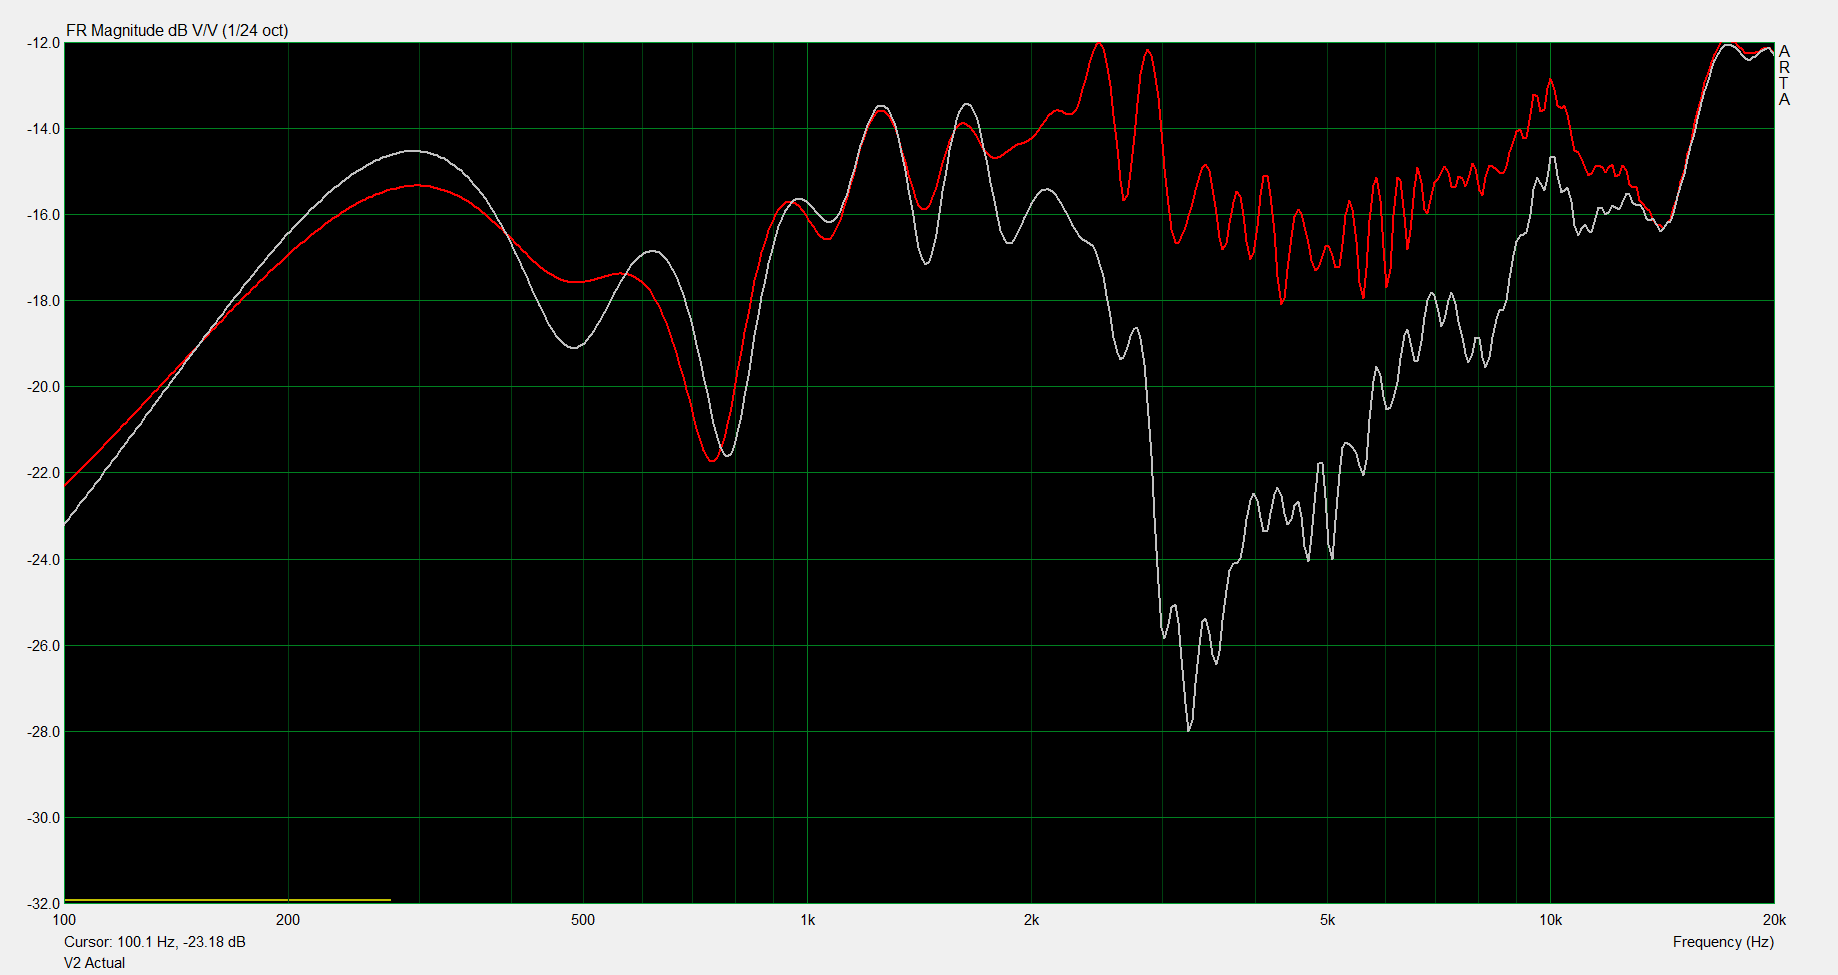
Ultimately I spent a lot of time making quasi anechoic measurements on these speakers and adjusting the crossover. My measurement environment isn’t ideal, but in comparative measurements with other speakers I have in the house this design performs well. Particularly when compared to the incredibly inexpensive Dayton B652’s these will be replacing, this design is a quantum leap above. On the right we have the frequency response of the B652 in purple compared to the MicroSat in yellow. The B652 suffers from a major response variance from 4-6kHz resulting from minimal crossover and interactions between the tweeter and woofer.
With the values finalized, the crossovers were built up on pegboard and mounted in the rear of the cabinet.
Final measurements were taken to validate the design. There is a bit of a difference between the L and R finished speakers, but performance is still good and listening doesn’t reveal any of issues I’m seeing in the measurements. At a future date, I may dig into the crossover to see if there are component issues, but for now I’m enjoying them.
Tips & Tricks:
Most of the learning involved in this build revolved around the finishing portion of the cabinet build. Tips include:
For gloss black finishes using enamel, ensure the paint layer is very think to avoid wet sanding back down to primer. Do not do this in layers of wet coats, instead keep coats reasonably thin, and apply repeated layers with 24 hours in between to ensure the enamel is cured. Otherwise, the paint is too thick to cure properly and takes weeks or months to properly harden.
For stain and poly on Poplar, do not over sand the bare wood. Leave some roughness for the stain to soak in. Use fine steel wool or 600 grit paper to smooth prior to poly application. Use high quality brushes to apply your poly and minimize bubbles. Use the same 600+ grit or 000 steel wool to smooth between poly coats.
Ultimately, the best tip for finishing is to be patient, read directions, and research on line to hear what others have already experienced.
Conclusion:
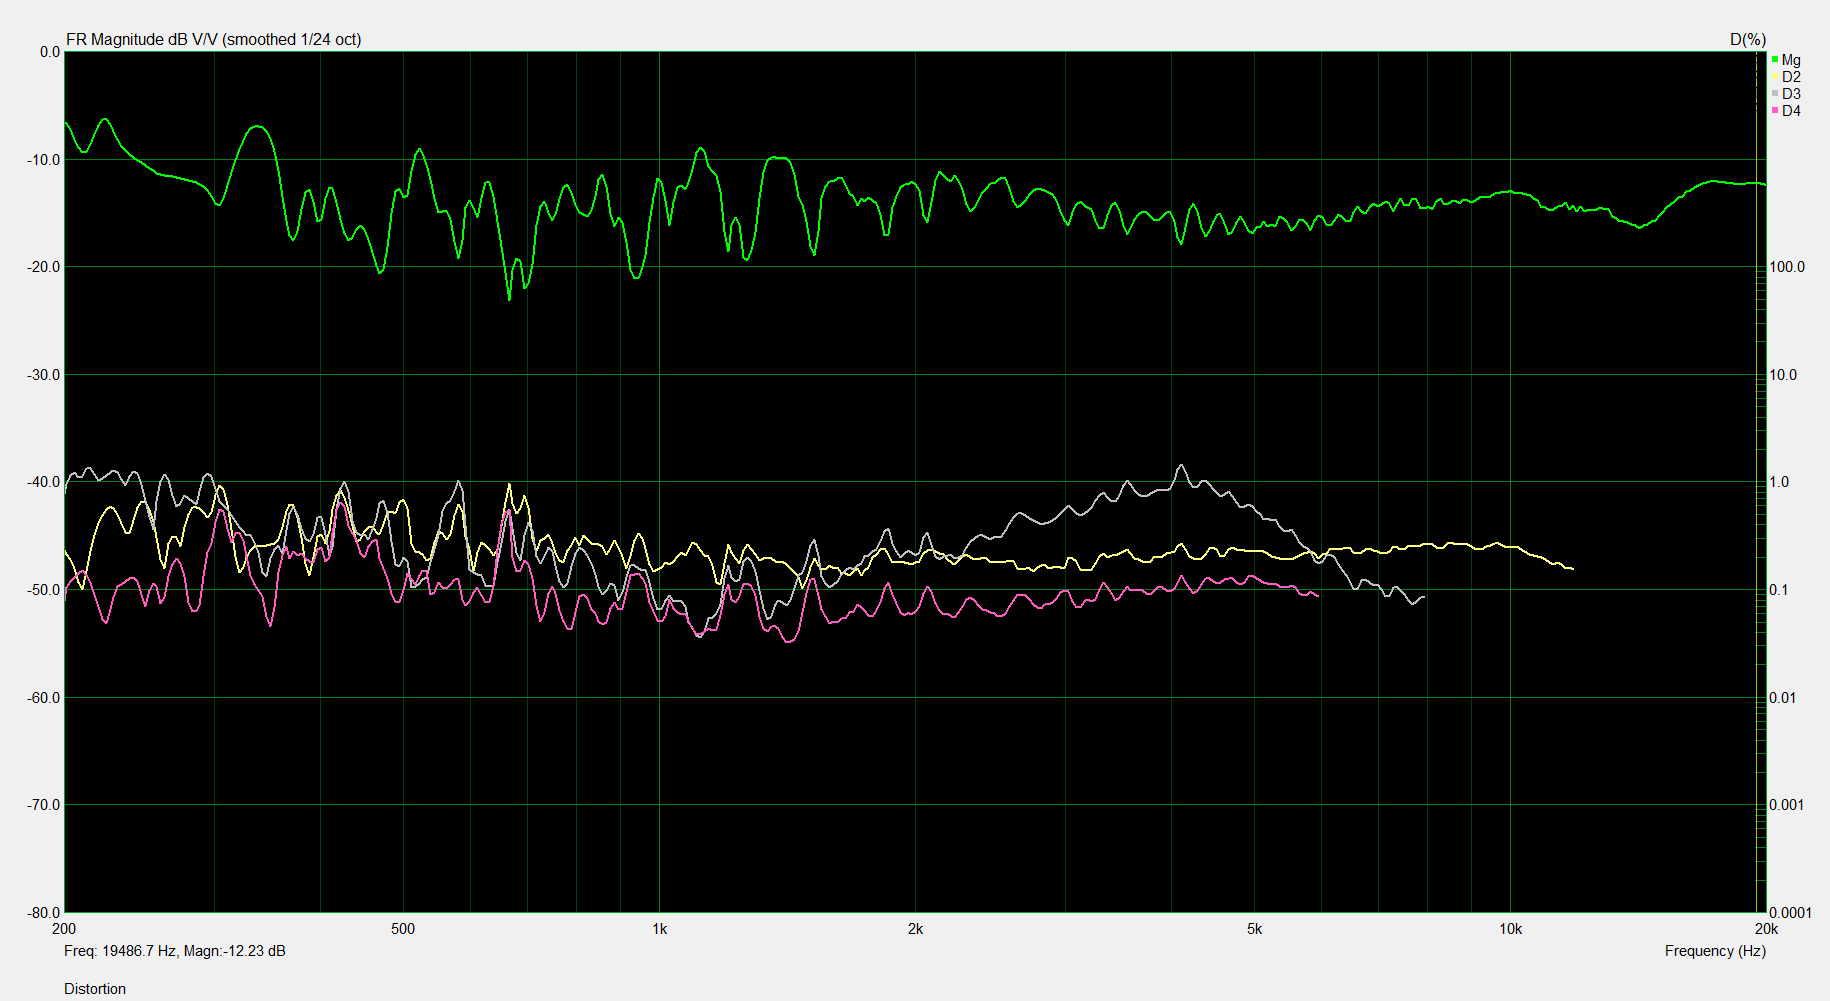
Final Response Measurements were taken at 85dB and 20″ away. The impulse response was gated to eliminate reflections, making the measurement valid from about 300Hz up. On the left is the on axis response with an overlay of the tweeter reversed. The drop in response indicates the tweeter and woofer are largely in phase, resulting in cancellation as they hand off to each other. On the right we have a distortion measurement showing less than 1% at 85dB across the whole spectrum.
With these in place and powered by the Indy 8 subwoofer / 2.1 amp, I’m very pleased with the whole system. These satellites have a very clean output, excellent dispersion and imaging, and plenty of output for a small room. The combination of the Indy 8 sub and the MicroSat speakers make a perfect Bose killing stand-alone machine for under $300 total investment.
About the Designer:
Paul Graves has been designing woofers since he was a teenager. I’ve also worked on amplifier designs for 25 years and have built and currently use several prototype pieces of audio equipment, primarily for my life as a bass player.
Project Parts List:
+ There are no comments
Add yours