
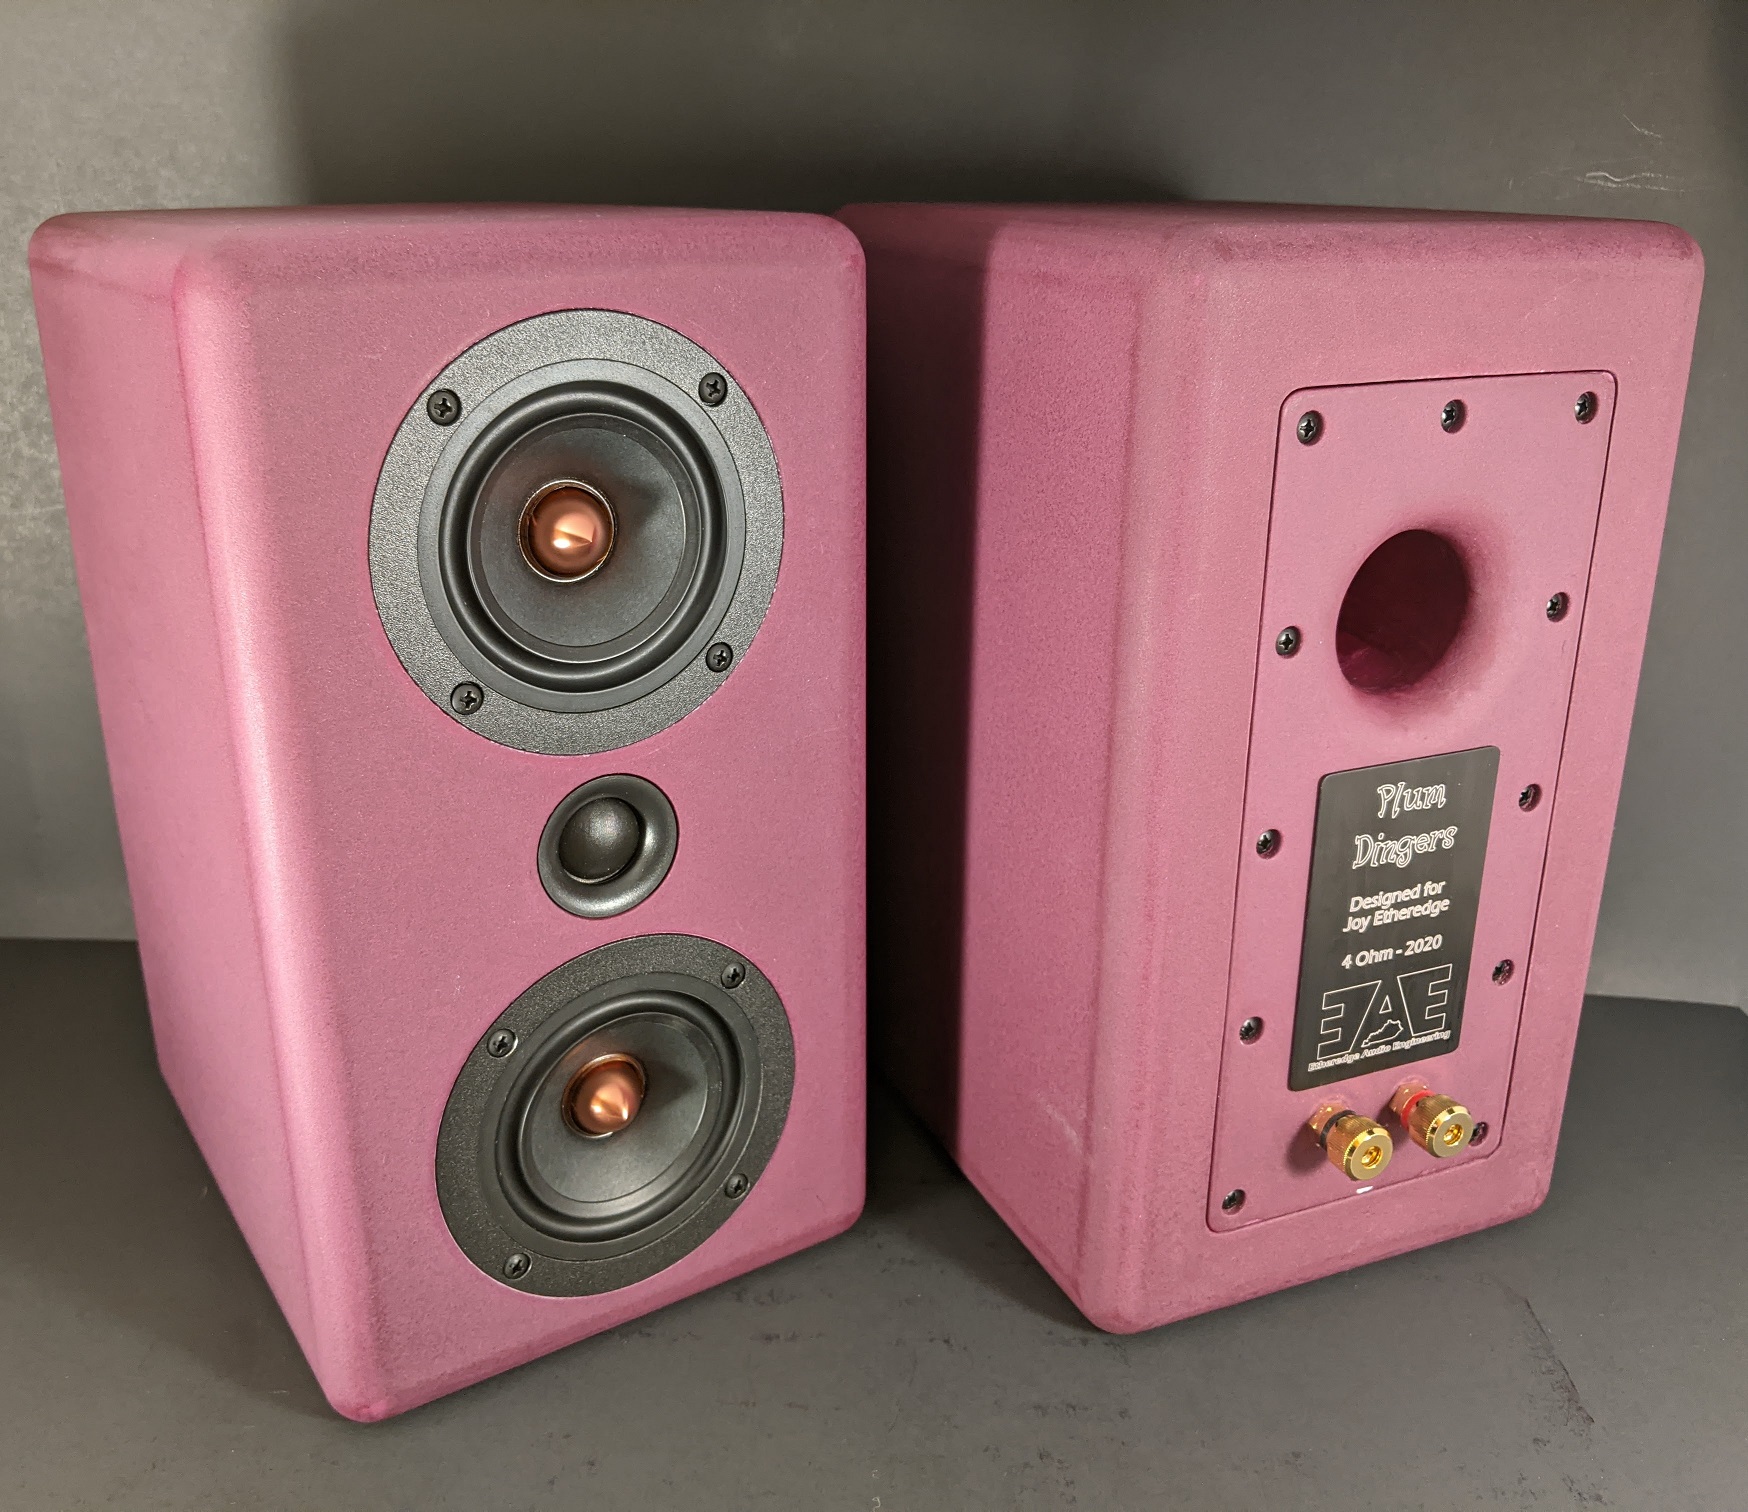
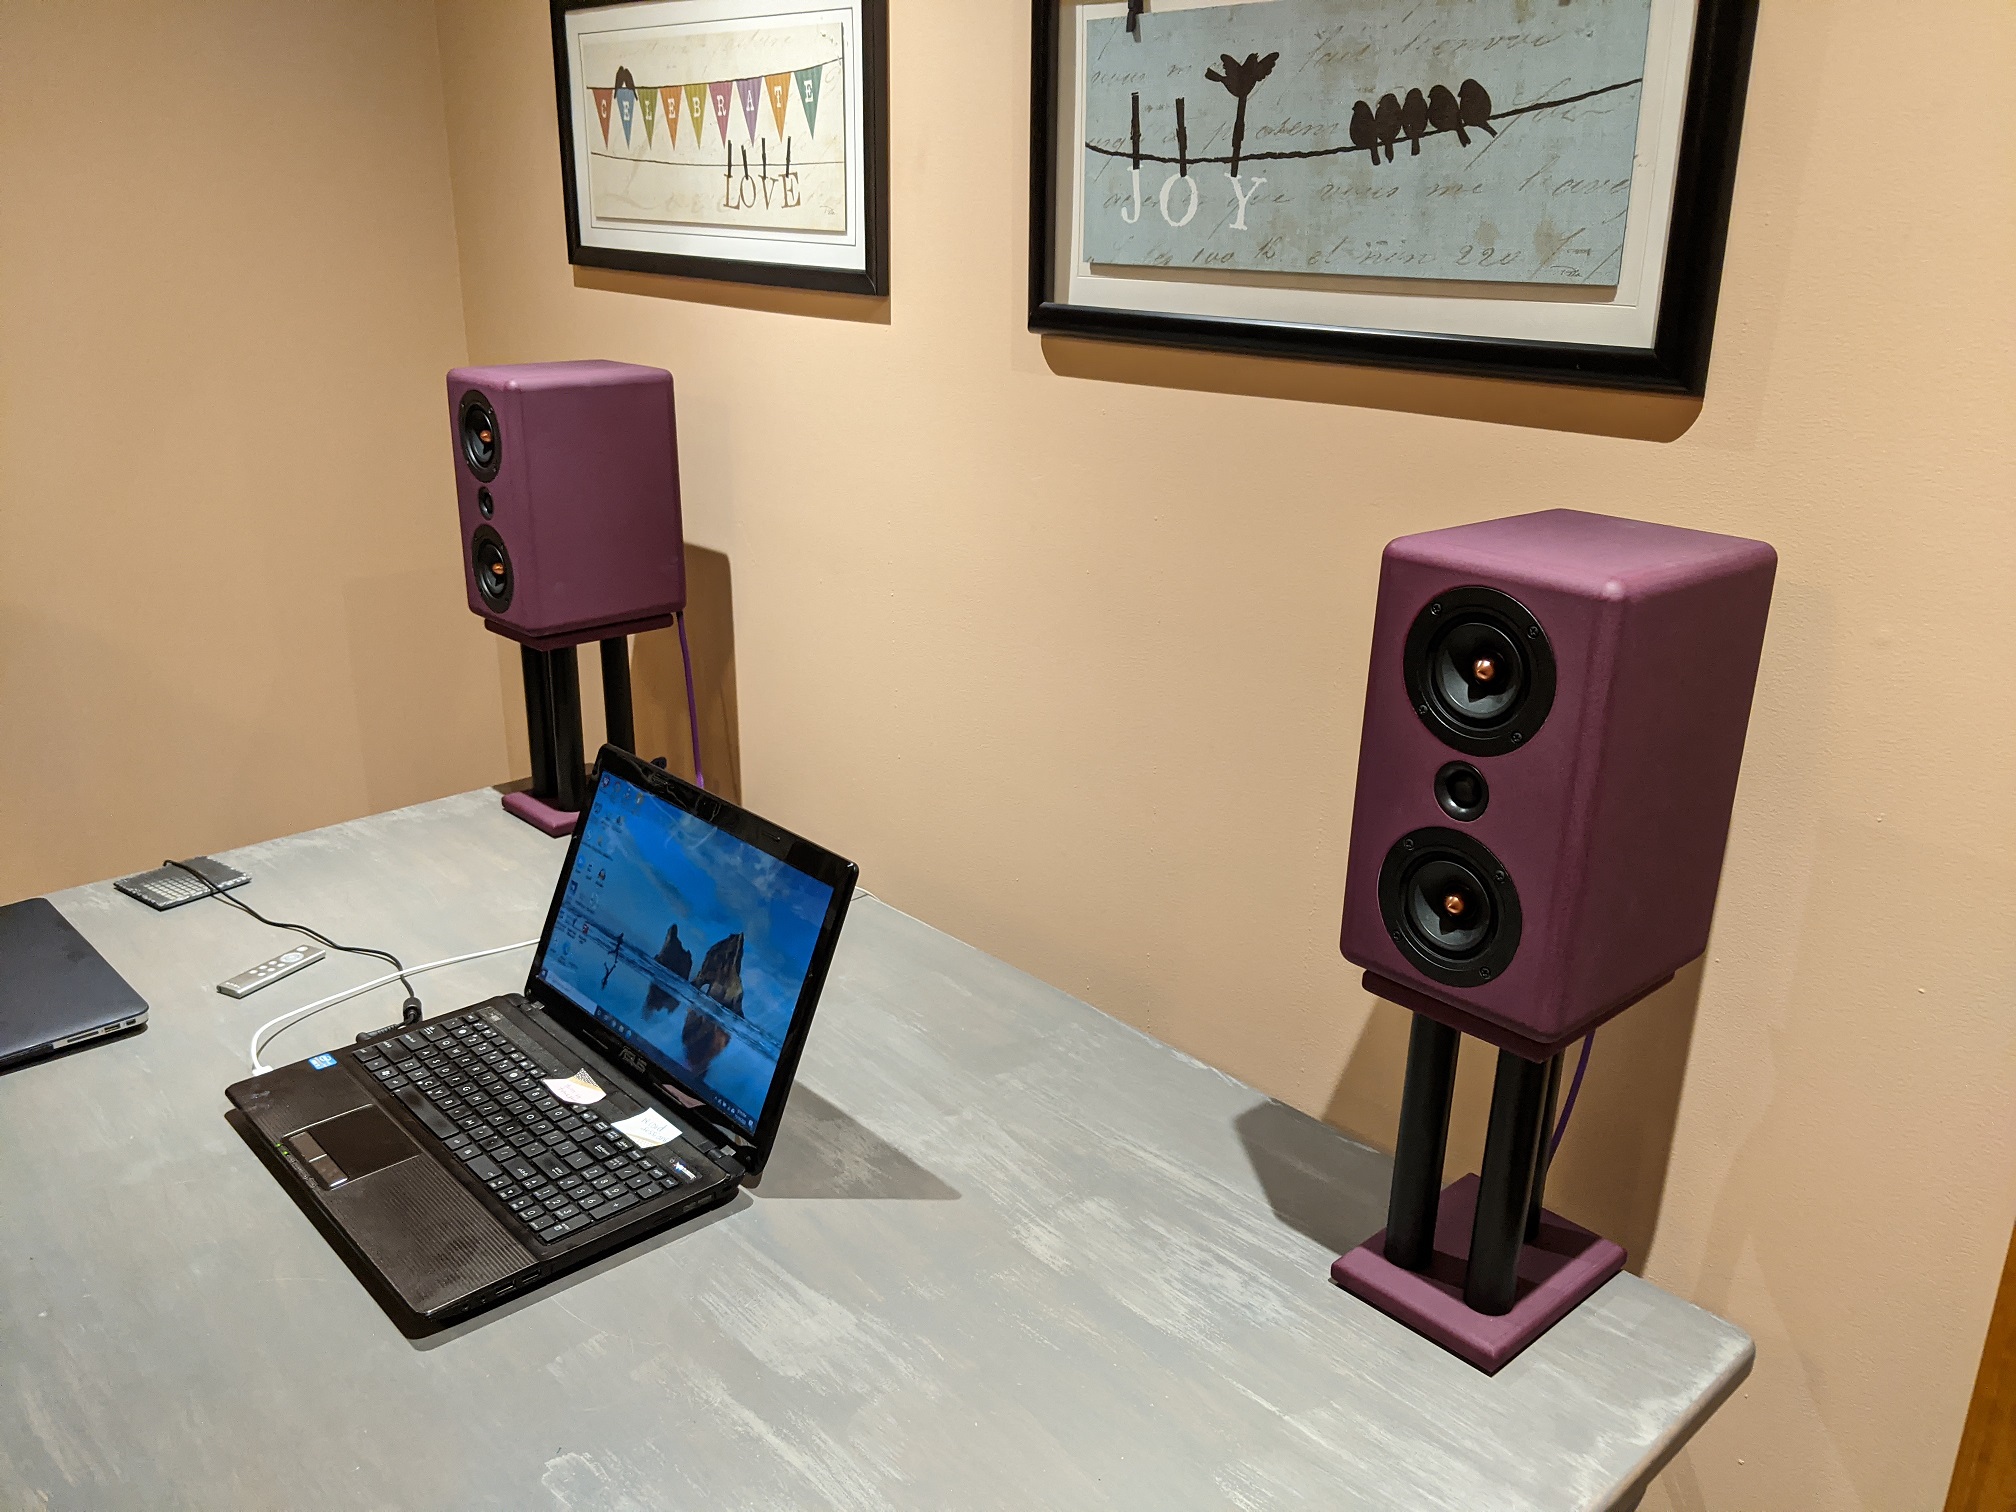
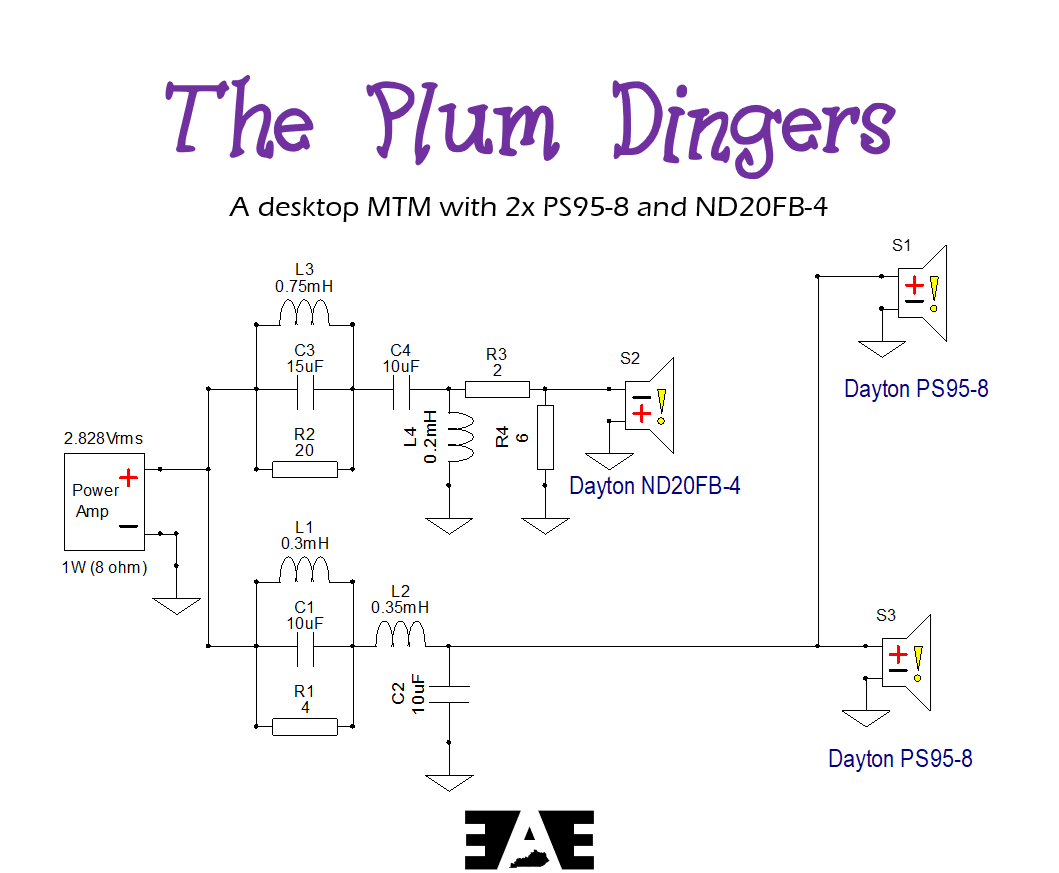
The Plum Dingers – Desktop MTM


Designer:
Keith Etheredge
Project Category:
Bookshelf Speakers
Project Level:
Intermediate
Project Time:
8-20 Hours
Project Cost:
$100 – $500
Project Description:
Etheredge Audio Engineering is proud to present “The Plum Dingers.” This is a small desktop MTM design with a matching set of stands to put the tweeter at ear level when seated at your desk. It was designed to help my wife conduct virtual tutoring sessions for children with dyslexia during the pandemic.
Design Goals:
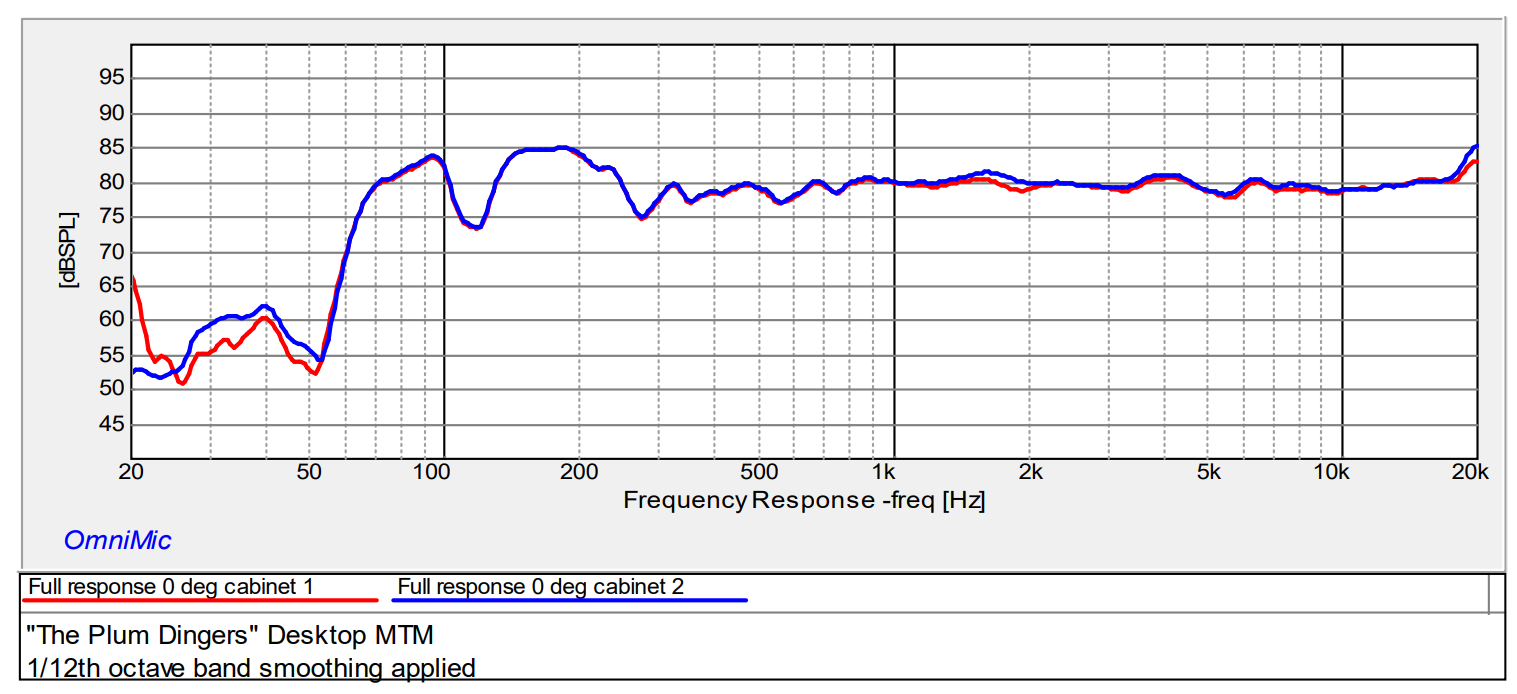
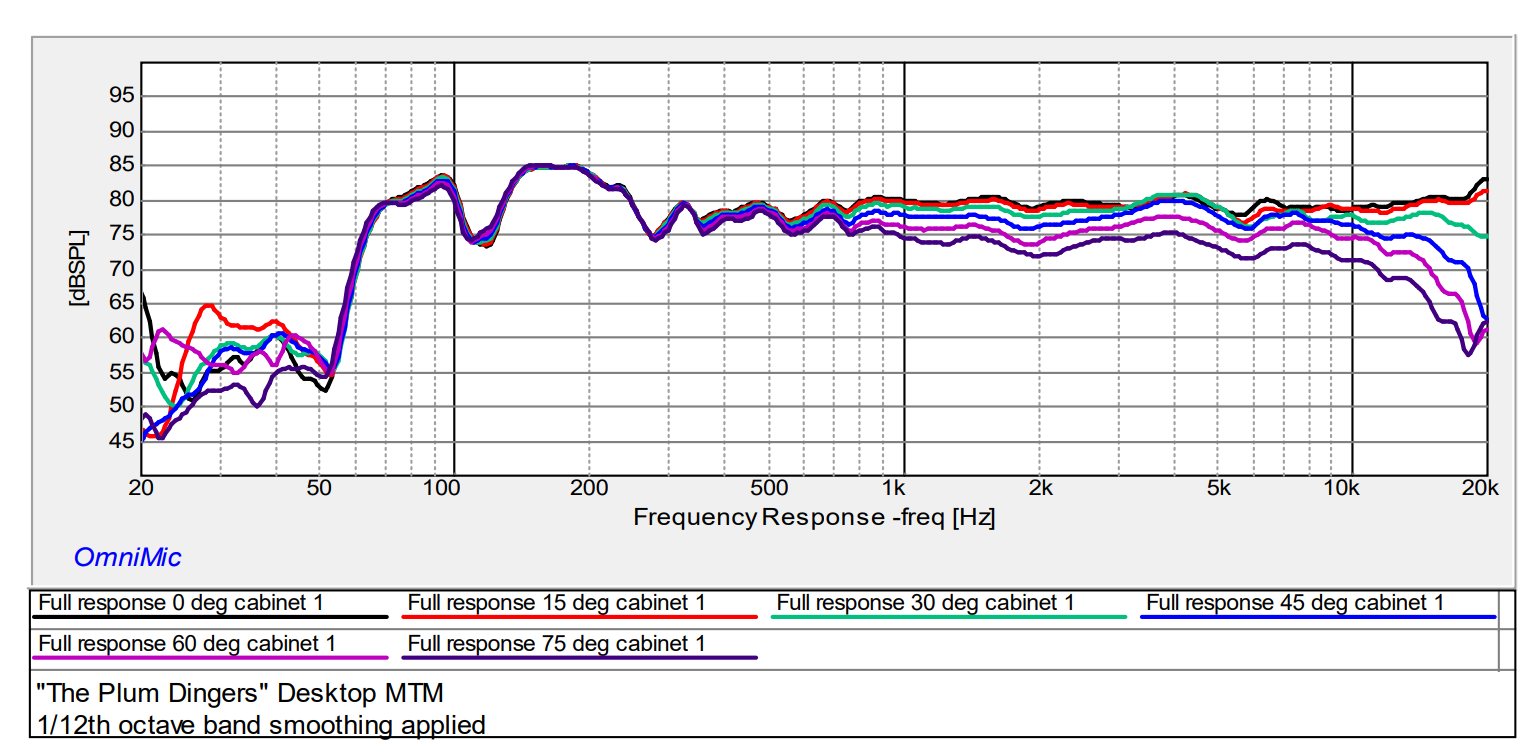
The goal of this design was to accurately convey the voices of students through virtual tutoring sessions. Being able to clearly hear the speech of the students is critical to providing good instruction. This meant a more flat frequency response was called for, and the vertical MTM design allows for a wide horizontal dispersion and good intelligibility while seated at the desk.
Driver Selection:
Each speaker uses two PS95-8s (295-349) and one ND20FB-4 tweeter (275-035). I chose the PS95’s for the extended frequency range in a small volume, as well as the classy copper phase plug. It really sets off the purple color nicely!
Enclosure Design:
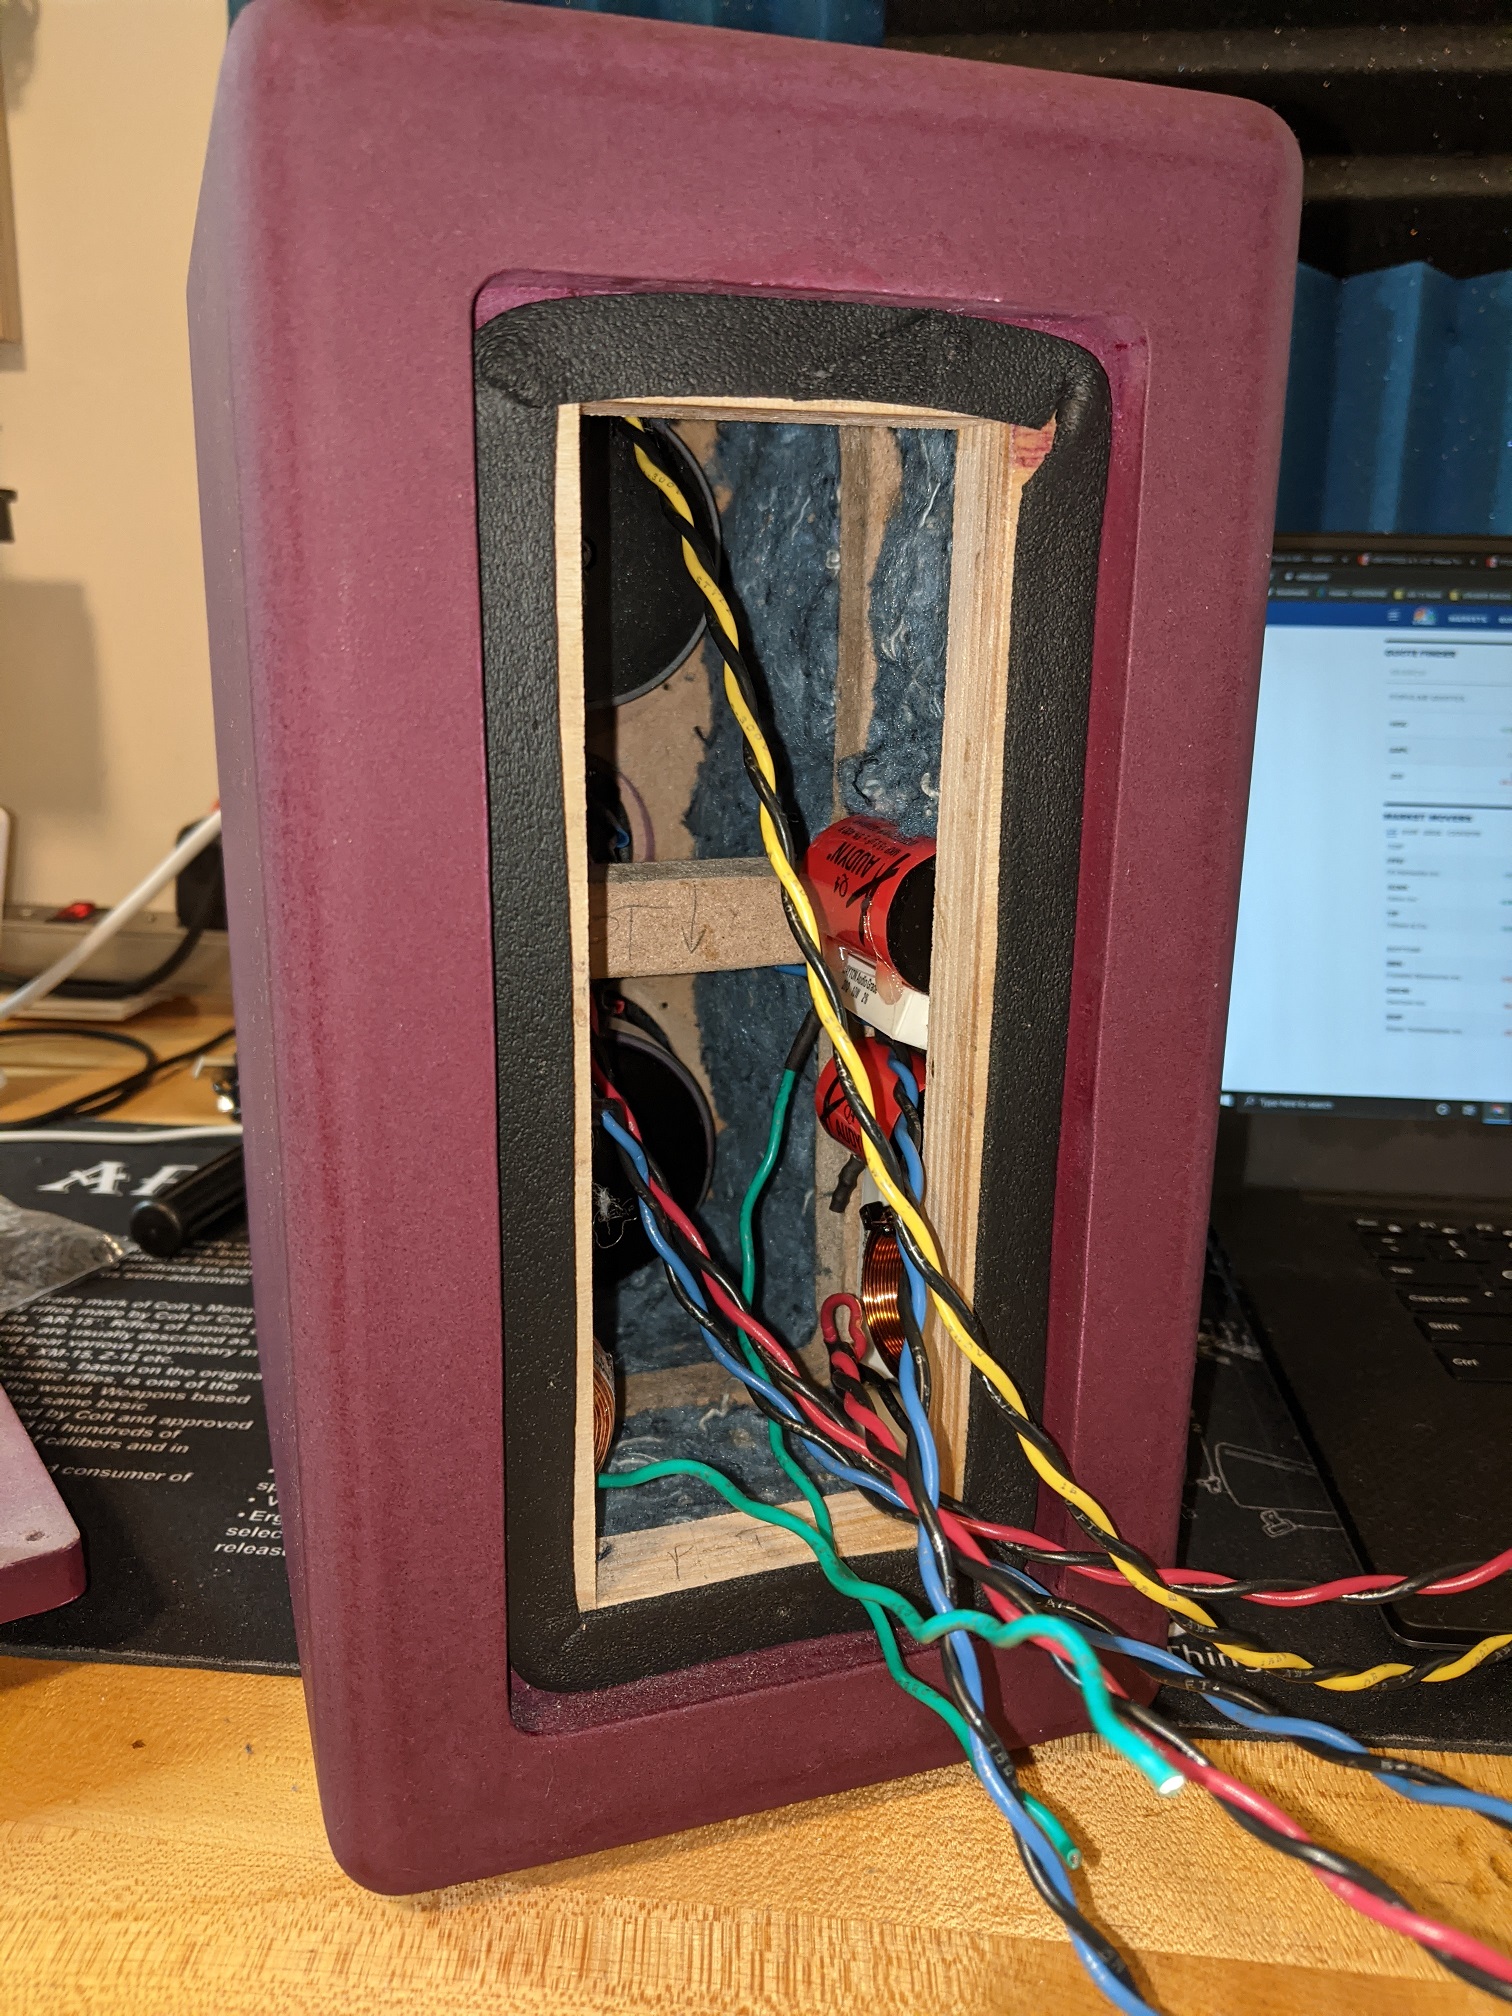
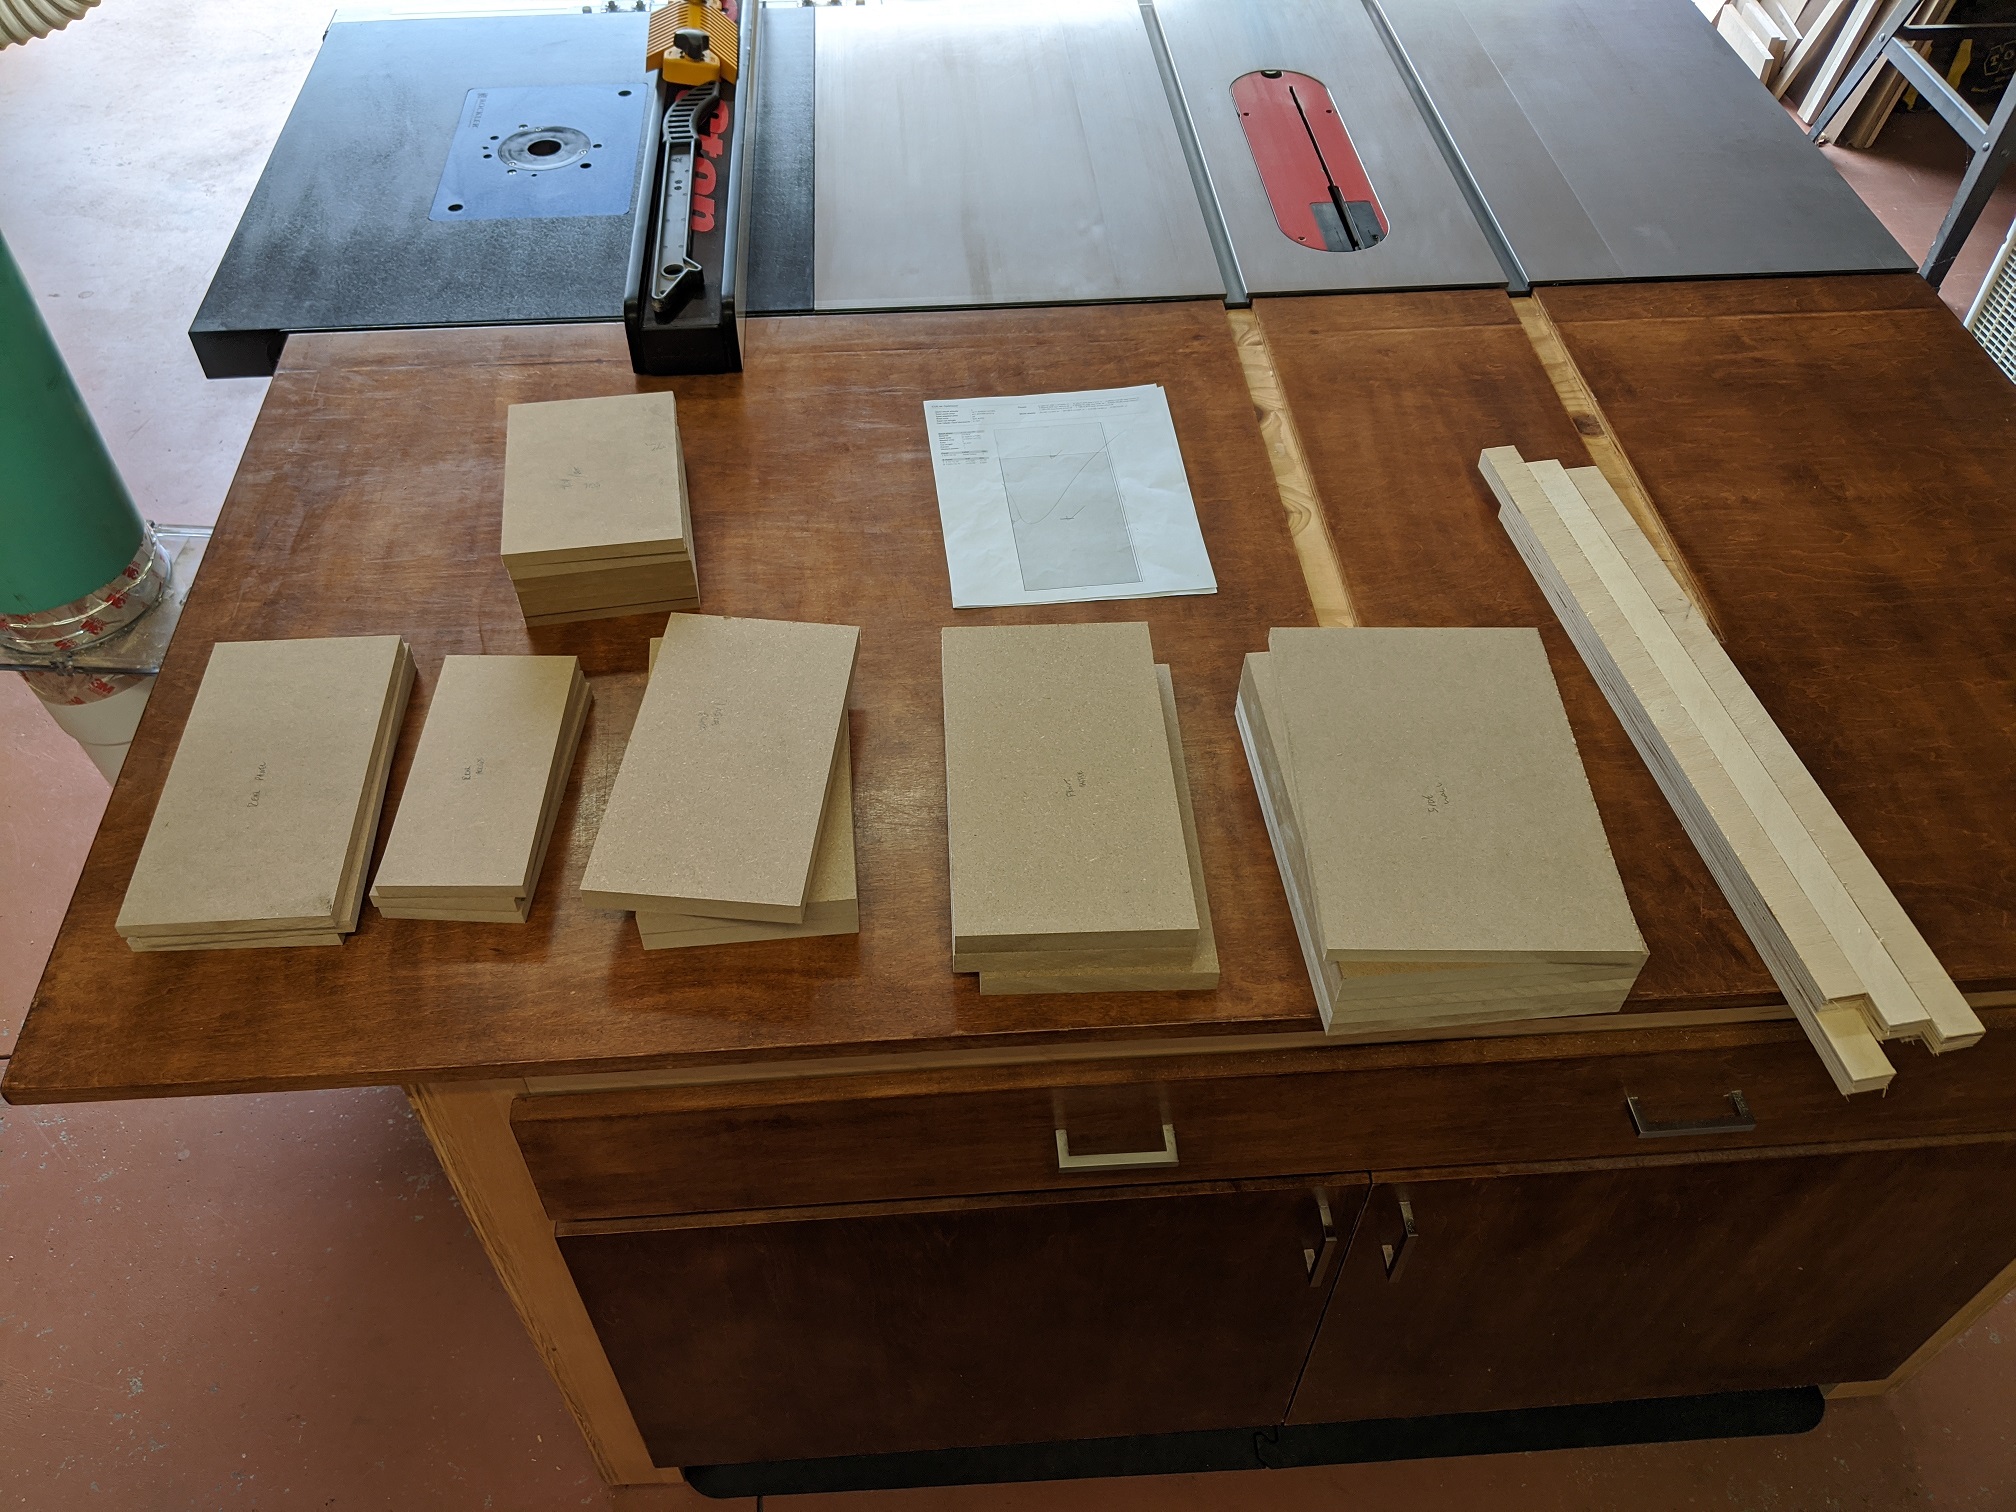
The enclosure is made from a 3/4″ MDF front baffle, 1/2″ MDF sides, top, bottom, and back, with a removable 1/2″ MDF rear panel that has been planed down to install flush when accounting for gasket tape. There is an internal brace made from 3/4″ MDF, and a rear panel mounting frame made from 3/4″ thick strips of baltic birch plywood. The plywood is recommended over MDF for this design so the screws have something consistent to bite into.
The cabinet itself is nominal size of 6″ wide, 11″ tall, and 8″ deep. It is a two-way bass reflex design, with a tuning frequency, Fb, of 93 Hz. It has a predicted frequency response of 75 to 20,000 Hz (F3 = 75 Hz). The port is made from 2 inch PVC pipe, with a roundover on the outside. Total length of 2 5/8″ long.
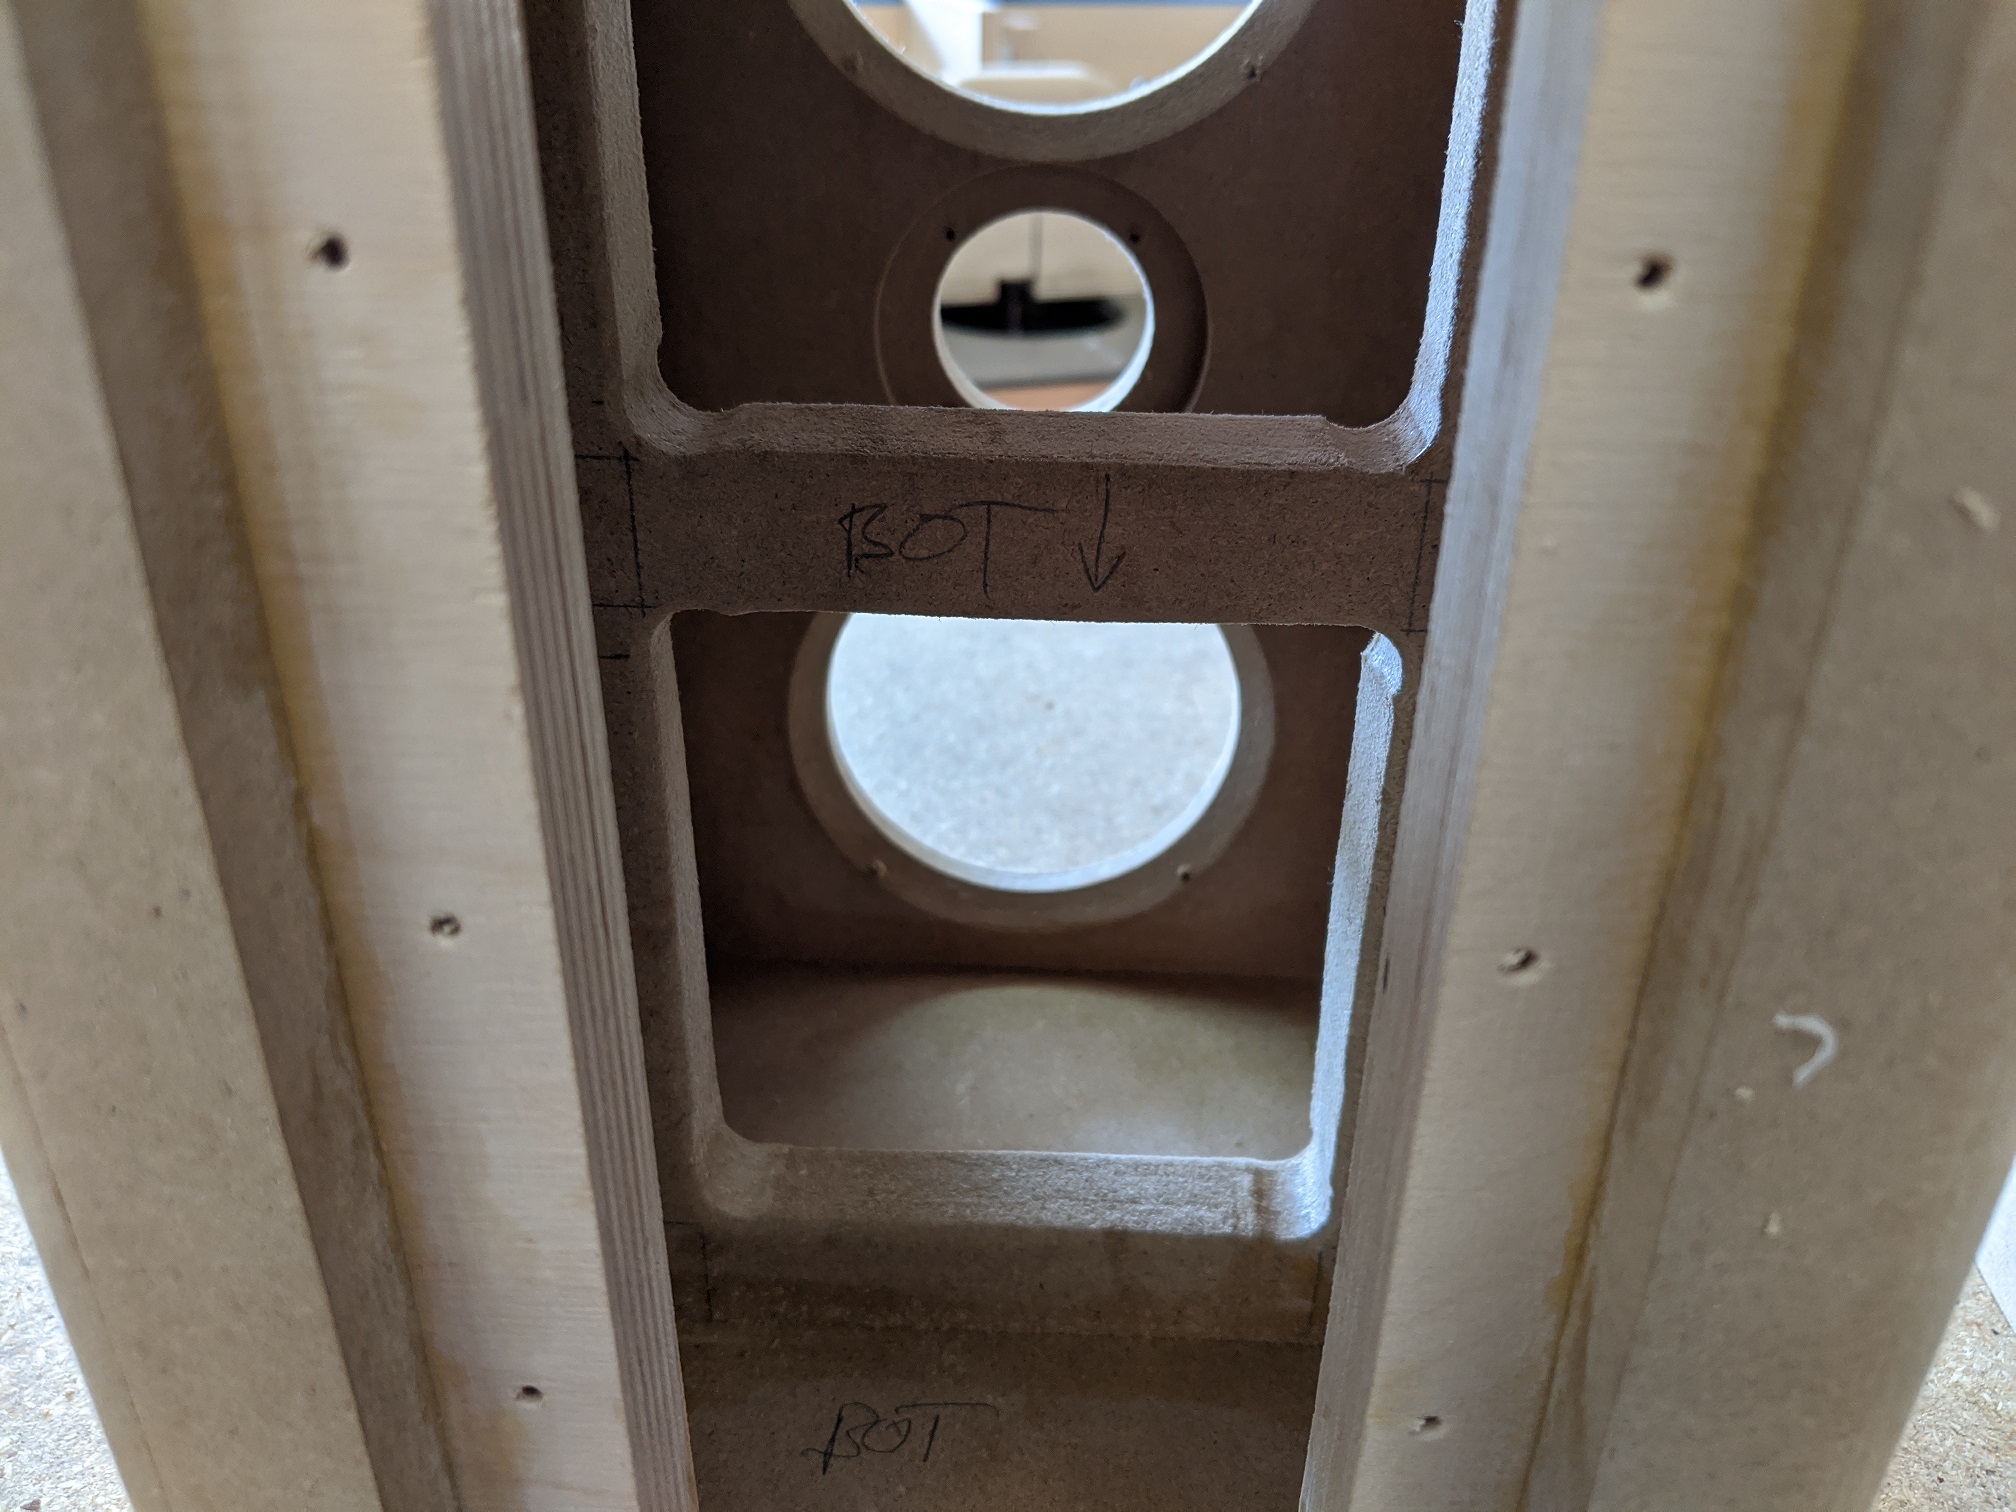
The PS95-8 drivers are flush mounted from the front, with a relief chamfer cut on the back side of the driver recess inside the cabinet. The ND20FB-4 tweeter is also flush mounted, but since it is a rear mount tweeter design, extra attention was needed. I had to carefully measure the depth of the tweeter for final installation including some gasket tape, and bore a large clearance hole for the mounting tabs to sit in. The tweeter was screwed into place from the rear using #4-40 pan head screws of appropriate length so they did not poke through the front baffle. Pre-drilling these holes to the right depth is highly recommended.
Enclosure Assembly:
The enclosure walls and rear panel were glued together first. Rebates were cut on all panels to aid in the alignment of parts while gluing up, as well as to leave a small amount of material for flush trimming later. The middle brace was installed with glue next. Baltic Birch strips were glued into place in the rear of the cabinet before the front baffle was glued on. These needed to be a snug fit, but not overly exact. Just snug enough to allow gasket tape to do it’s job later.
The removable rear panel was some added work. I made a master size template for the rear panel, and used template routing techniques with bushings to create a series of templates before arriving at a final template. This final template created a hole that’s 1/32″ clearance on all sides for the rear panel to install.
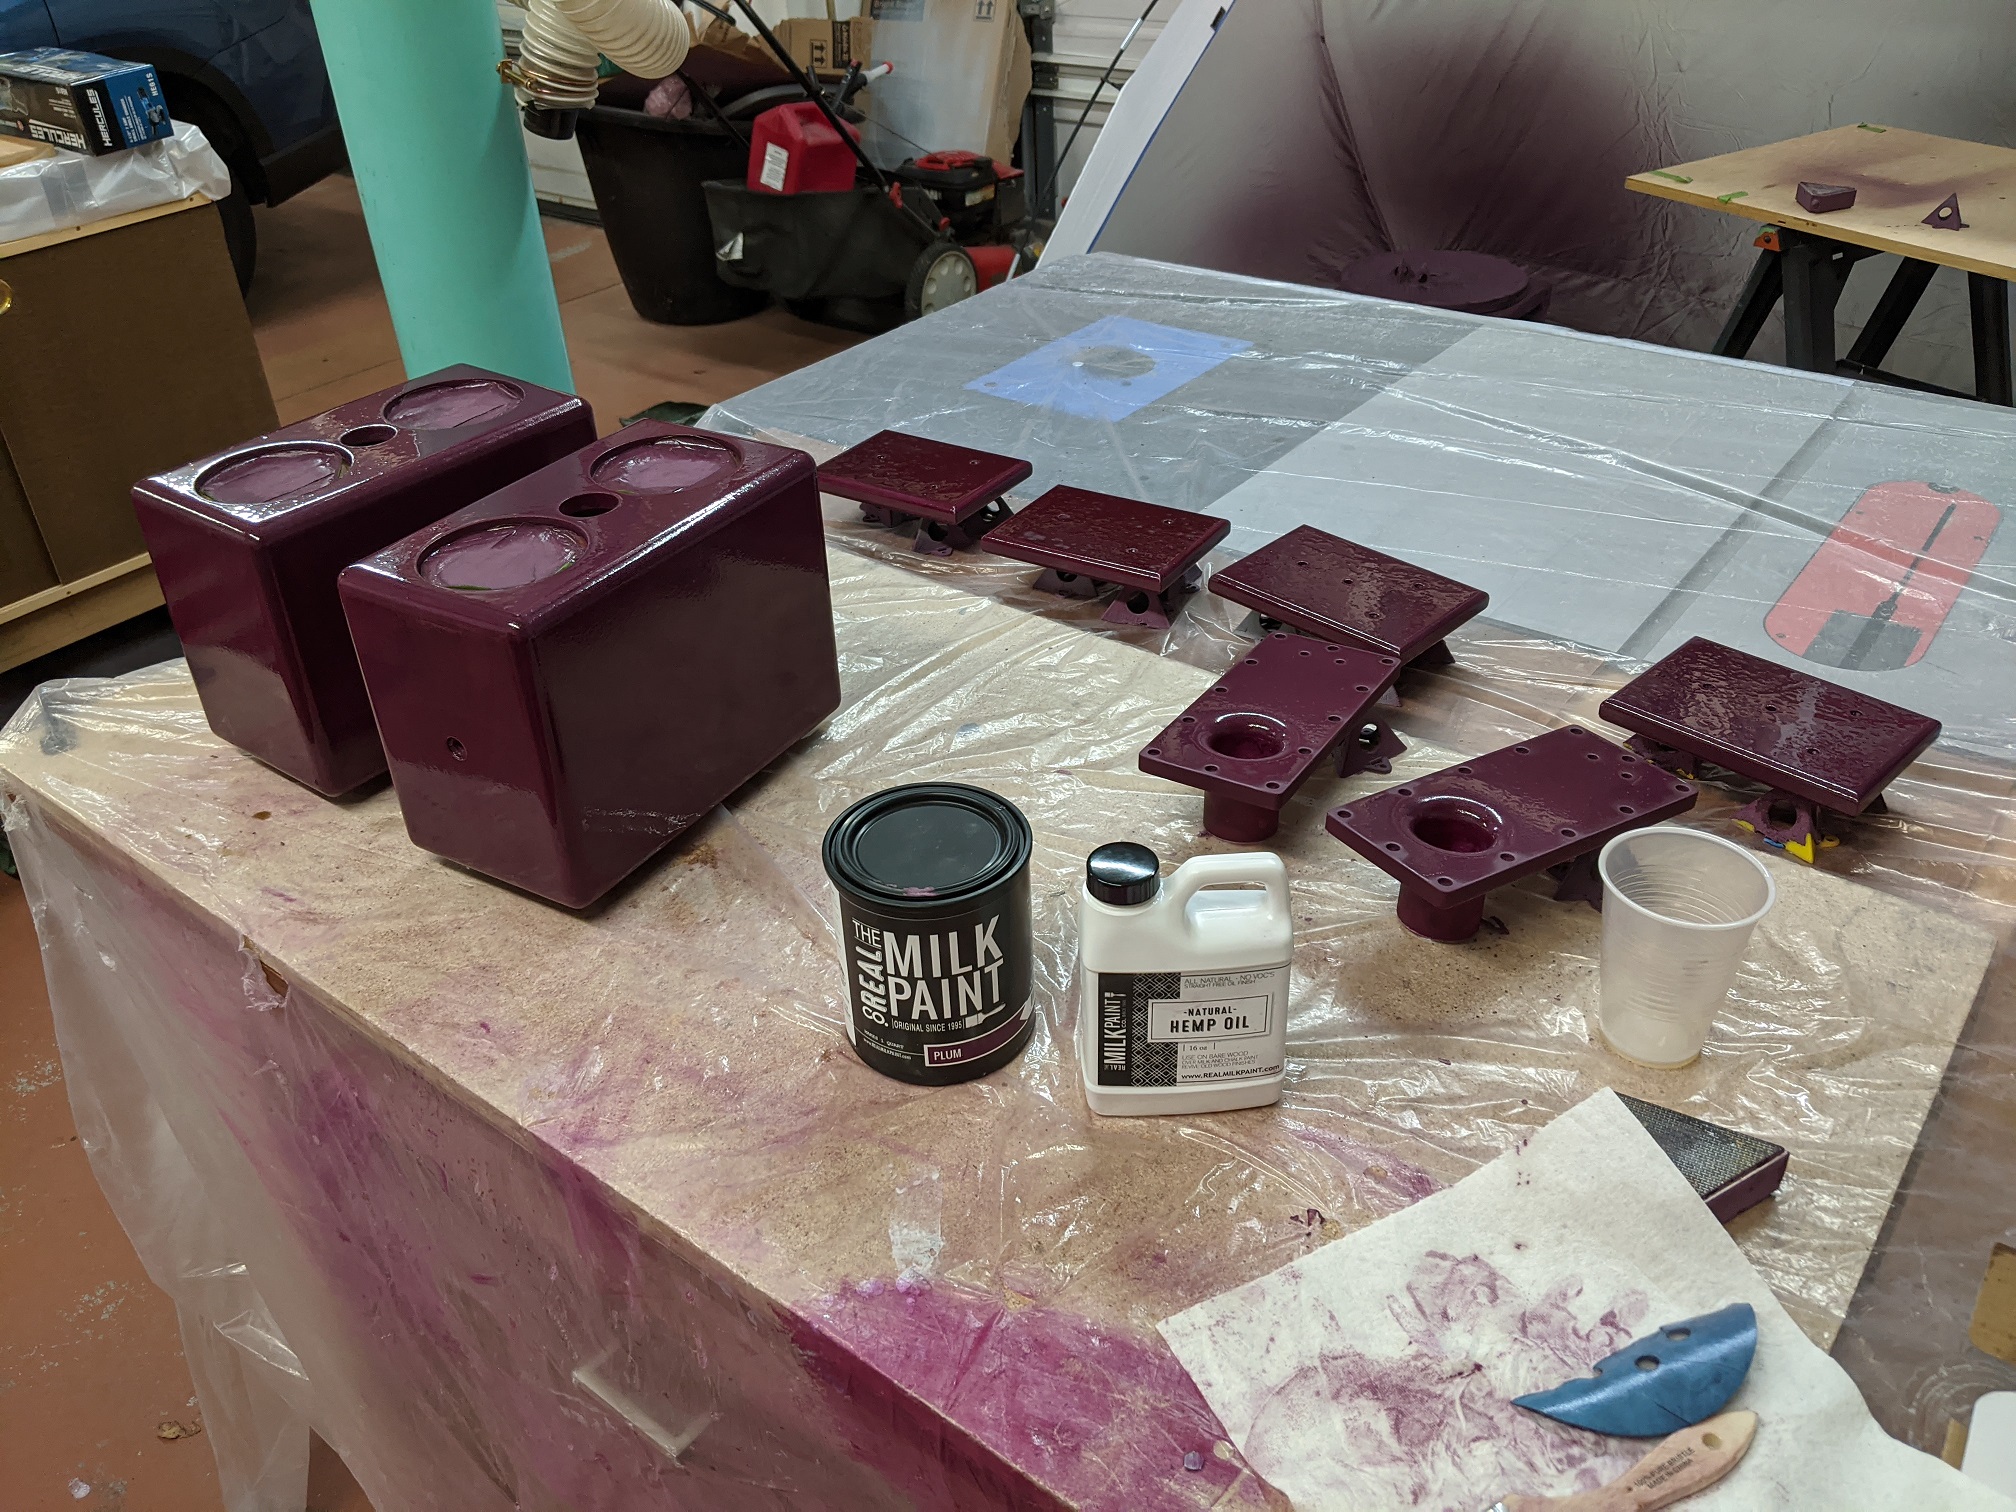
The cabinets are finished in Plum color from the Real Milk Paint Co., and top coated with two liberal applications of hemp oil. The oil deepens the color and seals the milk paint, which is porous and should not be left as a finished coat on its own.
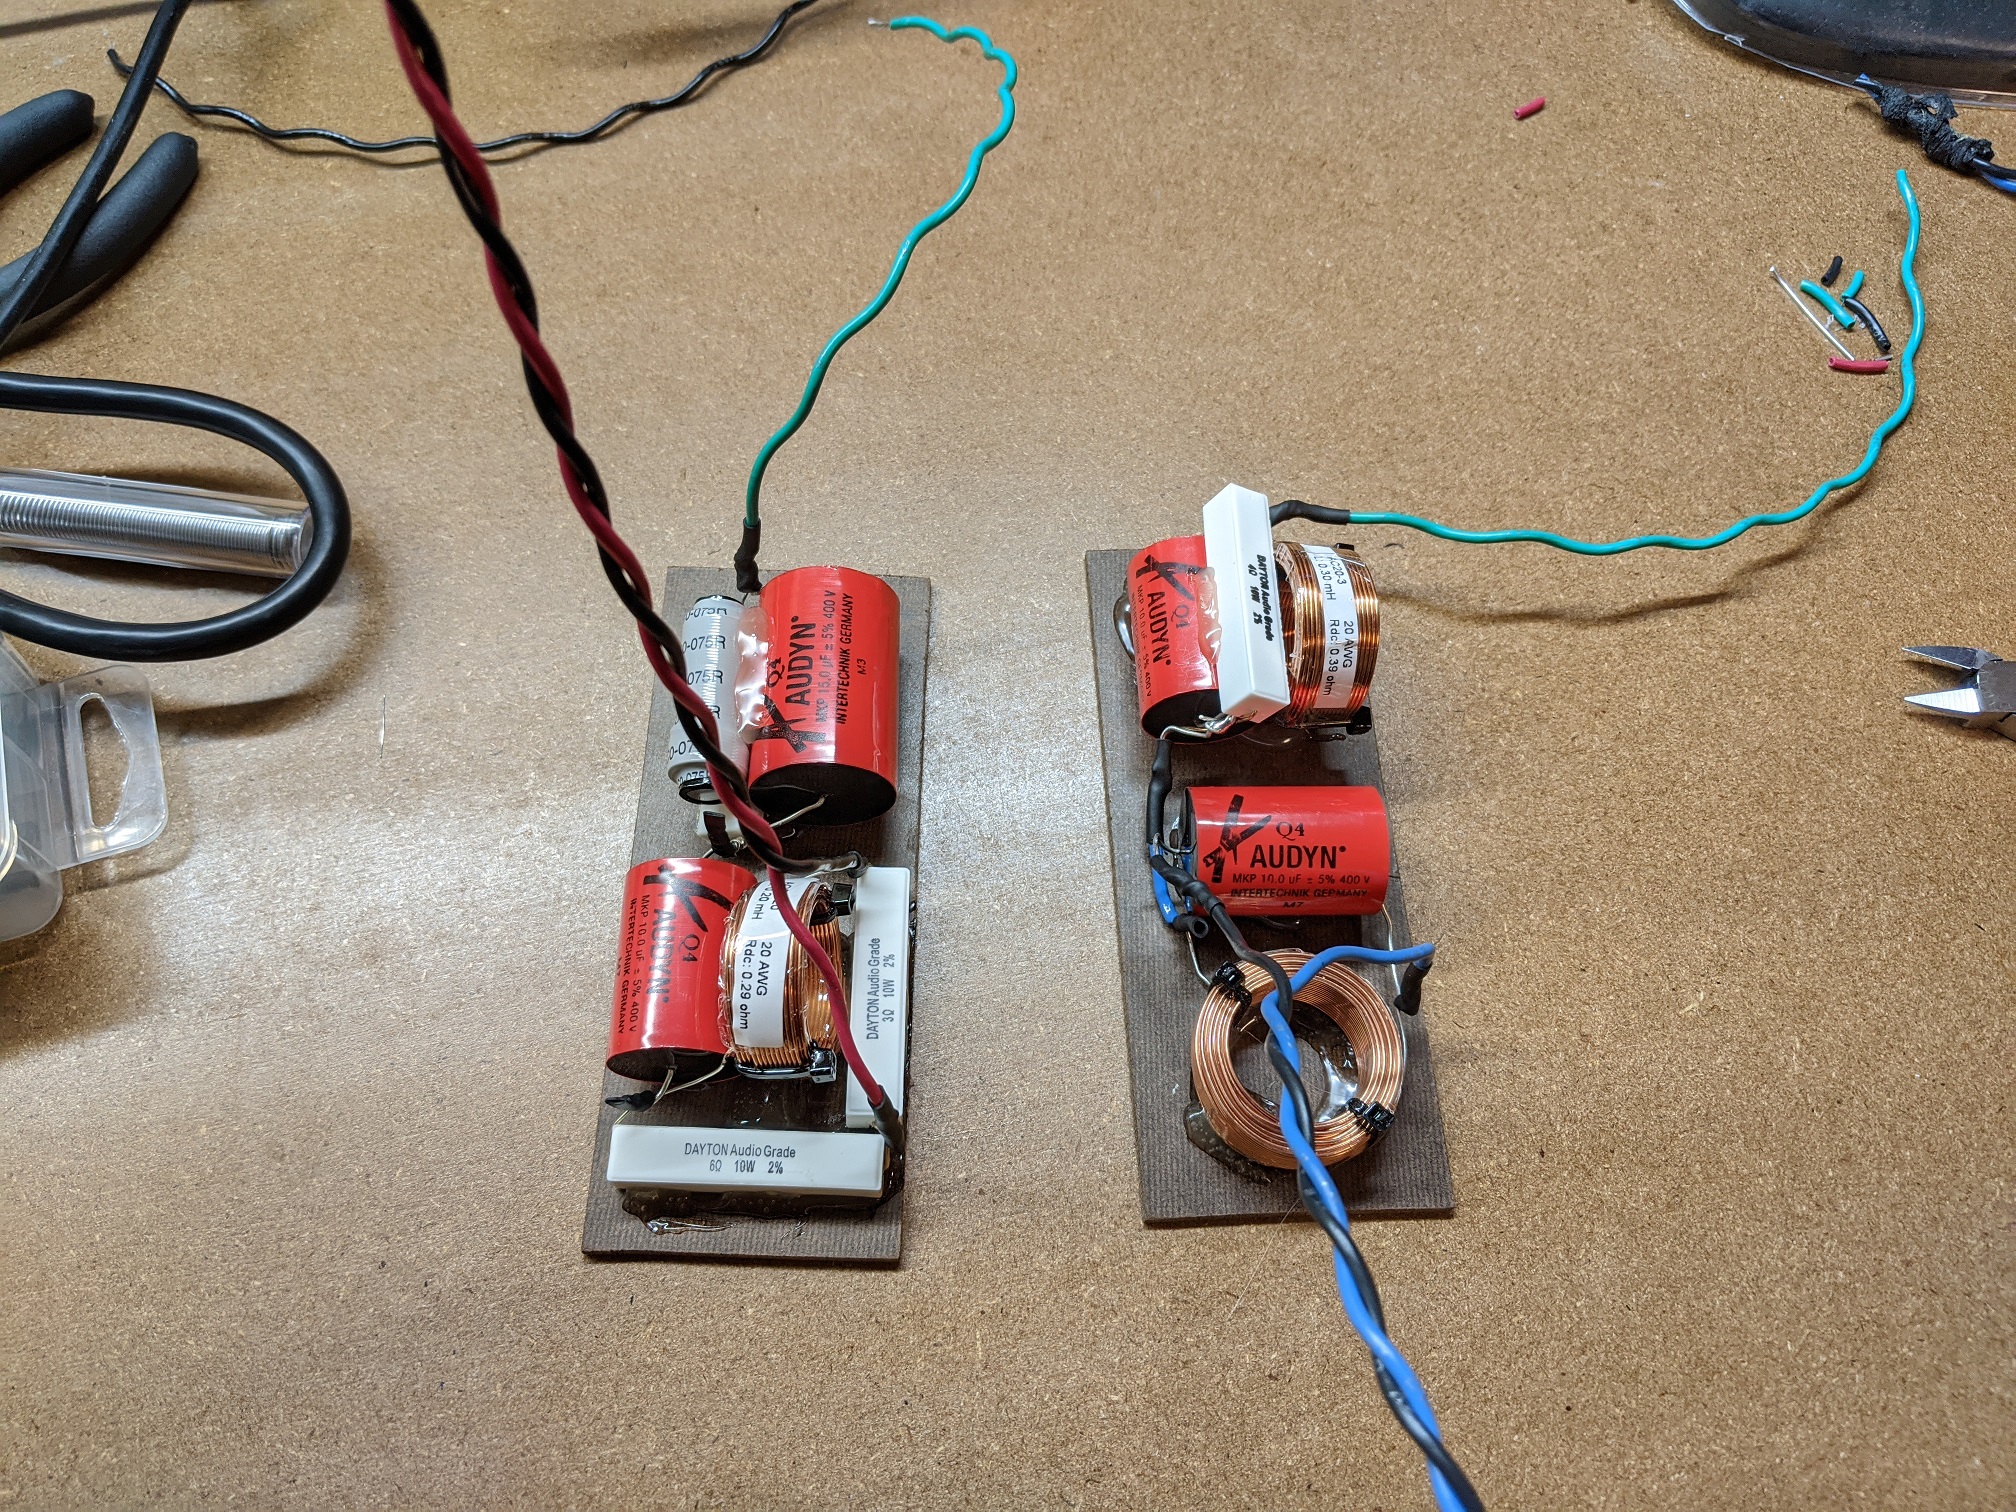
Crossover Design:
The base crossover is 2nd order electrical, linkwitz-riley filters with a final XO point at 4930 Hz as shown in PCD simulation. I included parallel LCR notch filters on both the woofers and the tweeter to handle issues I found. The notch filter on the woofer is pretty wide, helping to pull down the area from ~600Hz to 2kHz. The tweeter’s notch helped pull the area from 1100 Hz up to ~5000 Hz into line with my XO target slope.
Tips & Tricks:
For more build info and pictures see my project gallery thread at the tech talk forum: http://techtalk.parts-express.com/forum/speaker-project-gallery/1456831-the-plum-dingers-ps95-8-and-nd20fb-4-in-a-desktop-mtm
Conclusion:
These speakers were an interesting design challenge for me. THey were the first MTM I’ve designed, the first rear panel design I’ve done, and the first rear mount of any driver I’ve done. They are in service today and helping tutoring sessions go smoothly with much less annoyance at poor laptop speakers!
About the Designer:
Keith is a mechanical engineer by day, group fitness instructor by night, and an overzealous DIY speaker designer when he should be sleeping. He is always looking to try different techniques with each build, and deeply enjoys sharing designs, tips, and good stories with the speaker building community.
Project Parts List:
These turned out great! Nice work. What kind of amp do you have driving these from the laptop’s line out?
Nice work Keith
I really like the look of that Milk Paint finish. Since the Milk Paint is water based, does the MDF have to be sealed before painting? Do you sand in between coats of paint or hemp oil? The paint and oil can just be applied with a brush?
Thanks everyone! Ryan – I have an SMSL Q5 Pro driving these speakers and it does great. Tim, yes I sealed the MDF with a few coats of zinsser 123 grey primer before painting. That was recommended by the Milk Paint company. I did sand in between coats of paint, but it’s kind of a wasted effort as true milk paint dries to a chalky consistency. I tried some light sanding sponge action at 240 grit before eventually moving on and applying the hemp oil. Yes, you can brush on the paint and the hemp oil, or you can rag apply the oil. whichever you like. I had some harbor freight chip brushes laying around, so that’s what I used. I think natural bristle brushes are recommended by most people doing oil finishes like that. Maybe the oils interact with synthetic brush materials?