The Vegatrons
-
- ?
-
- ?
-
- ?
-
- ?
-
- ?

-
- ?
-
- ?
Designer:
mzisserson
Project Category:
Tower Speakers
Project Level:
Intermediate
Project Time:
20+ Hours
Project Cost:
$500 – $1,000
Project Description:
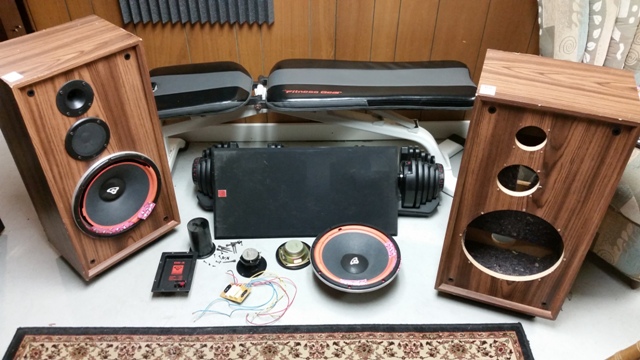
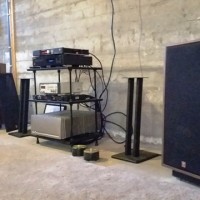
The Vegatrons are an amalgam between a 1985 vintage Radio Shack “Optimus-45” 10” 3-way with an open back midrange, a 1994 vintage Cerwin Vega DX-5 12” 3-way, modern speaker drivers, modern crossover and design technique, and they are wrapped up in an old-school, stealth-like package. When put in place the Vegatrons will look like original Cerwin Vega DX- 5 loudspeakers which have been weathered with time, however when the play button is pressed, an updated 10” 3-way with a u-baffle midrange will sing truly making this retro-fit more than meets the eye!
Design Goals:
In 1993 a 13 year-old boy from “The Ocean State” began a long-lasting love affair with music. For a number of years, this young man listened to a great deal of music through a pair of Radio Shack “Optimus-45” 10” 3-way loudspeakers which were handed down to him from his older brother who later would become a Lieutenant Commander in the US Navy. In short, this is basically how my loudspeaker journey began.
The “Optimus-45” sounded great! As time wore on, however, they faded to the background and when the woofers suffered their ultimate fate of rotting foam, the midranges were then slapped in a shoe-box that became my first center speaker for a pro-logic surround sound system. The “Optimus-45” was a classic example of a box-on-the-floor/monkey coffin loudspeaker that was anything but handsome. Yet with an open-back midrange and separate controls for the tweeter and midrange, it had its merits, and for its time very good fidelity.
A part of the goal is to capture some of what this loudspeaker use to do, which in my head now 25 years removed from last hearing them simply means: “Sound good.”
One of the loudspeakers I lusted over as a late-teen before discovering the world of “high-end” loudspeakers was the classic 1990’s big-box store monolithic loudspeaker: The Cerwin Vega DX-9. This 15” 3-way monkey coffin blew me out of the water at the time! I use to frequent the local, now defunct Circuit City with a hand-full of CDs just to listen to them in the off-chance the stereo guys would let me hang out for a while.
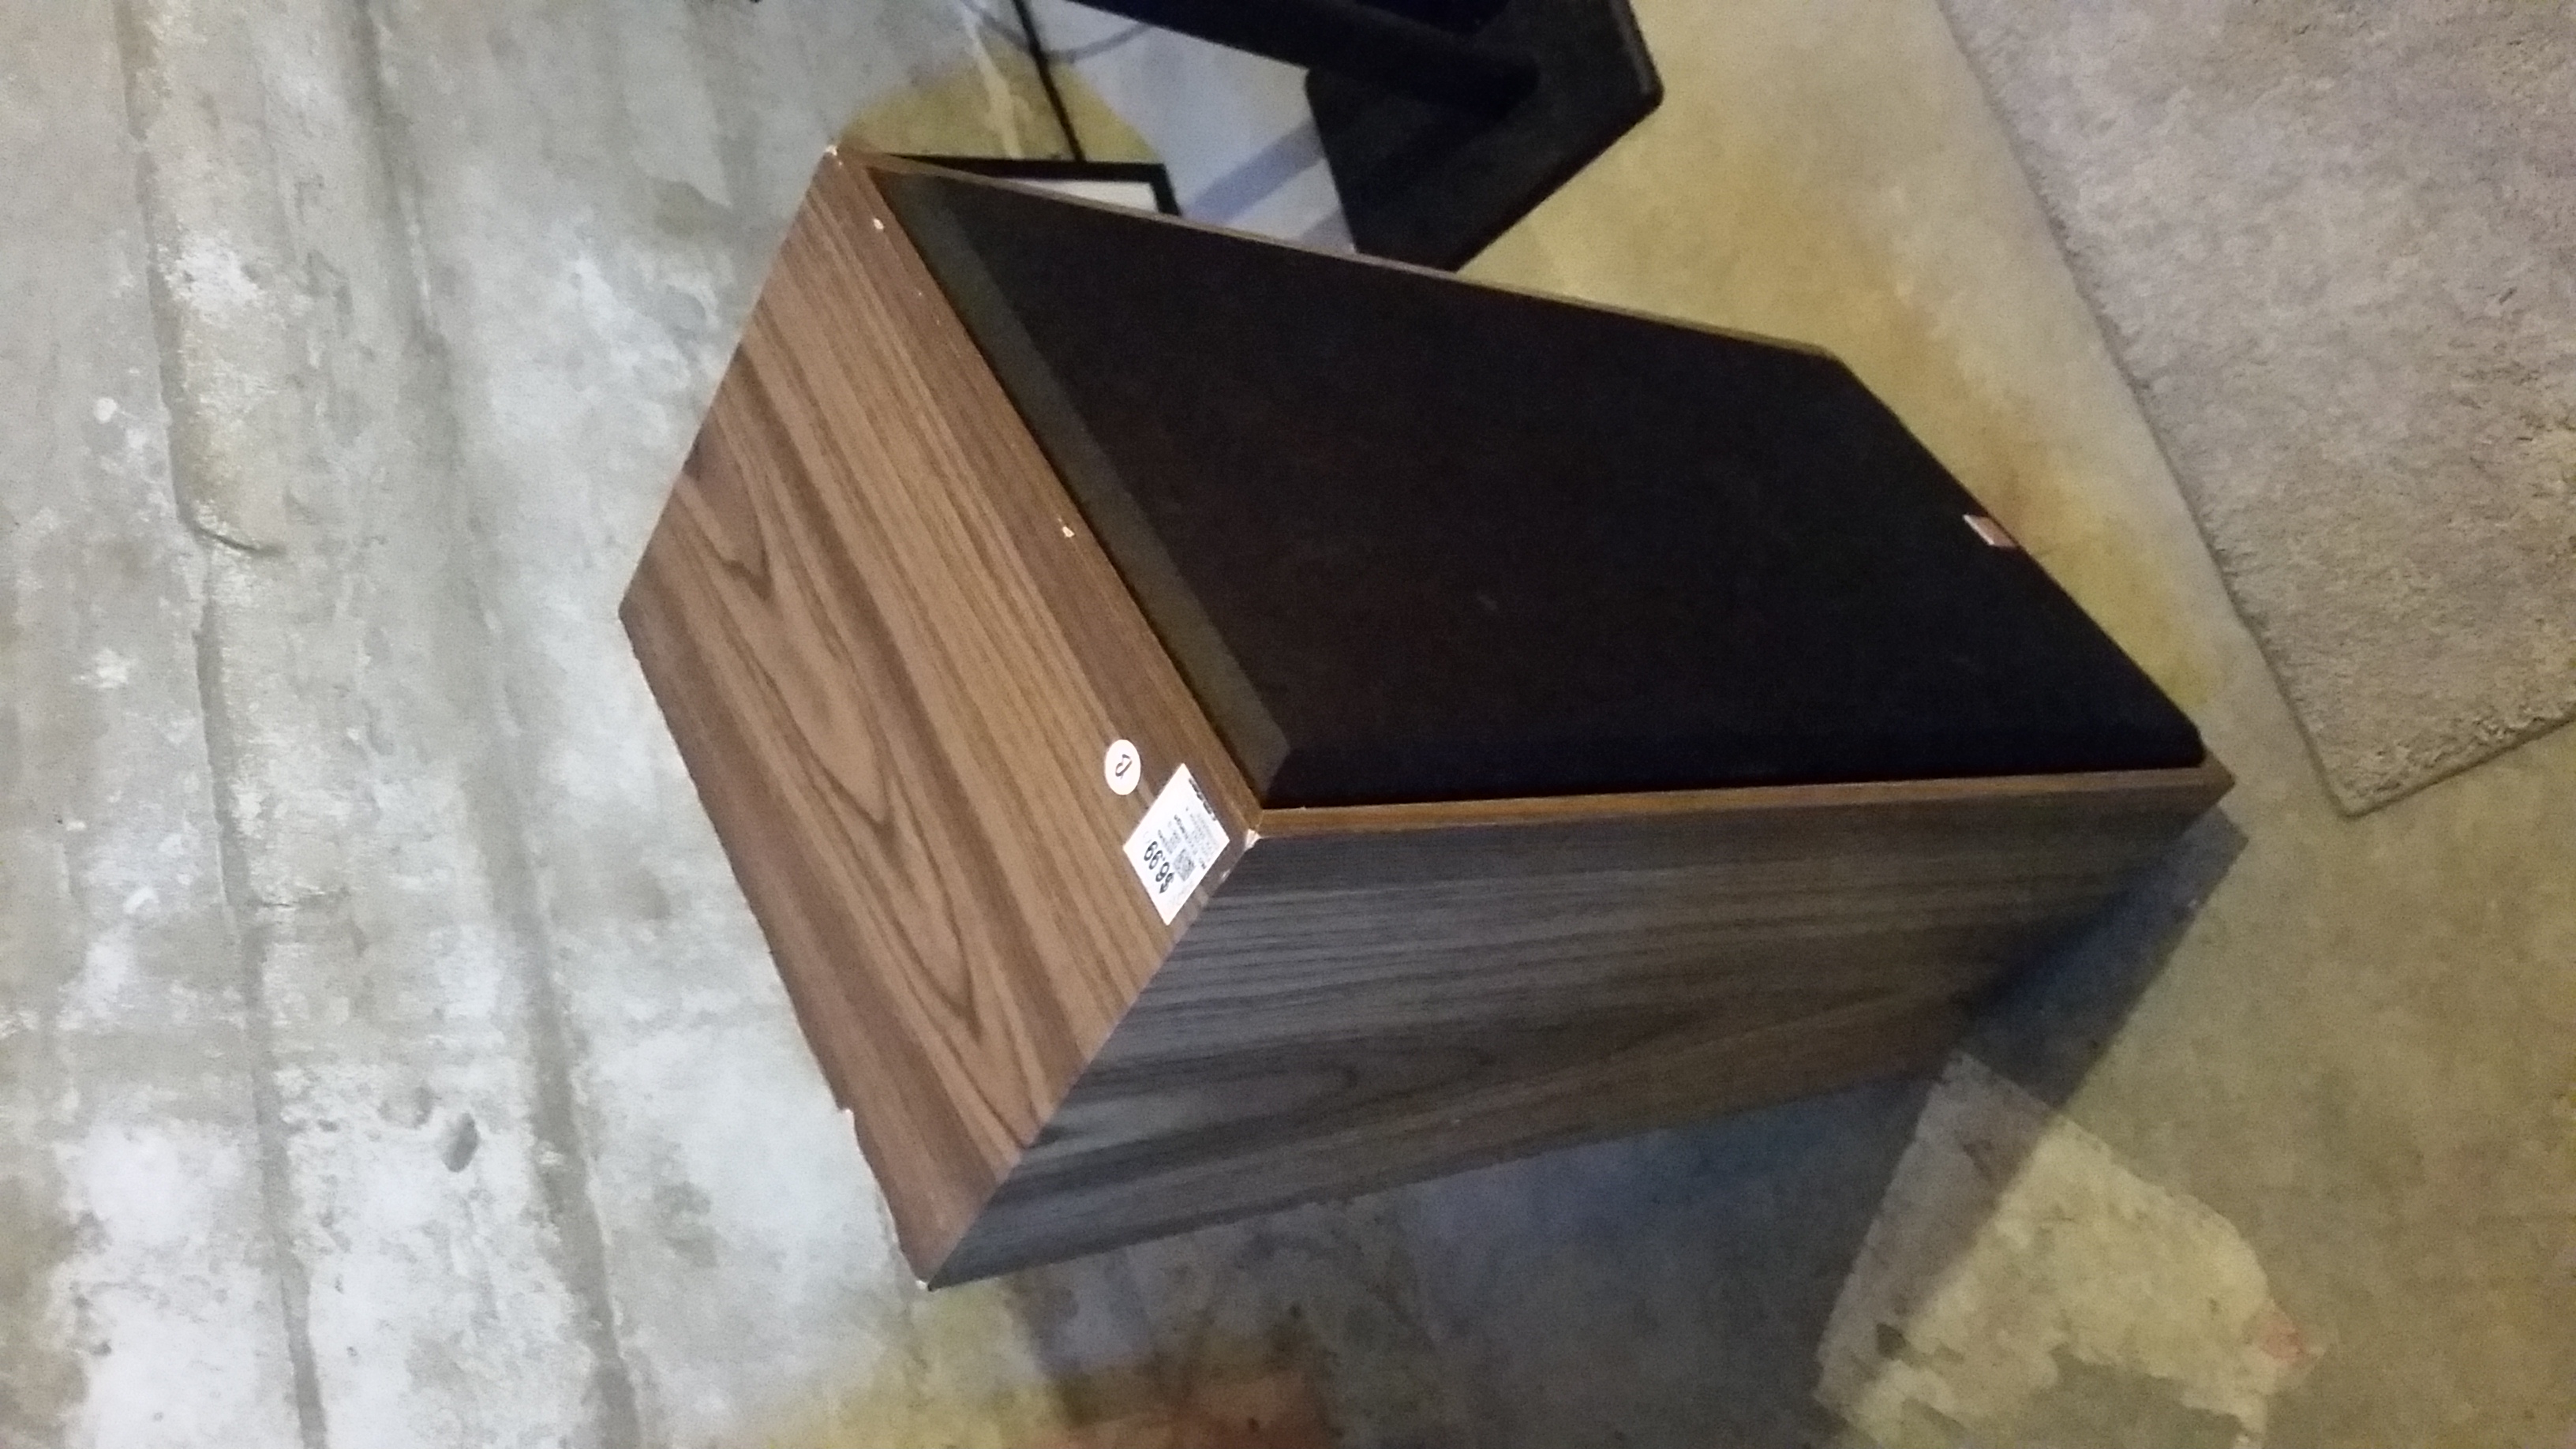
Perusing a local thrift store, there was an old, beat-up pair of the DX-9’s little brother, the DX-5 that was marked as “Not Tested” and had a price tag of $6.99 for the pair. I knew this was the moment I have been waiting for to pay homage to the old-school loudspeakers I loved so dearly but with a new-school, high performance twist!
The goal of the visual effect, with the full understanding that monkey-coffin loudspeakers will never have a high spousal acceptance factor, is to have the grills and cabinets preserved as the original loudspeaker appeared when buttoned-up. The Vegatrons will simply look like an old pair of Cerwin Vega DX-5’s. Remove the grills and this old-school dog’s breakfast will transform on command into a modern, high performance loudspeaker.
The final goal of the Vegatron build is to pull-in the spirit of loudspeaker design and DIY community. It was humble beginnings like mine where an early appreciation for great sound gave birth to many DIY Loudspeaker builders. Through this community, I received the midranges as a secret Santa gift from the Parts Express “Tech Talk” forum which ultimately is just one small representation of the unity this quirky hobby has. Finally, this community has shown incredible creativity, tenacity, and closeness over the years that I would like to represent in the essence of this design.
Driver Selection:
The heart and soul of the Vegatrons is the 3”, full-range Tang Band W3-2141. I received a pair of these from my 2016 Tech-Talk forum secret Santa during the 2016 holiday season. These lil’ guys tout an underhung motor, and a dual purpose phase that acts as a distortion lowering shorting path as well as a phase plug that extends frequency response. The W3-2141 also has impressive 87dB efficiency through its effective range and an 8 Ohm nominal rating. The underhung motor will also be a big distortion-reducing element. From underhung drivers I have worked with in the past, it seems this motor type typically has great transient performance, too.
To capitalize on the W3-2141 and to maximize dispersion, the Vifa NE19VTA ¾” soft some tweeter will carry the treble. This small, but advanced tweeter has remarkable texture and detail while maintaining low distortion and a smooth overall presentation. It is also fairly robust for a small tweeter and can cross lower than average if necessary.
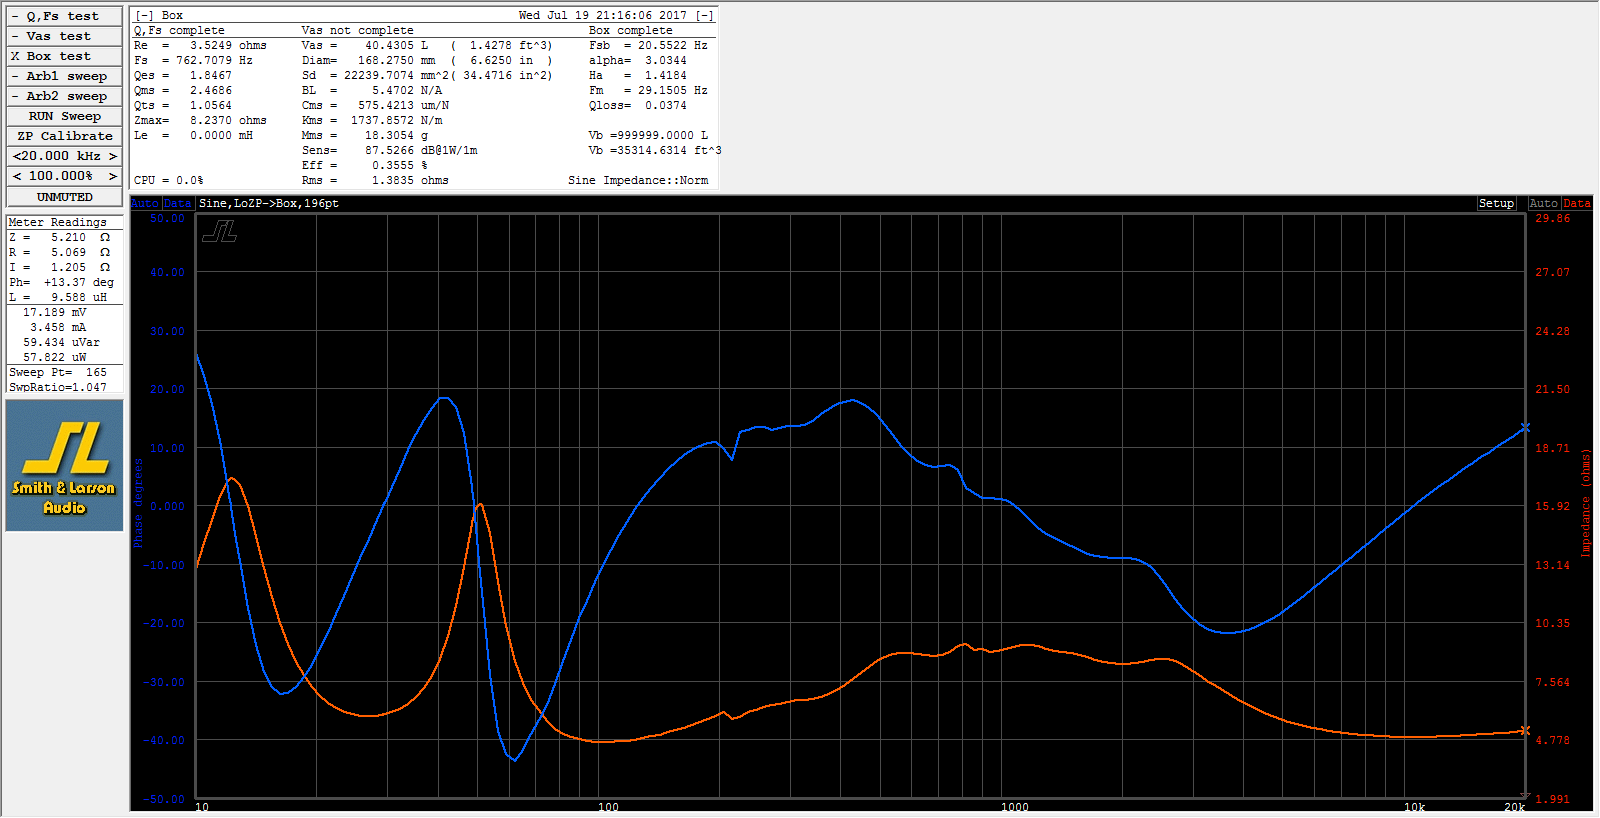
Anchoring the whole system is the Dayton Audio 10” RS270-4 reference series woofer. This 4 ohm woofer is newer to the Reference series line-up. Dayton did a nice job controlling the top-end break-up modes of this woofer which allows for crossover flexibility, and while the breakup modes are still there, they are much less of a bother than on most other metal cone woofers. The reference series drivers are proven performers and they offer a balance of fidelity and value that approaches some of the well-known Scandinavian driver offerings.
Enclosure Design:
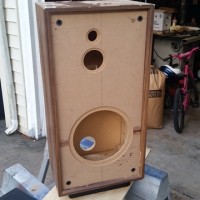
Since the Vegatrons are a retro-fit design, all of the enclosure constraints were dictated by the pre-existing Cerwin Vega DX-5 cabinets. After removing the woofers and seeing what I was up against for volume, I then chose a woofer that I felt would maximize fidelity with an ideally flat tuning when boundary reinforcement was considered.
I found it quite the challenge to optimize the volume of the enclosure while balancing all of the required bracing and a midrange chamber for the open back, “U-baffle” midrange. As with any ground-up enclosure design bracing, dampening, and absorbing needed to be used to assure detrimental internal reflections and external cabinet vibrations were controlled.
Since “reference” level fidelity was a major goal, it was also important that the vented alignment adhere as close as possible to a B4 (Butterworth, fourth order) alignment. In the case of a B4 alignment this means the port mass is equivalent to the driver’s moving mass so they ultimately have the same acoustic output through their working ranges generating a very uniform response.
While baffle reflections get some help with wool felt, there is little that can be done about the heavy diffraction from the cabinet as a result of the in-set baffle.
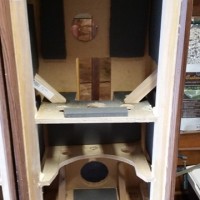
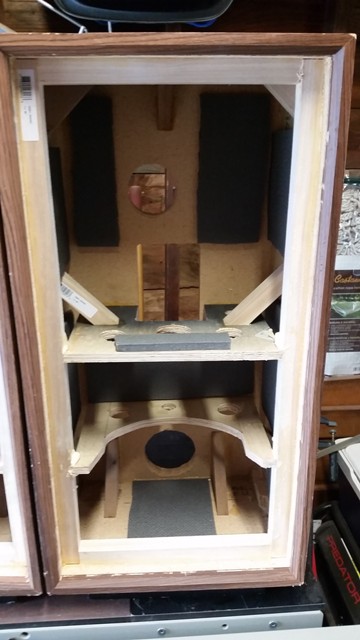
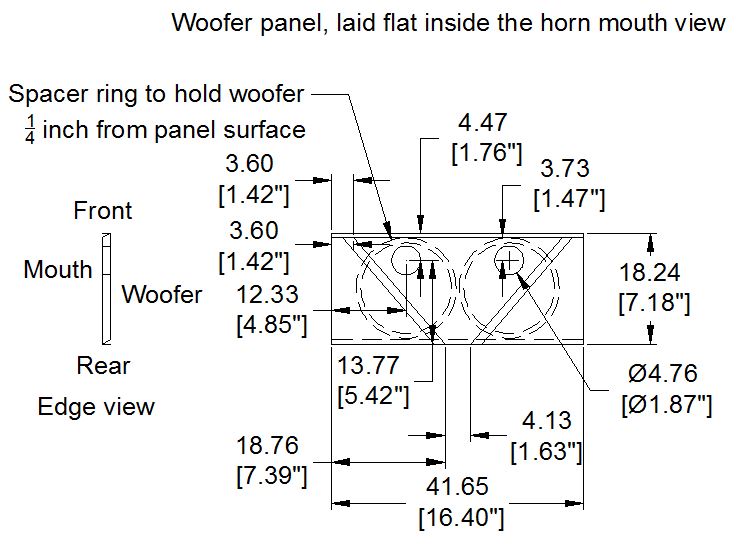
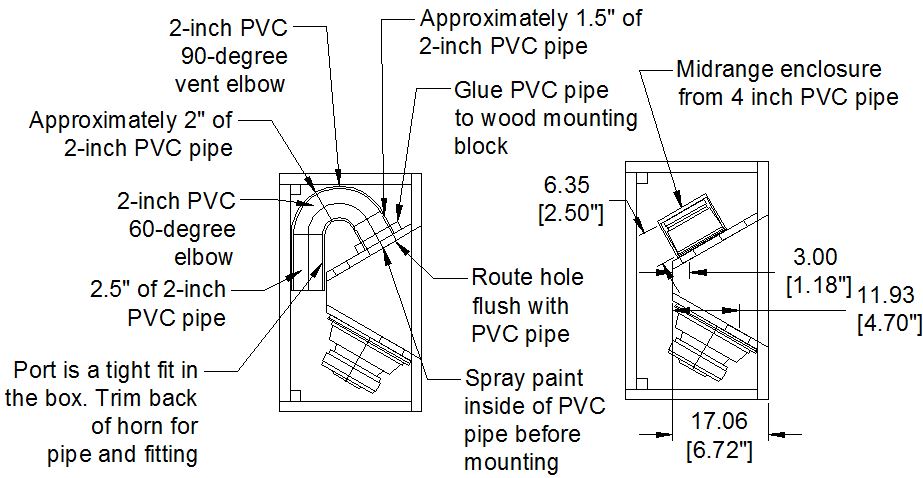
The open back, or U-Baffle midrange presents its own challenges, but was a necessary element of the Optimus 45 loudspeaker I wanted to capture. In order to use up the least amount of space inside the DX-5 enclosures, I needed the chamber to the back of the loudspeaker to be as small, rigid, yet self-dampening as feasibly possible from a DIY-er in their garage. The enclosure material came as a surprise while leaning on a fork-lift at work. Behind the driver’s seat was a roll of stretch-wrap used for wrapping items on pallets together for safe transport. The core of the stretch wrap is a high-density cardboard that is 3/8” thick with a 3” inner diameter. Perfect! A small ring of Acousta-stuff sits in the end of each midrange enclosure to aid with dampening.
Enclosure Assembly:
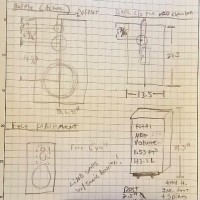
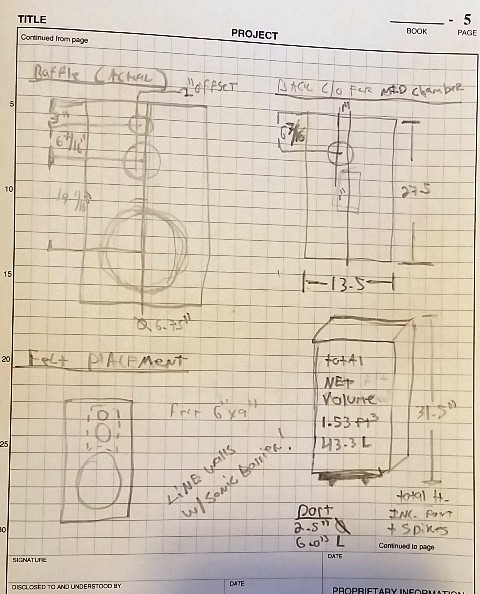
Start with a box. After “gutting” the DX-5’s of the rotted woofers, tweeters, sweet midranges I held on to, and baffle via jig saw and flush-trim router work, I was left with a ¾” thick, particle board box. Careful measurements were taken and spare dowels used as “go/no go” gauges to assure the inner dimensions were correct as this was ultimately going to be the dimensional requirements of the new baffle.
Using the old dado cut line from the original baffle as a guide, I created a frame from one inch square dowels so my new baffle could have a place to sit and glue-in. Since both the new and old baffle were ¾” material, everything would align properly allowing for the factory grills to be replaced and inset as they originally were.
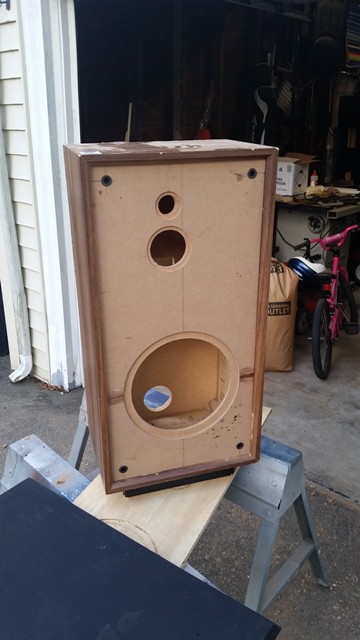
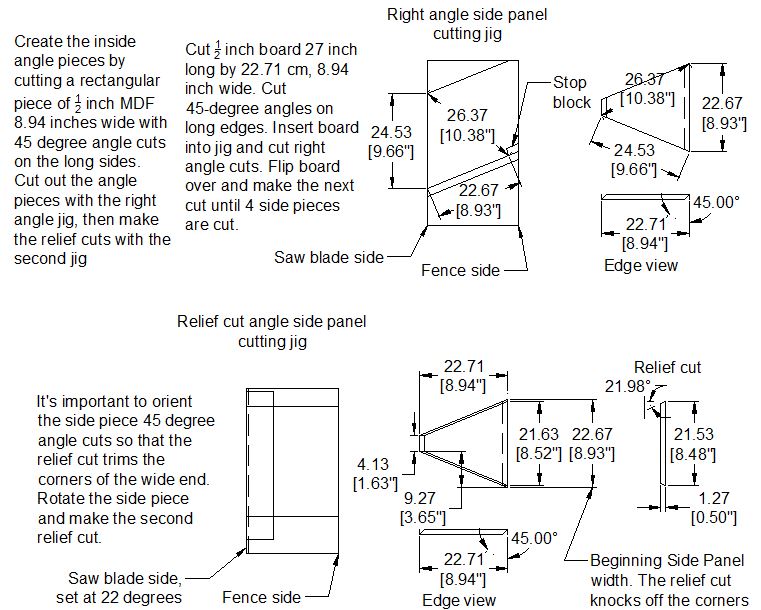
Since the rear-baffle would have the same dimensions as the front, once I knew where the midrange would be, it was just a matter of measuring the same location on the rear and cutting a 3” hole with a hole saw. After cutting the cardboard tubing to length, I used my chop-saw set at a 22.5 degree angle to make slits in the cardboard which I then filled with silicone to further assist with dampening. Expanding polyurethane glue was employed assure any air-leaks were sealed attaching the tube to the baffle prior to install.
To keep the whole structure as rigid as possible, I pre-drilled screw-holes all the way around the baffle and into the supporting frame. I then glued the baffle to the frame and bracing, using the screws as both a decorative feature, and as clamps, since a straight glue-and-clamp would have been tricky due to the inset front and rear baffles.
A rasp took care of enlarging the existing port hole to fit the Parts Express 2.5” flared port which was conveniently located at the bottom-rear of the enclosure, and the original mid-range grills were used to cover the exit of the mid-range enclosure.
Lastly, I ordered some ¼” thick, dense wool felt to go over the midrange and tweeter cut-outs to aid with the control of baffle reflections and a few spikes to remind everyone that the Vegatrons are more than meets the eye!
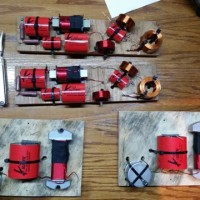
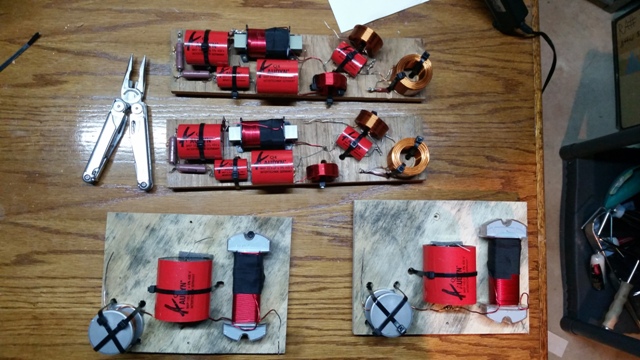
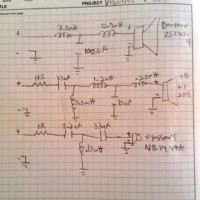
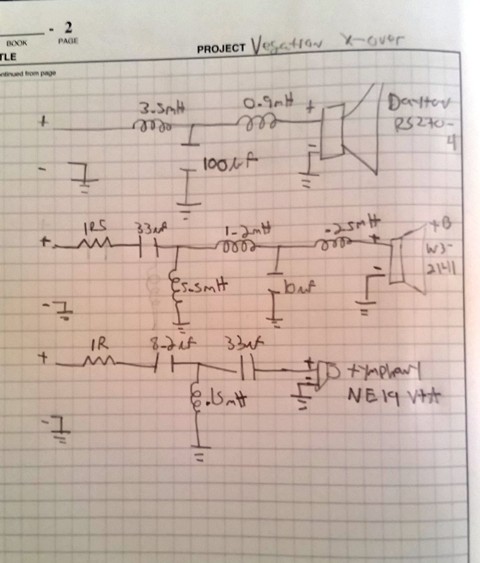
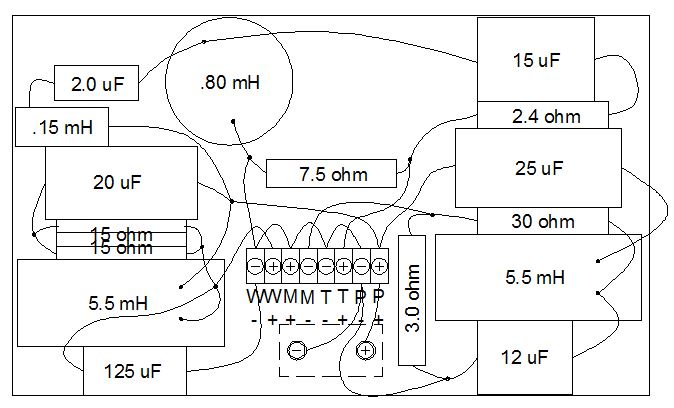
Crossover Design:
The crossover of the Vegatrons was going to take a little more work than a standard 3-way to assure the drivers were properly matched to at least 30 degress off-axis utilizing the U-Baffle midrange. Also, with the proximity of the woofer to the floor, full baffle step compensation would not be required to achieve an acceptable response.
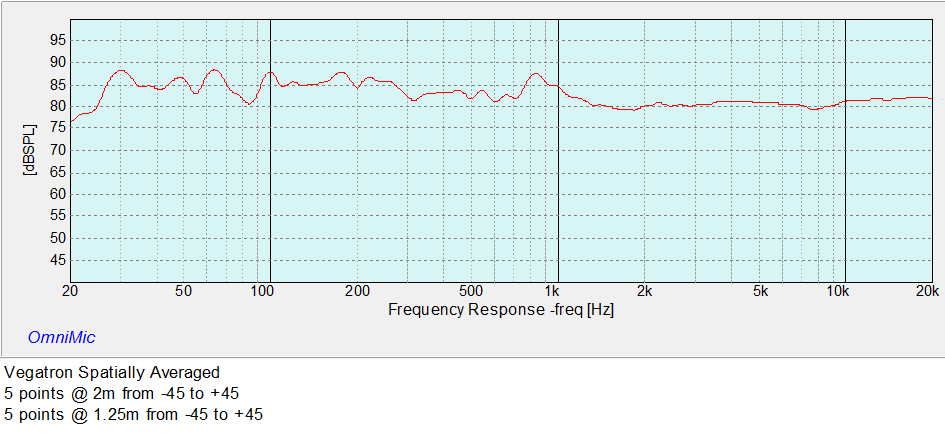
Unfortunately, when working with driver that can propagate their back-wave into the room, proximity to boundaries are more meaningful and a perfect simulation with on-axis measurements typically will not always produce the desired result. What is more important is the loudspeaker’s response within a given, factored space (spatial response) which in the Vegatron’s case is a window up to three feet on tweeter center from a side wall, and up to three and one half feet from the rear wall. Anywhere within this window, the Vegatrons will perform very well.
The aforementioned space the window covers seems to be where most speakers lie in most rooms. In order to maximize power response and prevent beaming from the rear of the mid-range chamber which can generate undesirable side-effects, the crossover points were selected by examination of far-field axial measurements out to 45 degrees off axis, and spatially averaged measurements within their desired window of use. Since the RS270-4 has a solid pass-band, I slung a good deal of the lower mid-range onto it which also helps relieve some of the acoustic demand off the 3” midrange. Further, it helped even out the off-axis response as the U-baffle midrange’s response turns more cardioid in nature at lower frequencies. When the dust settled, the legs and waist of this machine met a little less than 500Hz, though slightly asymmetrical.
Between the W3-2141 3” midrange and the NE19VTA 3/4” tweeter, the crossover was considered in similar fashion as the W3-2141 and the RS270. In order to minimize beaming out of the rear of the midrange enclosure, the crossover was kept low enough to stay well outside of the piston band response of the midrange, but high enough to assure no strain comes to the NE19, though this was quite easy since it is a very robust small format tweeter. The arms and head of the Vegatron machine meet symmetrically at 2800Hz.
The Vegatrons ran great on my 15 year old, “8 ohm” receiver so I am confident their impedance will not present an issue to just about anything despite them being a “4 ohm” speaker since the minimum impedance is 3.7 ohms and not reactive. They are relatively efficient, too, shaking out around 87dB 1W/1M, making them sing well with less watts. A high quality 25+ watt amplifier would easily make these come to life!
Tips & Tricks:
Built in to the above text!
Conclusion:
The Vegatrons are truly more than meets the eye! It was neat to design a “reference-level” loudspeaker into the shell of an old-school monkey-coffin. Best of all: Using the TB Speakers W3-2141 full-range drivers that were gifted to me by an unknown DIY-er via the Parts Express “Tech Talk” forum’s Secret Santa, making something old new again, getting creative, and paying homage to the loudspeakers of yore truly captures the essence and spirit of why I love to design and build loudspeakers.
Sonically they are wonderful; the presentation is very spacious and laid-back, though they are not missing resolution. The B4 cabinet alignment provides articulate bass that seamlessly integrates with the rest of the speaker, but does not have the typical “under-tuned port boom” making the sonic characteristic more akin to a sealed enclosure than what is typically expected of a vented one. A walk around the room provides very uniform sound with little sonic change. The flexibility of having a window they work well in helps make them less sensitive to placement, and I am flat-out bummed I will likely never build new cabinets for these relieving the in-set baffle to get rid of the measurable diffraction artifacts…Even if the derogatory sonic effect of these artifacts have been studied and are debatable.
I have gifted many of my designs away over the years; however these are going to be keepers for my personal speaker cache. So many elements came together for these they just have an undeniable cool-factor every time I look at, and listen to them. My final thought is simply a “thank you” to Parts Express for giving me the opportunity to continue to grow in this great hobby by selecting me as part of this year’s design team. Keep listening!
About the Designer:
Michael Zisserson is a member of the 2017 PEDT
Project Parts List:
|
Part # |
Description |
Qty |
|
295-382 |
Dayton Audio RS270-4 10″ Reference Woofer 4 Ohm |
2 |
|
264-1006 |
Peerless by Tymphany NE19VTS-04 3/4″ Silk Dome Tweeter |
2 |
|
240-660 |
Dayton Audio DSS2-BC Black Chrome Speaker Spike Set 4 Pcs. |
3 |
|
260-7706 |
Penn-Elcom 9120 Rubber Cabinet Foot 0.88″ Dia. x 0.31″ H |
4 |
|
320-3375 |
Mini Gold Plated Insulated 5-Way Binding Post Set 2 Red 2 Black |
1 |
|
260-478 |
Speaker Cabinet Port Tube 2-1/2″ ID x 8-1/2″ L Flared |
2 |
|
260-520 |
Sonic Barrier 1/2″ Acoustic Sound Damping Foam with PSA 18″ x 24″ |
3 |
+ There are no comments
Add yours