
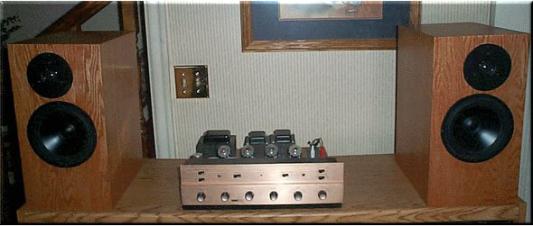
“V-D” Vifa-Dayton 2-Way Monitors

Designer: Dave Tenney
Project Time: 1-8 hours
Project Complexity: Hobbyist
Project Cost: $100-$500
Driver Selection
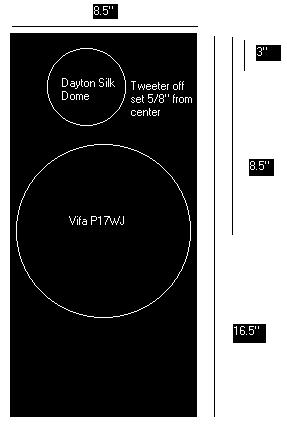
The Vifa P17WJ-00-08 6.5″ Cast Frame Woofer is ideal for mid-sized bass reflex designs, this is Vifa’s most popular woofer. It utilizes a cast magnesium basket, rubber surround, mineral filled polypropylene cone, and very smooth frequency response. Intended for use with vented enclosures with .35 to 1.00 cu. ft. of internal volume. Project edit: The origial woofer, P17WJ-00-08, is no longer in production. Aurum Cantus’ AC-180F1 should work very well as a replacement using the same enclosure and crossover as specified in this project. The Dayton 1-1/8″ Silk Dome Tweeter was clinically tested and compared to Morel with amazingly similar results, this tweeter is recommended for crossover points as low as 1800 Hz. That versatility, along with its high performance to cost ratio, makes this one of the most popular Dayton drivers.
Enclosure Design
The next thing I needed to tackle was a proper enclosure design. After researching different designs (especially this one), I decided I would need a cabinet with an internal volume of around 17L tuned to 45Hz. I used the calculators on Loud Speakers 101 to do all of my calculations.
Amplifier/Crossover Configuration
Building your own crossover is a pretty easy task, all you need is soldering iron, some solder, and the ability to read simple schematics. The way that I assemble a crossover is to lay out all the components on a newspaper and twist the appropriate components together. Then I glob on a ton of solder. I do not use any jumper wires when I build crossovers. I will readily admit my circuits are very ugly! You will notice in the parts listing that there isn’t a 9 ohm resister listed. I substituted the 8 ohm in place of it…I seriously doubt that anyone could hear a 1 ohm difference between the two values in a zobel network. I wouldn’t recommend my method of installing crossovers, but it does work and it’s cheap. I take a tube of two part epoxy, smear it all over the bottoms of all the components, stick them on the back of the enclosure, and pray I have them wired right. A lot of people use hot glue to install crossovers, but I always have a fear that one of the glue joints will come loose and cause a rattle inside the cabinet.
Enclosure Assembly
The enclosure is pretty basic. It is a 17L box with internal dimensions of 7″W x 10″D x 15″H. It has one brace in the middle which measures 4″ x 7″. The port is made from a 2″ ID x 5.5″ PVC pipe located 3″ from the top of the box. All of the drivers are flush mounted. I use a 1/2″ rabbit bit in a router to do this. The port is glued in, and all joints are sealed with white bathroom caulk. Project Edit: For simplicity, 2-1/2″ dia. x 8-1/2″ L port has been added to this project. My personal method of cabinet assembly is to use glue only. I like to use either Titebond or Elmer’s carpenter glue. I assemble the sides and rear baffle first, install the crossovers on the rear baffle, line the sides of the cabinet with egg crate foam, and then glue on the front baffle. In final listening tests I used about two ounces of poly fill behind the woofer. Veneering the cabinet is also pretty easy. The veneer is secured with contact adhesive, and trimmed with a flush trim bit in a router. I stained them with two coats of Olympic America Cherry stain, and six coats of Minwax satin polyurethane lightly sanding with 320 grit paper in between the first two coats, and steel wool for the last four.
Conclusion
The only thing that I have to reference these to are my D3’s. The VD’s are a bit bass shy, but this is a noted characteristic of the P17’s. This is not to say they don’t have a good low end, they just don’t seem to go as low as the Dayton drivers. This might also have something to do with the D3’s having dual woofers. Where these speakers really shine is the midrange. It is more detailed and pronounced than the D3’s. You can really hear the guitar or bass player’s fingers on the strings, snare drums really pop out of the mix. The high end is very good also…a bit more laid back than the D3’s, but very easy on the ears. You can always tweak the treble knob if you want to split hairs. This is my first experience with European drivers and I am quit impressed. I do feel that this design would make an excellent studio monitor. Overall I’m very happy with the way this project sounds, and at the price it costs to build a pair you would be hard pressed to find a commercial speaker of similar quality.
About The Designer
“I am a SWM lookng for high SPL via DYI. I have an AAS in Network Technology from The University of Akron, and am currently pursuing a BS in Tech. Ed. By day I am the Technology Coordinator at a medium sized library. By night I play bass with various shady characters in dirty bars and build speakers… that is when I’m not studying, of course!”
Project Parts List
|
Part # |
Description |
Qty |
|
296-412 |
1 |
|
|
027-410 |
1 |
|
|
027-424 |
1 |
|
|
027-419 |
1 |
|
|
027-432 |
1 |
|
|
260-302 |
1 |
|
|
266-355 |
1 |
|
|
266-814 |
1 |
|
|
275-070 |
1 |
|
|
005-8 |
1 |
|
|
005-3 |
1 |
|
|
260-478 |
1 |
+ There are no comments
Add yours