Wayne’s Dayton 2-Way
Designer: Wayne J
Project Time: 1-8 hours
Project Complexity: Hobbyist
Project Cost: $100-$500
Driver Selection
Enter the Dayton 2-Way Bookshelf Project (aka the Budget Bookshelf Project). I had heard some great things about the Dayton 1 1/8″ silk dome tweeter and that it compared very favorable with a Morel tweeter costing around $45. The Dayton tweeter cost $15.50 making me want to try it out. If it tanked, so what? But what woofer to match it up with? Then the project idea hit me… Set a maximum price limit of $100 for the speakers (in enclosures) with good quality crossovers. All things considered, I decided to go with the Dayton 295-300 5 1/4″ woofer. In retrospect, I think I made a pretty good choice, although woofers in this price range aren’t all that impressive. The 295-300 has excellent bass extension for such a small driver. Also, it’s very clean bass. The midrange however is merely adequate and the rolloff of the driver isn’t exactly picturesque. But this driver cost a whopping $13.50. I think for the prices we’re talking here, we have to put all things in perspective and wait for the final product before we judge any of the parts.
Enclosure Design
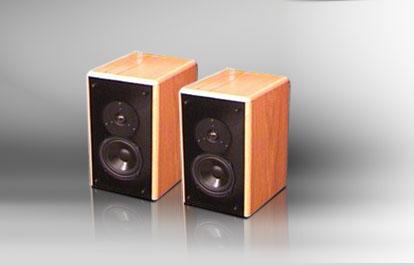
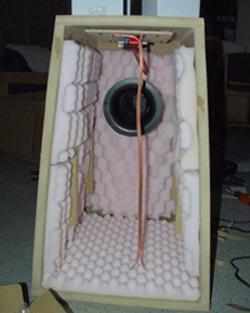
Internal dimensions: .48 cubic feet, W: 7.5″, H: 12″, D: 9.5″ (this overvolumes the cabinet slightly to account for the port and speaker volume, as well as a 1/2″ birch plywood ‘h-brace’ mounted horizontally between the woofer and tweeter to support the side f/r baffles. All construction is 3/4″ mdf with 1/2″ quarter round edges. The front is 4 coats of hi-gloss black enamel spray paint. The edge veneer is 3/4″ white-birch banding and the top, sides, and back are red-oak veneer. All wood surfaces have 6 coats of minwax wood-oil. The vent is center-mounted on the rear of the enclosure and measures 1.5″ diameter x 2.75″ long. The crossover is mounted on the bottom of the inside of the enclosure and the top, rear, and sides have egg-crate acoustical foam lining.
Amplifier/Crossover Configuration
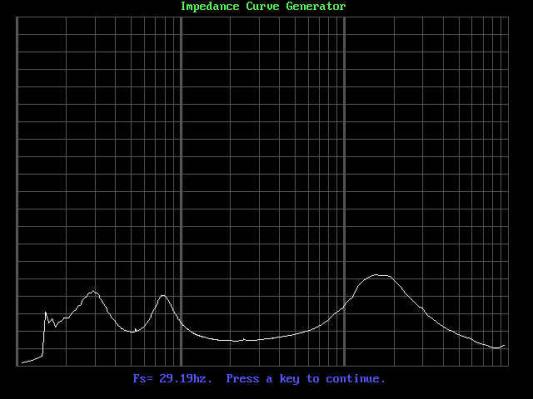
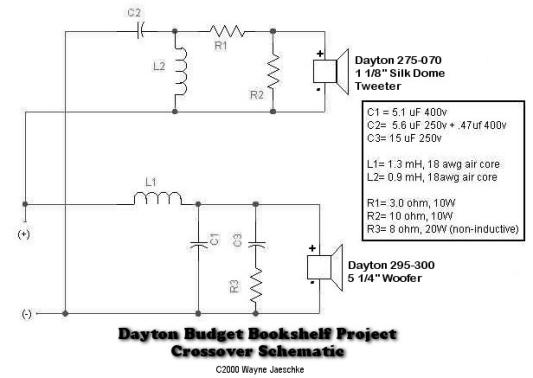
To select a crossover point, the first thing I did was to test the woofer’s T/S parameters and to build an enclosure based on the measured T/S parameters and my anticipated crossover point of 2500-3000hz. I used this to determine the width of the baffle and the location of the woofer (making sure I put it in a place where the tweeter could be mounted less than 1 wavelength from the woofer, center to center, and approximately 1 wavelength from each edge for reasons I’ll explain later.) This resulted in a .48 ft^3 vented enclosure tuned to 47.5hz. As it turned out, the box measured at 48.33 hz, so I guess I did ok in that respect. I then mounted the woofer in the box and began testing the frequency response both on-axis and off-axis. The off-axis -6db point for the driver was around 3.25 khz, so I built my first test crossover based on the book values for each driver using the impedance I measured for each driver at 3250 hz (13.5 ohms for the woofer and 6.35 for the tweeter). I used a linkwitz-Riley 2nd order for each. Lo and behold! It sounded pretty ugly. Between the baffle step diffraction of the cabinet and the fleshiness of the upper midrange of the woofer, this thing didn’t sound pretty — the design was augmenting the worst aspect of the whole design, the upper midrange of an inexpensive woofer. On the plus side, the bass was clean, tight, and as deep as I’ve ever heard from such an inexpensive woofer; and the high end was impressive. When you open the box, the 275-070 has the appearance and feel of a quality tweeter. When you put it IN a box, it has the sound of one. This definitely gets my 5-star award for one of the best values in DIY speakers. Accordingly, the high end in my enclosure was surprisingly crisp and accurate. Nevertheless, the gain of the frequencies where the woofer performed the worst, i.e., the midrange, had resulted in a pair of speakers that would make your ears hurt (the midrange was overly emphasized and quite muddy… Mariah Carey sounded like she had a pillow stuffer over her face and she was screaming into it.) Not being one for underkill… I then tried a crossover point of 1850hz (I didn’t want to go any lower because the tweeter’s rolloff is not very steep and the Fs is around 925hz for the driver i tested). This actually sounded quite nice… so nice, in fact, that I almost went with it except for some nagging peaking I could hear. After about a full day of tweaking the components and retesting the frequency response after each tweak, I found that the peaking was due to the high crossover Q of the woofer when i used an 18 awg inductor (trying to keep costs down). Alternately, i could go with a larger inductor and a lower Q, but then there was a nasty null around the crossover (which appears to have been a standing wave between the back of the woofer and the rear of the enclosure. I tried to dampen the wave with stuffing, but then the Fs of the enclosure would begin to rise as the null was removed.. nasty catch-22.) So, I tried raising the crossover point. First I went to 2700hz (which sounded great) and then i tried 2250hz (which also sounded great.) The difference between the two was a +2hump in response of the woofer for the higher crossover vs. about a +3db hump for the tweeter for the lower crossover (baffle step diffraction.) I went with the lower crossover and added the Lpad to even things out a bit. There’s still a slight hump in the tweeter response at around 3khz, but it doesn’t seem to have any negative affect on the overall sound quality. Hence I went with 2250hz. Finally, the zobel was added at the end for two reasons. First, the rise in response of the woofer was causing some moderate peaking above crossover and giving me trouble getting the rolloff the way I wanted (and overall 4th order acoustical filter.) Also, by using the big cap in the zobel (about 4 bucks) i was able to use a smaller gauge inductor for the lowpass and achieve the overall DCR I needed to get the Q i was shooting for (basically to save money and eliminate a small peak in the woofer response around 1500hz.). Also, the baffle step diffraction causes some rising response up to about 1.2khz but is not compensated for — these speakers are meant to be used in small/mid sized rooms on stands close to a wall or on a bookshelf where they will naturally compensate for baffle step because of room gain. By attenuating the highpass i was able to get a nice smooth curve up to about 9.5khz… after which the response measures flat with a slight dip at 15khz which is inherent in the driver (and just about every 1 1/8″ tweeter I’ve ever measured.).
Conclusion
When you design a project like this, it’s hard to separate your ears from your mind — you want it to sound good and every little bump and dip in the frequency response graphs seems to weigh on your mind. Going by the opinions of the people who have listened to the speaker, I’d have to say it was a success. I built this as a christmas gift for a friend and my wife said she was sorry to see them leave the house — she wants a set too! My 12 year old son thought they sounded great… and at least two visiting neighbors (who didn’t know I had designed and built the speakers) inquired about where I got them and how much they cost.
Project Parts List
|
Part # |
Description |
Qty |
|
295-300 |
1 |
|
|
275-070 |
1 |
|
|
027-423 |
1 |
|
|
027-425 |
1 |
|
|
027-432 |
1 |
|
|
255-256 |
1 |
|
|
255-246 |
1 |
|
|
004-3 |
Dayton Audio DNR-3.0 3 Ohm 10W Precision Audio Grade Resisto |
1 |
|
004-10 |
Dayton Audio DNR-10 10 Ohm 10W Precision Audio Grade Resisto |
1 |
|
017-8 |
1 |
|
|
260-402 |
1 |
|
|
260-292 |
1 |
|
|
100-016 |
1 |
|
|
260-516 |
1 |
+ There are no comments
Add yours