Millennuim III
Designer: Matt Phillips
Project Time: 20+ hours
Project Complexity: Professional
Project Cost: Over $1000
Driver Selection
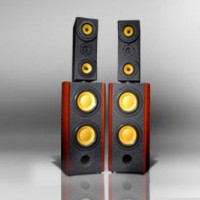
I thought first about an MTM design with 5″ or 6″ midbasses, and a decent tweeter. Since I wasn’t looking for any typical teenage low-end, my woofer selection was basically anything Parts Express carried. I have used Peerless, Dayton, and many other woofers before and was familiar with their sound, but I wanted something new. Hi-Vi was next on my list; I had heard a lot of good feedback about their products from my time on the phones as a tech at PE. Based on my experience actually hearing the F5 drivers in a setup a few months back, I decided they would do the job for bass/midrange. Right about the time I started the crossover design, I wandered through the Project Showcase and came across Vince’s VHT system. The standard D’Appolito design I originally thought of just got a little more complicated. I had two reasons for selecting the Hi-Vi D8G as the woofer: first, the surround on the D8G looks a little more treated and potentially more immune to dry-rot than its brother, the D8.8, and second, the overall appearance would be a lot better with all yellow cones complementing the cherry vinyl I was planning to use. The last driver to choose was the tweeter. I needed something that had a relatively low Fs but would maintain a high efficiency (around 92-93 dB). The Vifa DX25TG- 05-04 was pretty intimidating at first glance, and after consulting with Darren Kuzma, I decided to try the XT25TG30-04 instead. With an Fs around 500Hz and a 91.5 dB sensitivity, it looked very suitable-and best of all, I hadn’t used it before.
Enclosure Design
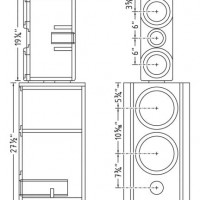
The new enclosures for this design are more complicated than any I’ve yet built. Each speaker utilizes two separate enclosures, like the originals, but in this case they are actually separated from each other. The upper MTM cabinet is simply a vented bookshelf speaker that is separated from the lower cabinet by using two 3″ diameter PVC tubes that are 1-1/2″ long and bolted through the center. I thought I would go all out and try to time-align everything, so the woofers use a 1-1/2″ baffle, where as the tweeter is set back 3/4″ My main goal in this new design was to measure the woofers I had, and build the perfect-sized enclosure for them. In this case, it was about 2.1 cu. ft. after subtracting driver displacement. An 11″ long 3″ diameter port would yield an F3 of about 37 Hz. This was originally going to be a typical rectangular prism with double-thick walls, until I remembered a design that Zaph had used for a couple of wall-mount Aura speakers he built. He used a wood bending technique that I thought was very cool and not too difficult to try, so I drew a curved-wall design in AutoCAD. The curved-wall version looks better, and also helps to make the cabinet stronger-doublethick walls are no longer required. The top and bottom plates would be double-thick however, and there’s also extensive internal bracing. The finished result is a woofer cabinet that weighs close to 50 lbs. empty, and has almost no wall resonance.
Amplifier/Crossover Configuration
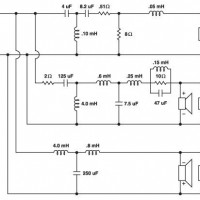
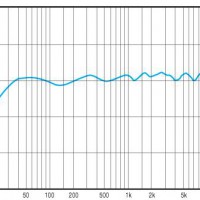
The credit for this crossover design goes to Mike Van Den Broeck from PE. Thanks to Mike for taking time out of his busy week to help me out. Due to the unusual baffle design in this project the crossover is a little on the extreme side, with eighteen components per speaker. The nature of the tweeter placement caused a huge null at 3kHz, and after playing around with it, we realized that a much higher mid-to-high crossover point was needed to eliminate this problem. This was, however, the biggest problem we came across. The XT25 and the D8G both use a third-order filter, while the F5 uses a second-order and a notch filter to help decrease the natural 1.4kHz peak. After a few days of getting lost in caps, coils, and alligator clip test leads, we measured it one last time and it was perfect. I used standard 18-20 gauge Jantzen air core inductors, and Dayton caps and resistors.
Enclosure Assembly
Before I started cutting and gluing, I spent a few days just thinking about what order I was going to put things together in. I ended up deciding to do the hardest part first, the woofer cabinets. The first thing I did was cut out the front and rear baffles for both enclosures. Due to the nature of the curved sides, I needed to cut a slight 5 degree angle along both edges. With that part out of the way, I had a template for exactly how wide I needed to make the narrow edges of the 3 curved inner braces, one for the top, one for the bottom and one between the woofers. Before I went further, I cut out the recess and driver holes in the baffle because I would not be able to after it is mounted. For the braces I cut out 6 square pieces with one dimension that matched the depth I needed. Using the front and rear baffles, I marked on opposite sides of one square piece where the curved edge starts and ends. Then I put together a make-shift compass using string, and drew a 1′-8″ radius curve along both sides, starting and ending on those marks. I cut along these lines using a saber saw, or hand held jigsaw, and then I sanded the edges smooth so there were no bumps. Now I had a template for the last 5 braces. Using the best invention ever created, the Irwin Quick Grips, I clamped each piece on top of this template, and using a flush trim router bit I one by one cut out exact matches to the first. Now with one hard part out of the way, I had to cut an 8″ diameter hole in two of these braces for the middle section which was done using the router and circle jig. Before I could start gluing and screwing, I had to cut out a few more small braces that would not only make the enclosure stronger but also help with the construction process. To get the spacing between the top and middle plates accurate, I cut two rectangular scraps to the length that I needed and glued them in place, spacing them about 2 inches apart, side to side. With these two pieces together, I was able to use those small braces as screw points and attach the rear baffle next. After letting this set up over night, I started by gluing the last curved brace to the rear baffle on the bottom. After that I was ready to attach the front baffle, and with that completed I had the inner frame ready for walls. Next were the curved sides. I cut them about 2 inches larger than I needed in both directions so I had enough play. Then I cut 7/8″ deep grooves lengthwise in each piece 1″ apart. Be careful after this step because the integrity of the wood has weakened significantly and may break if it is bent too far in the wrong direction. I then took one of the frames and screwed the front edge of the side flush with the baffle. With this locked in place, I curved the sides around to the back to see how much I needed to trim off so it would be flush with the rear. After trimming a few times it was finally perfect so it was glued and screwed in place. I repeated this step for the rest of the three sides until they were finished. I let this portion set up for a few days because of the odd shape. As I said, the sides were about 2 inches too long when I started, so there was an inch of overhang on the top and bottom that needed to be trimmed off. I did plan on this because there was one more layer that needed to be attached to the top and bottom, and by trimming this overhang with the router I knew I would get it perfectly flush. Since the sides were curved I had to go extra slow with the router but it worked perfectly when I was finished. Then I cut out 4 more square pieces for the final tops and bottoms. These were attached and allowed to sit overnight, then routed flush to match the curve of the sides. This process worked better than I expected it to. With the bottom enclosures just about ready to finish, I measured and marked where the PVC in lays were going to be to mount the upper cabinets. This was a simple process as well, and it only took one turn of the router and circle jig set at 3-1/4″ diameter with a spiral cut bit at a depth of 1/4″ for each mount, with two mounts per speaker. Then I started on the upper enclosures. There wasn’t anything special about this process, other than the midrange baffles. When the 6 sided box was finished, I cut the recess and through-hole for the tweeter. With that out of the way, I cut four squares out that were slightly larger than the width of the baffle and mounted them using glue and screws to each end of the box on opposite sides of the tweeter hole. After these dried over night, I trimmed the edges flush to the sides of the box. I then measured the centers of the woofer cut outs and used that same pivot for cutting the curved edge next to the tweeter. I set the router bit depth to 3/4″ and figured out what exact diameter I would need to finish clean on both sides. After I determined this it just took one swipe from side to side and then I had a curved midrange baffle. Now it was the daunting task of cutting the through holes through 1-1/2″ of MDF. I don’t remember how many passes it took, but the router was nice and warm when I was finished with all four holes. The last big thing to do with the upper sections before paint was to cut the same PVC recesses in the bottoms of the enclosures to match the recesses in the tops of the woofer enclosures. This was done by using the same technique. Then finally, I put a 1/4″ round over on all the sides (which is easy with new router bits). With all four cabinets ready for finish work, the hard part was over. The bottom sections were going to be partially finished using real wood veneer which I had never used before. I tested a few small pieces on scraps with contact cement just to make sure I knew what I was doing. After those dried I knew I was ready for the real thing. I cut small narrow strips for the top sections of the cabinets and laid them down first. I used the flush trim bit yet again to trim off the access and it worked flawlessly. I repeated the steps for the front and rear edges, and finally the sides. They were really starting to come together. I stained them with 3 coats of Minwax Cherry with polyurethane. I sanded with super fine steel wool between each coat, for a finish that you can see your reflection in. The rest of the lower enclosures and the whole upper enclosures both get finished with Rustoleum Stone Accents in black. I thought this would add a different texture and depth to the look. I used between three and 4 coats on each section and let dry for 48 hours. For the short PVC stand offs, I used 2 coats of flat black primer. With everything almost complete, I stuffed the cabinets with acoustic foam and Acousta Stuf using the correct amount of each, and mounted the crossovers below the terminal cutout in the back. I mounted brass cones to the bottoms to isolate them from the floor and used the new Dayton brushed aluminum bi-amp terminal plates for a higher end look. I waited until I got them home to mount drivers and bolt the cabinets together, as they are easier to carry in four pieces. Make sure these are in the vicinity of their final location because they are very heavy when they are finished.
Conclusion
“These are the best sounding speakers I’ve heard up here,” to quote PE Product Manager Brian Myers after he evaluated them in the listening room. I couldn’t agree more. Using an Usher test track CD, vocals are reproduced beautifully, and while listening to jazz, you feel like you’re there. I remember one piano track where I actually heard the pianist manipulate the pedals with his feet in the background during a short pause in the number. The soundstage literally surrounds you and the kick of the bass drum pounds your chest, but is not overbearing. Oh, and these will get LOUD. The test components used were the modular Audio Source preamp and two 5.3A monoblocks. With an average sensitivity of around 90 dB, as little as ten watts will send you running for the door, but in a good way. Standing side by side, Brian and I were yelling to communicate but the speakers never blinked. We tried finding flaws in the sound but they just aren’t there. I definitely feel that these are the nicest speakers I have built, both visually and sonically.
About The Designer
Matt Phillips has been an audio enthusiast for many years. His fascination with cutting-edge products and concepts has been strong ever since the beginning of his speakerbuilding hobby. Building on experience gained from working at Parts Express, he continues to explore new concepts and applications. Currently employed as a security and IP based surveillance technician, his love for technology is still growing. Matt’s other interests include woodworking, toying with RC cars, drumming for his local church’s praise band, and going to the shooting range.
Project Parts List
|
Part # |
Description |
Qty |
|
1 |
||
|
297-435 |
1 |
|
|
264-1016 |
1 |
|
|
091-610 |
Dayton Audio DBPP-SI Double Binding Post Plate Silver Anodiz |
1 |
|
091-624 |
1 |
|
|
091-654 |
1 |
|
|
027-421 |
1 |
|
|
255-020 |
1 |
|
|
027-426 |
1 |
|
|
004-.51 |
Dayton Audio DNR-0.51 0.51 Ohm 10W Precision Audio Grade Res |
1 |
|
004-8 |
Dayton Audio DNR-8.0 8 Ohm 10W Precision Audio Grade Resisto |
1 |
|
255-200 |
1 |
|
|
004-2 |
Dayton Audio DNR-2.0 2 Ohm 10W Precision Audio Grade Resisto |
1 |
|
255-058 |
1 |
|
|
255-040 |
1 |
|
|
027-429 |
1 |
|
|
255-026 |
1 |
|
|
255-022 |
1 |
|
|
004-10 |
Dayton Audio DNR-10 10 Ohm 10W Precision Audio Grade Resisto |
1 |
|
027-352 |
1 |
|
|
255-044 |
1 |
|
|
027-370 |
1 |
|
|
027-362 |
1 |


I am new in this area. If I just keep the MTM part of your design, how would I modify the crossover? Thanks.