Cynosure

Designer: Darren Kuzma
Project Time: 8-20 hours
Project Complexity: Professional
Project Cost: $100-$500
Driver Selection
I knew from my initial goals that I would need a single tweeter to cover the high frequencies and a collection of smaller drivers for the bass and midrange regions. The tweeter requirements were fairly simple: good dispersion, small faceplate, and the ability to play fairly low- the Tang Band 25-1166S immediately came to mind. Next, I debated between three and four-inch drivers for some time, looking at the necessary quantities and the resulting cabinet size. In the end, I decided that I could achieve the needed levels while minimizing the height of the speaker by using six three-inch drivers. With a large number of three-inch drivers to choose from, I focused my attention on excursion capabilities, which translates into higher maximum SPLs. On paper, there is a wide range of excursions on these small drivers, anywhere from .5 mm to 3 mm. However, I knew that the Tang Band neodymium drivers used an underhung design as opposed to the more usual overhung design found in the Hi-Vi. So, I decided to head to the lab for a mini driver bass shootout between the Tang Band W3-926S (XMAX = .75 mm) to the Hi-Vi B3S (XMAX = 3 mm). Surprisingly, the Tang Band had longer and cleaner excursion before massive distortion set in. The Hi-Vi driver simply does not have the mechanical excursion capabilities to live up to its 3 mm rated XMAX, and becomes heavily distorted with suspension noise rather early. So, the Tang Band W3-926S was my final choice of 3″ drivers for its good low-end capabilities and smooth overall frequency response.
Enclosure Design
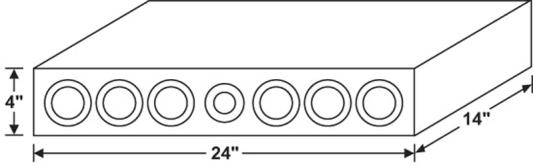
When it comes to getting the most out of small drivers, using a vented alignment is generally the best bet if enclosure size is not an issue. This is especially true in a home theater environment where low frequency signals can be eliminated in the digital domain. By filtering the signal from below the tuning frequency of a ported design, we can get the best of both worlds; i.e. greater bass extension without unloading at low frequencies. Based on the driver parameters, the required cabinet volume for venting six W3-926S drivers is about .5 cu. ft. For my design, this translated into a 4″ tall, 24″ wide, and 14″ deep cabinet constructed of 1/2″ MDF. While 24″ wide is about the minimum to fi t the drivers on the front baffl e, the dimensions can certainly be adjusted depending on the size of the television. If I had a large TV, I would probably consider making the front baffl e wider and putting the ports on the front Instead of the sides. This design calls for four 1-3/4″ x 4″ ports for a tuning frequency of roughly 100 Hz. While this size and number of ports seems like overkill for such small drivers, the ports do start to move substantial amounts of air at high power.
Amplifier/Crossover Configuration
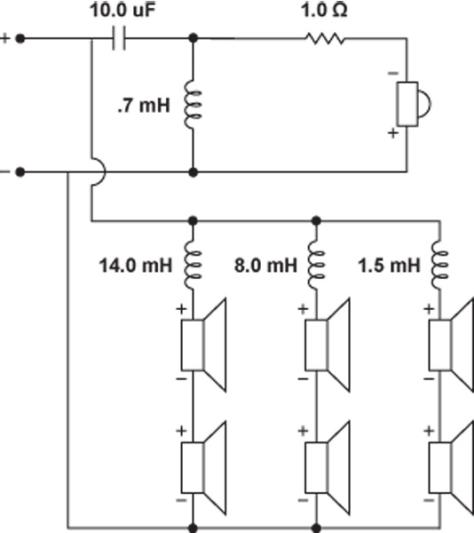
As established in the goals section, the crossover design is an integral part of the success of this speaker. I employed a somewhat unique approach to the crossover, namely what could be called a 2.5.5 way design. Basically, the outermost drivers operate up to about 200 Hz, the middle drivers operate up to about 700 Hz, and the innermost drivers operate up to about 2 kHz where they cross to the tweeter. This approach allows all of the drivers to work together at the lowest frequencies for maximum low-end extension, while only the innermost work at higher frequencies for maximum dispersion. To achieve the desired impedance, the speakers are wired with two drivers in series, and then each of these pairs in parallel. The outer two drivers are in series with each other, the middle two are in series, and so on. The net result is an impedance of 5.33 ohms, which once some inductor DC resistance is added results in a nominal impedance of 6 ohms. This impedance combined with the high overall sensitivity should work well with any home theater receiver, even if it is rated for an 8 ohm minimum center channel. The tweeter crossover is a second order high-pass with a very small padding resistor that reduces the output by a couple dB. This design is unique in that the tweeter is connected in reverse phase compared to a “normal” two-way design. The result is excellent off-axis response in the horizontal domain– far superior than what would be expected.
Enclosure Assembly
The fabrication of this cabinet is quite simple; it is simply a 4″ tall by 24″ wide by 14″ deep box. Bracing composed of scrap MDF was used at several points within the cabinet for connecting the large top and bottom panels. This can be done “to taste,” the exact location of the braces is not critical. Driver cutouts were done with the Jasper Circle Jig and port cutouts were done with a hole saw. The cabinet can be fi nished in many different ways, either to match your television or room decor. Since my television is essentially black, I decided to try the Band-It iron-on black Melamine. Instructions for application are included on the packaging, and I found that using kraft paper between the Melamine and iron worked the best. The Melamine appears to be able to take the full heat of an iron without any problem, so work slowly and steadily to make sure that the hot-melt glue fully melts. Apply the Melamine to one panel at a time, and once you have secured the trim with a knife or edge trimmer, work your way around all sides until complete.
Conclusion
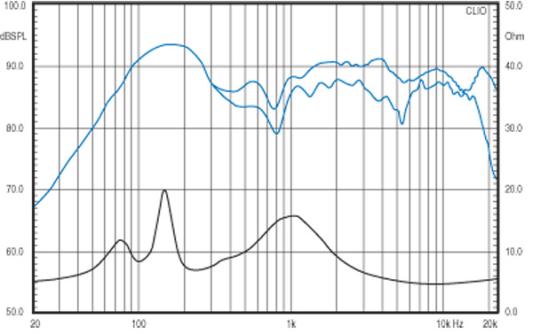
The overall cosmetic look of these speakers is quite nice; the Band-It melamine provides very professional-looking results. Sonically, this speaker can achieve high playback levels, and is signifi cantly more sensitive than even many big fl oor-standing speakers. When driven with a full-range signal, the speaker does have a bit of emphasis in the 100-200 Hz region, but once connected to a home theater receiver with an electronic high-pass fi lter, the response fl attens out. Since this is designed for HT use, as long as the size of the center is set to “small” with a 100 Hz to 150 Hz high-pass fi lter, the performance is excellent. The clarity of this speaker was amazing, I was hearing many details in the center channel mix that I had never heard before. The most impressive feature of the speaker is its off-axis performance, which remains good at just about any position imaginable. Cliche’d as it may be, it really did take my home theater experience to a new level!
About The Designer
During the daytime, Darren Kuzma is a mild-mannered product manager, handling the everyday business of making sure Parts Express has the best speaker building offerings and the most in-depth information available. At night, the DIYer in him comes out, and he spends most of his time working on projects, fixing things around the house, cooking, and keeping up with the speaker building community. He’s been building speakers for many years, and says “I learned the most by talking to other speaker builders, reading, doing experiments, and by trial-and-error. There’s nothing like getting your hands dirty, that’s why they call it DIY!”
Project Parts List
|
Part # |
Description |
Qty |
|
264-815 |
6 |
|
|
264-834 |
1 |
|
|
260-031 |
1 |
|
|
266-952 |
1 |
|
|
266-576 |
1 |
|
|
255-238 |
1 |
|
|
027-428 |
1 |
|
|
004-1 |
Dayton Audio DNR-1.0 1 Ohm 10W Precision Audio Grade Resisto |
1 |
|
260-303 |
1 |
|
|
260-407 |
4 |
|
|
266-832 |
1 |
+ There are no comments
Add yours