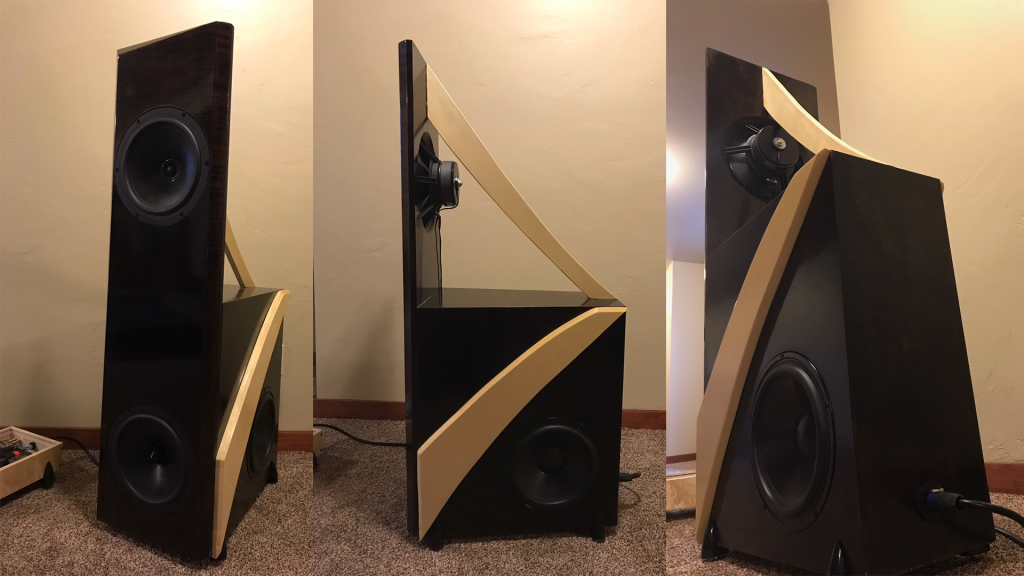
RSX


Designer:
Chris B
Project Category:
Tower Speakers
Project Level:
Advanced
Project Time:
8-20 Hours
Project Cost:
$500 – $1,000
Project Description:
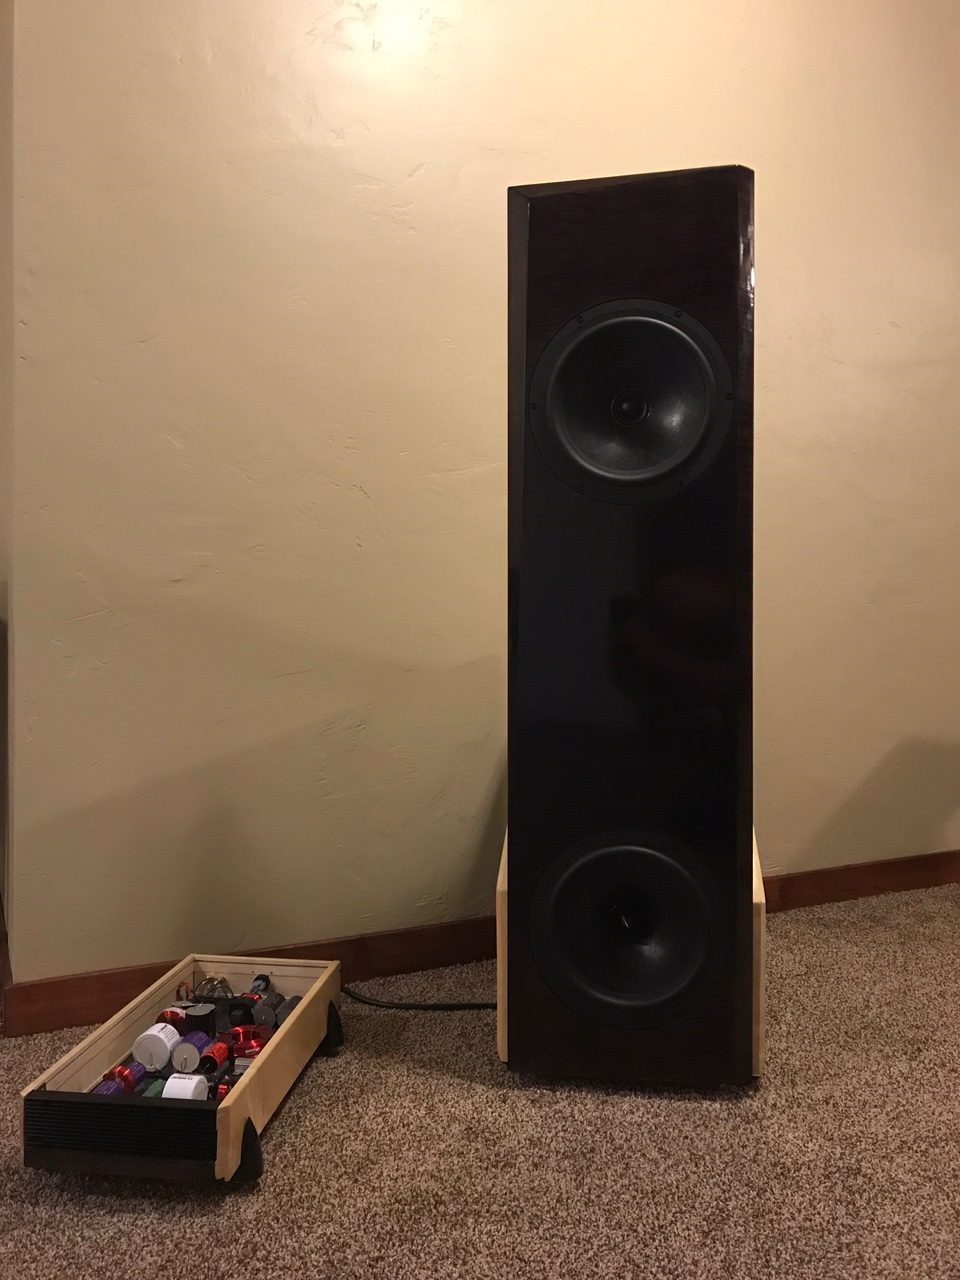
RSX is a large floor standing speaker featuring a 10″ woofer and a custom 10″ coaxial mid/tweeter.
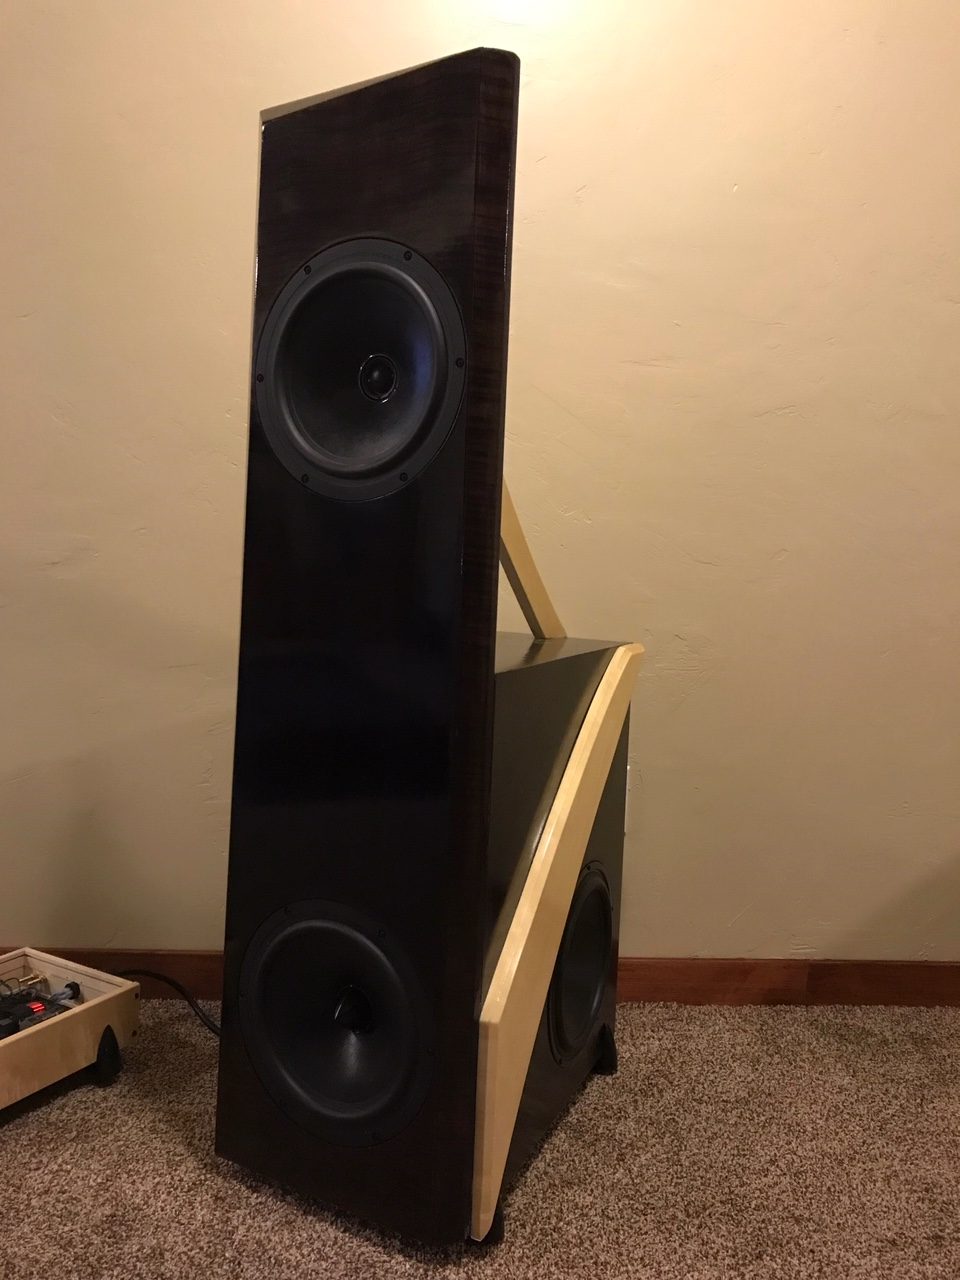
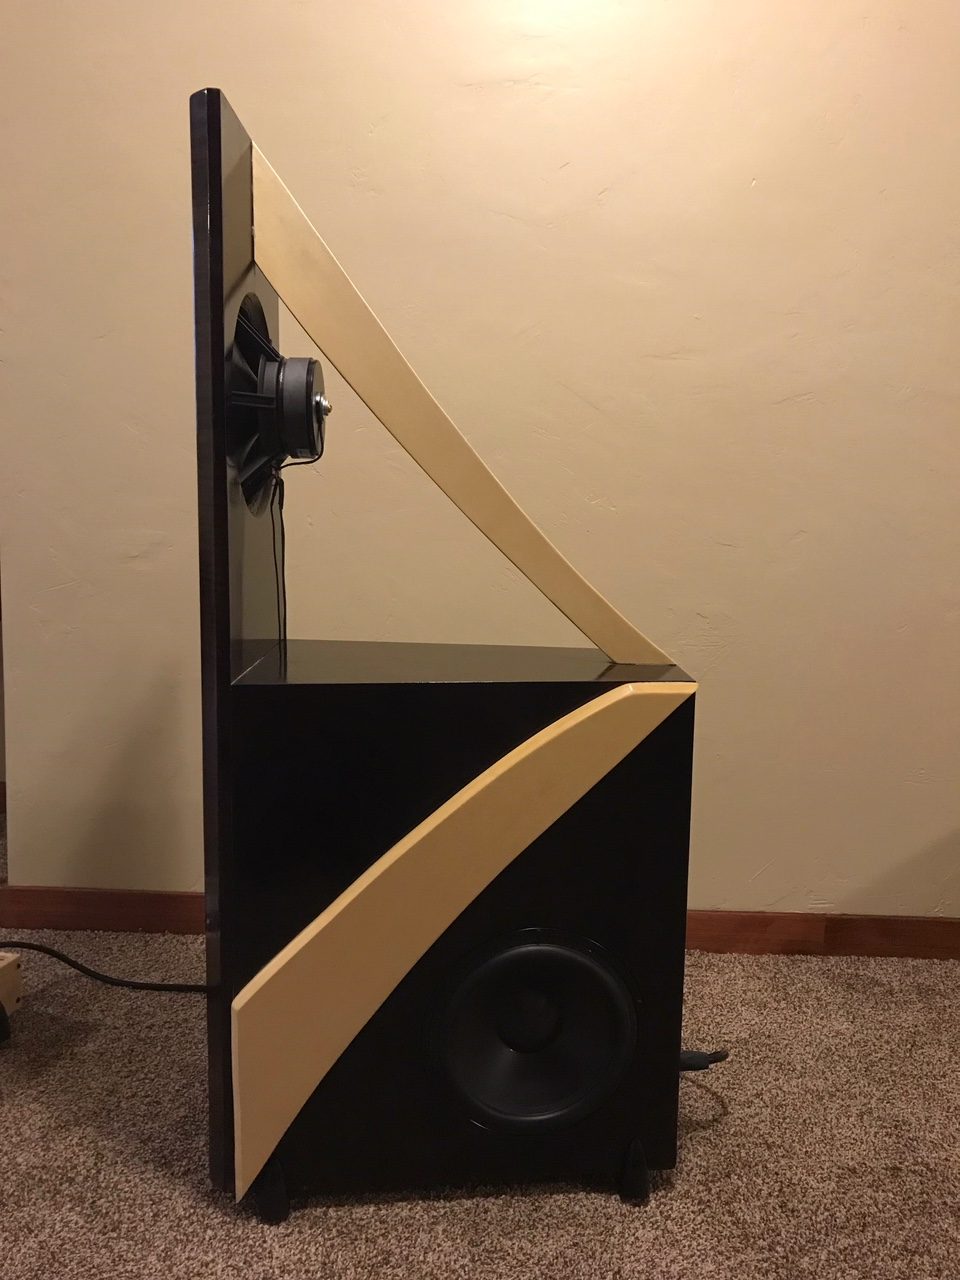
The project uses a open-baffle (dipole) loading of the midwoofer and passive radiators for the bass reflex loaded woofer.
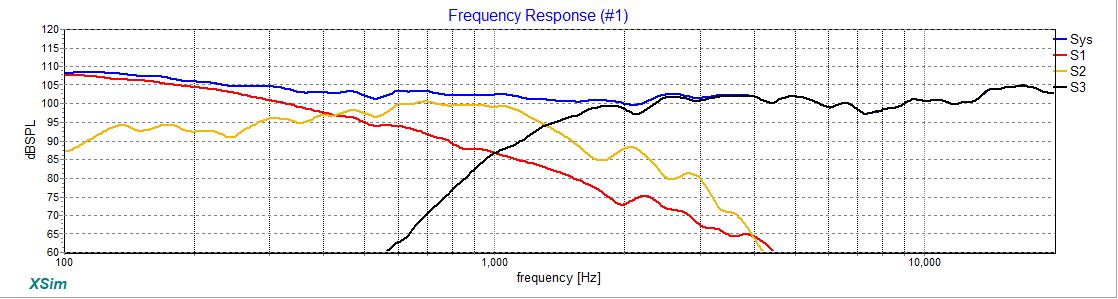
The system is an eight ohm nominal load and has an F3 in the low 30s and output in excess of 100dB.
Design Goals:
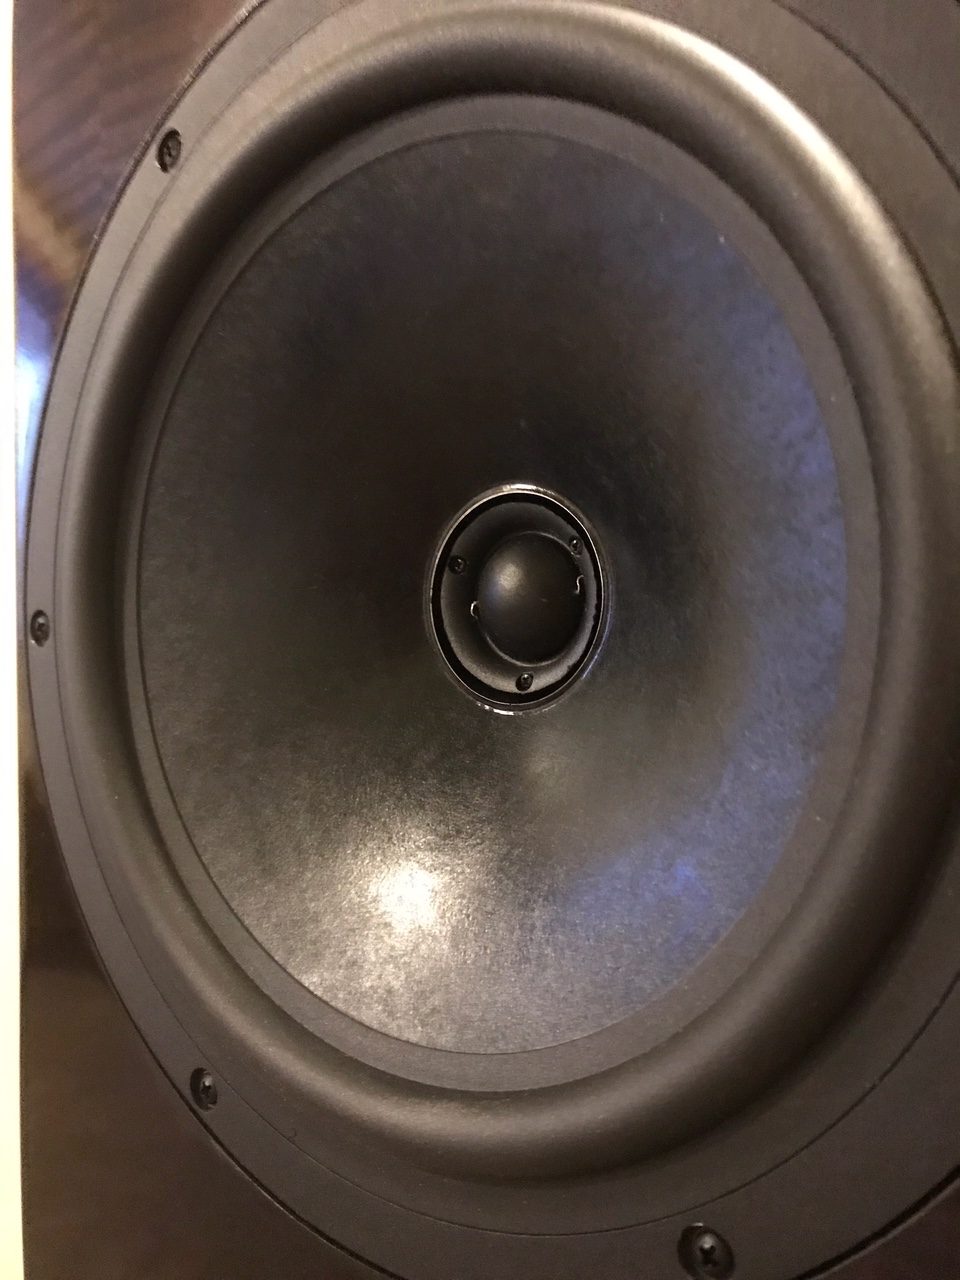
The primary goals of this design was low bass, high output, dipole mid, and to create a 10″ coaxial driver with use of a dome tweeter as opposed to the compression driver typically seen in a 10″ coax.
Driver Selection:
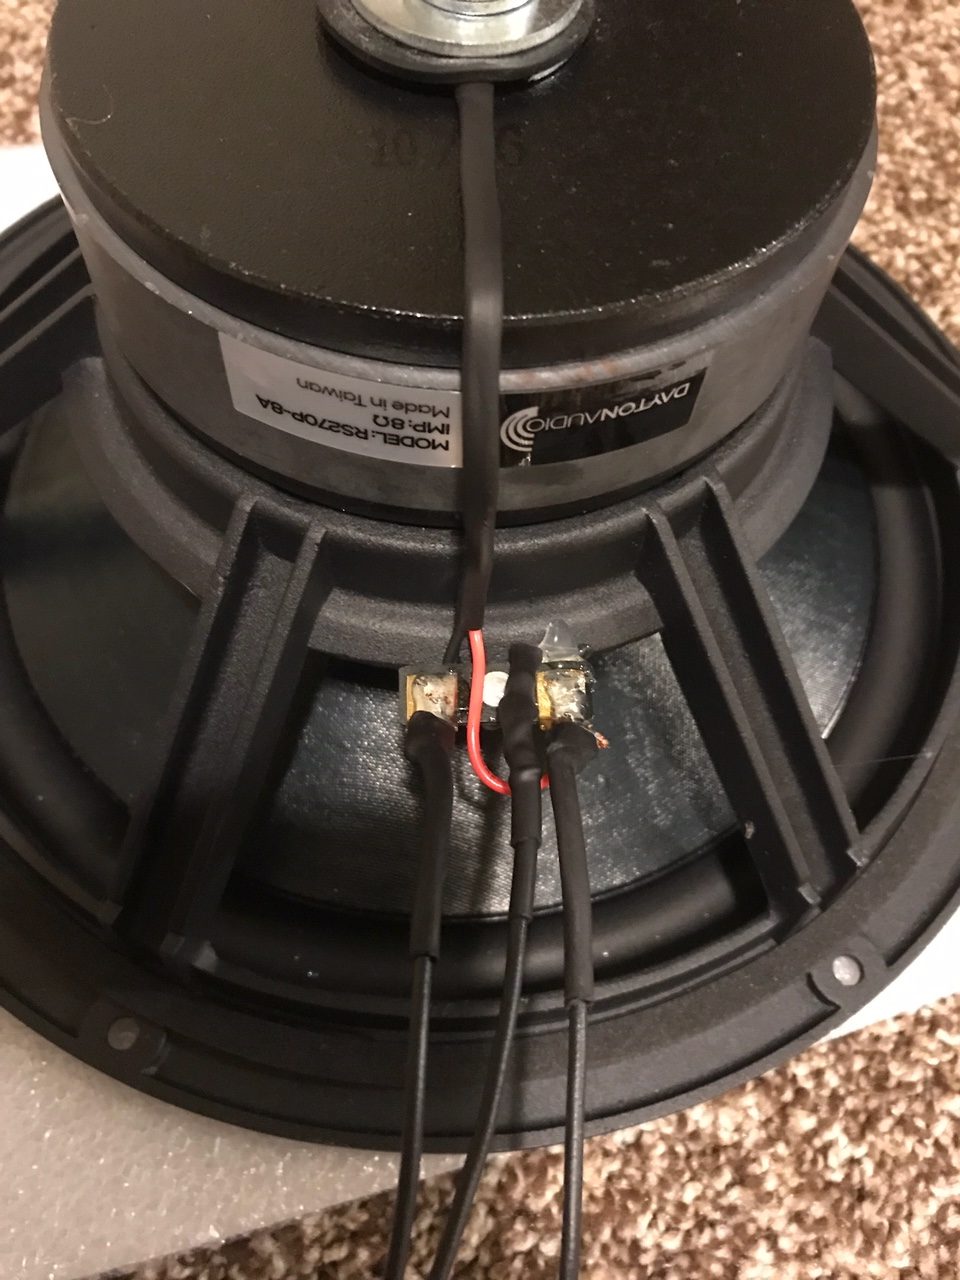
I chose the RS270P woofers due to their attributed looking favorable for use as both a woofer and as a midwoofer which could be easily converted to a coax.
The RS270P can reach to frequencies in the low 30s or deeper while still having strong power handling before running into excursion issues. I am very impressed with the quality of bass the driver exhibits.
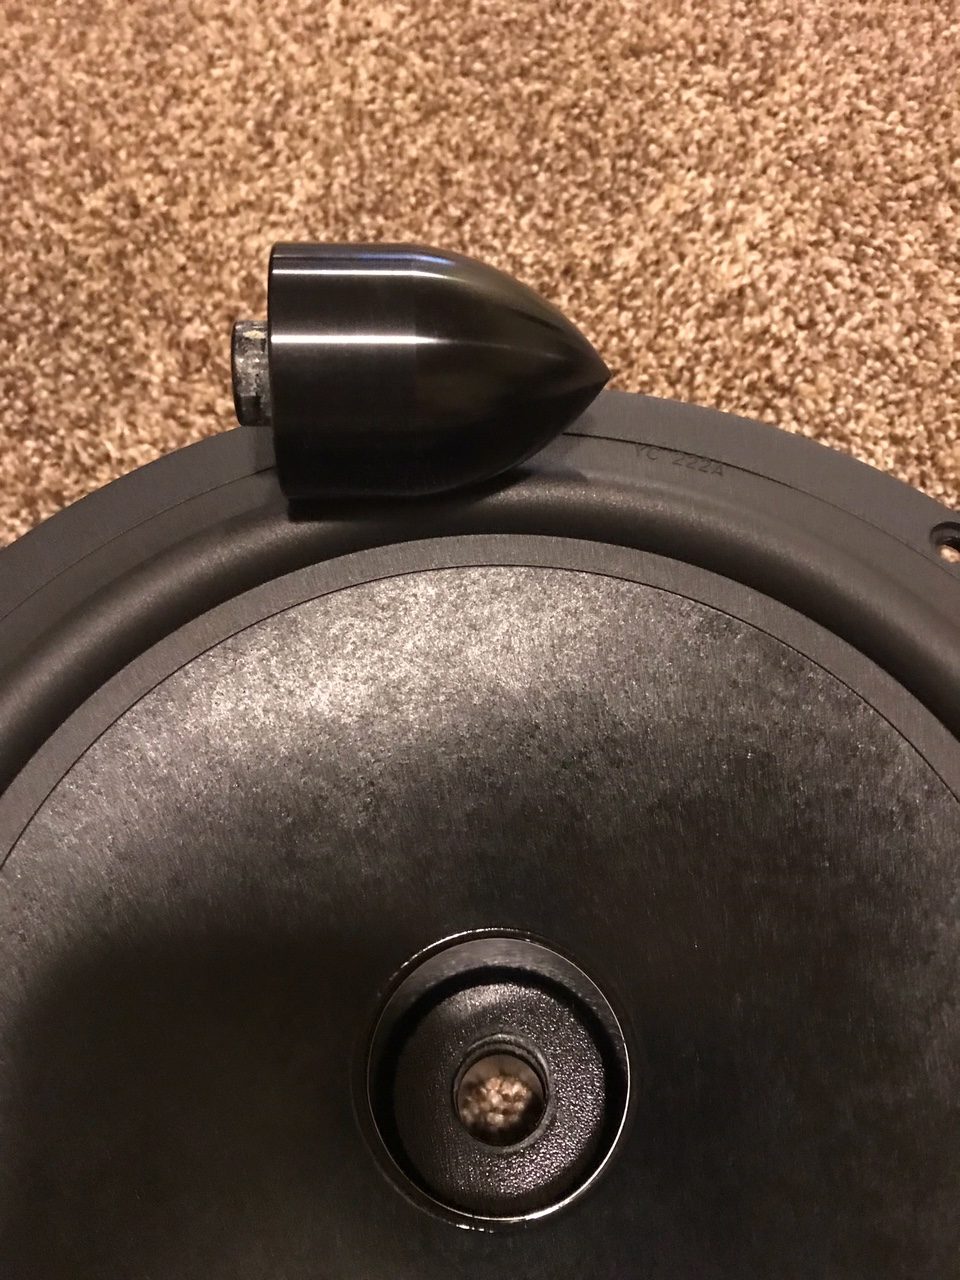
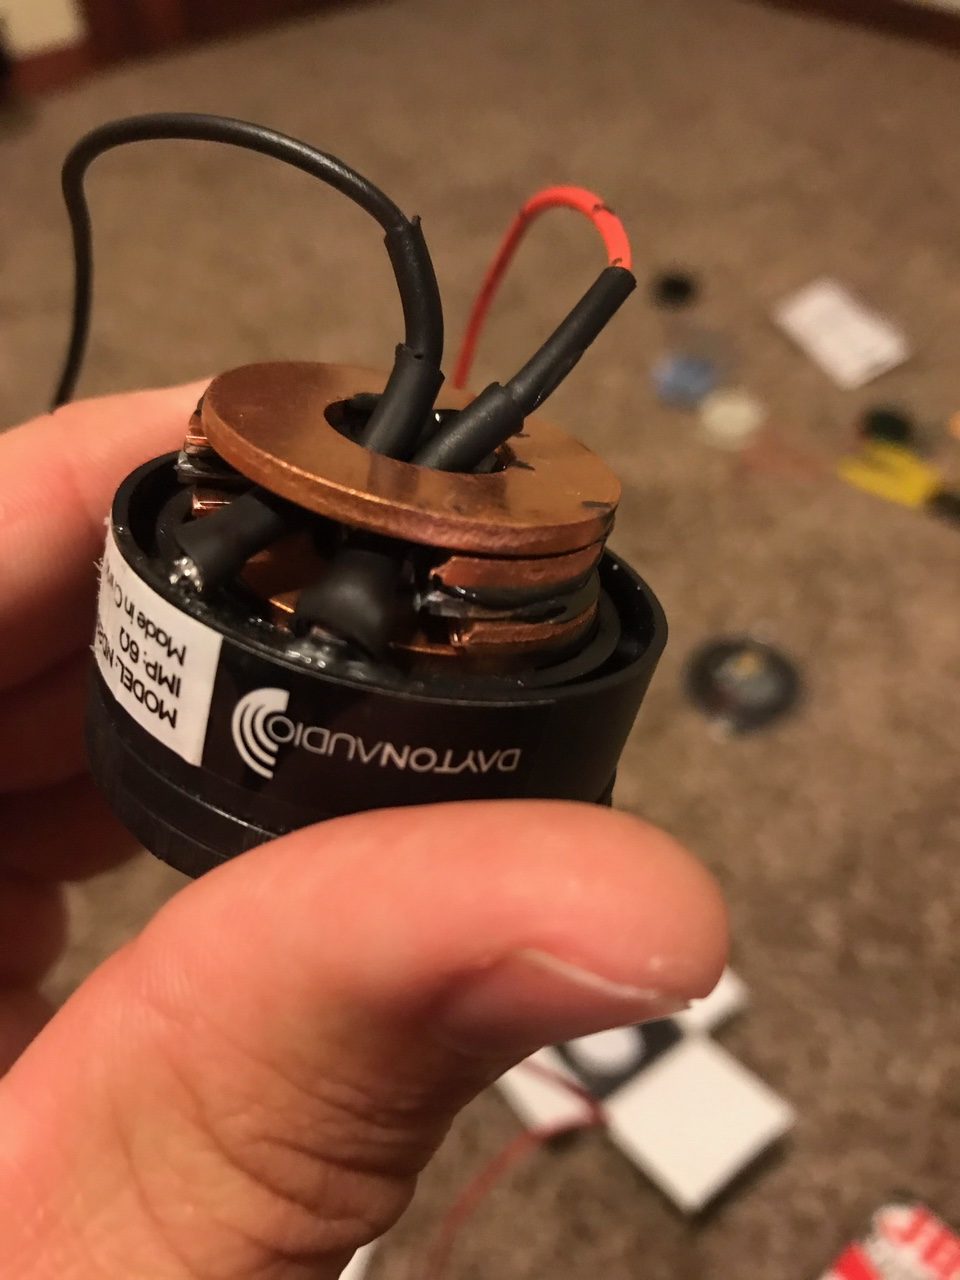
As for a midwoofer, the cone is heavy but this doesn’t seem to affect anything in a negative way. The breakup is well damped and does not require special attention. The RS270 has a large enough coil to accommodate a reasonably large tweeter. The phase plug is easily removed with a big bolt and a hammer strike from the rear through the pole vent.
The ND28 has a relatively low FS for its size and lack of a rear chamber. With the mounting flange removed (I used a bandsaw) it fits nicely where the phase plug was. I used large washers, along with a nut, epoxied to the back of the tweeter with JB Kwik Weld to space the tweeter and make a way to mount it. I recommend copper washers to replace the non-ferrous material removed with the phase plug removal (the phase plug acts as a shorting circuit in the RS270). I suspect the copper may also add a heat sink to the tweeter. The washers need to be notched to allow wire routing. A bolt cutter works nice for this. A brass bolt is recommended for tweeter mounting, as well as a rubber washer on the rear by the bolt head.
I used the DSA 10″ passive radiators and they look good and work well. there is 135g added to each one and two per cab. Use big washers to keep the mass close to the spider to help prevent the large weight from tweaking on the suspension.
Enclosure Design:
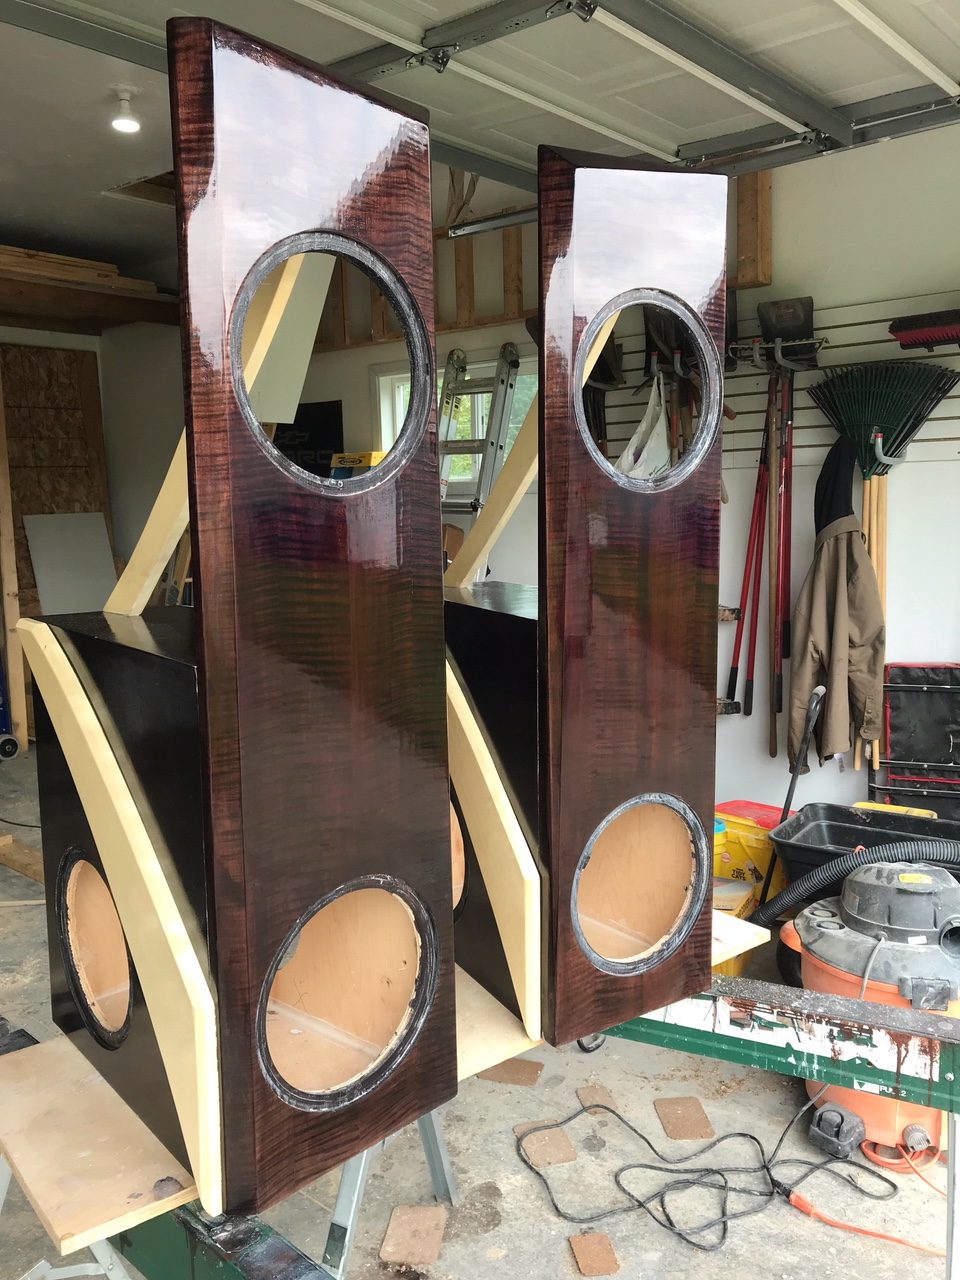
The woofer cabinet is 2.25 ft3. The drivers are flush mounted in the 1.5″ thick baffle (2 x 3/4″ plywood adhered together with construction adhesive around the perimeter and Green Glue in the inner area. The baffle has non-uniform facets to aid with diffraction control.
The baffles are 13″ wide and 48″tall. Drivers are centered at 6.5″ and the mid is centered 12″ down from the top and the woofer is centered 8″ up from the bottom.
The decorative pieces on the side of the woofer cabinet are functional as they trap Green Glue against the cabinet walls. The woofer cabinets are internally braced as well.
The baffle is veneered in curly maple and the cabinet is maple veneered plywood. Finish is TransTint coffee brown dye in alcohol and the finish is shellac/dewaxed shellac/laquer.
Enclosure Assembly:
Much of this was covered in enclosure design, however some additional details on the construction include that the baffle is glued to the cabinet with heavy duty construction adhesive (PL 8x). This must be done before the finish is applied.
The woofer and mid cutouts are chamfered on the rear with a large 45 degree bit to aid in breathing.
The finish is sprayed with a HVLP gun. The baffle is gradually sanded up to 1500 grit and buffed with scratch and swirl remover followed by machine glaze.
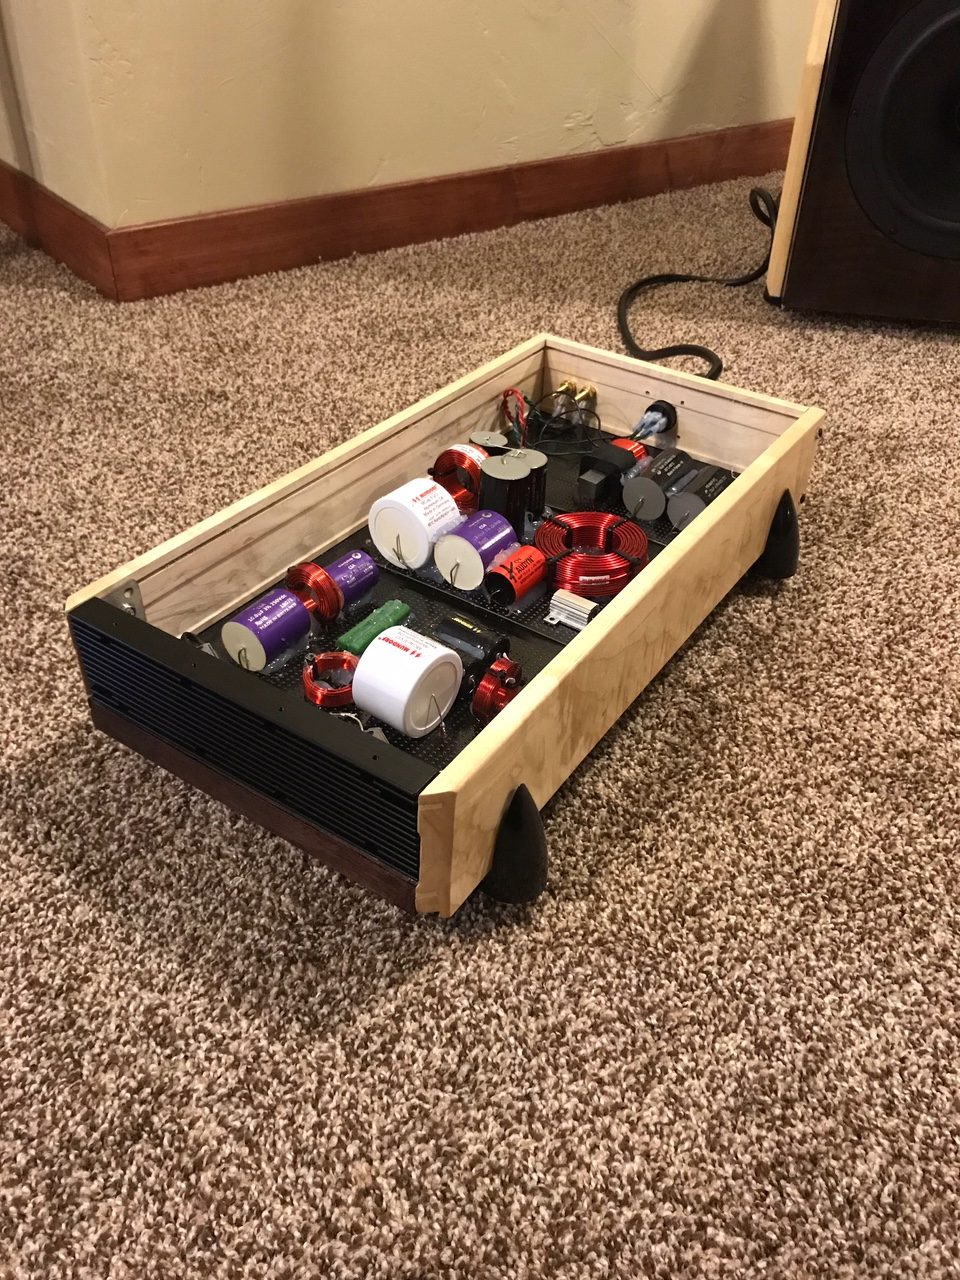
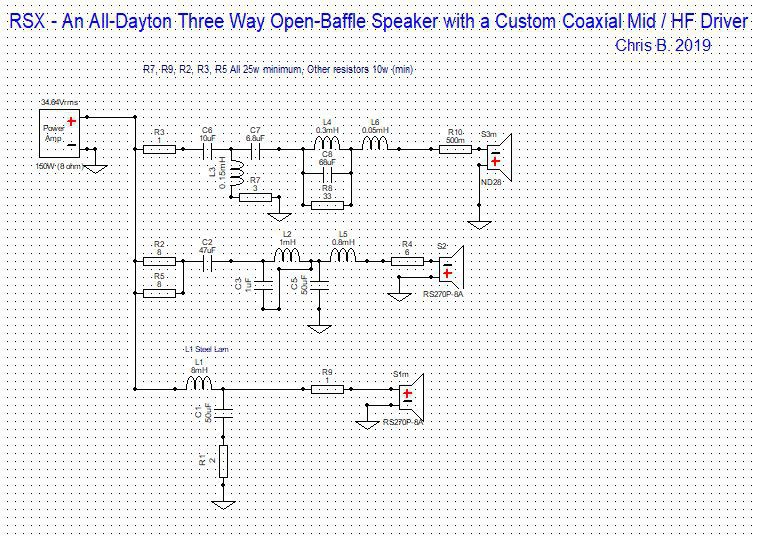
Crossover Design:
The standalone crossovers are not required. Internal crossovers are fine, keeping in mind to keep resistors away from combustible materials.
The crossover is fairly straight forward and the schematic is included in the photos. I used multiple capacitors of varying values to accomplish the values I needed. Capacitors in parallel add together. This is not necessary if a single capacitor of proper value is had.
The series resistor after the tweeter crossover can be adjusted to taste. The difference between zero and one ohm is noticeable.
The tweeter had a significant HF rise after the loading in the cone waveguide and crossover. I added a 0.05mH inductor to help tame this.
One unusual item is the one ohm resistor in series with the woofer. The resistor helps tame the bump created by the low crossover and helps eliminate boom and bloat around 100hz. This resistor does not dissipate a real lot of power but as with all resistors should be kept free to breathe and away from wood, stuffing, etc.
Tips & Tricks:
Large value shunt (parallel to ground) capacitors in the woofer and mid circuits can be switched out with electrolytic to lower cost.
Conclusion:
I am very happy with the result. The 10″ coaxial dipole mid really does well. Off axis is very nice and bass is very tight and solid. This project has some additional DIY steps to create the coaxial driver but is worth the effort.
About the Designer:
I have been building speakers since I was quite young. I enjoy learning more with each build. I rely on help and advice from the members of the Tech Talk forum, who have taught me so much about speaker building.
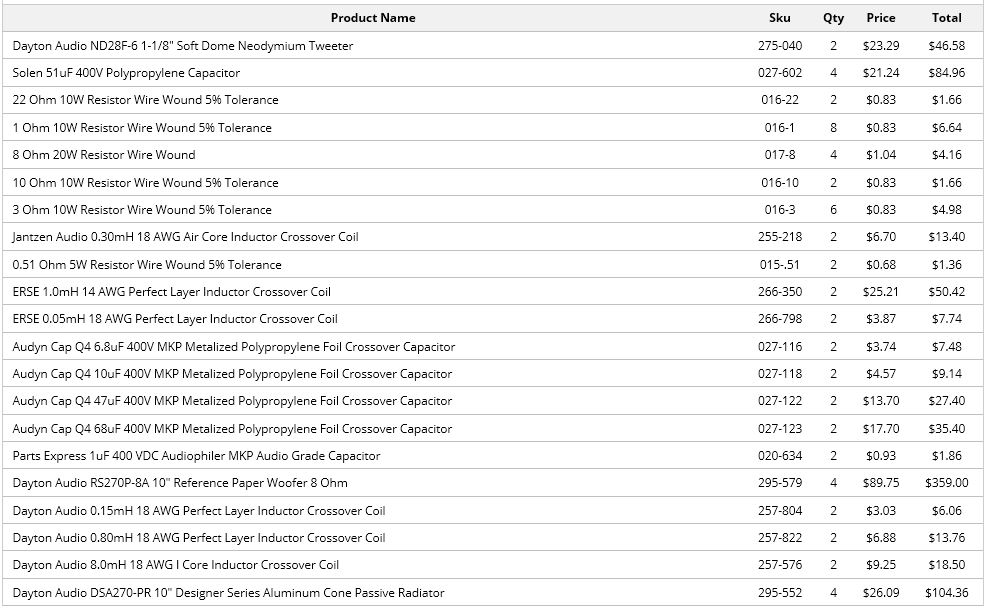
Project Parts List:
Very unique design! Beautiful job.
A fascinating build. I would love to listen to it as l have never seen such a diverse speaker arrangement, but when I imagine sitting in it’s sweet spot, l can’t help but imagine closeing my eyes and lay back and listen. Who could ask more?
TD Hanson
Beautiful build Chris! I love the attention to detail and I’m sure they sound fantastic. Congratulations!