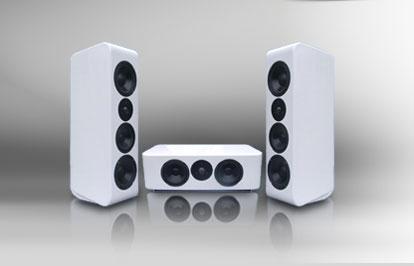
The Impresario


Designer: Curt C.
Project Time: 8-20 hours
Project Complexity: Professional
Project Cost: $500-$1000
Driver Selection
The purpose of this design was a dual-woofer loudspeaker with high sensitivity and improved mid range response. A dual woofer loudspeaker using the Dayton 6-1/2″ shielded woofer, Dayton 5-1/4″ shielded mid woofer, and Dayton 1-1/8″ silk dome tweeter. These drivers are among the “best bang for the buck” in low price loudspeaker drivers. These speakers provide quality sound at reasonable price.
Enclosure Design
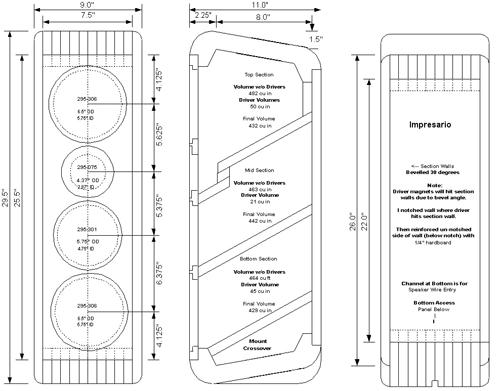
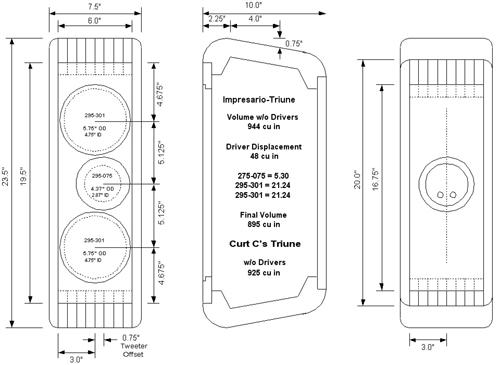
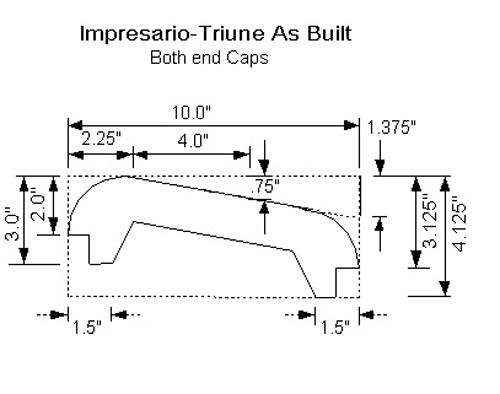
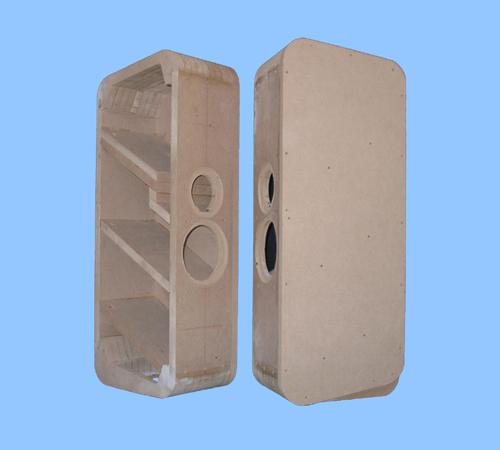
The Impresario has a sealed enclosure. It’s modeled, having a similar volume as the Dayton III. Front baffle measures 9.0″w x 29.5″h including the 2″ radius curve on top and bottom. Construction of the top/bottom caps requires a more advance skill level and without doubt will be challenging to some DIY’ers. A more traditional loudspeaker baffle (rectangular enclosure) for this design would measure 9.0″w x 27..5″h. If you’re going to use vinyl veneer round-over vertical corners of baffle. Construction of this enclosure is quite easy and should take less than a day to cut and assemble the cabinets and baffles. The 295-306 woofer enclosures have an adjusted volume (w/drivers installed) of about 430 cu in each enclosure. The Qtc at 0.65 is about 415 cu. in., F3 of 71 hz. and Driver Resonance of 65 hz. Polyfil is sparingly stuffed within center of enclosure. Drivers are sealed with a 1/8″ thin foam sheet type material used as shipping packing, simply traced and cut to size with scissors. The 275-075 tweeter resides with upper woofer. Its volume calculated into the adjusted volume of enclosure. The 295-301 mid woofer enclosure has an adjusted volume (w/driver installed) of about 440 cu in. The Qtc at 0.65 is about 450 cu. in., F3 of 77 hz. and Driver Resonance of 70 hz. Polyfil is sparingly stuffed within center of enclosure. Drivers are sealed with a 1/8″ thin foam sheet type material used as shipping packing, simply traced and cut to size with scissors. Curt C. suggested extending the mid enclosure back to the rear wall and making it narrower by mounting the tweeter in the upper woofer enclosure. It would have separated the two woofers into chambers of unequal volume but not if the mid enclosure is angled upwards from front to back to compensate. This required an 11.0″ separating wall at 30 degree bevel. Standing waves: In the Impresario design the fundamental standing wave will be at roughly 250 Hz. Standing waves can result in colored boomy or heavy sounding vocals. Dividing the enclosure into separate angled woofer sections will push the resonant frequencies upward into the stop band of the woofer, precluding their occurrence. Enclosure integrity: The mid enclosure panels now tie the four sides of the enclosure together with asymmetric shapes, spreading out the remaining panel resonance over varying frequencies. As for the offset, mid woofer sound surface wave would not hit back wall except after hitting offset angled panel first. This and the narrow baffle will likely eliminate the need for the double thick front baffle, although it won’t hurt to still do it. Midrange improvement: The actual mid enclosure volume is not critical as long as it adequately sized to absorb the rear pressure wave. To this end the longer enclosure will be advantageous over one where the back wall is only a few inches away. A minimal amount of stuffing will be needed to absorb the pressure wave reflected off the back wall.
Amplifier/Crossover Configuration
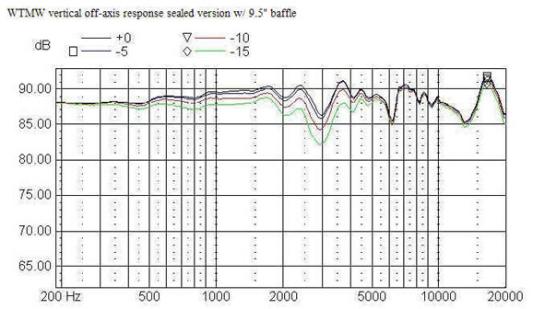
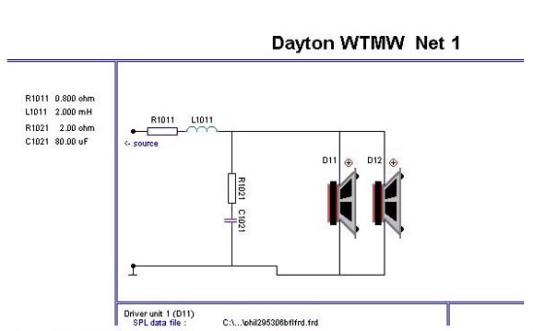
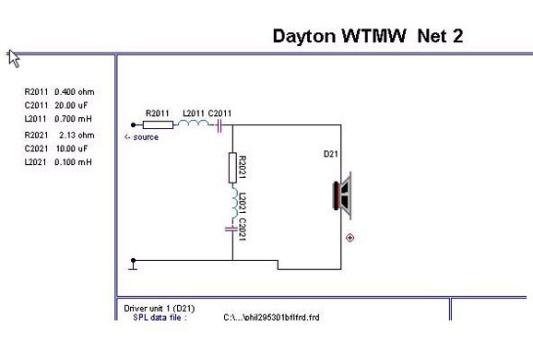
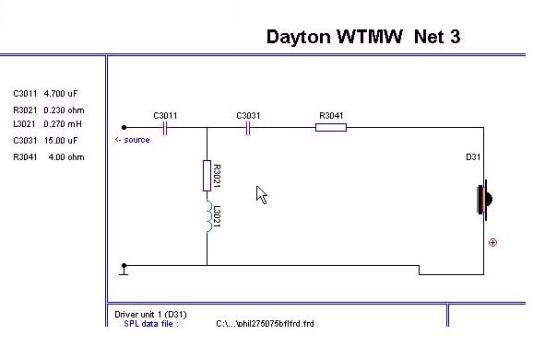
The crossover is 2nd order acoustic at 700 Hz for the Woofers and 4th order acoustic at 3000 Hz for the tweeter. The impedance minima is 4 ohms at just above 100 Hz. All resistor values below 1 ohm are the DCR of the associated inductor, or a standard value resistor with the DCR added in (i.e. 2.13 ohms). All inductors are Jantzen 18 gauge. The mid woofer and tweeter are connected out of phase to the woofers, and good phase nulls are modeled when they are reversed. The dips at 3K and 6K are diffraction artifacts, but they will disappear by 10 degrees off axis. So for the smoothest response don’t aim them at your sweet spot, but maybe straight out into the room, so you are listening slightly off axis. Decreasing the value of C2021 would have the effect of filling in the dip at 3K, but unfortunately it also raises the peak just above the dip. A 10 ufd capacitor was chosen for C2021 since dips are less noticeable than peaks, the lesser of two evils. Off Axis Response for sealed Wtmw with 9.5″ Baffle
Enclosure Assembly
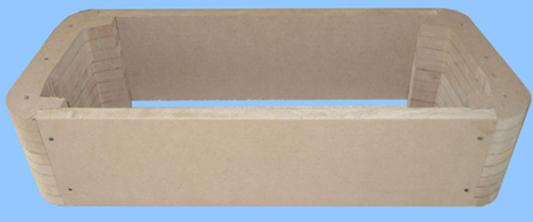
Laminating MDF Made Easy Create an mdf template by stenciling shape upon mdf surface. Trim undesired material from mdf following stencil markings. Next (very important) manicure template edges before using as finishing template. Determine best/strongest place to screw template to mdf copy pieces (note- see photo, screw holes have future use). Place finished template upon mdf copy piece, screw down template and trace copy piece. Repeat this step as many times as needed for each end cap. Trim undesired material from these mdf pieces to within 1/8″ of finished edge. A first starter piece will be needed for each end cap, screw template upon trimmed copy piece and flush cut. Repeat this step once for each end cap. Drill 1/4″ hole in all mdf copy pieces and starter pieces at point where screw hole appears. Apply glue to both sides of starter piece, insert a 12″ piece of all thread through 1/4″ hole, then sandwich one copy piece to each side of starter piece. Put fender washers over all thread then tighten 1/4″ x 20 nuts on all threads. Use additional clamping if available or make a clamping jig with all thread and scrap wood. This will self align the pieces. Allow glue to dry at least an hour before removing clamps. Next, flush cut copy pieces to started piece. This time apply glue to copy pieces, insert a 12″ piece of all thread through 1/4″ hole, then sandwich one copy piece to each side of first copy piece.. yada.. yada. Repeat as many times as needed until desired thickness is obtained. The Finish White High Gloss Lacquer Piano: All mdf surfaces were prepared before finishing. Yes some bondo was needed, not much though really. A 50%glue/ 50%water mixture was applied to all cut mdf edges using a brush. Allow surfaces to dry about an hour before applying another coat this time to all surfaces. The glue water mixture makes the mdf a rock hard surface. Now sand all surfaces using 320 grid sandpaper. Clean and wipe all surfaces before applying oil base primer. Sand primed surfaces with 320 grid sandpaper. Clean and wipe all surfaces, hang cabinet in clean location suitable for spraying lacquer. Lightly spray all surfaces with high gloss lacquer, allow an hour to dry. Take down speakers to clean terrycloth covered work surface. Sand all surfaces with 400 grid wet/dry sandpaper dipped in water. Paper towel dry, hand and repeat spray steps for 3 or 4 coats. Clear coat lacquer applied similarly to high gloss white lacquer except this step use 800 grid wet/dry. Repeat spray steps for 3 or for more times. Let speakers dry for 1-2 weeks before final assembly. A decision was made not to install speaker binding post cups but they could have easily been installed on back baffle. There is a crossover access panel section below lower woofer. A channel runs along the bottom of speaker to crossover section for speaker wire connection.
Conclusion
The “Impresario” center channel matches well with “Impresario mains”. Prior to building the center channel I was using a well known commercial center channel. The commercial center channel had a bright response forcing me to EQ its treble and mid frequencies down -2.5 db and the Impresario mains needed EQ increase of +5db. The EQ of the Impresario center channel and mains are now set at 0 db. I’ve played them with and without the sub-woofer. They do the job either way. The woofers are able to produce excellent bass, more than enough for me. Bass does not “boom” or sound muddy. I’ve noticed the Impresario center channel having a cupped hand sound on older technology music but not on newer technology music. As per the Triune tweeter tweak recommendation I have jumped out the resistor in tweeter circuit. This tweak resolved the cupped hand sound issues. I am pleased with the Impresario sound stage. Recently I was sharing my music with the neighbors and one of them invited the man in blue.
About The Designer
Thank you Curt C., for your never ending energies, time, knowledge and assistance to those on the “Tech Talk Board”. This project has been named in appreciation of your assistance. Quote. Curt C, “I’m not good at naming things, but FWIW, here’s my idea: “The Dayton Impresario” Pronunciation: “im-pr-‘sar-E-“O, -‘sar-, -‘zar-Function: nounInflected Form(s): plural -ri.osEtymology: Italian, from impresa undertaking, from imprendere to undertake, from (assumed), Vulgar Latin imprehendere” the promoter, manager, or conductor of an opera or concert company a person who puts on or sponsors an entertainment (as a television show or sports event) manager, director Seems fitting somehow…
Project Parts List
|
Part # |
Description |
Qty |
|
295-306 |
1 |
|
|
295-301 |
1 |
|
|
275-075 |
1 |
|
|
255-266 |
1 |
|
|
027-436 |
1 |
|
|
004-2 |
Dayton Audio DNR-2.0 2 Ohm 10W Precision Audio Grade Resisto |
1 |
|
255-238 |
1 |
|
|
027-428 |
1 |
|
|
255-202 |
1 |
|
|
027-422 |
1 |
|
|
027-432 |
1 |
|
|
004-4 |
Dayton Audio DNR-4.0 4 Ohm 10W Precision Audio Grade Resisto |
1 |
+ There are no comments
Add yours