The Smithereens


Designer: Darren Kuzma
Project Time: 8-20 hours
Project Complexity: Hobbyist
Project Cost: $500-$1000
Driver Selection
Initially, I was focused on keeping the budget for this design as low as possible. However, after beginning to look further into the specs and quality of most typical pro-sound monitors, I quickly realized that even a modest investment in drivers could yield results that would rival some of the best products on the market. Not to mention that the associated costs of amplification, hardware, construction time, and the need for long-term reliability do not jive with an ultra-budget design. Not to say that I totally disregarded price- instead I first looked at which drivers would meet my requirements, and then chose the ones that did so for the least amount of money. The horn driver that I selected is the Eminence PSD2002- 8, which I liked because of its smooth frequency response, and because it has excellent reliability in the field. While the top end extension isn’t quite as good as what can be found on some more esoteric drivers, it met the needs of this project and did so at a very reasonable price. This was mated to the Eminence LT250 horn lens, which is very rugged in construction, has a shallow mounting depth, and a wide but well-controlled dispersion. Looking at the low-frequency drivers that offered high power handling, robust construction, and modest cost, I was immediately drawn to the Selenium WPU1209-SLF. This driver has a lot of features for the money, including a 4″ voice coil, dual spiders, water-resistant treated paper cone, huge vented pole piece, and bumped back plate. Add to this a healthy XMAX and a breakup-free top end, and this driver is an excellent value in high-performance woofers. • Project edit: The Selenium WPU1209-SLF has been updated to the Selenium 12WS600.
Enclosure Design
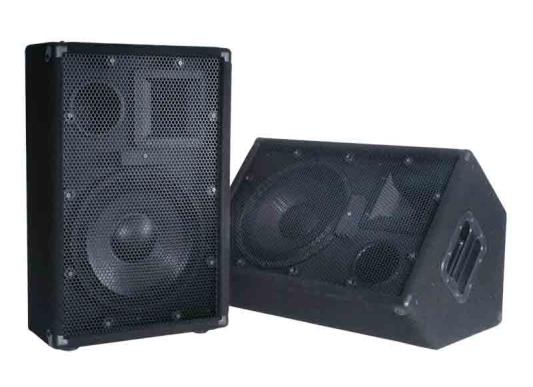
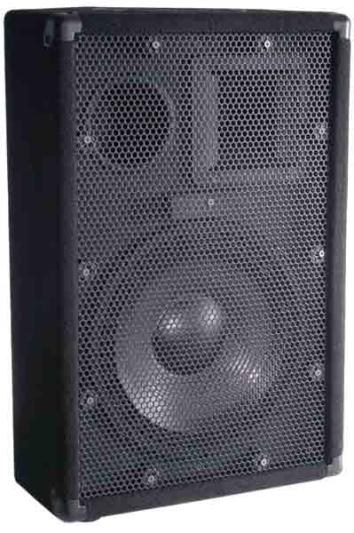
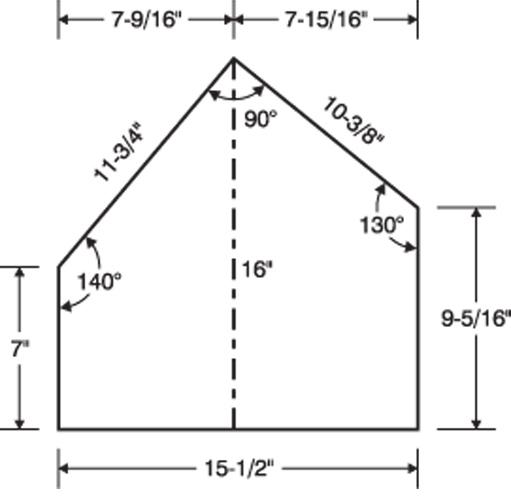
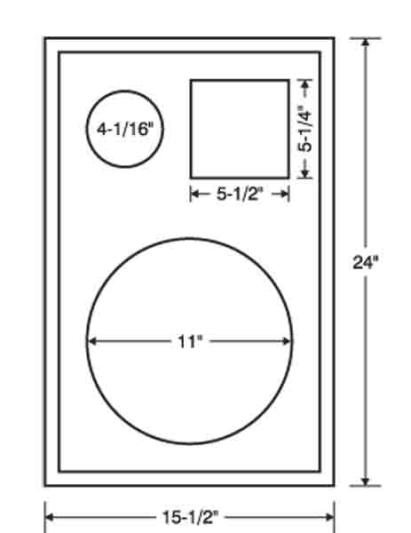
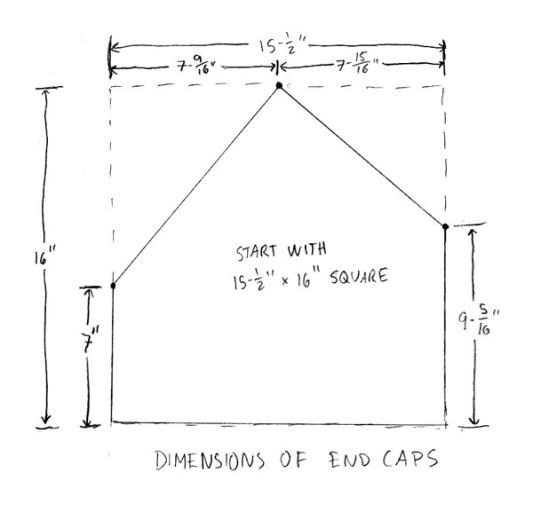
Since one of the main goals of this project was versatility, I wanted to develop a cabinet design that could be used either stand mounted or as a stage fl oor monitor. From looking at some existing cabinets and designs, I came up with a fl at front design with a combination of 50 and 40 degree rear angles. While these angles are less extreme than on many fl oor monitors, I found that they are good angles for mediumdistance stage monitoring use. The overall cabinet height and width were based on what would fit the #269-970 surplus perforated metal grill. If these grills are still available, I highly recommend that you pick up a pair to use in your project, as they provide very professional looks and great protection for the drivers. The overall cabinet height is 24″, width is 15-1/2″, and the depth is 16″; net internal volume is approximately 1.8 cu. ft. The cabinet is tuned to about 50 Hz via a 4″ diameter by 4″ length port. • Project edit: The metal speaker grills have been updated to use our 15″ W x 22″ H x 1″ D speaker grill #262-872.
Amplifier/Crossover Configuration
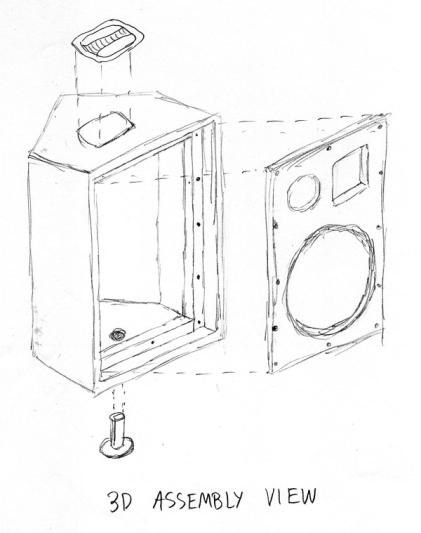
In essence, this cabinet is a 15″ external cube, and the assembly can be done many different ways. For my construction, I knew from the outset I was going to be chamfering and veneering the cabinet, so I chose to make all of the joints 45 degrees miters with biscuits. From a purely technical standpoint, this method is good because it provides a lot of gluing surface area and therefore high joint strength. But, this also allowed me to get smooth surfaces for the faces of the cabinets without any need for sanding or filling end-grain MDF. In addition, the lack of metal fasteners eliminated any worries of destroying my expensive 45 degrees router bit in the chamfering process. As I mentioned, the 2″ thick front baffle is one of the unique features of this cabinet, which was made by laminating two pieces of 1″ MDF together. But, before I did the final glue-up, I cut and machined the two pieces separately. The outer piece got a round cutout that would become the recess for the driver; the inner piece got a cutout for the woofer through-hole. Once these two were assembled, I had a perfect driver recess with a minimum of fuss. The divider was dadoed into the top, bottom, and side panels of the cabinet, which allows it to not only separate the airspace, but also provide substantial bracing. The grill frame was cut with a Jasper Circle Jig out of 1″ MDF, is an approximately 1/2″ wide ring, and has a 3/8″ roundover on the outside edge. This was painted black, grill cloth was attached, and I added magnetic grill guides to allow it to “stick” to the driver mounting hardware. Band-It Cherry veneer with Maple accents was applied with standard contact cement and finished with gloss polyuret
Enclosure Assembly
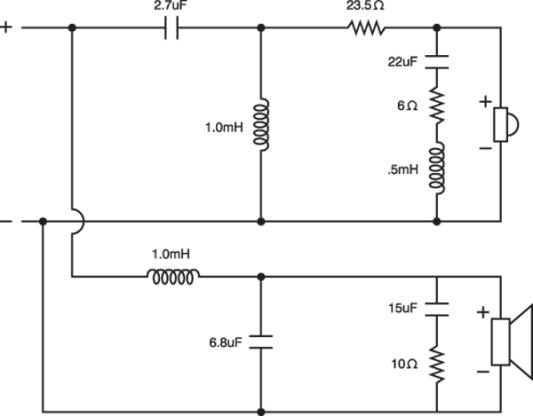
One of the goals of this project was to have a speaker that offered great sound quality, and as such, I put a little more work into the crossover than what you would probably fi nd in most other “music store” cabinets. I did initially test the design with a stock passive pro-sound crossover, which produced fair results, but I decided that a little more effort in the crossover design could deliver dramatically improved results. My final passive crossover design includes a second order low-pass fi lter plus impedance compensation network on the woofer, which works with its natural roll-off and eliminates higher frequency hash. The horn driver also has a second order high-pass fi lter in addition to an impedance notch fi lter at the resonance frequency. Without the notch fi lter, I was getting excess excursion and distortion at the resonance frequency. This circuit really cleans up the sound of the high-frequency driver. The net crossover point is about 2.5 kHz, though the drivers are slightly underlapped, meaning that the woofer rolls-off a little lower and the tweeter rolls-off a little higher. Note that because of the high power levels that this speaker will see, it is important that high wattage resistors are used, especially in the woofer impedance compensation leg. I chose to make a high-power resistor pack by connecting four 20-watt resistors in parallel. This is an excellent opportunity to mention that biamplifying with an active 2-way crossover could be a very viable option for these drivers. Thanks to the woofer and tweeters’ smooth frequency responses, a standard electronic crossover should work well. Not to mention that this approach would eliminate the crossover component cost and the need for high-power resistors. Just center the crossover around 2.5 kHz with about 10 dB of attenuation on the tweeter and you should be most of the way there.
Conclusion
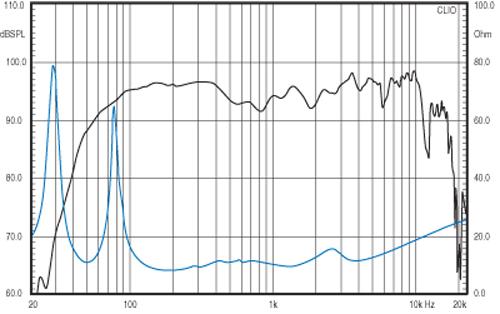
The frequency response of this speaker is relatively fl at, which defi nitely gives this monitor more of a “hi-fi ” sound than what you get from many other pro-sound cabinets. I’m not going to claim that I personally would be happy using them in my home system, but they are probably not too far off from some vintage large woofer and horn tweeter home speakers. The overall sensitivity of these monitors is a little lower than what you would typically fi nd on this type of cabinet, due to the greater excursion capabilities of the woofer. While this does mean you will need a powerful amplifi er to push them hard, it also means that they have much more bass and maximum output potential. I would surmise that for a small DJ venue, you could probably EQ the low end on these monitors and get away without using a sub. For a larger venue, you will need to cross over to a sub and dedicate a high power amp just for the monitors. All in all, as either a stage monitor or a DJ front-of-house speaker, I think this design is pretty tough to beat; it offers a slew of practical features at a reasonable price. Even without any EQ, they sound quite good, and lend themselves to simple DJ setups that have a minimum amount of processing available. But, they have the performance and reliability to meet the needs of even the seasoned pro-sound veteran.
About The Designer
During the daytime, Darren Kuzma is a mild-mannered product manager, handling the everyday business of making sure Parts Express has the best speaker building offerings and the most in-depth information available. At night, the DIYer in him comes out, and he spends most of his time working on projects, fixing things around the house, cooking, and keeping up with the speaker building community. He’s been building speakers for many years, and says “I learned the most by talking to other speaker builders, reading, doing experiments, and by trial-and-error. There’s nothing like getting your hands dirty, that’s why they call it DIY!”
Project Parts List
|
Part # |
Description |
Qty |
|
004-6 |
Dayton Audio DNR-6.0 6 Ohm 10W Precision Audio Grade Resisto |
1 |
|
016-47 |
1 |
|
|
017-40 |
1 |
|
|
027-344 |
1 |
|
|
027-348 |
1 |
|
|
027-416 |
1 |
|
|
027-424 |
1 |
|
|
092-052 |
1 |
|
|
092-122 |
1 |
|
|
245-012 |
1 |
|
|
255-036 |
1 |
|
|
255-048 |
1 |
|
|
255-422 |
1 |
|
|
260-114 |
1 |
|
|
260-768 |
1 |
|
|
260-771 |
1 |
|
|
262-150 |
1 |
|
|
262-160 |
1 |
|
|
262-319 |
1 |
|
|
264-391 |
1 |
|
|
262-872 |
1 |
|
|
290-442 |
1 |
|
|
290-558 |
1 |
We built a pair of these, the sound quality is truly impressive, they blow away any of the plastic cased JBLs & the like
I am looking into a different type of input ( Midas MR-18 ) I’d like to build the same again, but given new mixer would like to keep the whole package small. Could I make a pair with on board plate amplifiers? would I have to scale up the entire box to accommodate the volume of the amps, do you sell plate amps that would do justice to the speakers, or is this a fools errand, and I should just buy some power amps. I would surely appreciate any thoughts Mr. Kuzma might have