3CR-Ti

Designer: Ben Shaffer
Project Time: 8-20 hours
Project Complexity: Hobbyist
Project Cost: $100-$500
Driver Selection
I purchased a set of Tang Band W4-1337S titanium-coned wide range drivers at the third annual Parts Express Tent Sale, and decided to try these in the 3CR cabinet geometry. The drivers’ parameters were decent for a vented enclosure application, so I was encouraged to put them to the test. I also had to install five port structures in the enclosure to facilitate the “3CR” setup, and a higher initial Fb (tuning frequency) was required to make this happen. Due to the W4 being implemented as a full-range 4.5″ driver it would fit the bill physically as well, and with a smallish cabinet volume requirement. One caveat about the W4-1337S’s cone: it is made of very thin pure titanium, which makes it very fragile. Any pressure on the diaphragm WILL leave a dent, and possibly oxidize the surface. Extreme caution should be exercised when handling these drivers.
Enclosure Design
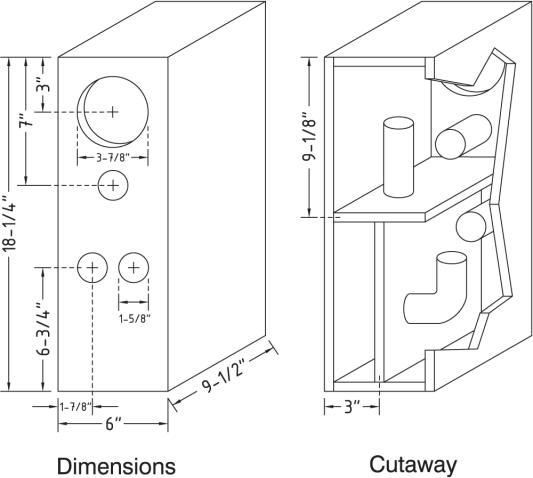
As I already partially explained, these are a slight construction nightmare. I had to have five ports, with two of them firing from one chamber to another internally, individually, and also have each of the three chambers vented to the surrounding room. I drew up a sketch with these in place, to help me visualize how they would fit. I wanted to keep the externally-firing ports near each other to minimize any wavelength offset, just as you would between the mid and tweeter in a 2-way monitor. Granted, if the wavelengths of all the tunings are long enough this should not be an issue. I modeled the measured parameters from the W4 in Unibox, which resulted in a 9.9 liter enclosure with three ports 1.5″ diameter by 4.3″ long. This is an Fb of 80 Hz for the three ports with heavy fill. Baffle-step-compensation (BSC) should be factored in at about 750 Hz with the 6″ baffle width, even though the bass response peaks just a little bit in this alignment. Since the enclosure is a 3CR I split the volumes in half, and a then pair of quarters for the three chambers. I did not have a way to model the 3CR portion of the design, so I went with a gut notion, and separated accordingly. Now that I had the alignment, I had to figure out the assembly…
Amplifier/Crossover Configuration
Yep-there is one here! Technically, it’s only an elaborate contour filter, as you don’t “cross-over” from one driver to another. I felt from prior listening experiences that the W4 needed some help in the top octave, as it rings incessantly. I also had to apply a baffle-step/bass shaping circuit for the low end. This involved a “tilt” inductor to correct the rising HF response, a BSC/parallel-notch for smoother bass transition, and a shunting series notch to reduce the cone material’s tendency to ring. Fellow PE Tech Talk Forum contributor Curt Campbell completed the initial model, and I tweaked and altered the values until it sounded right. I adjusted the 3 ohm resistor to a 4 ohm resistor to give a little more baffle step correction, and played with the values for the tilt-coil. I ended up settling on what Curt originally modeled for the coil. I worked up the layout using pegboard and zip-ties, being careful to allow for coil placement at right angles. After completing the networks one still sounded a bit louder than the other, left vs. right. When I swapped networks the anomaly followed, so I investigated. As it turns out (pun intended), I had shorted out the 1.0 mH coil when I zip-tied it in place. I shimmed and re-zipped, and then both sides sounded similar.
Enclosure Assembly
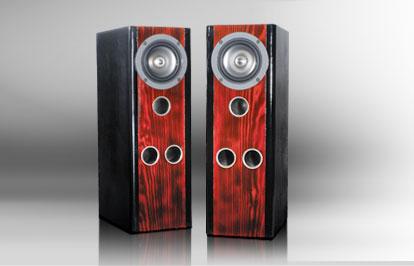
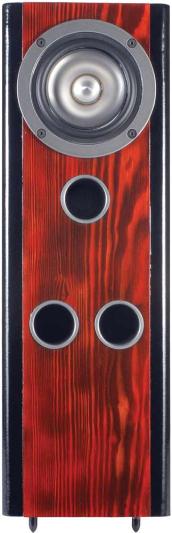
Total enclosure external dimensions are 18.25″ H x 6″ W x 9.5″ D. Half-inch roundovers on the vertical edges were implemented for diffraction reduction, and aesthetics. Using 3/4″ MDF and 3/4″ pine for the front and rear, I found the lower chambers just barely wide enough to fit the 1.5″ external ports, which are also 4.3″ long. The transfer port that went from the second to the third chamber had to involve an elbow-port, inserted/ sealed PRIOR to assembly. I drilled the hole through the future-inner panel with a Forstner bit, and inserted the elbow. To assure a tight fit I edge-drilled a 1/4″ hole on the bottom edge of said panel, through to the porthole, and through the port. I then inserted a 1/4″ dowel and glued/sealed the structure in place. After the glue set, I used a pair of flush-cuts to snip the excess dowel in the port. This panel was then ready. Most of this port’s length should be in the third chamber. I also drilled the same diameter portholes in the baffle for the three ports, and in the horizontal partition for the other transfer port. This port’s length is in the first chamber behind the driver. I installed the front and back baffles last, with the outer ports pre-sealed and grilled, truck bed liner applied to all internal surfaces, and dacron stuffing loosely filling all three chambers. I made sure the chambers are sealed from one another so there is zero air transfer around the inner partitions and into the other chambers. I used plastic for the inner transfer ports, and chromed sink-drain pipes for the external ports. The outer upper port is 7″ from the top of the cabinet, and the lower two are 6.75″ from the bottom of the cabinet. The driver is surface mounted, and centered 3″ from the top of the cabinet. I wanted the speakers’ appearance to make a bold statement, and decided to do so by simulating a rosewood finish. I passed a butane torch slowly over the front and back baffles (pre-assembly) until dark tones were burned into the surface, and the grain stood out the way I wanted. Be sure to use a damp sponge or cloth to quench the scorched wood and remove excess ash after you are finished with the torch-if the ash is not removed, the applied finish will smear it around. The finish color was Rustoleum “Apple Red” acrylic brush-on paint, which I wiped off after letting it soak in for a few seconds. The rest of the cabinet is gloss black, and the whole enclosure is then brushed with polyurethane. I think it was about five coats.
Conclusion
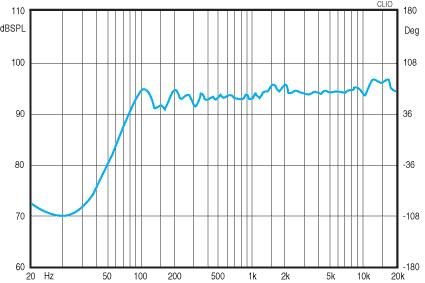
My initial listening impression was that the midrange is astoundingly clear. The bass is taut and fairly well-defined, even if not all that deeply extended. As expected, the treble rolls off a little off-axis, but this is common with most full-range projects. The measurement indicates that there is a little rise in the top-octave, but this also sounds better in a 4″ fullrange application. Spatial imaging is nice, and some toe-in definitely helps the sound when the speakers face the listener. There are other options I have not yet implemented in this enclosure. I’m aware of three additional drivers manufactured by Tang Band that may suit the enclosure and fit in the current cutout: the W4- 1052SD, W4-1320SB, and W4-657SB. All three have decent Qts parameters for vented boxes. I believe any of them would be a good alternative to the W4- 1337S in this enclosure; however, a contour-filter adjustment would be imperative. I am pleased with this experiment’s end result, in that it is a bold statement in appearance, sounds fairly balanced in the top and low end, and that it gave me some knowledge I otherwise would not have had about this type of enclosure. I don’t know of anyone else who has built one. Other than a little cabinet complexity, this is a decent full-range project for a novice or anyone else who wants to try a fullrange project. I hope you learned a little about 3CR enclosures, and won’t be too leery to try one for yourself!
About The Designer
Ben Shaffer resides in Northeast Indiana with his wife of five years, and works second shift driving a forklift for a local factory. He enjoys hanging out on the PE Tech Talk forum where he helps the hobby newcomers with their questions. “Wolf” also likes to watch movies and listen to music, and is a talented non-speaker woodworker.
Project Parts List
|
Part # |
Description |
Qty |
|
264-848 |
1 |
|
|
255-250 |
1 |
|
|
255-028 |
1 |
|
|
255-024 |
1 |
|
|
091-1247 |
1 |
|
|
027-434 |
1 |
|
|
027-408 |
1 |
|
|
027-400 |
1 |
|
|
004-6 |
Dayton Audio DNR-6.0 6 Ohm 10W Precision Audio Grade Resisto |
1 |
|
004-4 |
Dayton Audio DNR-4.0 4 Ohm 10W Precision Audio Grade Resisto |
1 |
|
004-30 |
1 |
+ There are no comments
Add yours