Amaroso


Designer: PaulK.
Project Time: 20+ hours
Project Complexity: Hobbyist
Project Cost: Over $1000
Driver Selection
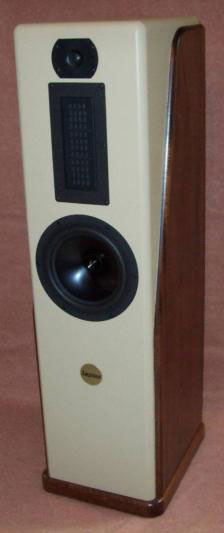
For the woofer I chose Dayton Audio’s RS225-8. I used this woofer in my previous build (the RS duets); it’s a very high-performing and high-value woofer and I knew it would be able to generate a completely satisfactory bass response. While Dan used the BG Neo10 in his Echelons, I chose the BG Neo8 for my midrange because it was a bit smaller. My first, and probably obvious choice for the tweeter was a BG Neo3, or a ribbon tweeter. As it turned out, though, I used the Hiquphon OW2. Why? Well, another of our fellow DIYers, Maynard Goff, was thinning out his driver inventory in the process of building his “last” design. I offered to buy whichever pair of Hiquphon tweeters he didn’t want to keep (he had both OW1 and OW2 pairs). Maynard refused to sell me a pair, instead telling me he’d give me the OW2s in exchange for some TL modeling work. Score–tweeter decision made easily! Besides costing me zero (thanks, Maynard) I’ve always wanted to try a pair of Hiquphon tweeters because they are highly regarded, plus I’ve always liked the better dispersion of similar small-dome tweeters I’ve used in the past. At normal list prices, the drivers cost ~$600 for a pair of speakers.
Enclosure Design
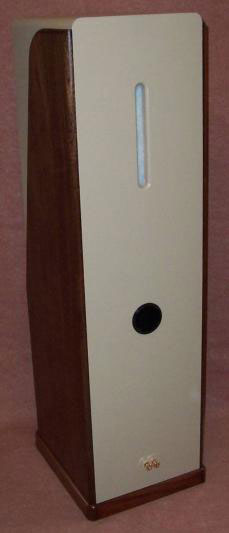
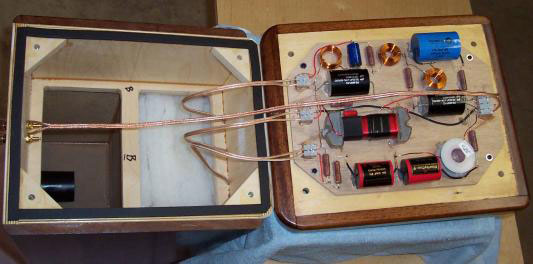
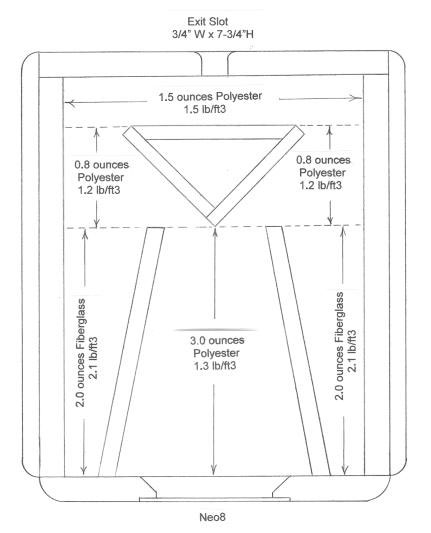
For the woofer I chose a mass-loaded TL (ML-TL) because it’s simpler and a bit more flexible than a tapered TL, ending up with a two-fold line almost 53 inches long, with its mass-loading port on the cabinet’s back. I modeled this TL using Martin King’s ML-TQWT worksheet (version 2/09/08), which resulted in a system tuning frequency of 29 Hz and a predicted anechoic F3 of 33 Hz (re: 2.83v/1m). Originally I had planned to use a simple sealed and stuffed enclosure for the Neo8, but Dan twisted my arm to try something different. I built a test box for the Neo8 based on Dan’s concept, which he then used to optimize its “guts”. This enclosure is sealed off from the woofer below and tweeter above and uses a short, tapered TL to provide some lift (from its inherent ¼-wavelength resonance of ~400 Hz) to the rolling off response on the low-end of the Neo8. The primary goal of this enclosure’s design was to completely eliminate reflections back through the Neo8 via deflection, diffusion and absorption, and the secondary goal was to provide a small, well-controlled rear output to enhance spaciousness and depth (the midrange enclosure’s exit on the cabinet rear is a vertical slot). The whole midrange enclosure is filled with polyester fiber and fiberglass at different densities. The tweeter is mounted in an otherwise unused section at the top of the cabinet. Internally the cabinet is 9 inches wide, 12 inches deep and 38-3/4 inches tall. The cabinet’s main walls were made from 18-mm Baltic Birch Plywood (BBP) and the external sides of the cabinet were clad with ½-inch solid Brazilian cherry primarily for esthetics, but this also significantly increased the cabinet’s mass and rigidity. Externally the cabinet is 11-1/2 inches wide (including the side cladding), 13-1/2 inches deep and 39-1/2 inches tall, and sits on a base that adds 1-1/2 inches to the overall height with a footprint that’s 12 inches wide and 14 inches deep. The crossover assembly is attached to the top of the base, ending up sitting at the very bottom of the cabinet within the woofer’s ML-TL when the base is attached.
Amplifier/Crossover Configuration
Dan also created the crossover using an otherwise finished speaker I delivered to his doorstep, making on-baffle driver measurements to start off. Dan’s design uses 2nd-order slopes from woofer to midrange and 4th-order slopes from midrange to tweeter, at corner frequencies of 610 Hz and 2.7 kHz, respectively. The design axis was essentially the tweeter’s center vertically and 15 degrees off-axis horizontally. Thus, if you listen at a distance of 10-12 feet with the cabinets spaced 5-6 feet apart, you should orient the cabinets straight ahead, toeing them in with wider cabinet spacing. Both midrange and tweeter crossovers use split-series resistors, one in front of each filter and the other immediately ahead of the driver, to shape the responses and improve phase tracking. Notch filters were incorporated for both woofer and midrange to minimize the effects of their response aberrations. The overall response is very smooth from 500 Hz to 17 kHz, with SPL variations mostly +/- ½ dB and excellent phase tracking. The impedance magnitude, mostly 7-8 ohms or higher, and impedance phase are amplifier-friendly, while the final sensitivity is a bit low but still satisfactory at 84-85 dB (re: 2.83v/1m). At normal list prices the components for a pair of crossovers will run ~$300. Costs could be reduced somewhat by not using Mills resistors or ClarityCap capacitors like I did.
Enclosure Assembly
I’ve attached a side view cabinet drawing and a top view drawing of the midrange enclosure. In the main cabinet, there’s a solid horizontal divider of 18-mm BBP forming the top of the ML-TL and the bottom of the midrange enclosure. The folded line for the woofer was created with ½-inch MDF dividers, and there are two “window” braces in the woofer’s line, one extending half of the cabinet’s depth and the other the full cabinet depth. All of these dividers and braces were attached via dadoes in the internal cabinet sides, while the baffle and rear panel overlapped the edges of the side panels. The top of the midrange enclosure was fashioned from ½-inch MDF; instead of dadoes in the cabinet’s sides, the midrange top was simply glued to the internal cabinet sides, the top edges of the tapered line dividers and top edges of the diffuser/deflector assembly (after the tapered line dividers and diffuser/deflector had been glued to the bottom of the midrange enclosure). The external side and top edges of the baffle were rounded over with a ¾-inch radius, as were the side edges of the top. Polyester fiber, at a uniform density of 0.75 lb/ft3, is used to stuff the first half of the woofer’s ML-TL. The base assembly, with the crossover assembly attached to its top, is attached to the bottom of the cabinet using ¼-20 hex-head bolts into T-nuts located on the opposite sides of four 18-mm BBP gussets in the cabinet’s lower corners.
Conclusion
I’m still getting acquainted with the Amarosos and immensely enjoying the process. At first, I thought they were lacking some in sensitivity compared to the RS duets that use the very same woofer and have the same sensitivity (both designs have 3.0-3.5 dB of BSC incorporated), causing me to turn up the volume. What I eventually came to realize, however, was that the Amarosos weren’t lacking sensitivity but simply could be played louder without any sense of strain. I attribute this directly to the Neo8’s abilities and strengths. I did tweak Dan’s crossover design by increasing the output from the Neo8 by ~1 dB by using a 3-ohm resistor in series with the driver instead of Dan’s finalized 4-ohm value (R4 on the crossover schematic). As always with my TL designs, the bass is very articulate and satisfying, plus the OW2 is one sweet tweeter. And, Dan was completely correct; the Neo8s really let violins shine, but trumpets, percussion, woodwinds, etc., all sound great, too. Simply put, the Amarosos are very well balanced from top to bottom and very dynamic. I’m really pleased with their sound, as apparently were the judges and fellow competitors at MWAF 2013 by awarding the Amarosos first place in the Dayton Audio category. In case anyone is interested, from a musical context, Amaroso, when written on a musical score, means lovingly. I’ve already acknowledged Dan for his significant contributions as well as Maynard for being so generous. Yet another fellow DIYer made a big contribution. Ed LaFontaine, as he has in the two previous years for my MWAF entries, sourced and cut the 18-mm BBP for me because I’m simply unable to safely and accurately cut from pieces that start out being 5 feet by 5 feet (besides being highly experienced and an accomplished woodworker, Ed has access to some really neat tools and machinery). Ed also sourced solid Brazilian cherry in 5/4-inch thickness, sawed it in half thickness-wise and sanded it down to ½-inch thickness, then edge-glued pairs together to form four pieces each ~12 inches wide and over 3 feet long that I cut further and shaped to clad the cabinets’ sides. Last, all of us that use Martin King’s MathCad modeling software for TLs should really count our blessings. I know from lots of experience in modeling and building for personal use, that if you model with accurate data, get good predicted results from that modeling and build exactly what you modeled, you will achieve actual performance like that modeled, without having to perform any post-build tweaking, TL-wise.
About The Designer
I have a BSEE degree and retired in 2003, employed in the medical device industry for the last 36 of my 40-year career. I started out in design, then switched over to quality assurance and regulatory affairs for the last 25 years, eventually serving as Manager, then Director of those departments (while continuing to contribute to the electronics design of products throughout that time). Audio and speaker interests developed naturally from my wife’s and my musical abilities, experiences and preferences. In addition to designing and building solid-state preamps and power amps, I made my first serious attempt at building speakers in the mid-‘90s. That pair of speakers is still in use today by my son-in-law. Exploring different bass alignments eventually led to experimenting with transmission lines, and once I started to use Martin King’s modeling software, really good sound, particularly in the bass, consistently resulted. TLs are what I prefer and do almost exclusively, not only for personal builds but also for just about anyone that asks for help. Paul Kittinger
+ There are no comments
Add yours