BR-2


Designer:
John H
Project Category:
Bookshelf Speakers
Project Level:
Beginner
Project Time:
1-8 Hours
Project Cost:
$100 – $500
Project Description:
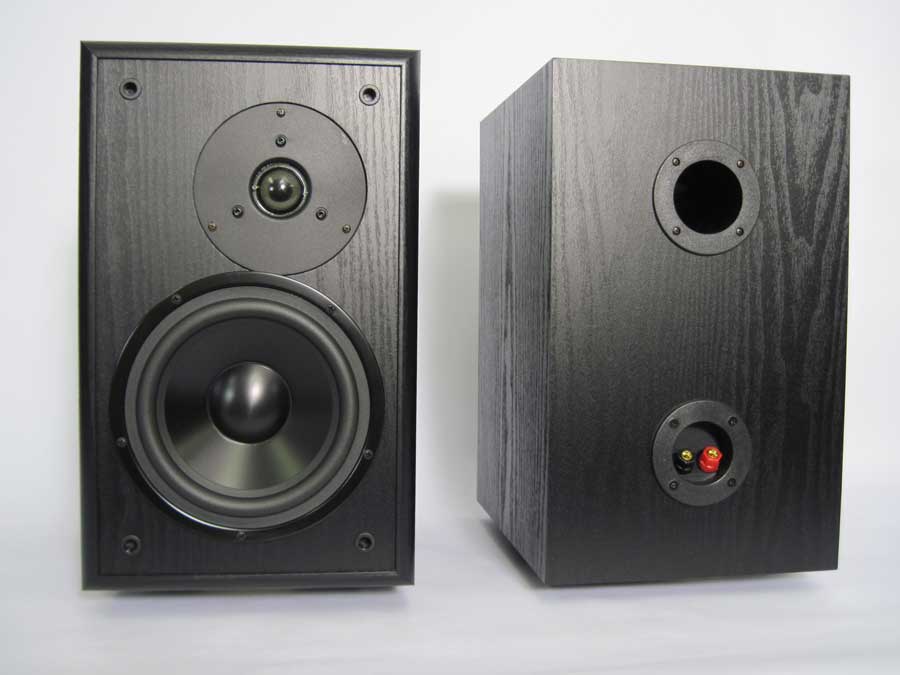
This project uses the BR-1 cabinet and the Dayton DSA-175 woofer. The BR-1 cabinet pair is available separately which makes this project easy to accomplish as no cabinet building or finishing is required.
Design Goals:
The design goal was to make something that would both sound and look good that could be accomplished with minimal woodworking skills.
Driver Selection:
The project started in reverse as the BR-1 cabinet was selected. With the improved motor and surface mount face plate the DSA-175 woofer was a good fit for this project. The original DC28F-8 turns out to be the best choice to match the quality of the DSA woofer and fit in the cabinet.
Enclosure Design:
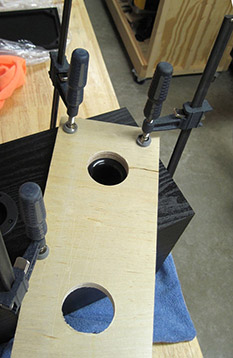
Each BR-1 cabinet is 15 liters. With the DSA175-8, the bass response results in an F3 of 41 Hz with a box tuning of 45 Hz. The stock port is to small so it was removed by tapping it out from the inside or you can drill it out with a hole saw. The new port hole was cut by first drilling a 2 3/8-inch hole through a piece of scrap plywood then clamping this template to the box over the old port hole. This keeps the hole saw centered and minimizes damage to the vinyl covering.
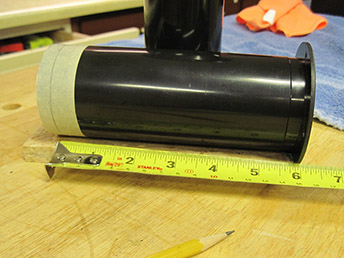
The new port tube has a sliding outer sleeve for adjusting the port tube length. This sleeve is glued in the closed position then cut to length. The port tube length is 6-inches measured from the inside of the port tube.
Enclosure Assembly:
There’s not much assembly, but the woofer mounting holes need to be predrilled. Set the DSA175-8 in the woofer cut out. You will notice that the woofer overlaps the tweeter hole. Rotate the DSA175 so one mounting hole is at the middle bottom of the cabinet. This will keep the screw holes away from the tweeter.
Center each of the DSA175 mounting holes at the edge of the woofer cut out on the cabinet. Mark the location of the mounting holes on the edge of the cut out. To get the DSA175 mounting screws to go in straight, drill a small diameter pilot hole at the edge of the cut out. Using progressively lager drill bits to expand the top of the pilot hole such that a recess is made into the edge of the woofer cut out for the DSA175 mounting screw.
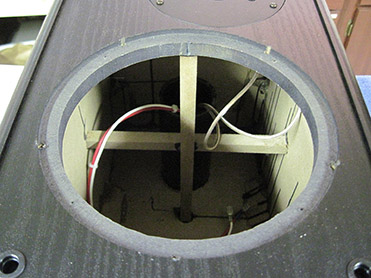
Assembly starts with the port tube. After drilling the hole for the port tube, predrill pilot holes for the port tube, add a small amount of wood glue around the port hole to seal any air leaks, screw the port tube to the box.
The leads and connectors for the power in, woofer, and tweeter should be attached to the crossover board. If you are using crimp on connectors, slightly squeeze the back half of the connect so there is a tight fit on the spade terminals at the terminal cup, tweeter, and woofer.
Mount the crossover on the bottom of the box. Unscrew the terminal cup and connect the power “in” leads between the terminal cup and the crossover. Add a small amount of glue around the terminal cup hole (to seal any leaks) and screw the terminal cup back in place.
The crossover board can be attached to the box with a small screws, hot glue or other glue.
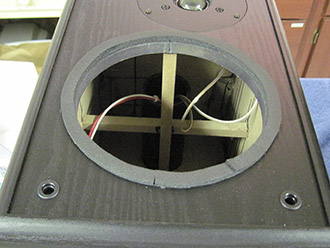
Add about 4 oz. of Acousta-Stuf Polyfill Speaker Cabinet Sound Damping to the back of the cabinet below the port tube. Keep the insulation away from the back of the woofer by an inch or more. You can use poly batting to hold the insulation away from the woofer by stapling to the cabinet sides or by pushing the batting behind the bracing and crossover.
Attach the leads to the tweeter and screw the tweeter into the cabinet cutout. Add two layers of 1/8 by 3/8- inch speaker gasket tape to the woofer recess cut out in the cabinet. Attach the leads to the DSA175 woofer and screw the woofer to the cabinet. Be careful not to over tighten the woofer screws.
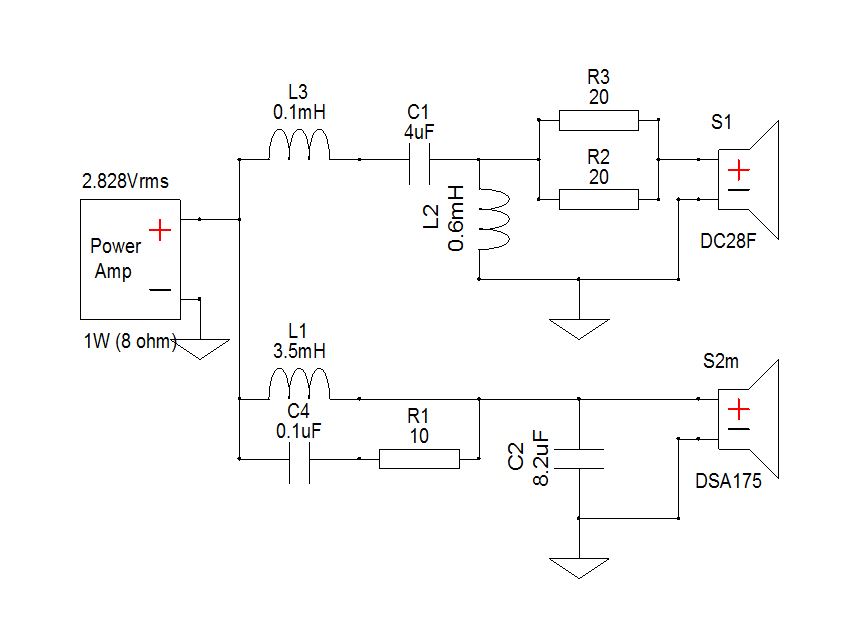
Crossover Design:
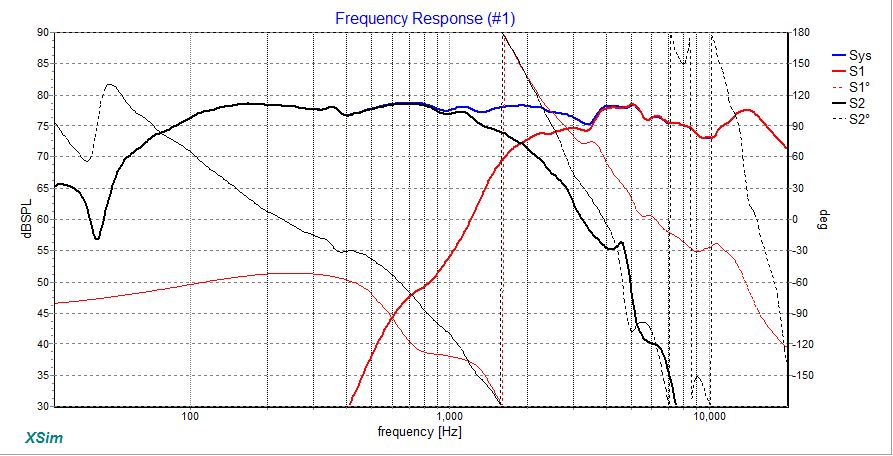
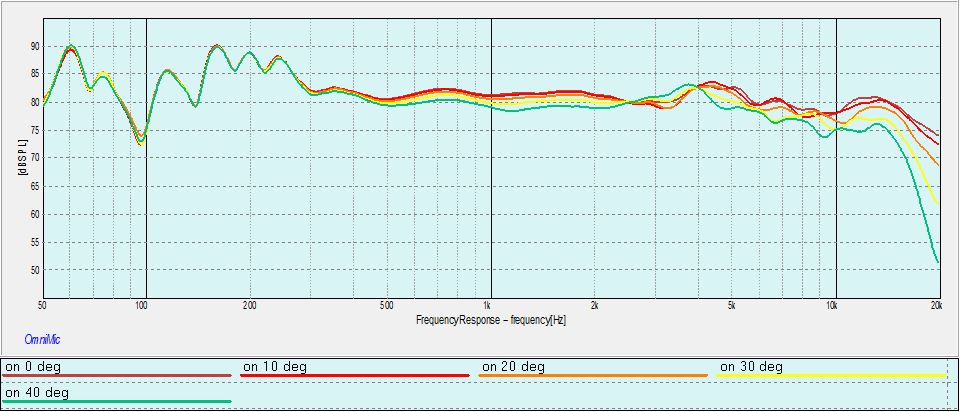
The crossover was designed for flat frequency response with the grill on. All the measurements were done with the grills in place however, the speaker sounds great without the grill for those who prefer that look.
Based on the distortion of the DC28F, and matching of the driver phase, the fit best is a crossover at about 1,900 Hz. with Linkwitz Riley 4th order slopes.
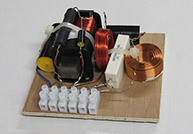
The crossover part layout drawing is just a suggestion, there is plenty of space in the bottom of the cabinet for a larger layout.
This crossover was assembled on a 4 x 4.5-inch board. Wire ties and hot glue hold the components to the board.
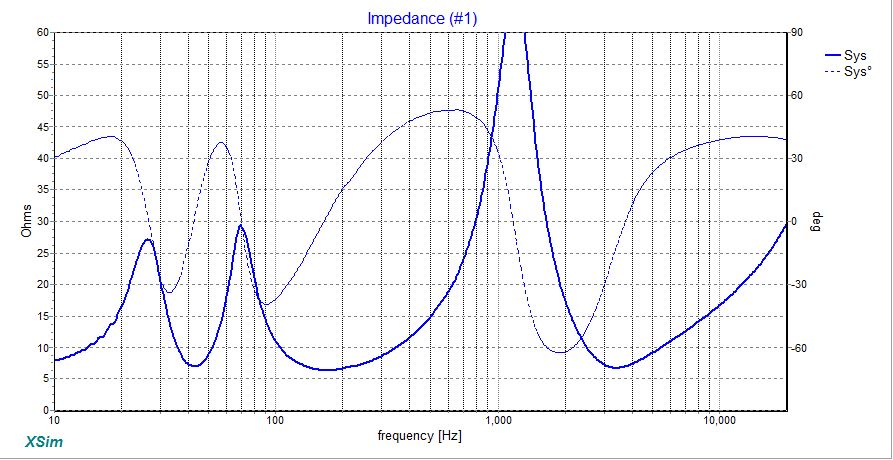
The measured impedance stays above 6 ohms
Tips & Tricks:
The cabinet could benefit from a bit more bracing or thickening of the side and top panels, although none were used here.
The tweeters are offset and should be positioned toward the inside/ other speaker. Use a black magic maker to touch-up any flaws in the cabinet.
Conclusion:
The BR1 cabinets look good for the money. Combining the cabinets with the new DSA175 woofer and raising the DC28 crossover point a bit higher results in a very nice sounding speaker.
About the Designer:
John is a member of the speaker design team.
Parts Used:
295-528 Dayton Audio DSA175-8 6-1/2″ Designer Series Aluminum Cone Woofer 2
275-070 Dayton Audio DC28F-8 1-1/8″ Silk Dome Tweeter 2
260-317 Acousta-Stuf Polyfill Speaker Cabinet Sound Damping Material 1 lb. Bag 1
260-540 Parts Express Speaker Gasketing Tape 1/8″ x 3/8″ x 50 ft. Roll 1
090-830 NTE European Terminal Strip 25-E2000 12-Pole 20A 1
101-786 Consolidated 16 AWG 2-conductor Power Speaker Wire 25 ft. (Red/Black) 1
095-282 0.205″ (16-14) Female Disconnect Crimp Terminal Blue 50 Pcs. 1
260-387 Speaker Cabinet Port Tube 2″ ID Adjustable 2
300-645 Dayton Audio BR-1CAB BR-1 6-1/2″ 2-Way Speaker Cabinet Pair 1
004-10 Dayton Audio DNR-10 10 Ohm 10W Precision Audio Grade Resistor 2
004-20 Dayton Audio DNR-20 20 Ohm 10W Precision Audio Grade Resistor 4
266-560 ERSE 3.5mH 18 AWG I Core Inductor Crossover Coil 2
255-040 Jantzen Audio 0.60mH 20 AWG Air Core Inductor Crossover Coil 2
266-800 ERSE 0.10mH 18 AWG Perfect Layer Inductor Crossover Coil 2
027-426 Dayton Audio DMPC-8.2 8.2uF 250V Polypropylene Capacitor 2
027-421 Dayton Audio DMPC-4.0 4.0uF 250V Polypropylene Capacitor 2
027-400 Dayton Audio DMPC-0.10 0.10uF 250V Polypropylene Capacitor 2
How do they fare against the BR1 ? Has anyone tested or compared the two ?
I haven’t heard this speaker but I have compared the BR-1 to the Silver AL that uses the DA175 and DC28 in this BR-1 cabinet and it was WAY better than the BR-1. With this woofer I’m sure it would be at least as good as the Silver AL and would probably be even better.