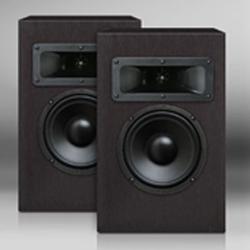
Cabrini

Designer: Johnny Richards
Project Time: 1-8 hours
Project Complexity: Hobbyist
Project Cost: Under $100
Driver Selection
With all that being said, I selected the new GRS poly cone 6.5″ woofer and the Goldwood 3″ x 7″ piezo tweeter. Both drivers are priced at or near the bottom of their respective categories. I chose the GRS poly cone based on two criteria: Past experience with poly cone drivers, and physical appearance. The GRS drivers are really very nice looking units. The tweeter was chosen purely on cost and popularity.
Enclosure Design
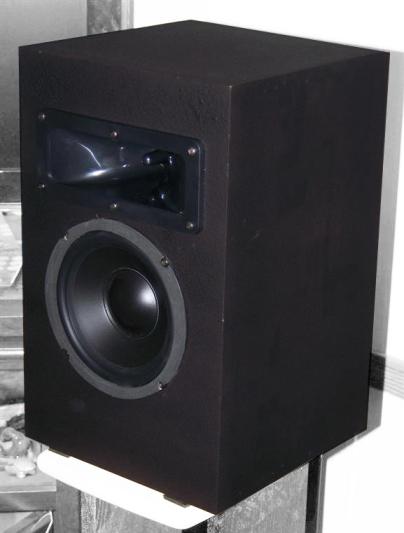
The GRS woofers are a high “Q” design, which indicates that vented enclosures are pretty much out of the question. These days, vented enclosures are very common but for this project, the sealed approach is more fitting. Sealed enclosures are simpler to build, and far more tolerant of driver variation. In addition, I decided to do a basic “six sides and three holes” construction with it. There are no bevels and no chamfers; in fact the entire enclosure can be built with a Skil-saw and a jig-saw. One of my goals was to create a project targeted squarely at newcomers and the simplicity of the enclosure is a very large part of that. The GRS woofer will work reasonably well in sealed enclosures from 0.3 to 1.5 cubic feet, making it a very versatile driver. I elected to go towards the smaller end and chose 0.4 cubic feet. This results in an F3 in the low 70’s with a mild hump at 120 Hz. With approximately 1/2 pound of poly-fil, the alignment yields a Qtc of ~1.0. This is a common bass alignment in the commercial world, and is not uncommon in DIY either. I personally prefer a bass alignment with a bit of a high “Q” bump, whether it is vented or sealed.
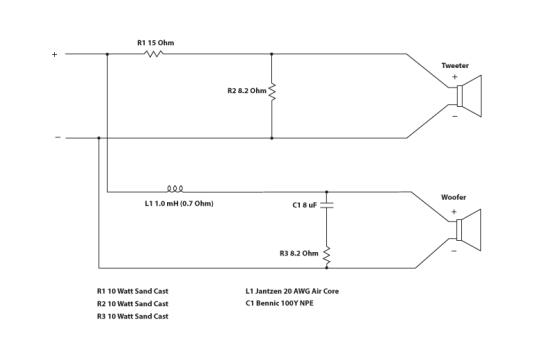
Amplifier/Crossover Configuration
This is where I started paying close attention to a lot of things in order to decide which compromises to make. Given the goal of creating a cost effective and easy to build project I decided to attempt a minimalist crossover. My in-box measurements show the GRS woofer to live up to its advertising of having a minimal breakup while the Goldwood piezo has a very ragged response that is challenging to work with. The first step I took was to throw an 8 ohm resistor across the terminals of the piezo tweeter to try and normalize the impedance. I played with several iterations of the crossover and finally settled on a version with very little baffle step. These are not stand mounted speakers by any means – they are meant to be placed near a boundary such as sitting on a bookshelf. The crossover consists of five components, three of them resistors. The piezo has an L-pad, and the woofer has a series inductor with zobel. Crossover point is approximately 2800 Hz using 3rd order Butterworth slopes. I used the cheapest components available – 5% sandcast resistors, 20 AWG coil and an NPE capacitor. Response is not exactly smooth, but peaks are more or less balanced out with dips, and it is relatively smooth throughout the midrange and into the lower treble. This is an 8 ohm speaker, and most amps will not have a problem with it.
Enclosure Assembly
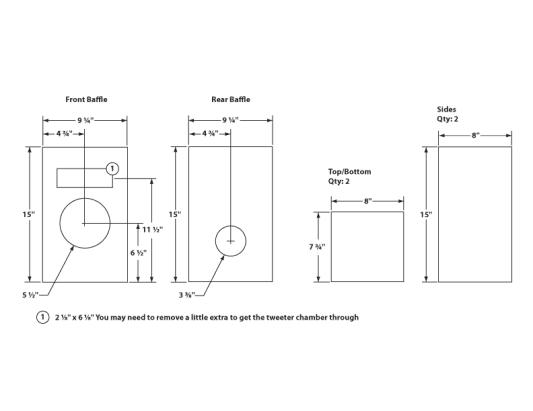
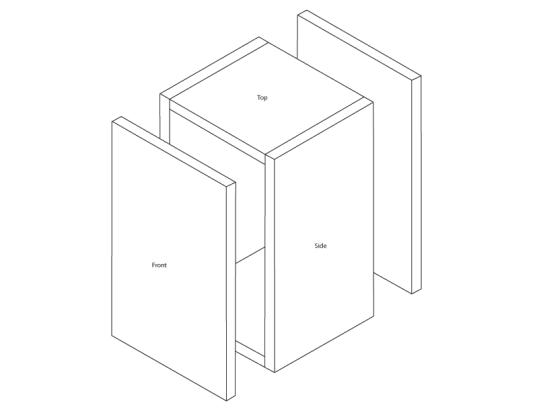
After cutting the six panels, glue and clamp (or screw) them together following the included drawing. The prints include the correct cutout dimensions for the woofer, tweeter and terminal cup. Before installing the woofer, stuff the enclosure with the 1/2 pound of poly-fil and it is done. This is really an easy build.
Conclusion
The GRS woofer is really not bad, with some limitations. For many builders, the lack of an extended bass response can be a deal breaker. I operated under the assumption that most people dipping their feet into the DIY pool have already built a powered subwoofer (or have plans to do so). Powered subwoofers are a very common first build and this design requires assistance on the bottom end. With the addition of a subwoofer, Cabrini becomes an acceptable listening experience for a very minimal cash outlay. Easy to build, versatility in bass alignment, and plenty of room for several in-situ upgrades – adding round-overs on the baffle, flush mounting the drivers and bracing the cabinet will all make noticeable improvements in sound quality (especially in the midrange), all for little to no added cost in terms of dollars. If the builder chooses to go on the smaller end of things (the 0.3 cubic feet area), this project can also be adapted to sit on top of a “bass bin”, using the GRS 12″ poly cone woofers. In the future, I will provide plans for that integration.
About The Designer
Johnny Richards is an avid supporter of DIY for the sake of DIY and is an active member of the PE Tech Talk forum. He has been designing and building speakers for over a decade. Johnny lives and works in Sioux Falls, SD, as an engineering tech at a large electronics manufacturing firm. He is married with one child, two dogs, a turtle and a guinea pig. When he isn’t tinkering with speakers, he can be found writing, reading, running, listening to music and watching movies.
Project Parts List
|
Part # |
Description |
Qty |
|
292-426 |
1 |
|
|
1 |
||
|
280-062 |
1 |
|
|
255-048 |
1 |
|
|
016-15 |
1 |
|
|
016-8.2 |
1 |
|
|
027-338 |
1 |
+ There are no comments
Add yours