Chatoya


Designer:
Neil Davis
Project Category:
Subwoofers
Project Level:
Intermediate
Project Time:
8-20 Hours
Project Cost:
$100 – $500
Project Description:
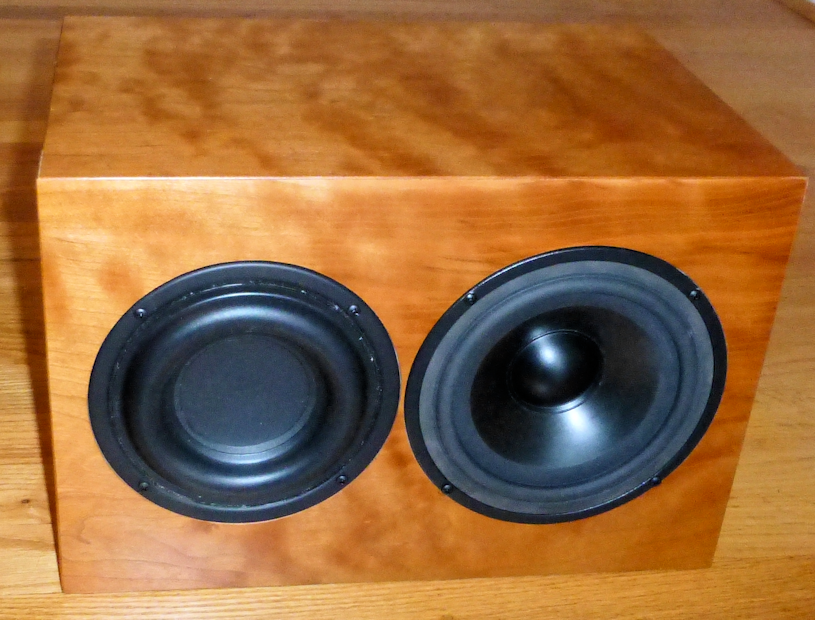
Chatoya is a solid hardwood subwoofer, made from locally grown hardwood. This project is the second in a series of small woofers that use the 5” Tang Band subwoofer driver. This variation uses a single driver with a passive radiator and a 100W amplifier. But what makes this project special is the beautiful cherry wood and the way the wood “comes alive” with a penetrating oil finish. The finish has an iridescence that causes light and dark areas that “move” when the box is rotated. This effect is called chatoyancy (from the French word for “cat’s eye”). I have a hard time remembering that term, so the project name is a mangled version of “Latoya” or “Tafoya”, which are popular names that are easier to remember.
Design Goals:
There were several goals for this project. First, I needed a nice looking compact subwoofer for a 2.1 system (the other parts of the 2.1 system are described in a separate project). Another goal was to demonstrate that loudspeakers do not need to be made from MDF. In fact, there are many good reasons why hardwoods can be an excellent building material for speakers, even for a subwoofer. And finally, this project allowed comparing a passive radiator design with a sealed woofer approach that was described in my “Act 1” project.
Driver Selection:
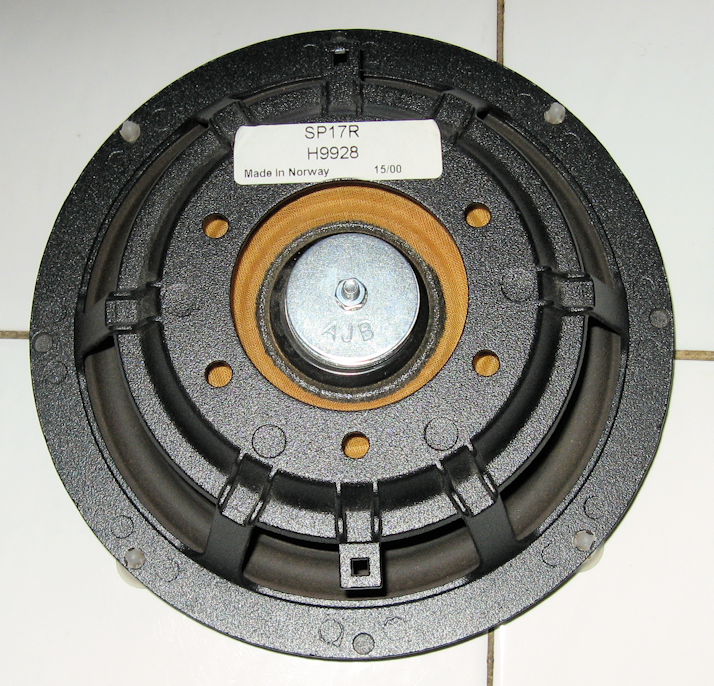
One of the best drivers for a small subwoofer is the Tang Band W5-1138SM (264-831). This little driver features an impressive 9.25 mm of Xmax and there really aren’t too many other drivers in this size that can provide as much bass output. The passive radiator (PR) will need to move a larger volume of air than the driver, so you need to select either a 6-1/2” or 8” PR to work with the W5-1138M. I had a high-excursion Seas H9928 laying around that I ended up using, but the Dayton 295-492 (8”) could also work well. The Dayton 295-498 (6-1/2”) would be OK for lower volumes, but it doesn’t have enough excursion to get the most output from this woofer.
The amplifier is the same 100W Yung SD100 used in the Act 1 project, except for this application the unboosted version (301-500) works better. The Yung amp is well built, compact, light weight, and provides plenty of power for the TB W5-1138 to reach full excursion.
Enclosure Design:
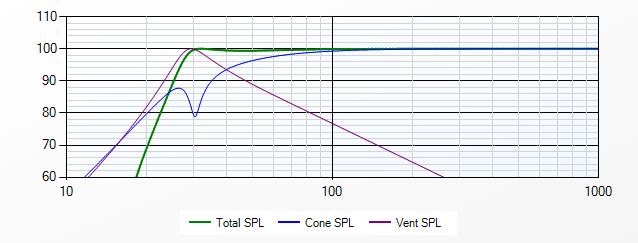
This version of the W5-1138 subwoofer was intended to be smaller than the sealed version and uses a passive radiator. The enclosure ended up being about 15L. I used the PSD-Lite program to model the overall response and determine the amount of additional mass needed for the passive radiator. PSD-Lite is more useful than other modeling programs for this design because it also models the response of the amplifier. It turns out the “unboosted” version of the Yung amplifier has a small amount of boost associated with the highpass filter. The circuit board has a separate MFBP filter that is used for the boosted version of the amp, tuned to 45Hz, and this MFBP filter is disabled. But the “Q” of the high pass filter is 1.2, which provides about 2 or almost 3db of boost at 30Hz. It turns out this slight boost works out very well to extend the response almost perfectly flat down to 30Hz, as you can see from the response chart. It’s easy to experiment with different weights for the passive radiator by rolling the mouse wheel in the “added” mass textbox. I kept looking at both the SPL and excursion charts, as the peak excursion exceeded the mechanical limits for high input power. After some experimenting with different values of added mass and power levels, it became clear that the input power needed to stay below 40W to avoid excessive excursion. That’s the rated continuous power of the driver, so the driver, amplifier, and passive are well matched. The resulting response is almost perfectly flat down to an F3 of 28Hz, at a maximum output of 96dB for 40 Watts of input. The high pass filter and port response results in a very steep low frequency roll-off, with an F10 of 26Hz.
The best tradeoff of response and excursion was with an added mass of about 35-40 grams. The 3/16” by 1-1/4” fender washers sold in bulk at Home Depot measure about 7 grams apiece on my wife’s food scale. 5 washers gave me about the mass I needed. One of the pictures shows the washers attached to the passive radiator. Since the SEAS passive radiator is no longer available, I specified the 8” Dayton Audio SD215-PR in the parts list. That passive radiator should give about the same results using a 50G weight, or 7 washers.
Enclosure Assembly:
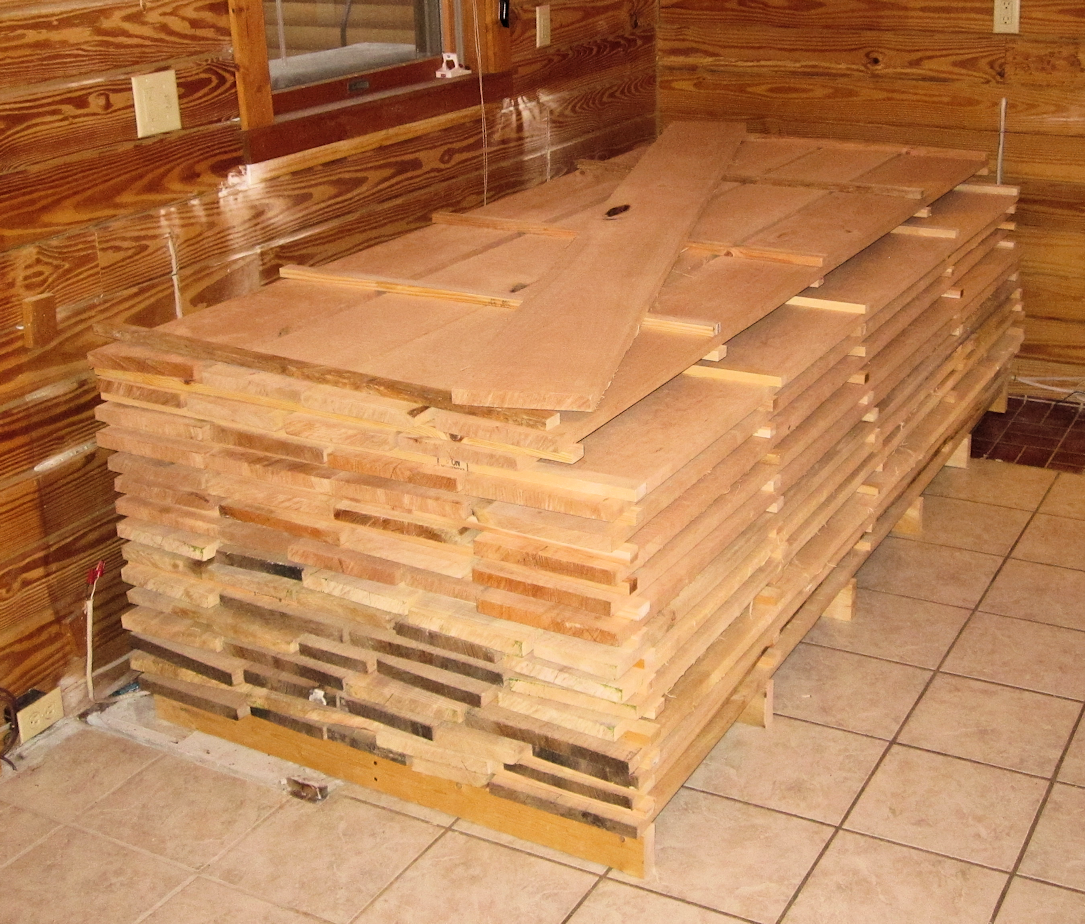
This project started about 4 years ago, when our neighbor at our cabin house in Western Maryland had some locally grown cherry and maple logs that he was going to use in his boiler. He usually uses and prefers the red oaks that are plentiful in this area, so he agreed to have these logs milled—I would pay for the milling, and he would get half of the lumber. We have a local lumber yard that milled the trees for about 40 cents a board foot, so I ended up with a large stack of high quality cherry and maple at a very good price. You can see from the picture of the logs covered in snow that the trees were at least 24” in diameter, so we ended up with about 500 board feet of lumber that was around 10-12” wide and 9 feet long. There is a picture of the wood drying in the living room of our cabin. My wife graciously agreed to allowing the lumber in the living room for about 2 years, after which we starting making some projects.
Cherry has a number of properties that make it well suited for building speaker cabinets. First, it is fairly rigid—much more so than MDF, so it doesn’t require extensive bracing. Second, the wood is relatively stable in the presence of moisture. If you look at wood movement chart such as this one: http://workshoppages.com/WS/Articles/Wood-Movement-Charts.pdf, you’ll see that shrinkage for cherry is smaller than most woods, and that the likelihood of cupping is fairly low. Of course, that stability is one of the reasons it has been a popular wood for furniture making for many years. And if you follow the example in that chart for moisture changes of about 2.5% from summer to winter, the amount of shrinkage or expansion on the order of .3%, which is comparable to MDF. However, most hardwoods have very little di mensional change in the length (parallel to the grain), whereas MDF expands and contracts the same in all dimensions. That means you need to make sure the grain of the wood is properly oriented and that the joints where the grain changes direction is properly secured, with biscuits and glue.
The fine grain and rigid cell structure of the cherry wood is also good from a sonic perspective. There is a common misconception about MDF being a superior material for loudspeakers because it absorbs sound and dampens vibrations, but this simply isn’t true. In fact, Art Ludwig’s interesting experiment with MDF at this link: http://www.silcom.com/~aludwig/Loudspeaker_construction.html shows that ¾” MDF can be a “complete sieve for the sound”. Dr. Ludwig’s experiments show that a constrained-layer panel construction is the most effective technique to dampen resonances, his but his experiments also show that a combination of a rigid cabinet with fiberglass filler will do a good job of minimizing radiation from or through the walls. In order to dampen the back wave from the woofer, I’ve used light stuffing inside the cabinet to act as what Dr. Ludwig calls a “sound sponge”.
A final reason for using cherry is the natural beauty from the fine grain and rich cherry color. There is an animated GIF image at this location that shows the wood from 6 different positions: http://www.audiodevelopers.com/Projects/Chatoya/inside2.gif. As you can see from the animation, the wood almost looks “alive”, with patches of dark and light that move as you change the lighting. The grain of the cherry is very fine, with a mix of denser areas interspersed, and a penetrating finish such as tung oil accentuates the reflections from the grain. The chatoyancy didn’t start to be strongly evident until I had applied about 5 coats of tung oil. After each application of oil, the box was sanded with 1200 grit paper, and it had a total of about 10 to 15 applications of oil.
There aren’t any detailed construction photos, as this was simply a box with mitered corners and lots of urethane glue to fill the voids. And the exact dimensions weren’t too important, as I expected to simply tune the radiator to get optimal output from whatever box size looked nice. So, this was a “fun” build, where I got to build a box without really measuring except to have all the pieces come together in the end, and I worked with some nice, well-behaved wood that looks gorgeous and has local interest. I still need to build a small stand or cradle to protect the finish, but that will come when I build the main speakers that go with the sub.
Tips & Tricks:
I’ve completely glossed over many of the woodworking details because it takes quite a few tools to work with rough-cut hardwood, and most people with these tools are going to know a lot more tricks and tips than I do. Make sure you have someone available you who can give you good advice on how to use these tools safely and can help you with assembly and finishing. The planer generated about 40 gallons of sawdust, so this is a project where you need at least a small woodshop with a dust collector.
PSD-Lite was intended to be a multiway speaker design tool, but there is a mode where you can just work with subwoofers. On the Box Model module, there is a “What-If” tab that lets you design with just one type of driver, which is convenient for subwoofers. Also, PSD-Lite allows you to save the design variables in a self-documenting XML file. If you want to experiment with this design yourself, simply load this file into PSD-Lite, selected the “what-If tab in the Box Design modules and then open the amplifier module recalculate the response: http://www.audiodevelopers.com/Projects/Chatoya/chatoya_PSD_lite.xml.
Conclusion:
In many ways, a high-quality hardwood can be a good choice for a loudspeaker enclosure. It’s rigid, it’s easy to work with, it doesn’t require veneering, and it has natural beauty that you just can’t get with other materials. You need to be careful that the wood is dry and that is has been cut properly, as hardwood’s uneven expansion and contraction in different directions can cause problems. And you will need to pick through the cupped and warped pieces and watch out for knots and an occasional boring insect tunnel. But with some common sense and some good woodworking tools, you can transform a snow-covered log into a beautiful subwoofer.
The passive radiator design results in good low frequency extension without requiring huge amounts of amplifier power, and the combination of the 5-1/4 woofer with a larger passive radiator gives this subwoofer more output than you would expect from its size. The bass output is about the same as the sealed version (Act 1) that used two drivers and a cabinet that is about twice the size. The F3 is even lower than the sealed version that used EQ and that required twice as much amplifier power to extend the response.
This was my first passive radiator design and up to now I hadn’t fully appreciated the benefits of this approach. A comparable ported enclosure would require an unreasonably large port (18” @ 2” diameter), and a comparable sealed version would require either a larger box or a larger amplifier. The PSD-Lite modeling tools were based on the equations from Jeff Bagby’s WBCD Excel model, but I had never actually used the program before for a real design. I can understand now why Jeff was an early proponent of PR designs, and I’m glad he made his spreadsheet available.
About the Designer:
Neil is a member of the 2017 PE speaker builder design team (SBDT).
Parts Used:
264-917, Tang Band W5-1138SMF 5-1/4″ Paper Cone Subwoofer Speaker
301-500, Yung SD100 100W Class D Subwoofer Plate Amplifier Module No Boost
295-492, SD215-PR (for new designs), with 7 fender washers (50G weight)
30” diameter cherry log, milled to 1” thickness and dried for 2 years
+ There are no comments
Add yours