Corona


Designer:
Garry Parker
Project Category:
Tower Speakers
Project Level:
Intermediate
Project Time:
8-20 Hours
Project Cost:
$500 – $1,000
Project Description:
The Corona speaker system is a 3 way, floor standing WWMT using two 7″ Dayton Audio Esoteric woofers, a 5″ Dayton Audio Reference midrange, and a Fountek Ribbon tweeter. The enclosure is an AMLTL (mass-loaded transmission-line) cabinet designed using the “Accidental MLTL Technique” described here: https://www.diyaudio.com/forums/full-range/231951-accidental-mltl-technique.html.
Design Goals:
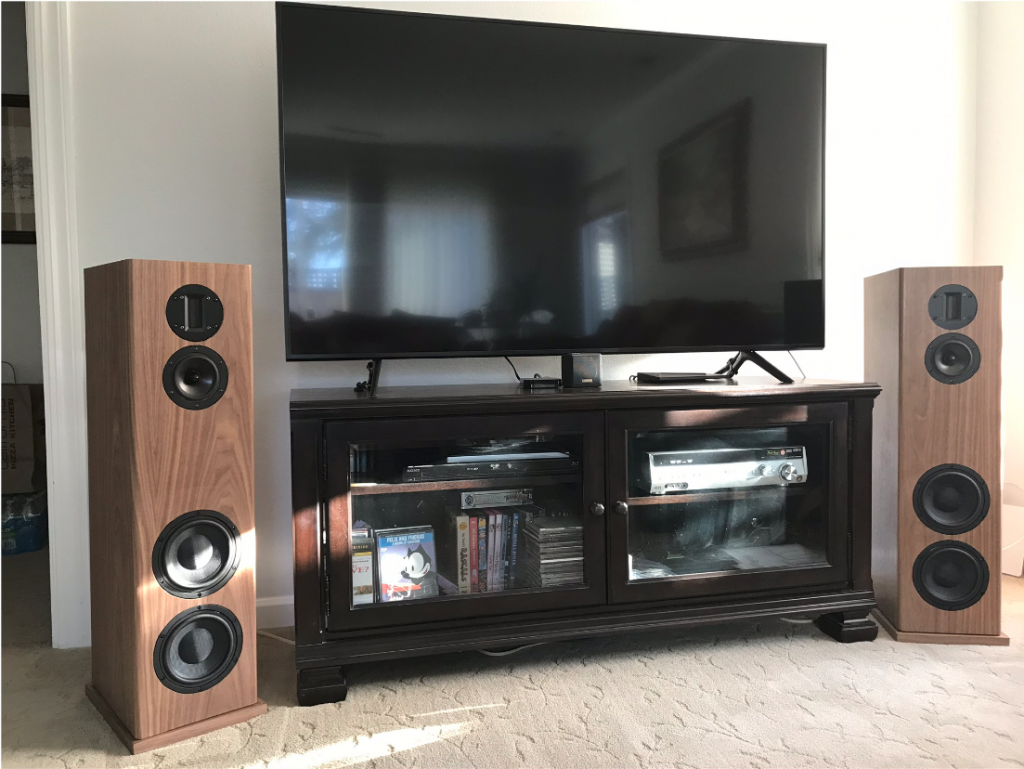
The goal was a full range speaker system large enough to not need a subwoofer. My old speakers were looking pretty bad after my daughters cats used them for scratching posts. I decided to replace them with cabinets that would look nice enough not to require grill cloth. My inspiration for the size of the cabinet and the driver layout was the Magico A3 speakers. The Magico A3 uses a pair of 7 inch woofers with the woofers at the lower portion of the front baffle and the midrange and tweeter at the top.
Driver Selection:
2 Dayton Audio ES180TiA-8 7″ woofers.
When the Dayton Audio ES180TiA drivers came out, I was very impressed with the specs. I noticed that Paul Kittinger got excellent results with these drivers in the “Clarinos”, and that AudioXpress had reviewed the ES180Ti drivers and seemed impressed.
Dayton Audio RS125-8 5″ midrange.
The Dayton Audio RS125-8 midrange was chosen for its extended and relatively smooth frequency response.
Fountek NeoCD3 ribbon tweeter
The Fountek NeoCD3 ribbon tweeter was chosen for the highs. The datasheet shows the frequency response of the Fountek NeoCD3 extending to 40KHz with good horizontal dispersion. Jim Holtz used this tweeter in the “Statements” and the “Mini Statements” with good results. In his words, “Cymbals sound like cymbals and the sound of triangles floats in the air… [ribbons] do a better job of realistically reproducing highs to my ears than any other type of tweeter. The highs are open and airy with great off-axis dispersion.” I agree!
Enclosure Design:
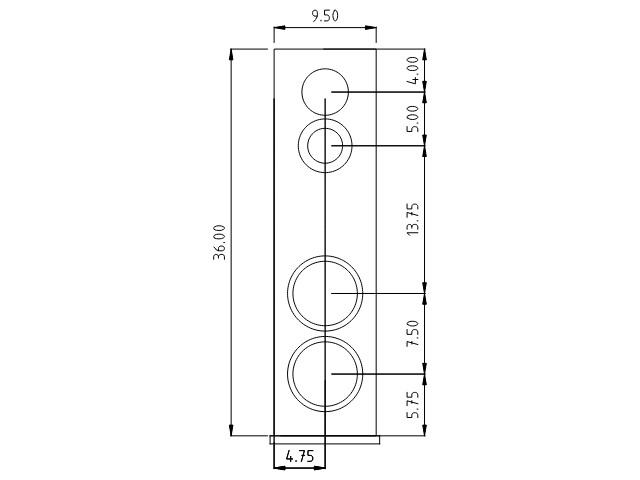
I chose a cabinet size of 36″H x 9.5″W * 13.5″D. For an AMLTL design, it needed to be constructed as a folded transmission line terminated with a port rather than a full opening. The 5″ midrange would be in a separate enclosure to isolate it from modulation by the woofers. The net internal volume is 1.86 cf (52.67 L).
According to the Accidental MLTL Technique you need to “design a vented bass reflex speaker enclosure using the default optimal case. That will give you the volume of the box and the vent cross sectional area and length.” Calculations for 2 ES180TiA woofers indicated a box volume of 1.8 cf tuned to 32 Hz would result in a QB3 alignment with a low frequency cut-off of 30 Hz.
A 2 inch diameter port cut to 3.15 inches was used. It was necessary to keep the port diameter small so the length of the port wouldn’t be too long to fit in the folded enclosure. Fortunately, no noticable port noise has been observed at loud listening levels. The first half of the enclosures were stuffed with 0.75 lbs. per cubic foot of polyester fiber and a 1.5 inch thick piece of convoluted foam was placed on the back wall of the enclosure directly behind the woofers, and another piece was placed at the top of the enclosure where the fold bends.
The midrange speaker is in a separate 0.04 cf sealed enclosure. This enclosure is 7.375″H x 5″W * 3″D. A layer of 1/2″ foam and a layer of 1/2″ felt were used to line midrange enclosure.
The ribbon tweeter is sealed and is in the main cabinet above the midrange.
Enclosure Assembly:
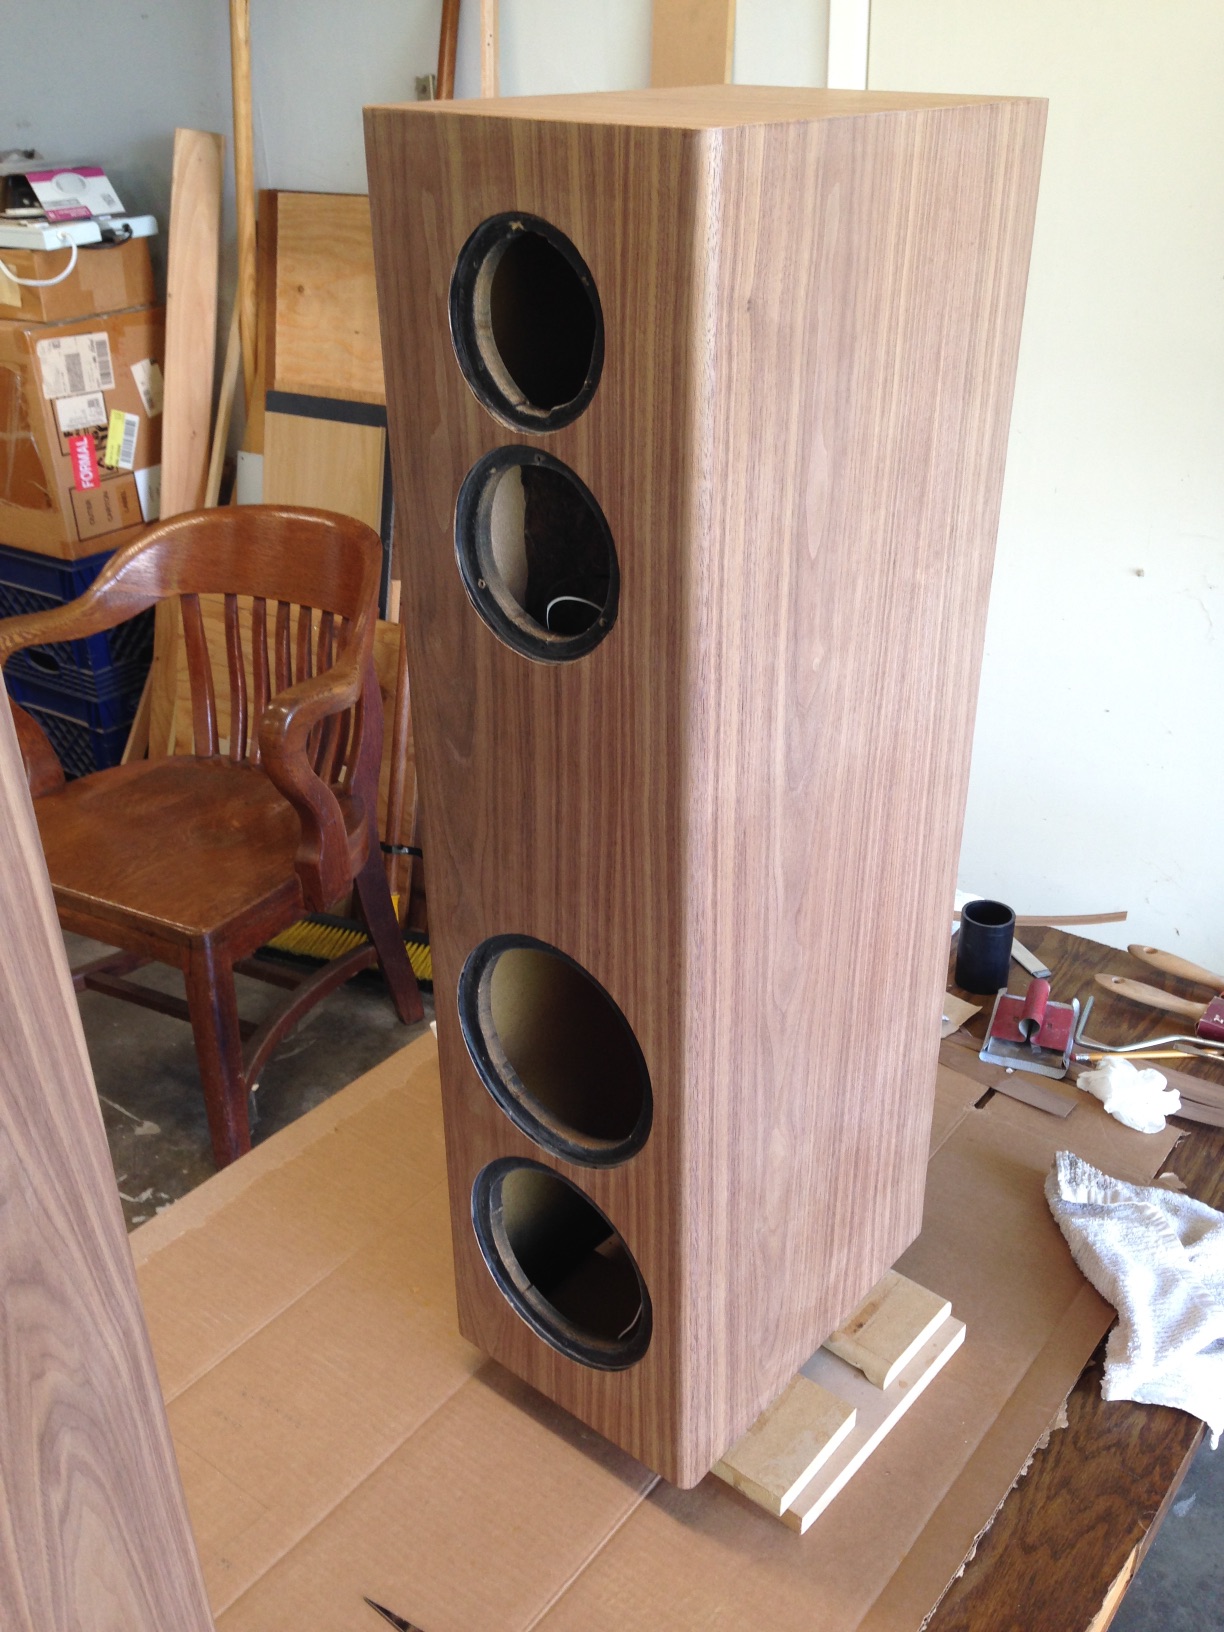
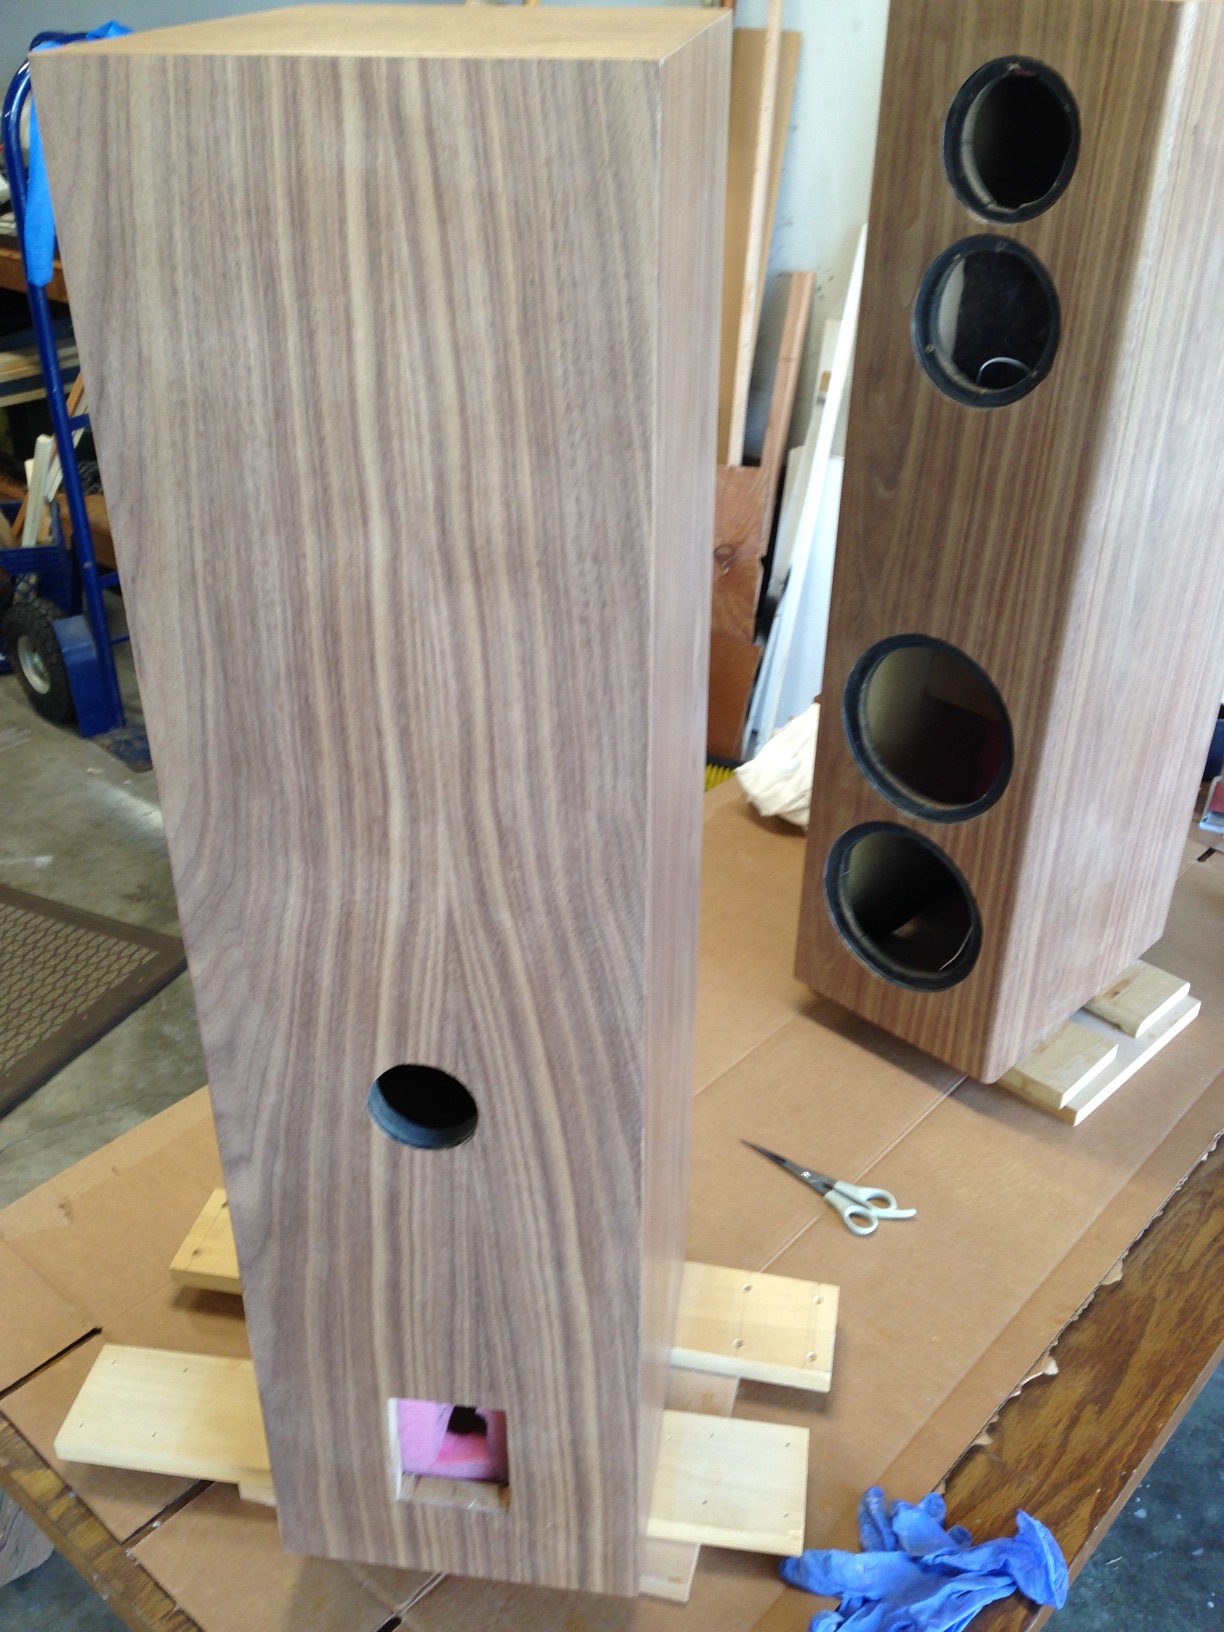
Two sheets of 4′ x 4′ 3/4 inch MDF were used to make the Coronas. A few pieces of 1/2 inch MDF were used in the interior for the folded transmission line. The folded transmission line creates a rock solid enclosure so no additional bracing was needed. The subenclosure for the 5″ midrange is made of 3/8″ wood. All pieces were cut using a circular saw and a straight edge as a guide.
I used Gorilla glue and small nails to assemble the back, the sides, and the top. Then assembled the ell shaped piece for the fold in the transmission line and glued it to the back and sides. Before attaching the front panel, I glued the midrange subenclosure to the back of the front panel. Then the front panel was attached and the speaker holes were cut out with a router. After this the hole for the port was cut using a hole saw, and the hole for the terminal cup was cut out using a jigsaw. The bottom is not installed at this time as it is the base for the speaker and is 1/4″ wider on all 4 sides than the speaker enclosure. The crossover will be attached to the base also. The base is removable to allow easy access to the crossover.
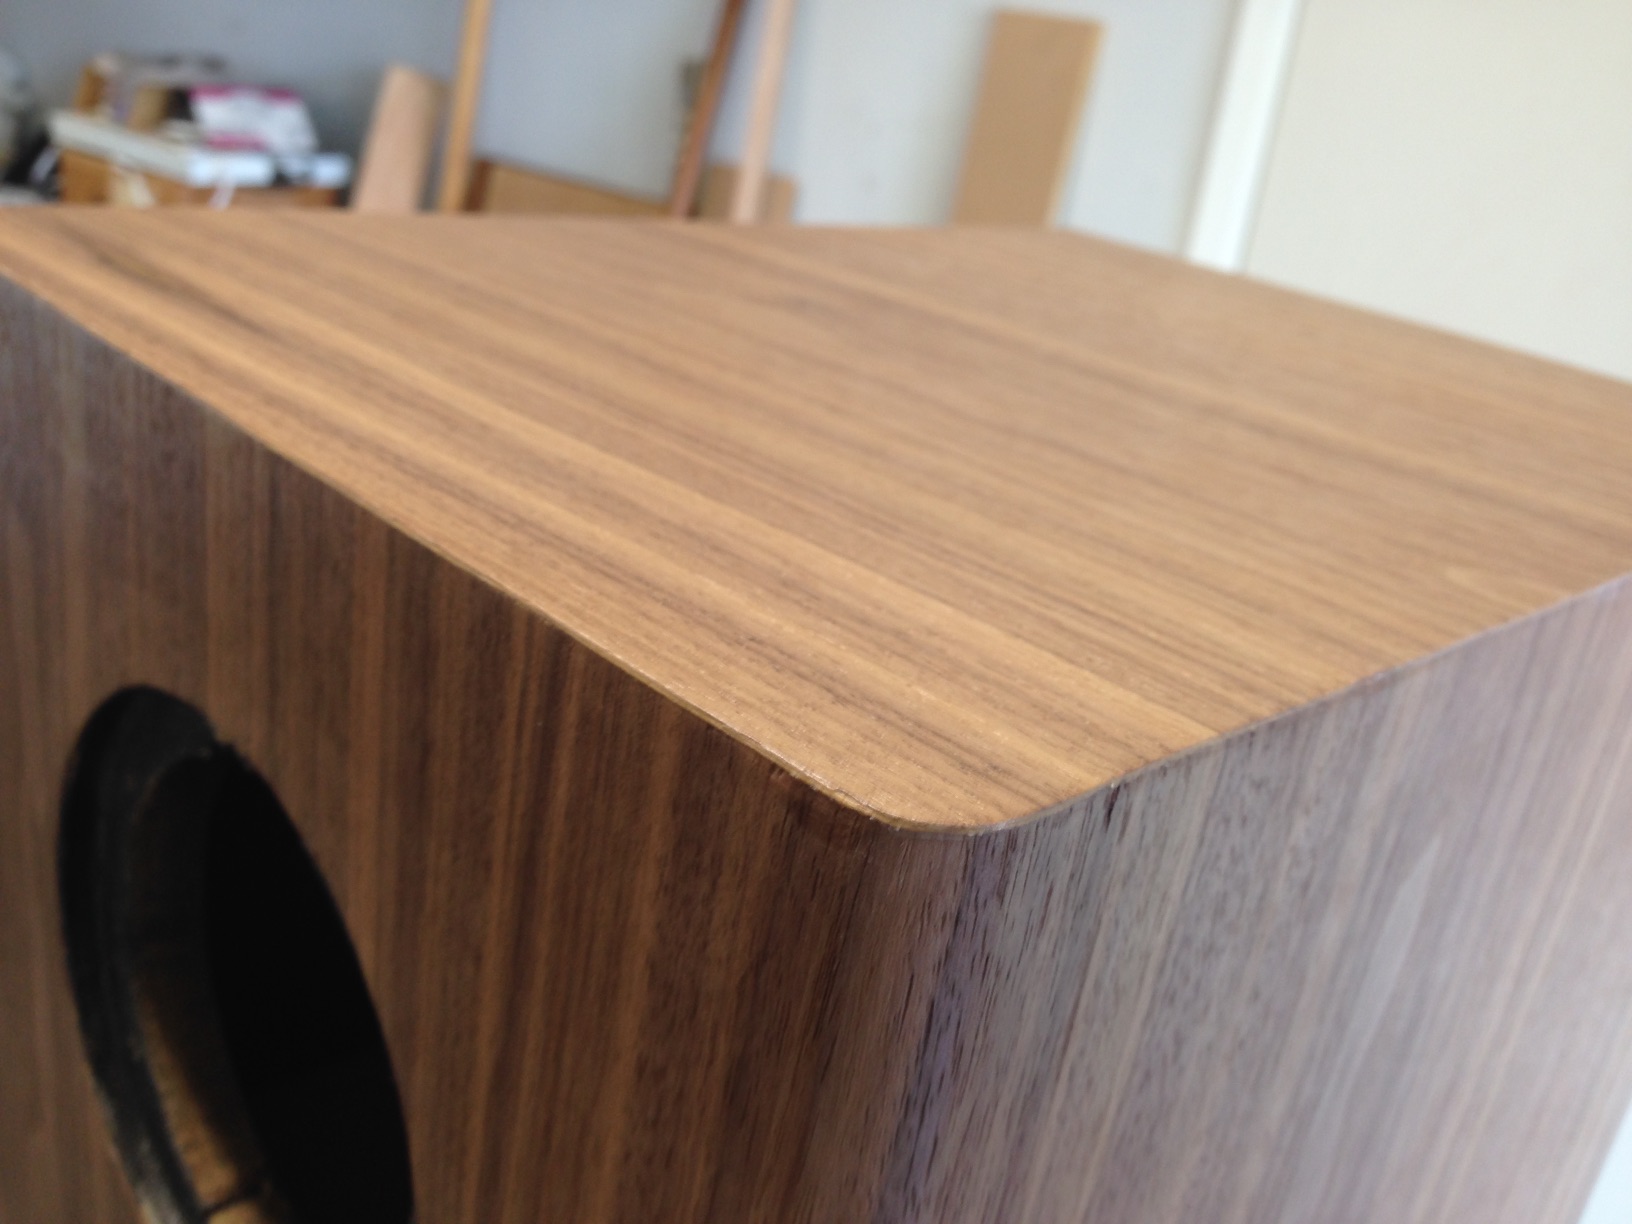
The enclosures, when fully assembled, were given a 1/2″ round over on the left and right sides of the front baffle and then walnut veneer was applied. No stain was used, but three coats of clear polyurethane were applied. Oil based polyurethane adds a slight amber color which I didn’t want, so water based was used.
Crossover Design:
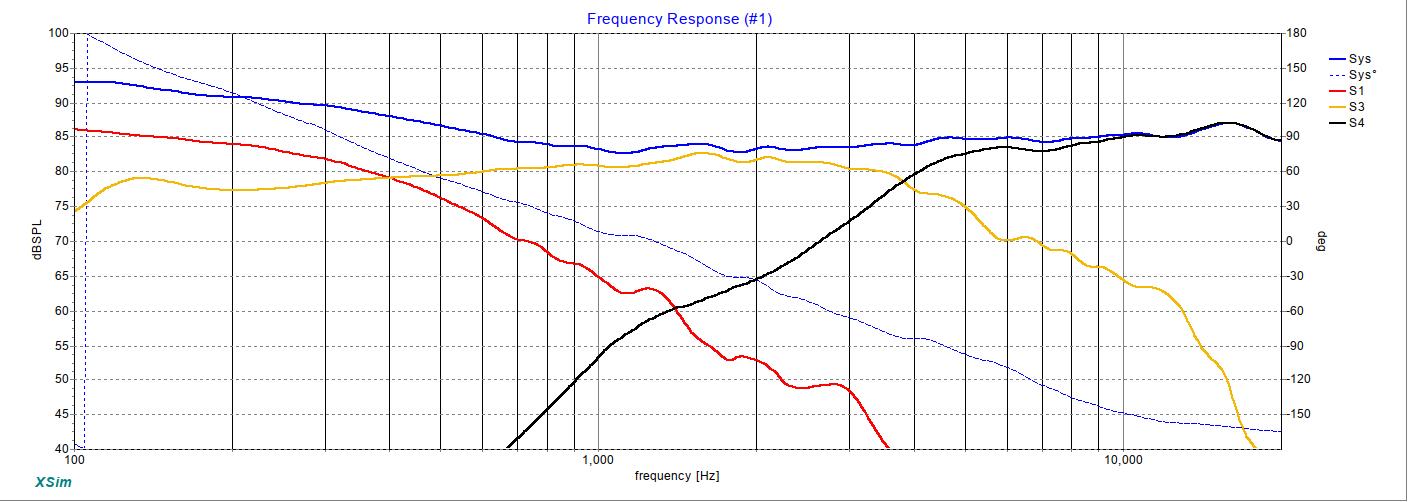
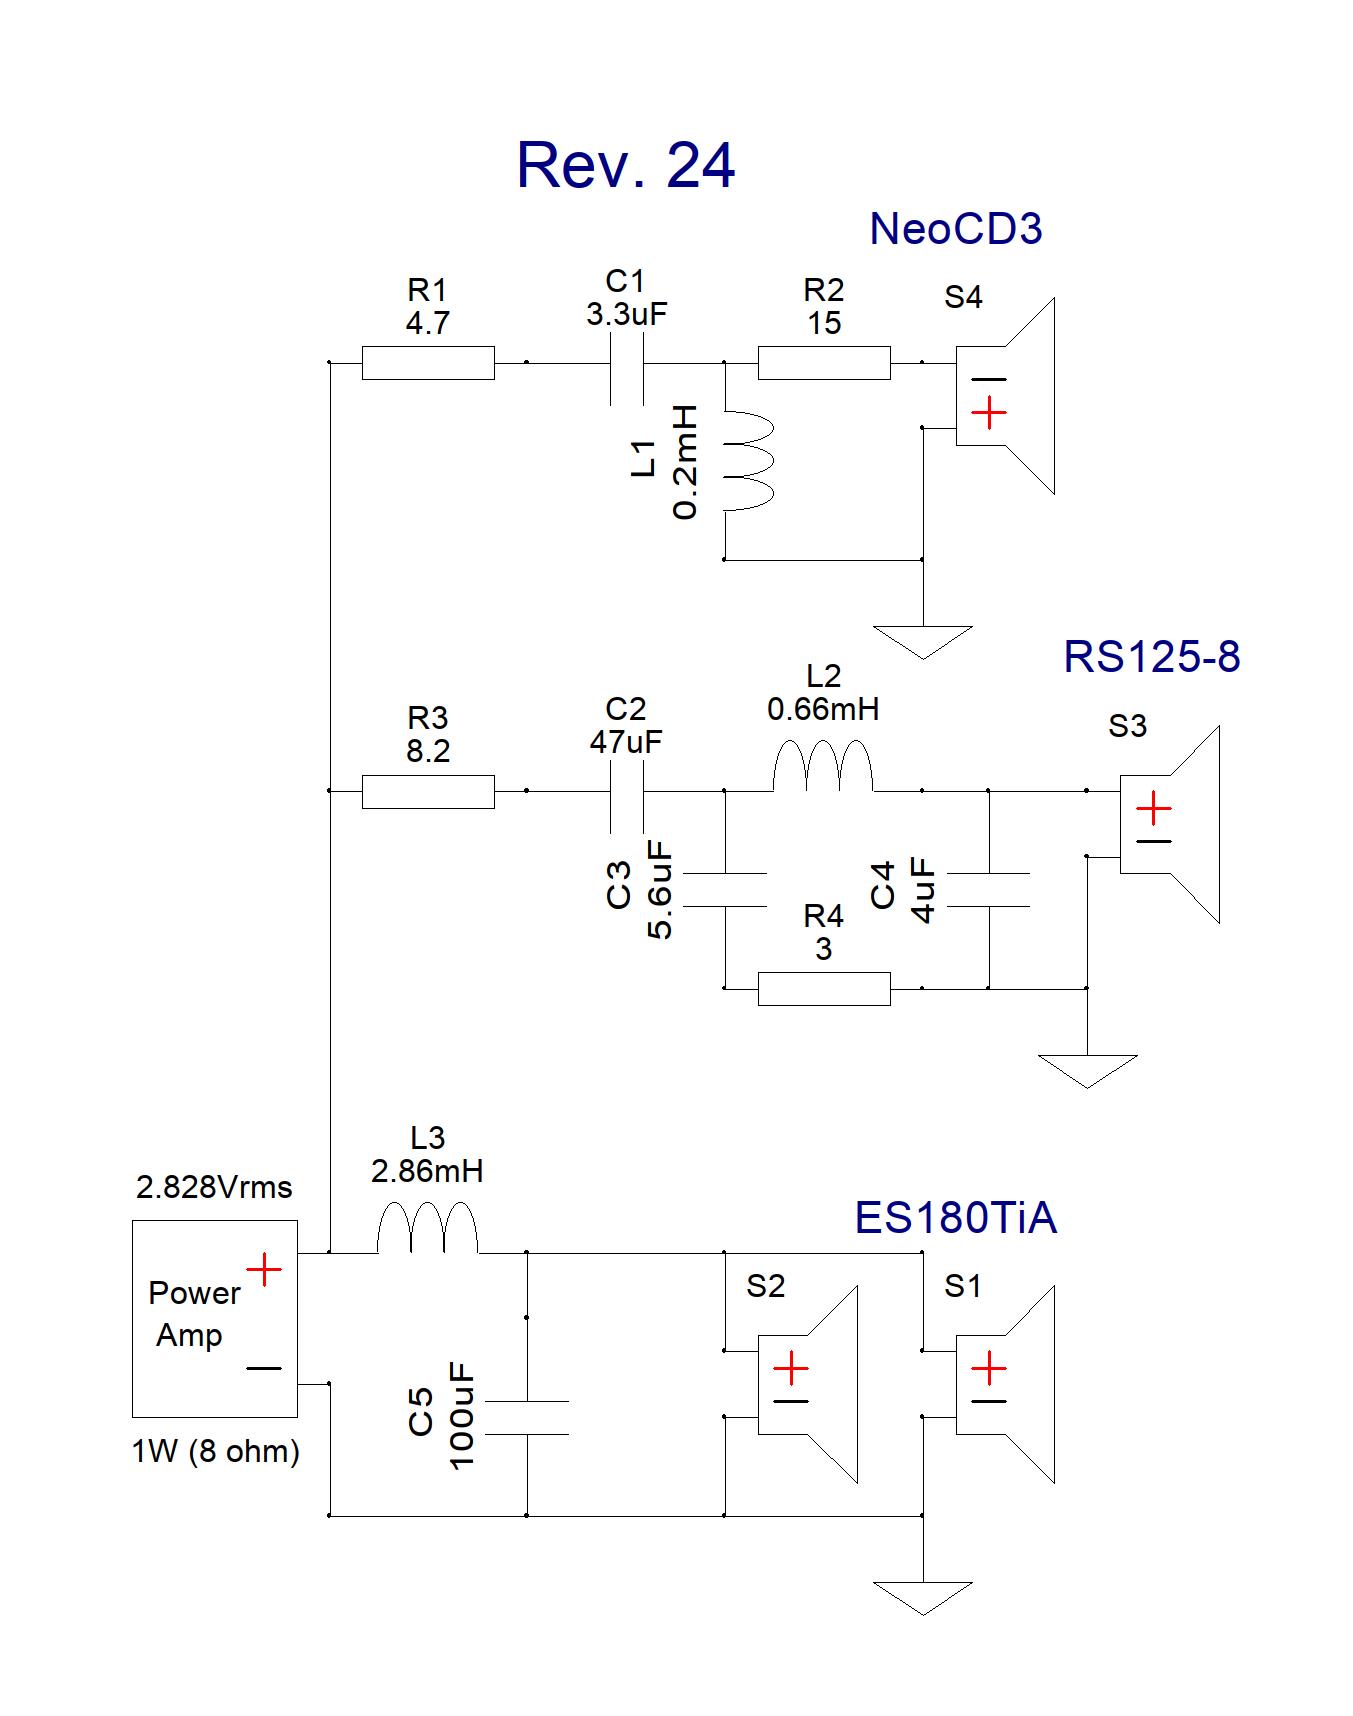
XSIM software was used to design the crossover. All Parts Express Dayton drivers come with the FRD and ZMA files that XSIM needs to work with. The crossover rolls the woofers off at around 480 Hz which just happens to be the step frequency for speaker on a 9.5 inch baffle. The midrange crosses over to the tweeter at 3900 Hz. The minimum impedance is 3.5 Ohms at ~100 Hz which shouldn’t be a problem for most amps today. I gave the speakers a slight BBC dip between 1000 Hz and 5000 Hz, which many listeners prefer.
Tips & Tricks:
Trust your ears and spend a lot of time listening while tweaking your crossover network. It helps if you have a good selection of parts on hand when fine tuning your crossover.
Conclusion:
The completed speaker system looks beautiful and sounds excellent. The bass goes extremely low but is not over-emphasized. Live music is the standard by which a speaker should be measured and I think these speakers measure up quite well. We have a piano in the house, so I’m very familiar with the sound of live piano, and the Coronas reproduce piano recordings very well. My step-father is a jazz musician who plays the sax, and I have heard him practice in the living room many times. When listening to one of his CDs, it sounds like he is playing sax in the room with us.
My wife and I spent many hours listening to music and tweaking the crossover till we were satisfied the speakers sounded like live music. The crossovers went through 24 iterations until we were satisfied. Even with the help of software as good as XSIM, there is no substitute for the human ear.
About the Designer:
I have worked in the computer industry since the mid 1980s. I am currently working for NVIDIA in Failure Analysis of graphics chips. I have been with NVIDIA for 17 years. Building speakers has been a passion of mine since the 1970s. I inherited my passion for electronics and speaker building from my grandfather who was a Navy radar technician and an avid audiophile. Hearing his “Hifi” as he called it then, and the speakers he had built, was an experience I would never forget.
Project Parts List:
The author has made a few engineering changes to the crossover since this was published. The primary change is in the high-pass filter to the midrange for better power handling, plus a few other minor changes.
Was looking at building a pair of these. Are the crossover changes updated here or no?
Hi Josh. No, the xovers are not updated here. The second order filter on the woofer is unchanged, but the midrange and tweeter circuits are slightly different. The main reason for the revision was to raise the high-pass xover frequency of the midrange for better power handling. The output of the midrange is also now ~2dB higher and the output at the extreme top end of the ribbon tweeter was lowered just slightly. If you email me, I can send you the revised xover and answer any other questions you might have. gparker21 at earthlink dot net
Great looking speakers. I grew up in the 70’s listening to my dad’s home built hifi. Tube amps and big Karlson speaker cabinets that gave you full range all day long. I got into speaker design in the 80’s and it brings me a lot of joy seeing a set of cabinets like the ones you’ve built. I’ll bet that sounds fantastic. Well done!
Josh, the crossovers shown here are not quite the same as what I am currently using. I am unable to add the schematic here for some reason. I will be happy to send it to you and anyone else if you contact me at gparker21 at earthlink dot net.