DML Flat Panel


Designer:
Rich Meinke
Project Category:
Freestyle
Project Level:
Beginner
Project Time:
1-2 Hours
Project Cost:
$50-$100
Project Description:
This project, the first in the set of DML Flat Panel “Beginner Series” projects, will briefly introduce you to DML speaker technology and explain, step by step, how to build a simple 2’x2’ DML flat panel speaker from materials that are readily available. In short, this project is the quickest way to get listening to a nice sounding flat panel speaker.
Design Goals:
WHAT IS A DISTRIBUTED LOUDSPEAKER (DML)
A Distributed Mode Loudspeaker operates on completely different principals than conventional dynamic/cone speakers or other panel speakers such as electrostatic or ribbons. Unlike those types of transducers where the diagrams move in a pistonic motion, a DML flat panel speaker randomly generates vibrating nodes producing output at different frequencies and amplitudes across the entire panel with equal output from both sides of the panel.
This provides some very interesting advantages:
- Near Omni-directional dispersion pattern, radiating equally from the front and back of the panel, has little narrowing of off-axis output with increasing frequency.
- A single diaphragm (panel) capable of producing a true full-range response.
- Low 3rd order distortion provides excellent voice intelligibility.
- Panels and the resulting finished loudspeaker are thin and light-weight, making them easy to move around the listening room or put away out of sight.
Large, tall panels operate as a line-array which exhibit a 3dB loss in sound pressure compared to a point source that decreases by 6dB for every doubling of distance. Not a DML technology advantage however, even a 24” x 36” panel will display qualities of a line-array at reasonable listening distances. Some explain an array sounding like a large set of headphones. To me, listening in the focused array is like stepping into the recording venue.
LISTENING TO A DML PANEL
The term “magic” has been associated with these flat panels long before I began building and listening to my own panels. After listening to them for some time now I can only agree that there is, indeed, magic in these panels!
The near Omni-directional output is an absolute joy to listen to. They throw a huge soundscape that just fills the room. Even tiny 14.5” x 12” panels absolutely fill the room with delicious flat panel sound. If you didn’t know that the tiny panels were speakers you would have little clue where the music is emanating from. This is very unique.
The panels are also very light and the large surface area requires little movement to generate sound pressure. This leads to a “fast” and detailed speaker. Even on recordings that I know very well, I began hearing nuances in recordings that I had not heard before. The detail that these panels are able to extract is not etched or harsh and provides the detail in a polite way; much different than what we are accustomed to with conventional high quality speakers.
DML’s are sensitive and require little power to play loudly. For instance, a single Dayton Audio DAEX25FHE-4 exciter on a 2’x2’ XPS panel is roughly 91+dB. DML panels also do not suffer from Baffle Diffraction Loss so a 91dB panel is equivalent to a 97dB traditional box speaker, assuming 6dB diffraction lose. While this is a very compelling quality, panels will saturate often times before the thermal limits of the exciter are reached. This reduces the output of the panel. This is not to say that even a small 2’x2’ panel cannot play to satisfying listening levels. Where higher output may be required, a multi-panel array is a solid solution. Look for updates in the Flat Panels section of the Speaker Projects area of the Parts Express Project Gallery for a DML multi panel array design.
It is my opinion that these flat panels are not as well suited for rock or synthesized music, but best with: Jazz, Blues, vocal and other acoustic music genres. Well recorded, live performances on these panels are fantastic and bring the performers into the listening room like no other speaker I have had the pleasure of listening to over the last 30+ years.
Finally, a word of caution from my own experiences listening to these panels. The presentation of a DML is different as sound is produced across the entire panel; this makes for a more diffused output compared to a traditional speaker. There is a lack of presence and a sensation that the sound is coming from the back of the speaker, through the panel, then finally to the listening position. This took many hours of listening to adjust to. I had nearly given up on these panels before giving them a few long listening sessions. Also, after switching from my KEF Q500s to the panels, I heard a constant underlying, vibrating signature with my XPS panels. While it is a warm sound, it is an aspect of the panels that I had not noted previously. I adjusted to this aspect quickly and the KEF remains in storage and has not been connected to my audio system for some time now.
These speakers may not be for everyone due to music tastes and personal preferences. But they are easy to build, inexpensive, and take only an hour or 2 to put together so I can highly recommend them to anyone looking to build a musical sounding speaker. I always wanted to own an exotic flat panel speaker, and these have exceeded my expectations.
Driver Selection:
Based on sound quality, the most recommended exciter for small, light-weight panels (as used in the project) is the Dayton Audio DAEX32U-4 Ultra. The DAEX32EP-4 Thruster is a close second, and for an inexpensive exciter that still performs very well, I can recommend the Dayton Audio DAEX25FHE-4.
Enclosure Design:
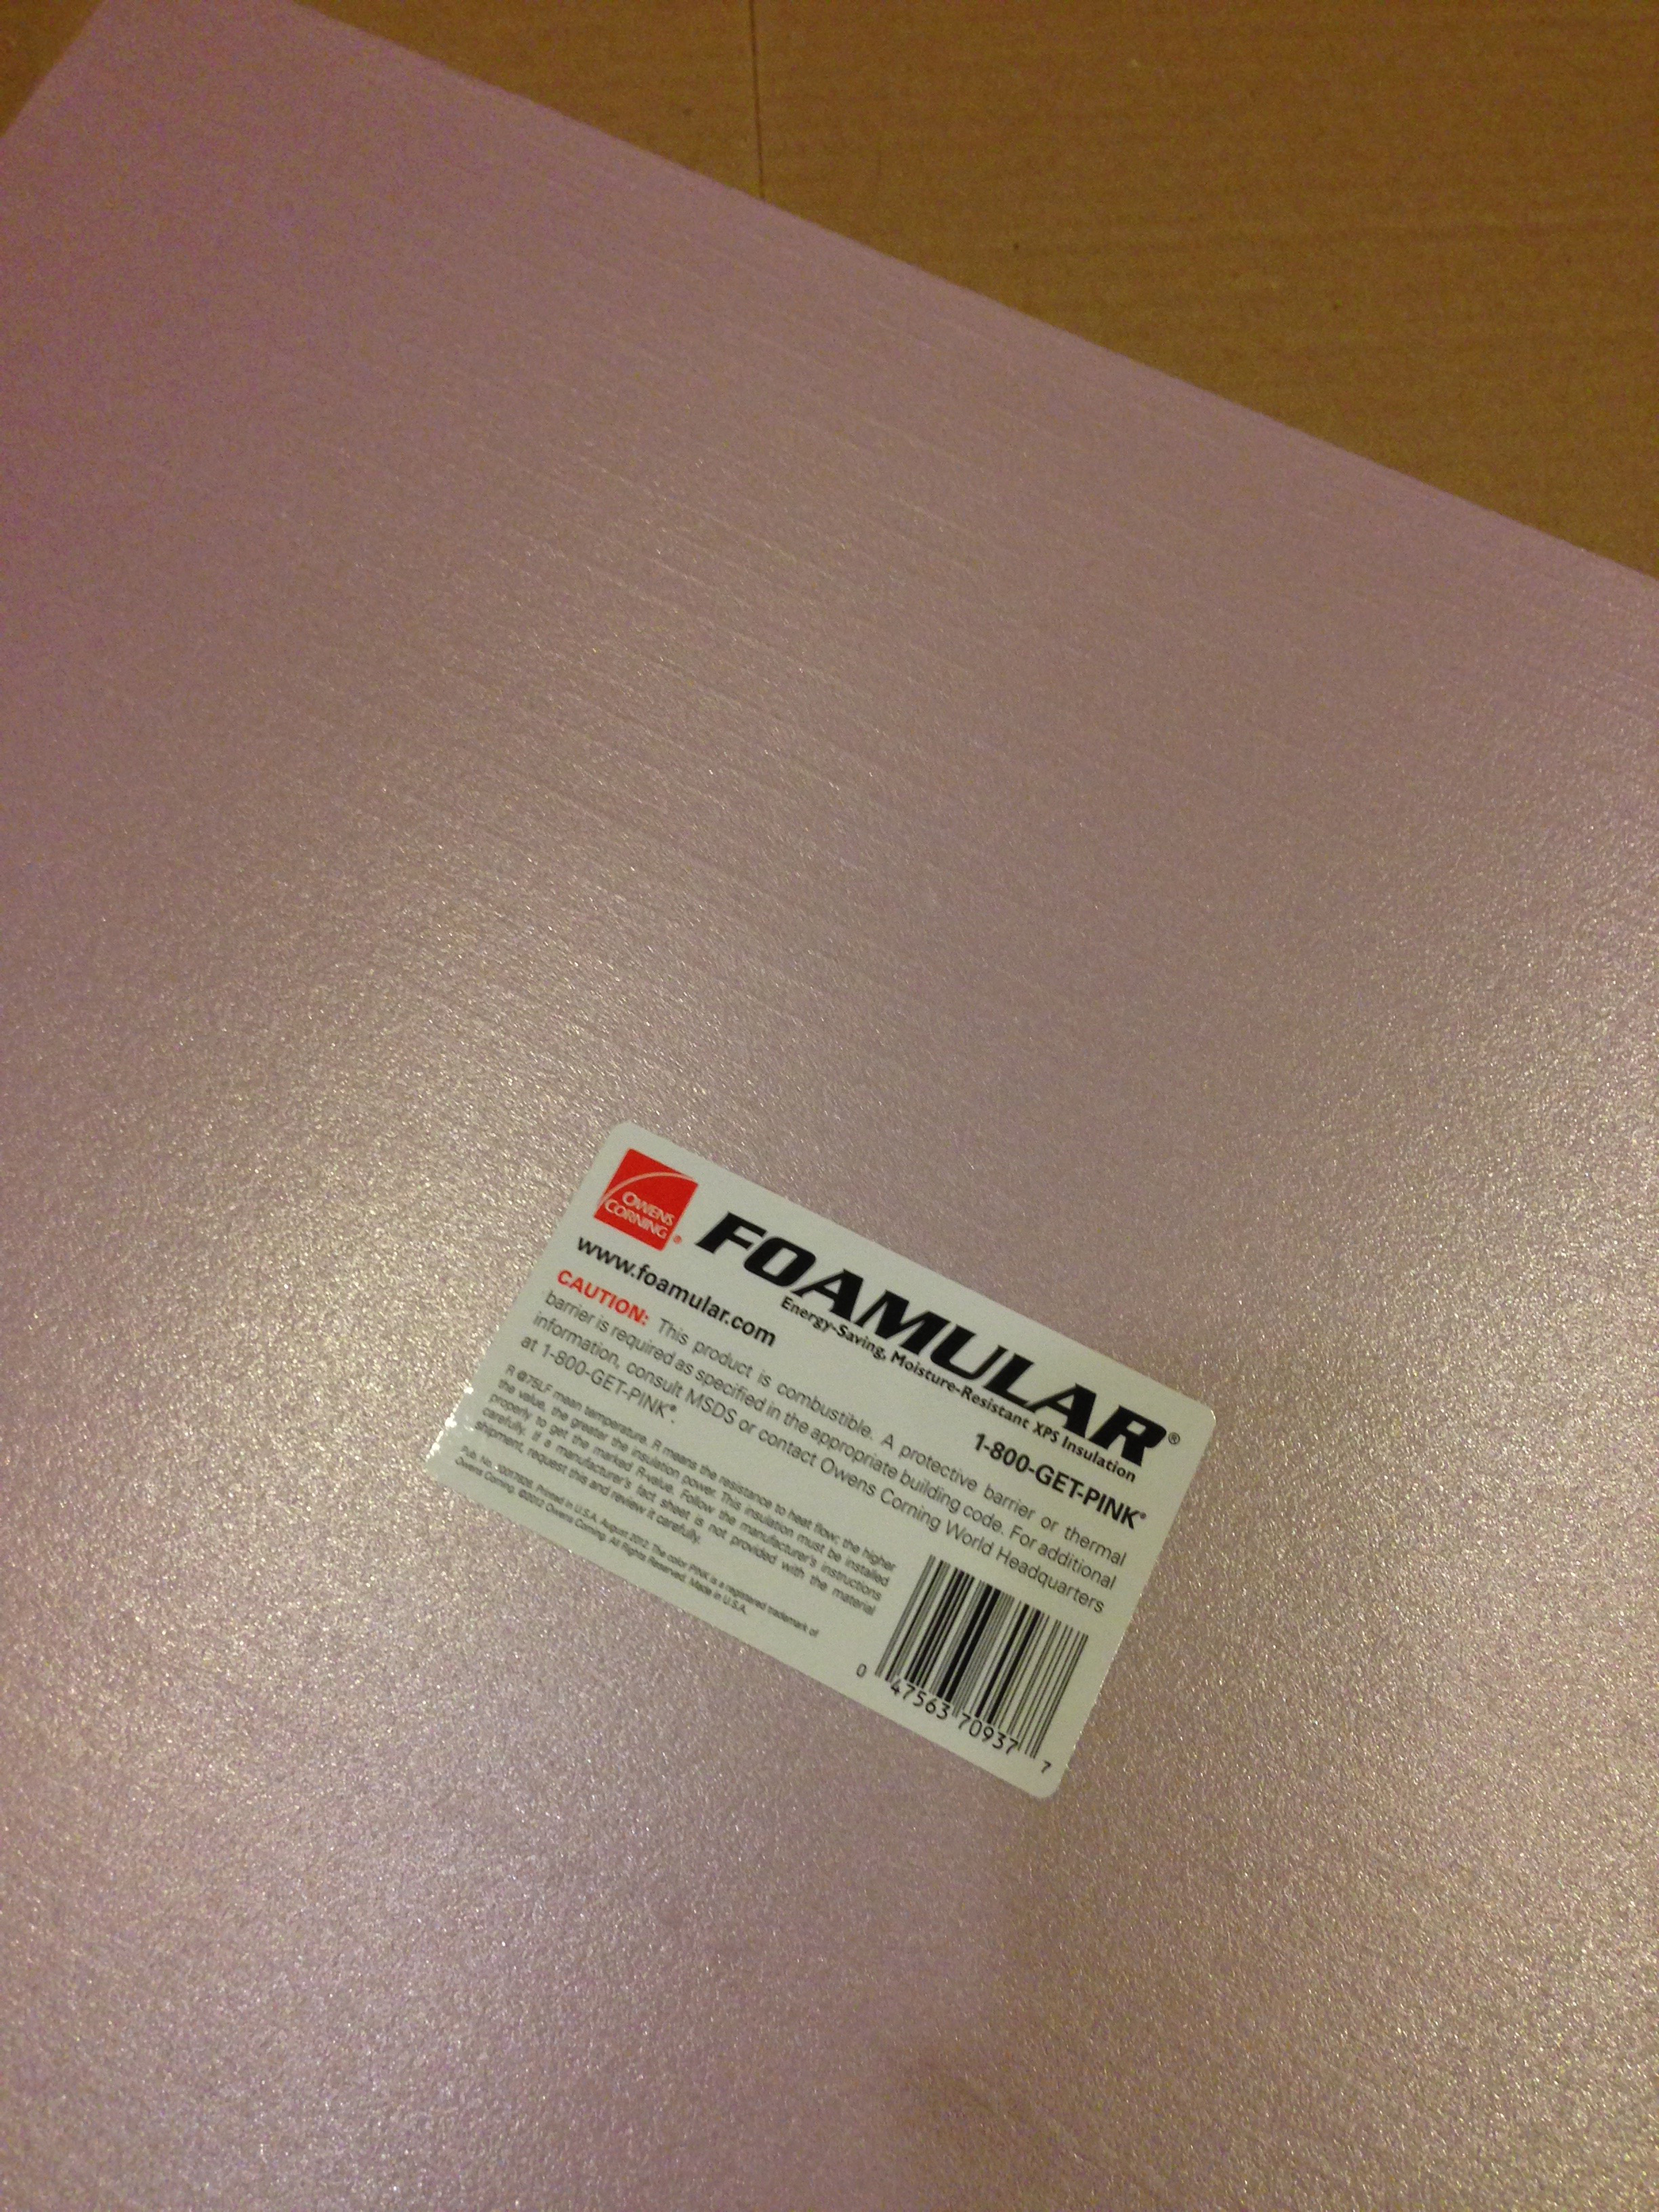
For the easiest build, use 2’x2’ Project Panels from Home Depot (Owens Corning FOAMULAR® 150 rigid XPS foam insulation). These are cheap, require no cutting, and will give you a good introduction to DML panel sound. However for better performance, a panel 24”x32.5” (golden ration) would provide better low and high frequency response. Home Depot will usually, but not always, cut a 4’x8’ sheet of XPS on their panel saw. If this is possible, go for the larger panels and follow the same process outlined below.
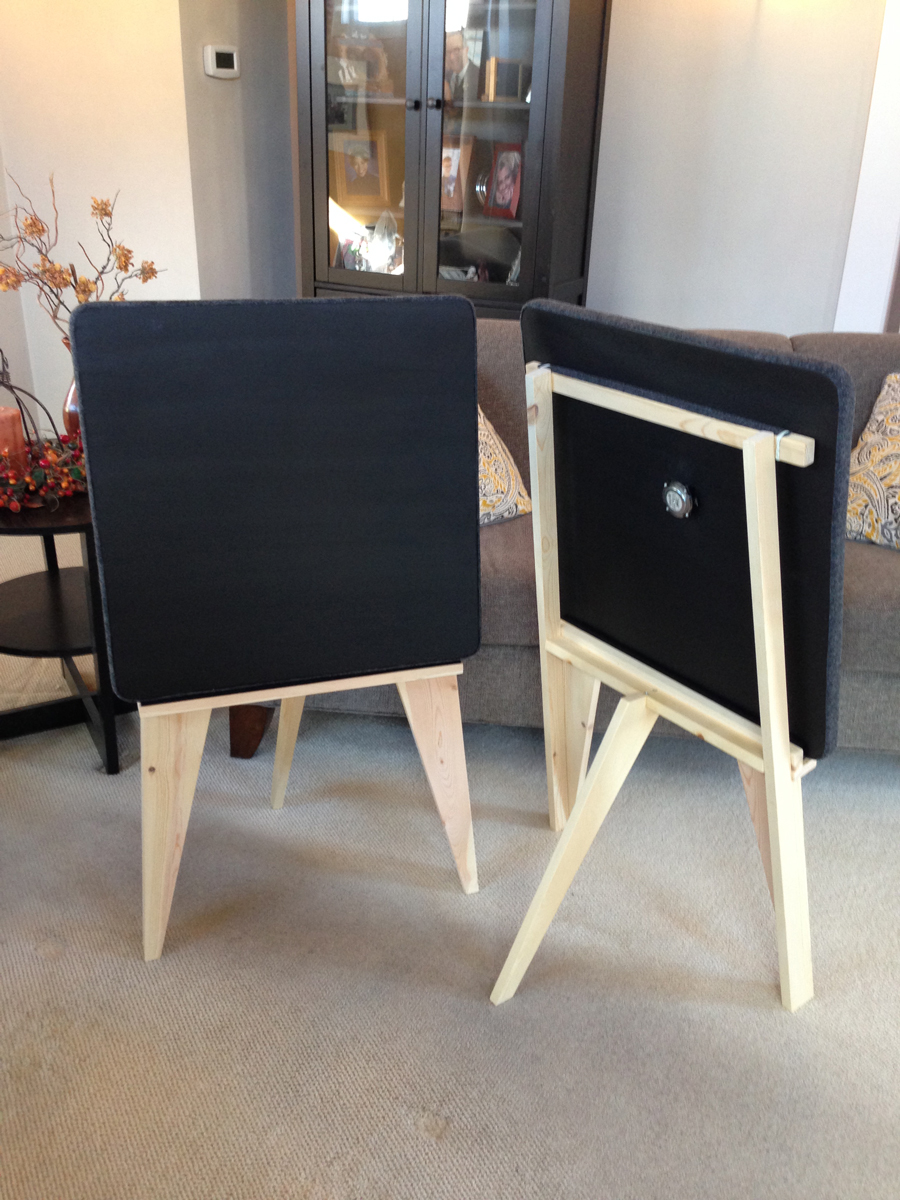
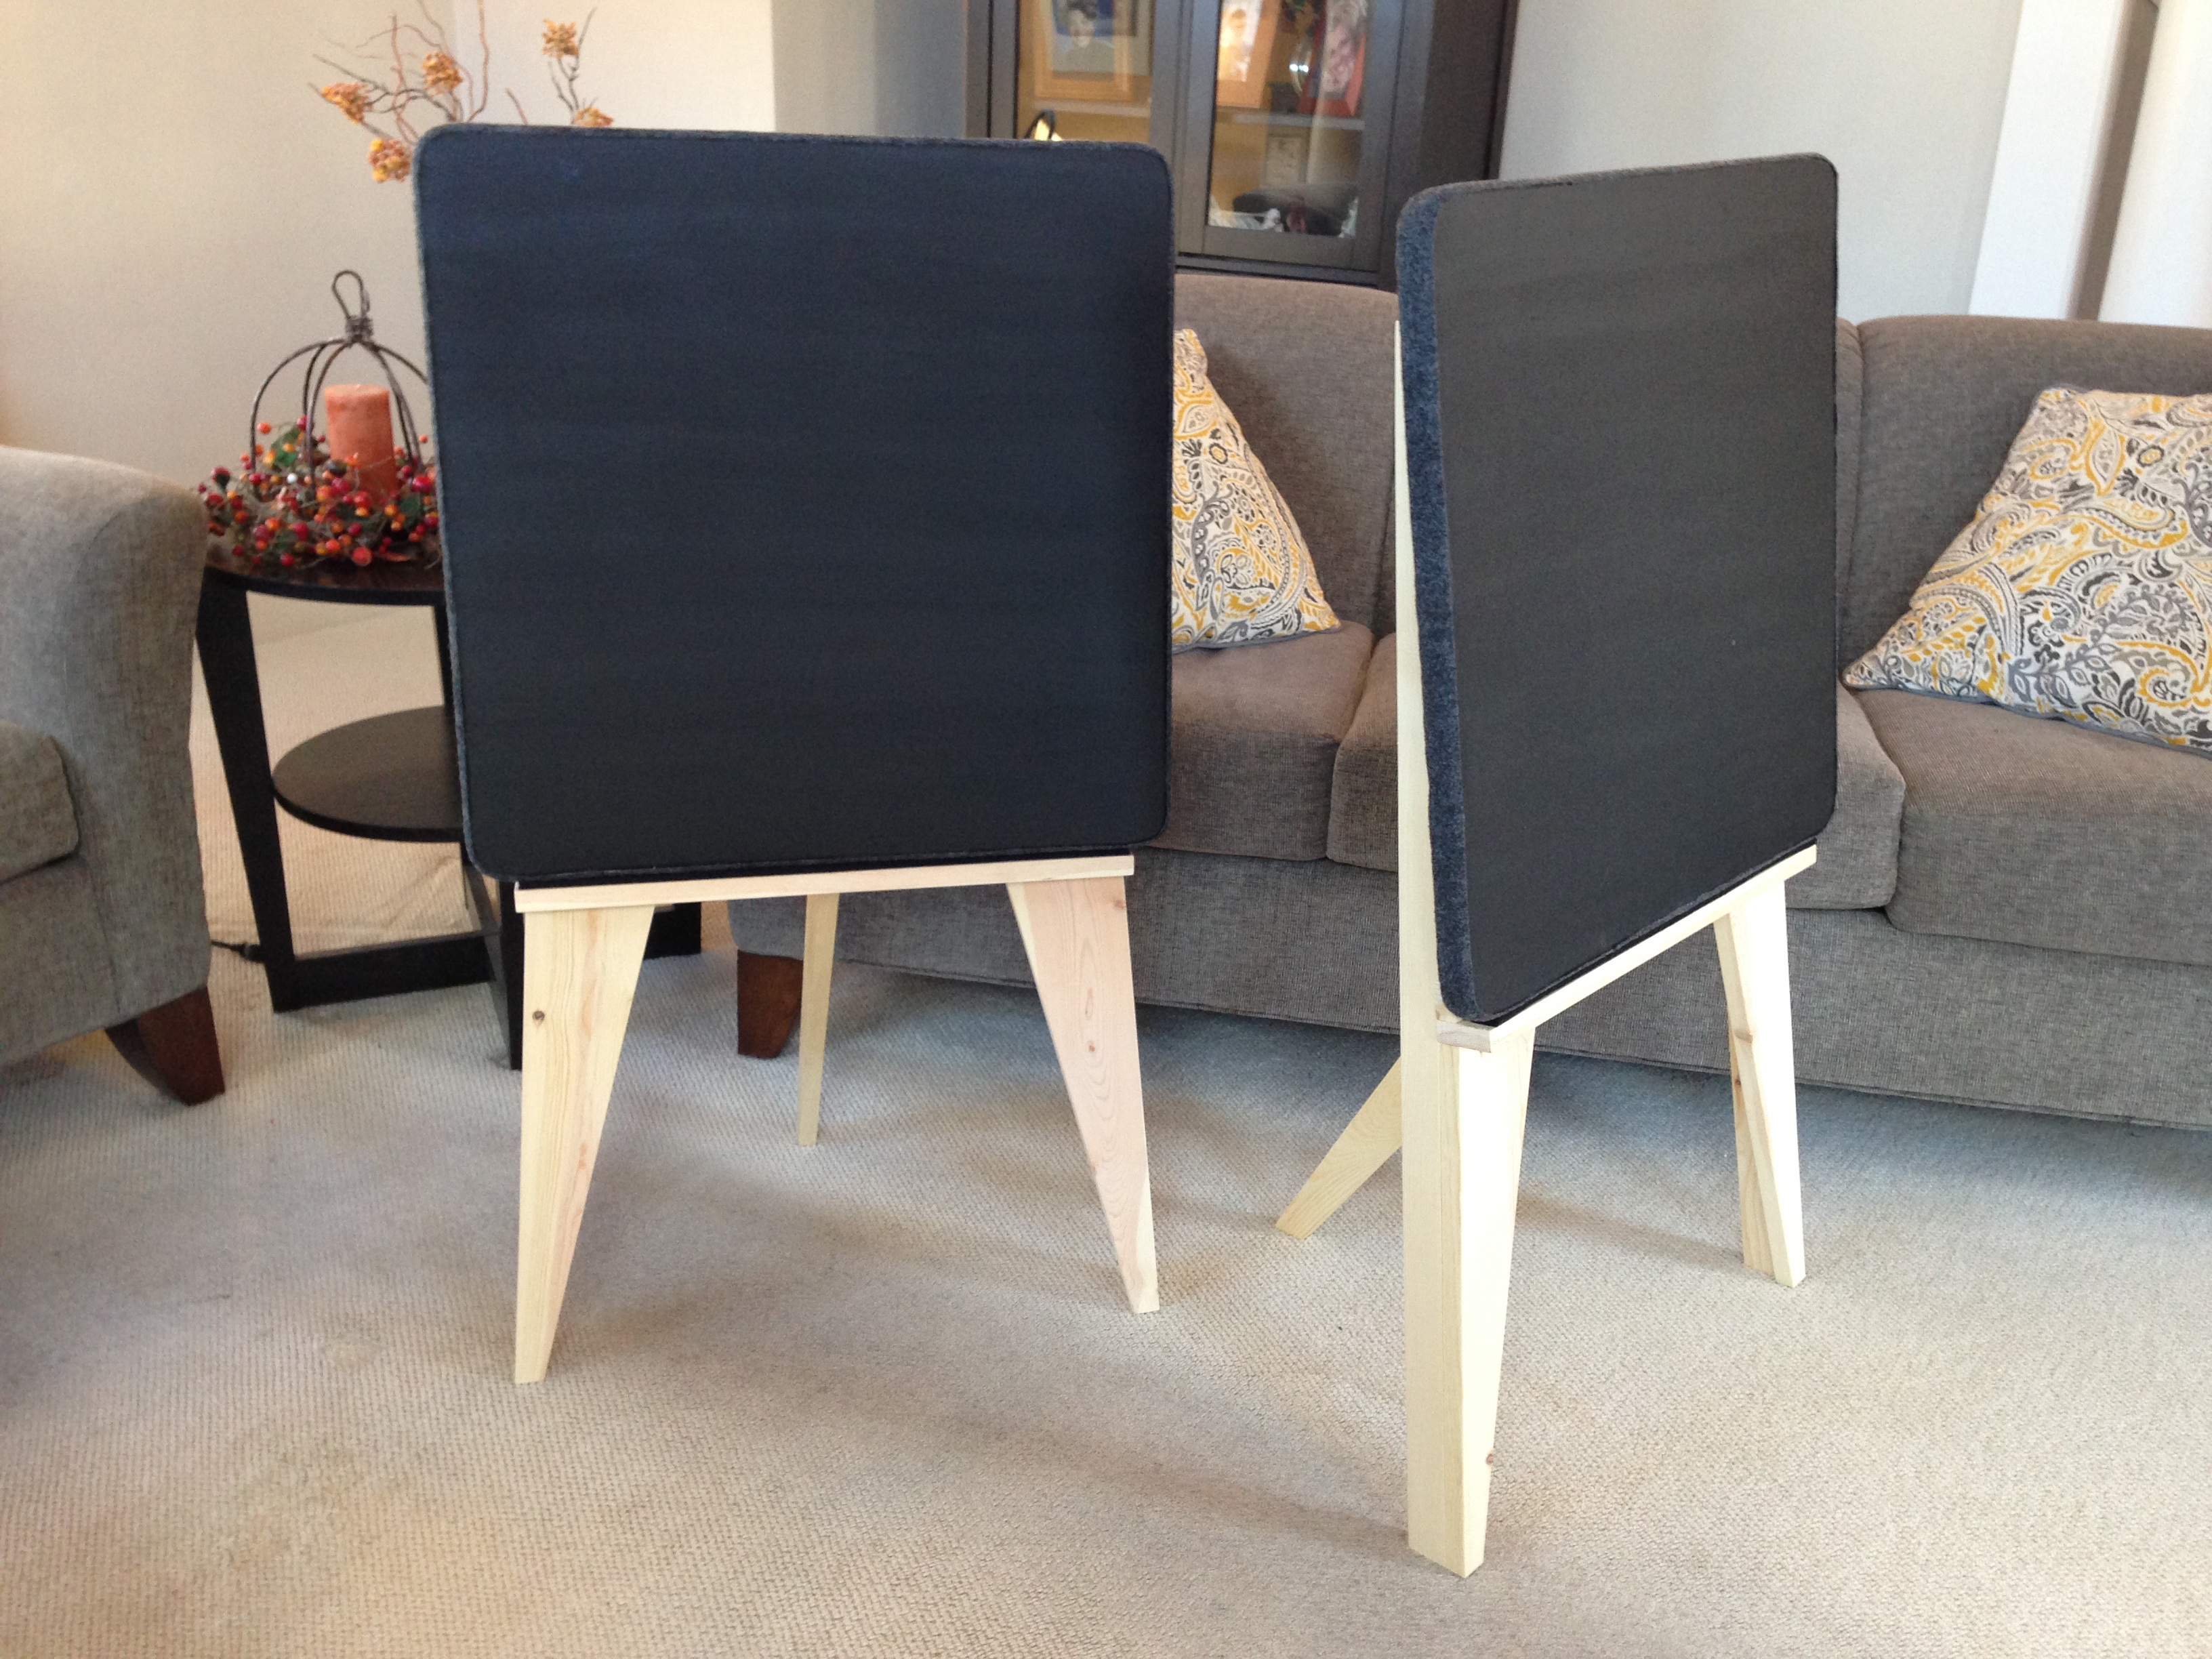
Enclosure Assembly:
Building the panel is simple and can be completed in 1-2 hours. It is important to sand off all of the panel “skin”. The sanded surface should be dull, soft and velvety feeling, with none of the original sheen still present. After the panel is prepared, it must be treated with a mixture of even parts of glue (wood or white) and water. XPS, non-treated, does not sound as good and has a “plastic” sound quality.
Step 1 – Panel preparation.
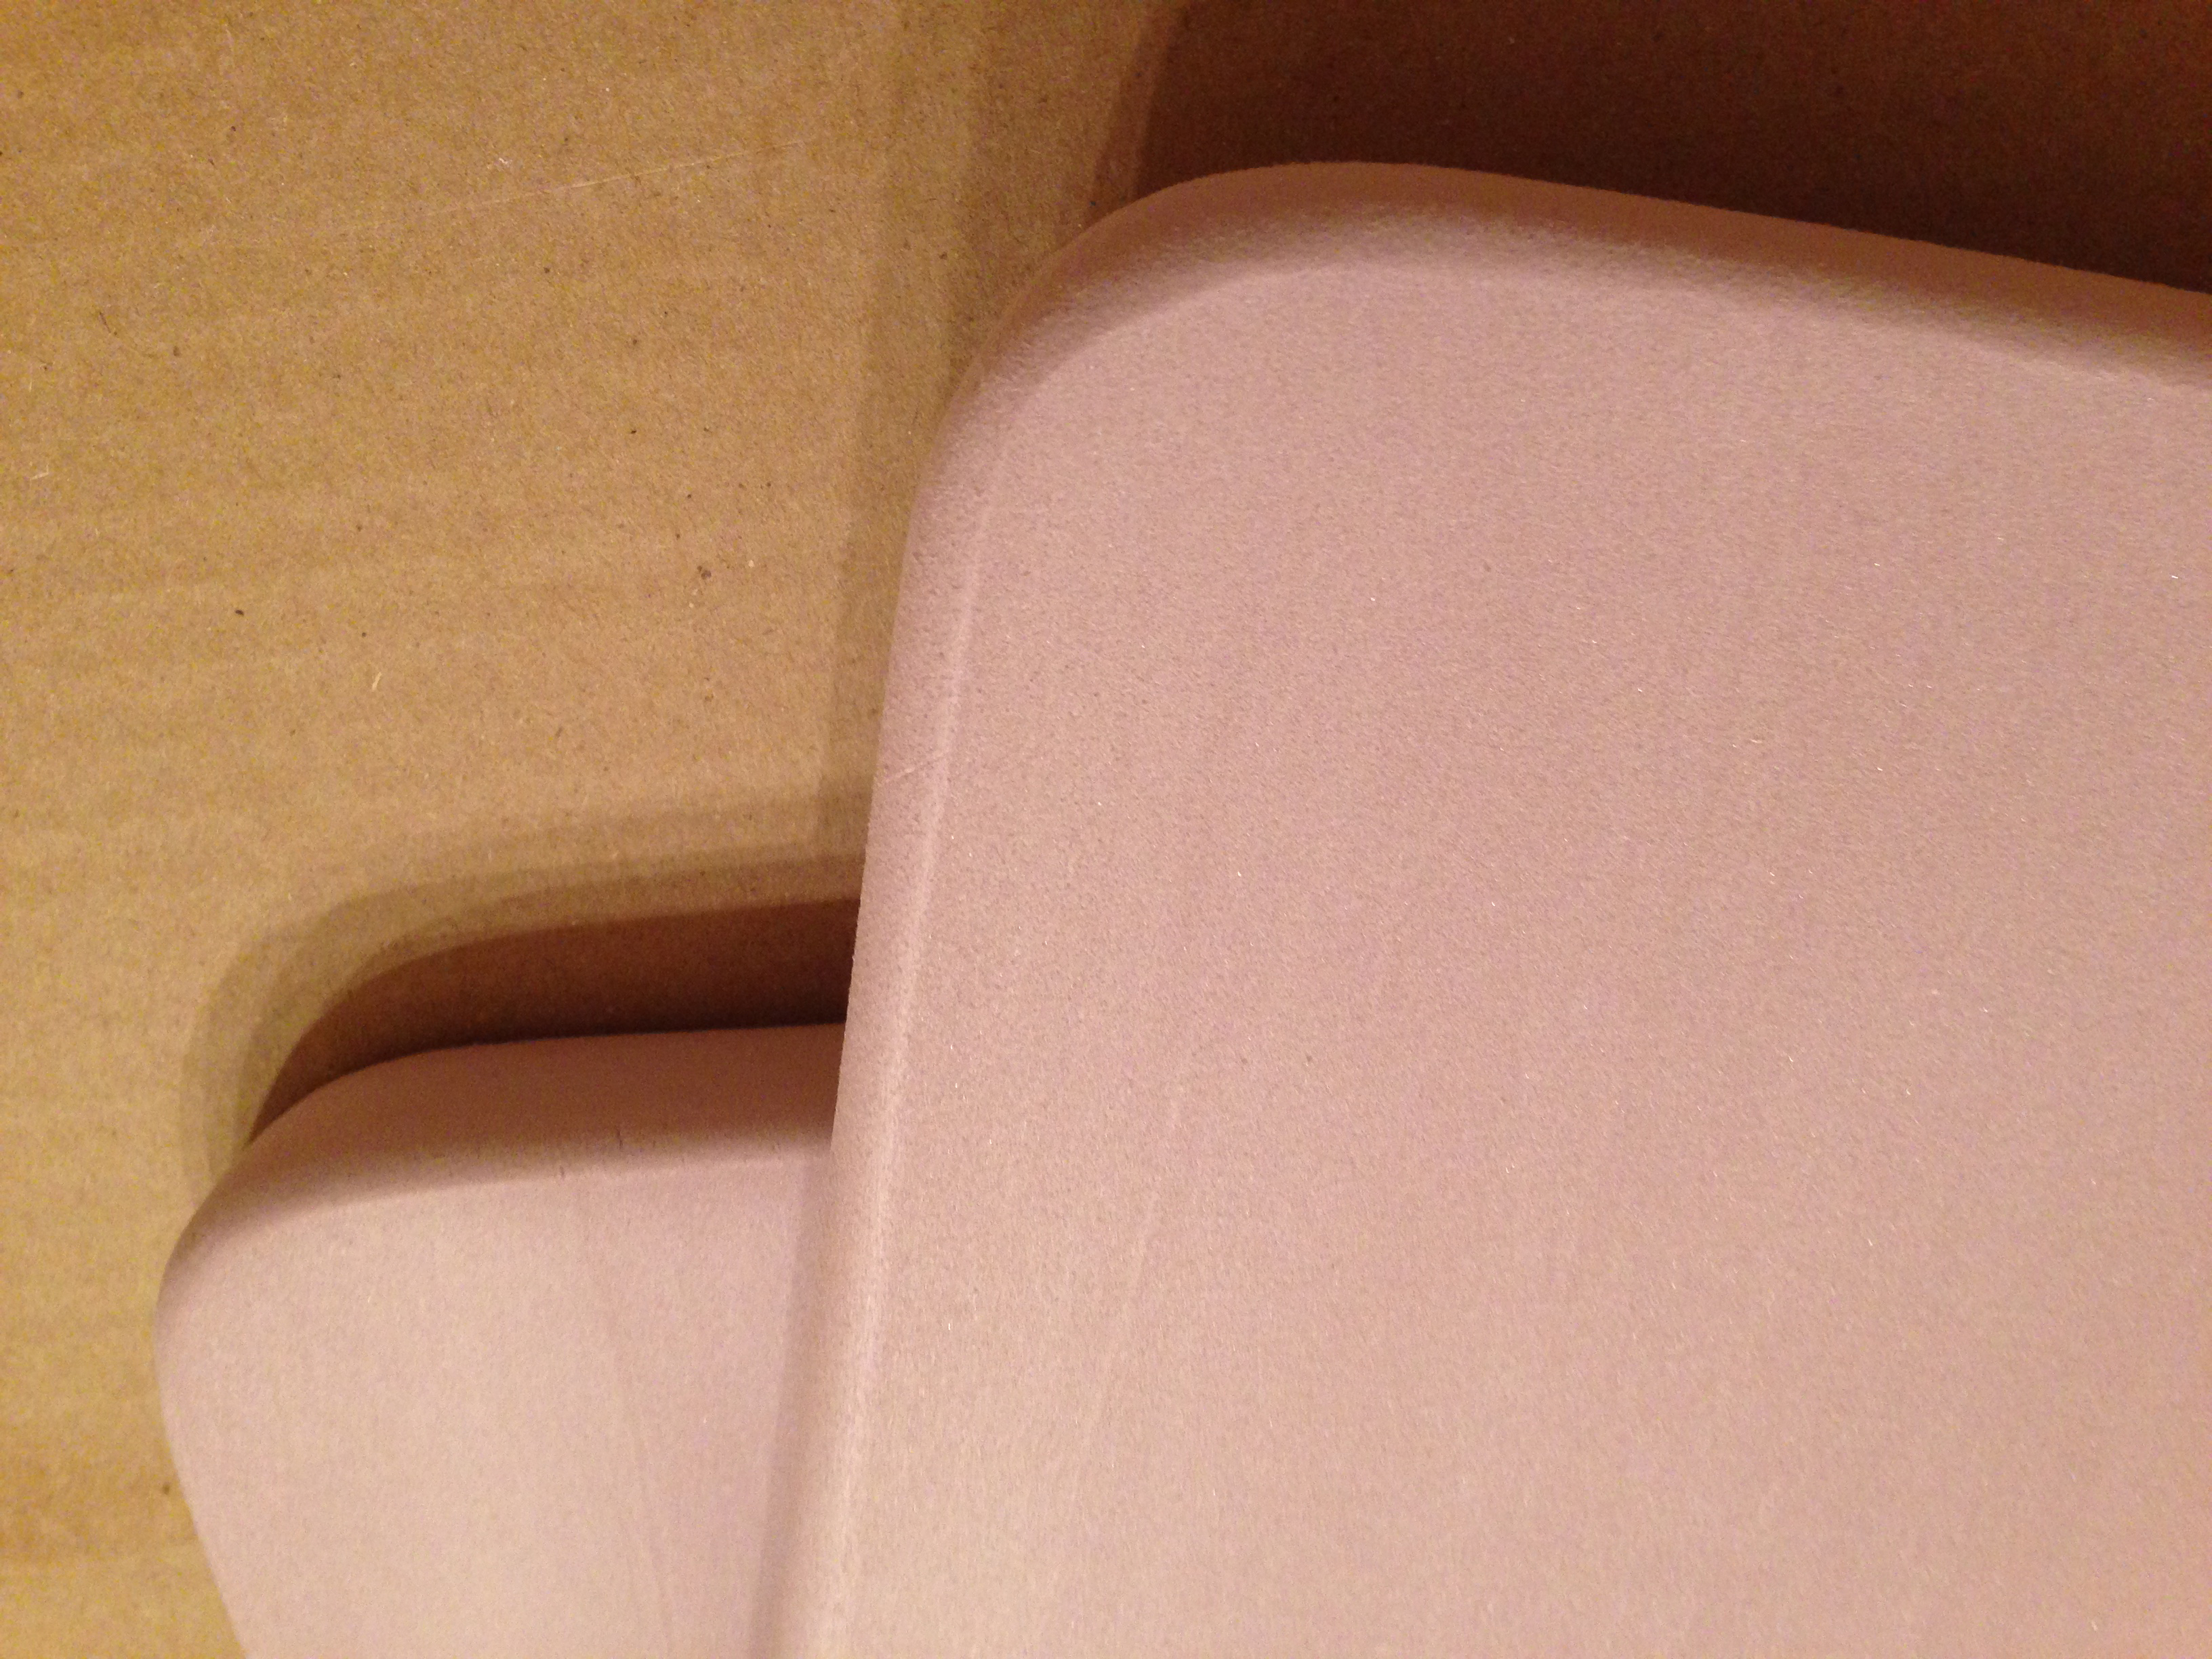
- Round the corners of the XPS project panel. Using a glass or bowl as a guide, lightly mark the panel using a pen or pencil. With a serrated knife, cut up to 1/4” from the marked line. In other words, leave extra material by not cutting right up to the marked line. XPS tends to break away in large chunks and could ruin our nice round corner.
- To finish rounding the corner, use an electric palm sander and 100-grit sandpaper by sanding right up to the marked lines. Sanding goes quickly, so use light pressure.
- Again with 100-grit sandpaper, sand off the XPS panel’s “skin” by holding the sander firmly but applying light pressure, make straight passes over the panel in the same direction with each pass. Clean the XPS dust off the panel and sandpaper frequently to avoid build up that leaves scratches to the panel. Sand both the front and the back of each panel until there is no “sheen” on the panel’s surface. Better to take off more panel than leave any skin.
- Break the edges and corners of the panel by taking light pressure with the sander held at a 45 degree angle to the edge. Be careful to not apply too much pressure as it can create gouges.
- Once you have reasonably round edges, finish the panel by hand sanding the edges and corners. With 100-grit sandpaper, use light, long passes over the entire length of the panel’s edge. While not required, finish off with 150-220 grit if you have it handy.
Step 2 – Panel treatment.
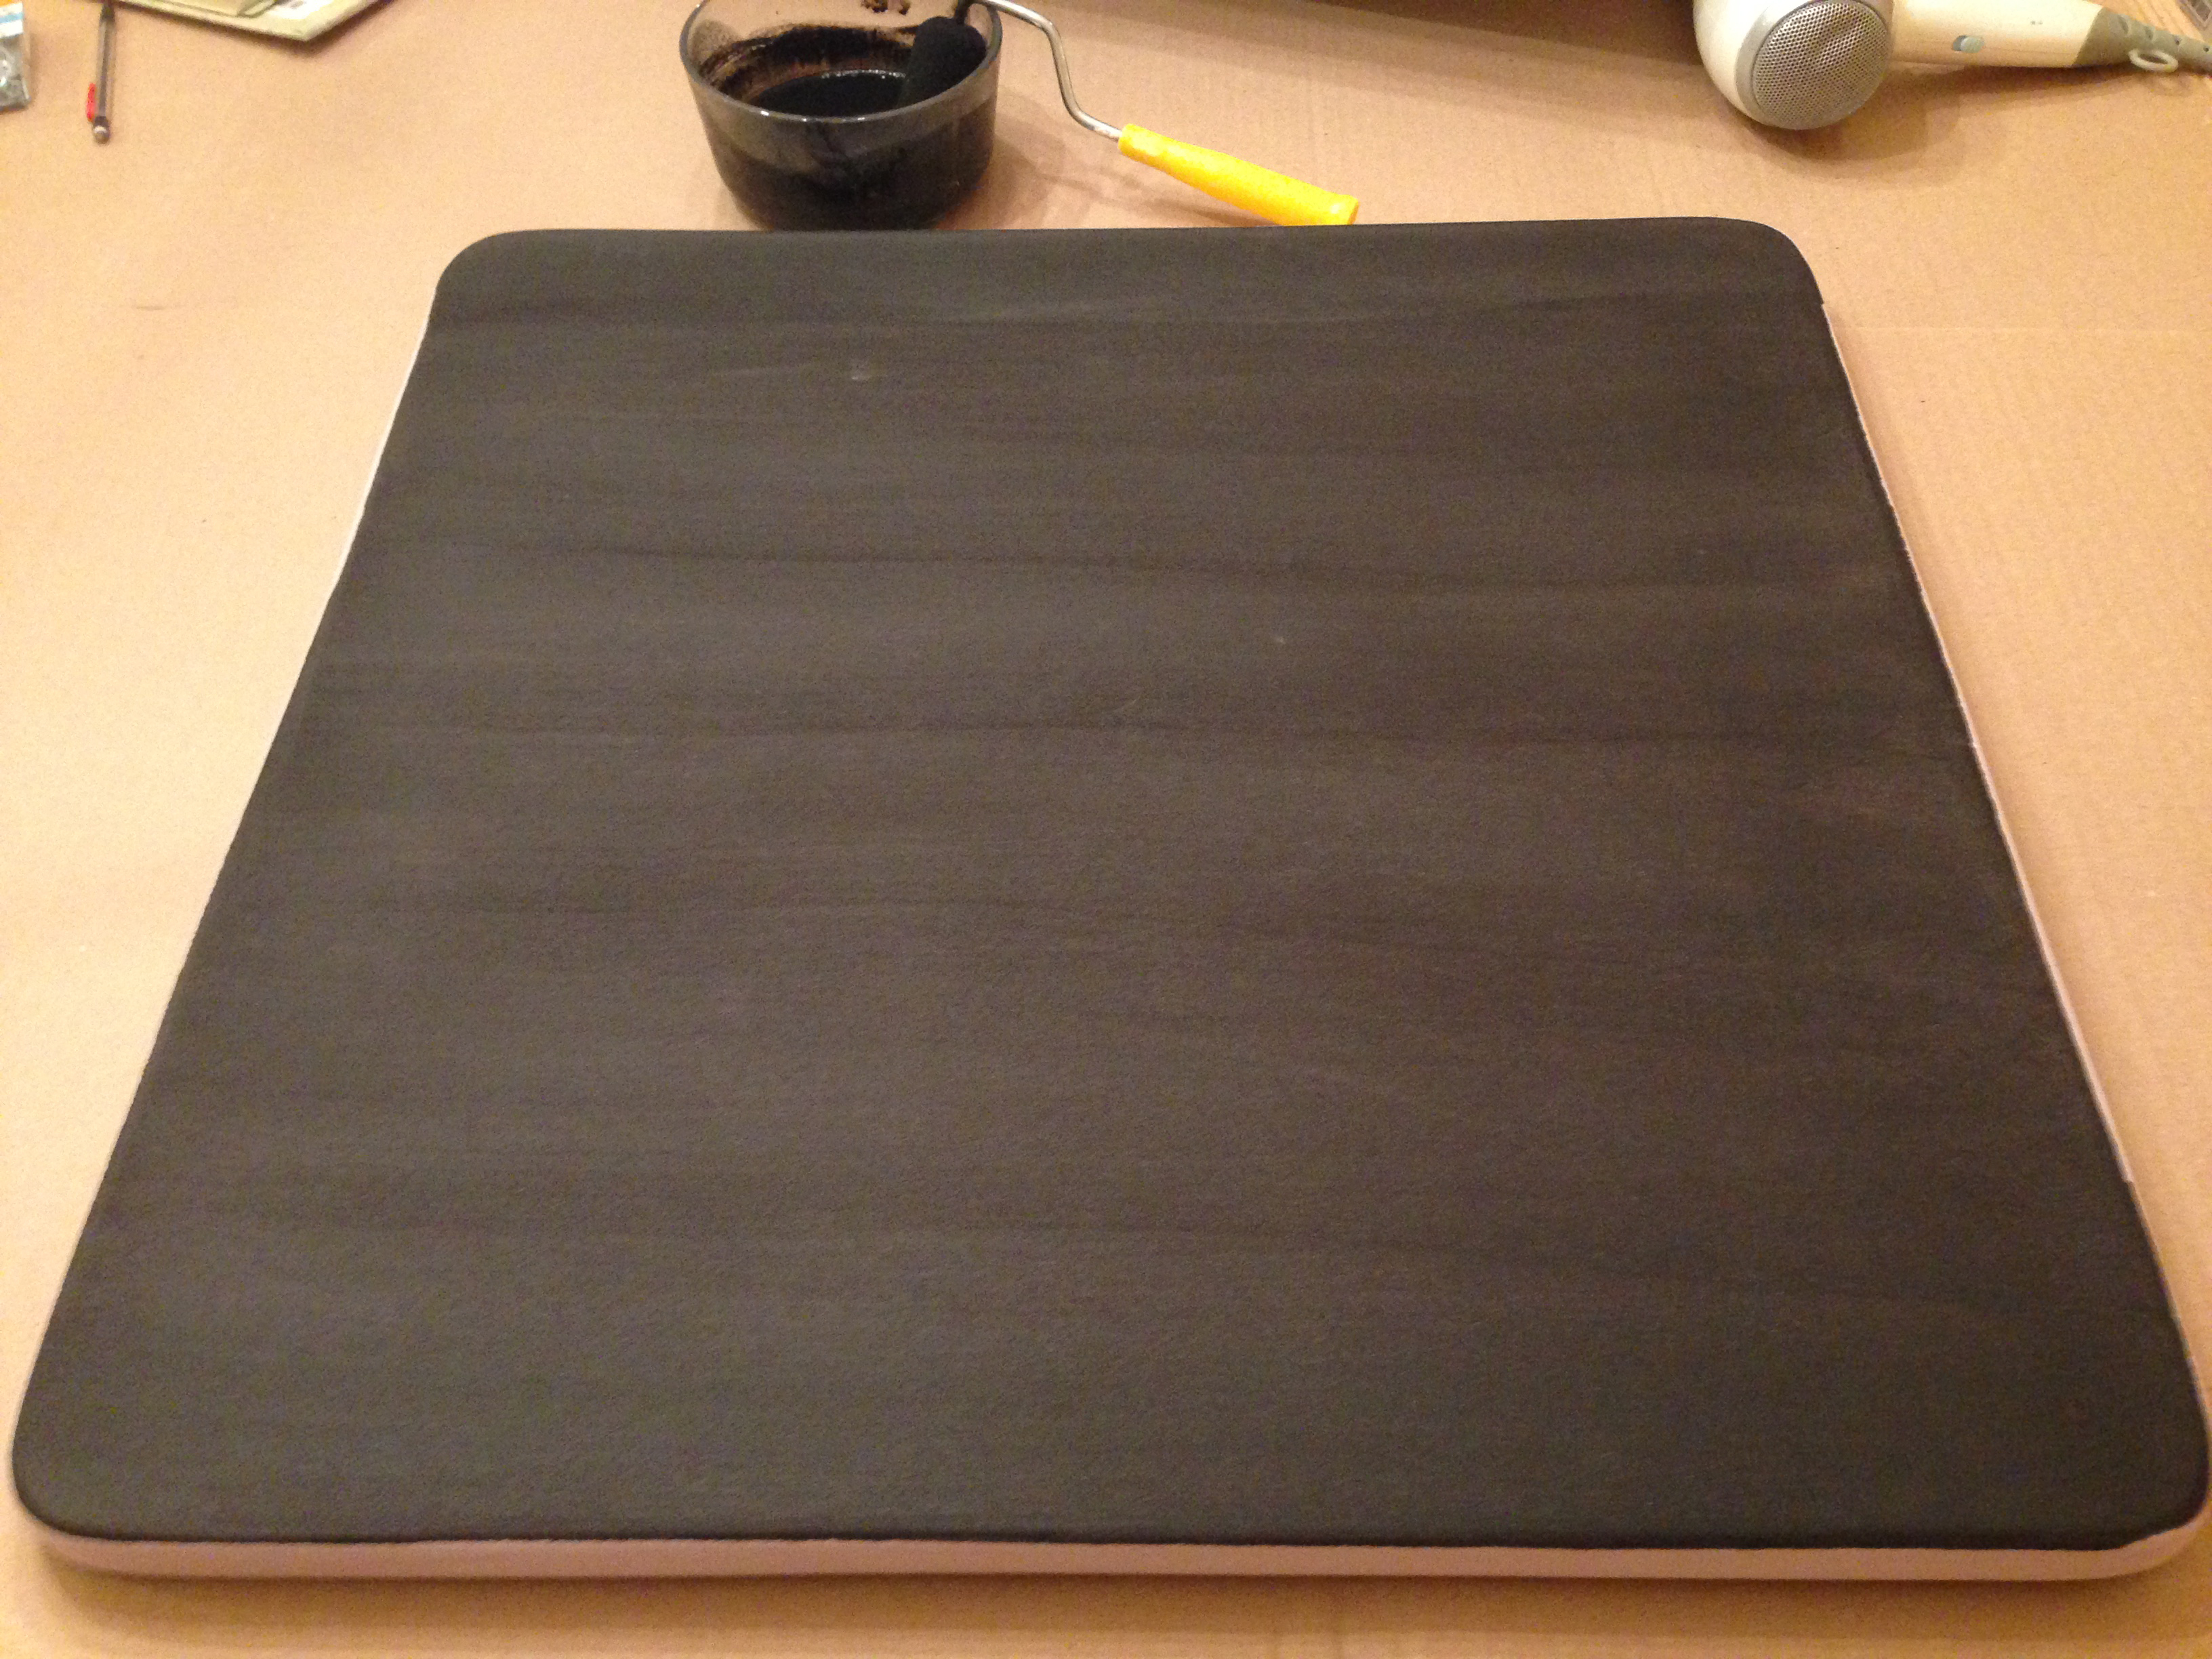
- The panels need to be treated with even amounts of water and wood or white glue. If you want to color the panels black, mix black ink with the water but keep the 1:1 proportions if not extra glue. You can mix the glue, water and ink (if desired) in a flat bottom glass bowl.
- With a 2 Inch foam roller, roll on the water and glue mixture over the panel. The mixture is thin so don’t worry about applying too much but make sure it is even. Treat 1 side for each panel.
- If you are not coloring the panels with ink, do not treat the round edges. If you are coloring the panels, use only 1 thin coat on the edges.
- Repeat the treatment on the other side until both sides of the panel are treated twice. To make this process go faster, use a hair drier to quickly dry the treated panel.
Step 3 – Apply the exciters to the panel.
- Each exciter is mounted roughly 2/5 from the top and side of the panel. On a 2’x2’ panel, place the exciter 9 ½ inches from the inside and 10 inches from the top. I mark this location by making a light indent with a pen or pencil. Mark both panels but make the pair in a mirror image. I position the exciter so that the wire connection tabs are facing the inside of the panel. So imagining viewing the panels from the listening position, the exciters will be mounted at the top inside of each panel with the tabs pointing to the inside of the panels.
- Lightly sand the location where the exciter is to be placed. Blow or brush off any dust so the exciter will make a good bond to the panel.
- Place the exciter on the panel in the marked position. The exciters come with 3M VHB (Very High Bond) adhesive pre-applied to the exciter. Just remove the paper exposing the adhesive and slowly lower the exciter on the panel surface. Press the exciter with light pressure. For best results, glue the exciter to the panel with the same glue you use for the panel treatment. I would try the VBS first to allow you to try another panel size or material.
Tips & Tricks:
Equalizing
As stated earlier, light weight flat panel made with XPS have an uneven frequency response. One of the biggest improvements that you can make to these panels are equalizing and shaping the response to your preference.
2 areas that benefit:
- Smoothing and tailoring the overall frequency response to your liking.
- Extending the bass and high-frequency extremes as desired.
I have used the Behringer DCX2496 Loudspeaker Management System & Crossover for many years with my open baffle speakers and appreciate the power and flexibility. I no longer purchase expensive passive components and use this for all cross-over and equalization duties.
Extending bass response and adding “slam”
While these particular panels can sound quite good down to a reasonable 80Hz (can go much lower on larger panels), flat panels of all types have a general reputation for bass that lacks “slam”. These panels are very open, “fast” and clean sounding and had concerns about the potential of adding bloat or muddy bass response with a subwoofer. But in an attempt to add slam, I tried a small (and hopefully more agile) 8” sub, the Dayton Audio SUB-800, and am very happy with the results obtained with this small sealed sub, especially considering the low cost. Playing these at reasonable levels the quality is very good; reading the user reviews on the PE website confirms my own results. They also look really nice and not what you would expect from a subwoofer costing under $100 – very highly recommended!
To relieve the panels from playing lower bass, I recommend the Harrison Labs FMOD Inline Crossovers if you have no other means of preventing the panels from playing the low frequencies. For smaller panel as described above, I recommend the 150Hz crossovers (the specific model is listed below). For larger panels, the 100Hz crossover would likely be a better choice.
If you need higher output and greater extension, the Dayton Reference or Ultimax based subwoofers with high powered plate amps will obviously provide significantly better performance.
Measuring speakers
To give insight and guide equalization, I recommend some means of measuring the speaker response. Keeping with a low cost approach, I have used the following with my iPhone to good effect:
- Dayton Audio iMM-6 Calibrated Measurement Microphone
- Audio Tools iPhone app (base app with no in app purchases) to apply the calibration file of the iMM-6 mic.
- Audio RTA is an inexpensive RTA app with 1/12th octave resolution.
While I own Omnimic and REW measurement systems but still use this combination above often as it is so quick and easy to use; very handy.
Conclusion:
There is something special about these flat panel speakers that make them very enjoyable and just plain fun to listen too. I’ve gone back and forth between my DIY open baffle speakers and KEF Q500s but I keep coming back to these flat panels despite the drawbacks mentioned above; all of this from a speaker that costs about $50. If you enjoy listening to music instead of a pair of speakers, you cannot go wrong with these magic panels!
About the Designer:
Rich is a member of the Parts Express Speaker Building Team.
Projects Part List:
| 295-235 | DAEX32U-4 Ultra 32mm 40W 4 Ohm | 2 |
| 300-627 | Dayton Audio SUB-800 8″ 80 Watt Powered Subwoofer – [optional] | 1 |
| 266-276 | Harrison Labs FMOD Inline Crossover Pair 150 Hz High Pass RCA – [optional] | 1 |
| 100-020 | Wired Home SKRL-14-50 14 AWG OFC Speaker Wire 50 ft – [optional]. | 1 |
| – | Project Panels 2 ft. x 2 ft. Project Panel-PP1 | 2 |
| – | Wood or White “School” Glue 4oz | 1 |
| – | Foam paint roller | 1 |
| – | 1-2 oz. Black ink | 1 |
Good job Rich. Very impressive design. I may copy this design just for fun. Thanks for posting this. Hong.
Thanks Hong… much appreciated!
DML, amazing!!!
If the 8″ subwoofer mentioned in this article is used why would you need those RCA crossovers if Using low-level input and high level outputs to the panel speakers?
Hello Wmg,
When using the Dayton sub, I do not use the high-level outputs. Reviewing the manual, it appears that there is no high-pass filter: “Note: High level outputs are paralleled to the high level inputs with no high pass filter”. So the line-level Harrison Labs crossovers are required. I used the 150Hz high-pass as I had it on hand, but I would want to try the 100Hz filter to allow more flexibility in positioning the sub-woofer. With the higher 150Hz crossover point, the sub needs to be positioned close to the panel.
I’m still impressed with the Dayton sub for music played at reasonable levels. The value is high and perfect for an inexpensive audio system. For higher output I would not hesitate purchasing the larger 10″ and 12″ as the reviews, like the 8″, are very positive and seem to have the same characteristics; tight and musical.
Apologies for just responding to everyone. Just saw these comments.
Wicked cool Rich.
Curious, if space were no object and these could be suspended, would a 4′ x 4′ project panel result in louder and fuller sound? I’m looking for a solution in which the walls of a room appear to be talking.
Hi Robb,
Absolutely, a larger panel would be excellent. Surprisingly, I found larger panels to have better high-frequency response using the same exciter and foam panel. Large free-mounted panels had drum resonances that I was not able to remove, so a more firm suspension would be recommended. You would also need material to absorb the panels rear radiation.
Register on the PE TechTalk forum to talk over the design you have in mind. This is a VERY INTERESTING implementation!
Thanks for the tips. I’m thinking about framing these with thin strips of furring, both for durability in transport
and for looks. Do you think this will increase dampening of output? But perhaps temper some of the resonances you mentioned?
Thanks much!
How the fact of panels laying on the frame affect the overall response?
Should them be laying on a viscose elastic surface instead?
Hello David,
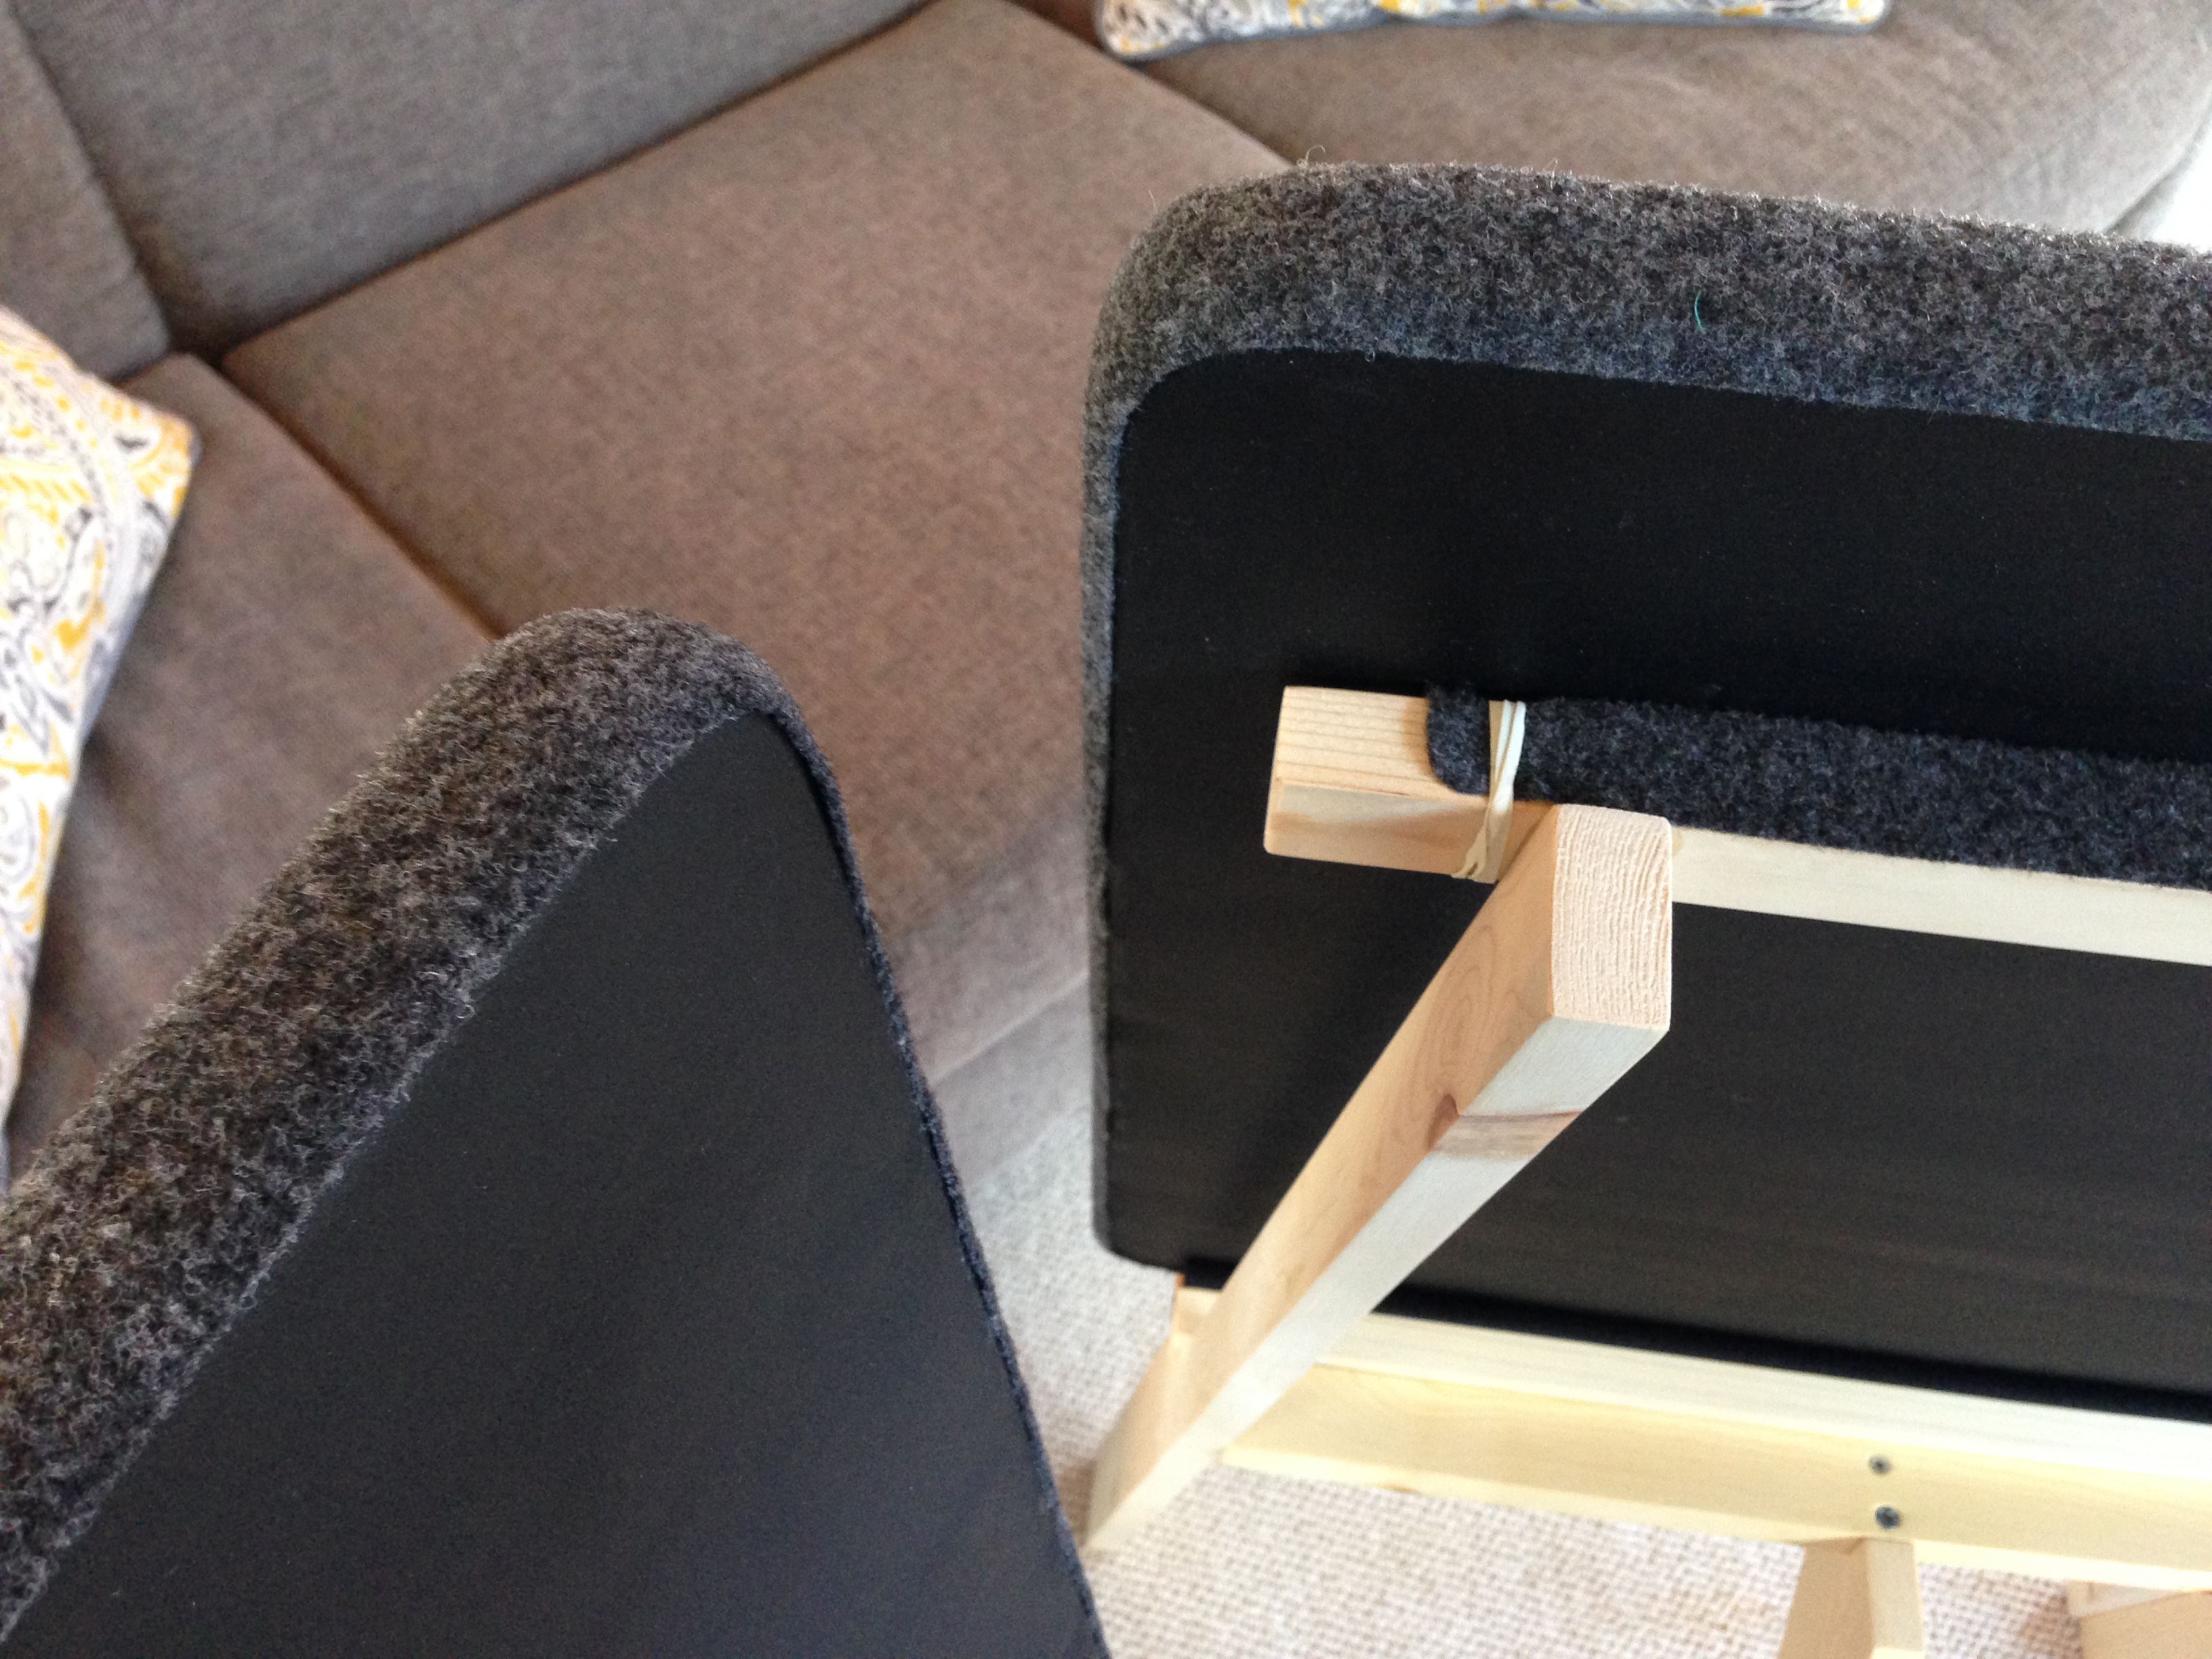
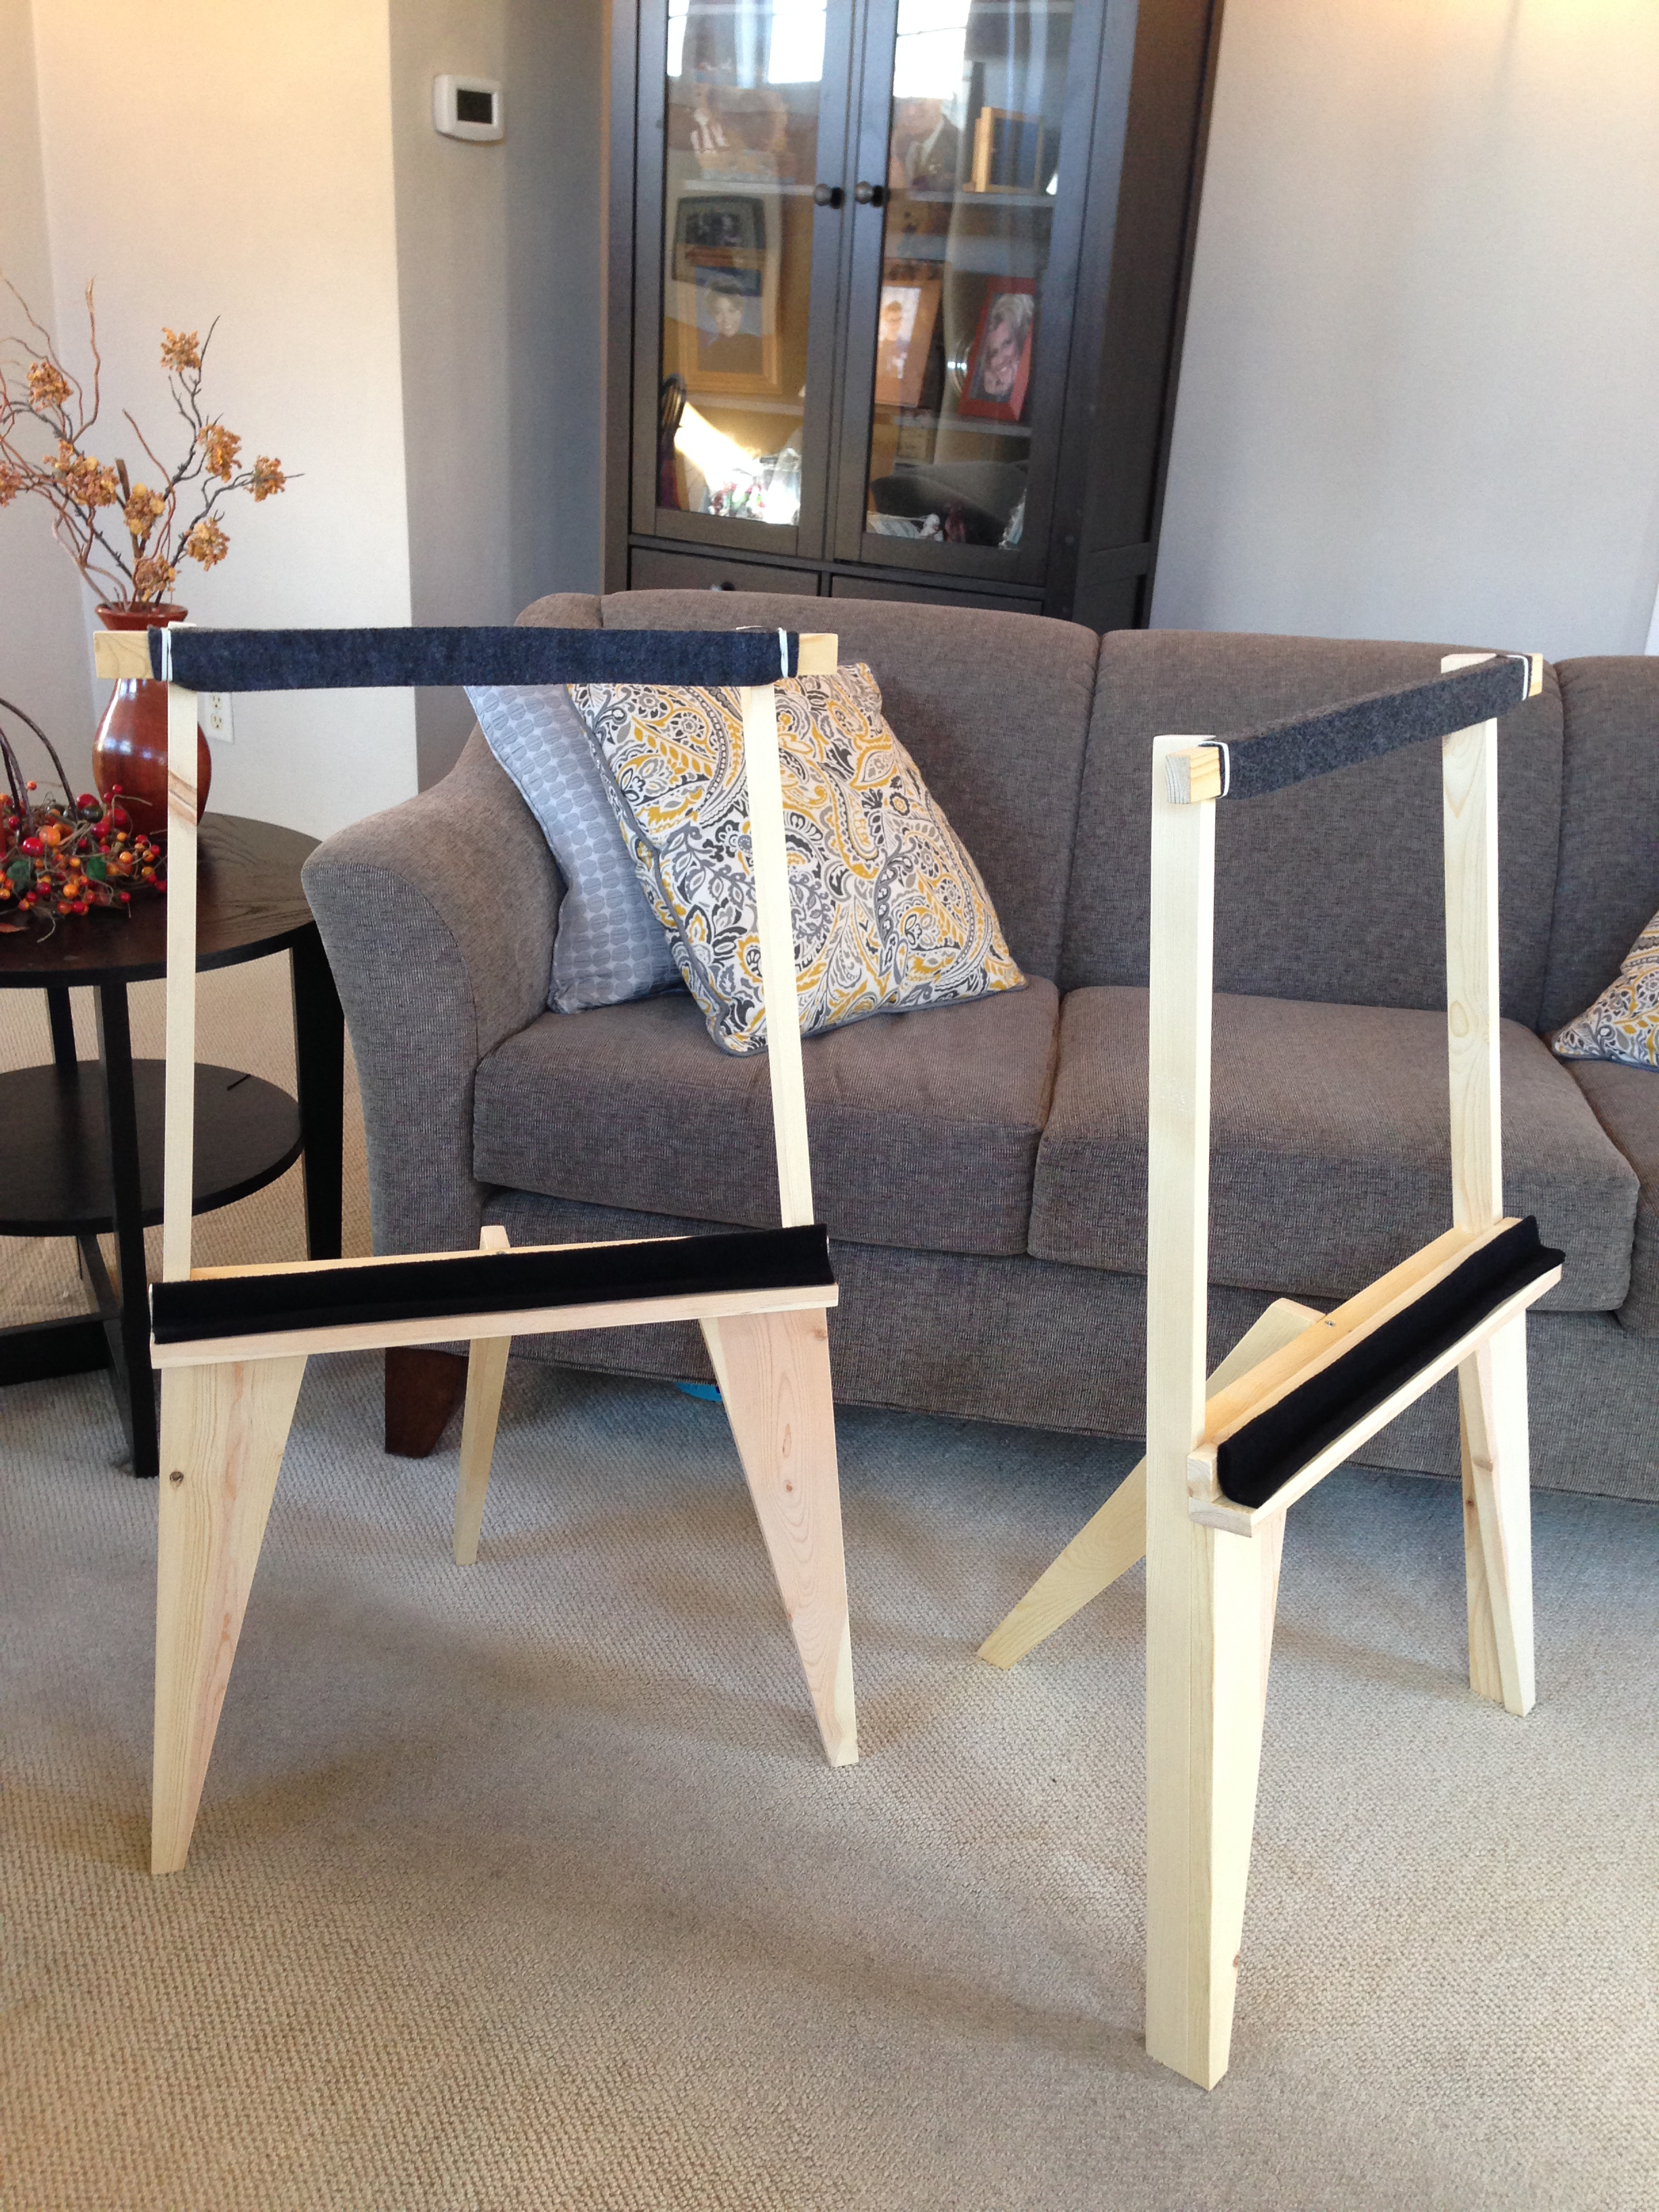
On smaller panels, I prefer light suspension as there is more “air” and detail in my opinion. Generally, I would say that opt for the least amount of suspension but a panel free of resonance/panel noise. For most panels, I place 2 small pencil erasers under a thick, soft, tri-folded piece of fabric so that the panel is really only touching the fabric where the erasers are (a few inches into the panel where the large round corners begin). On the top, I prefer to rest the top of the panel on large rubber bands toward the top corners. For all but one exciter, this has controlled panel resonances yet still delicate and airy sounding. Again, as little suspension as possible and only enough to control resonances.
For the single exciter that this suspension did not work as well, I had to rest the top of the panel against the wood frame support that runs the full width of the panel. The top wood support piece is then covered with the same thick, soft fabric used for the bottom “suspension”. This was needed to control the higher levels of panel noise that the 24 watt high efficiency exciter placed onto the panel.
But, to be honest, there are MANY different methods and materials that could work to control resonance. So would a viscose elastic material work? I don’t see why not. Experimenting with different materials is half the fun.
Build on David!!
I absolutely love mine (especially used in conjunction with a pair of very fast 15 inch single driver speakers [and two 12 inch subwoofers!!]. By themselves, they defintely have an uncanny, magical midrange and treble, in terms of presence, harmonics, decay, soundstage, etc., that I doubt you can achieve without some form of DML.
I wish we knew more about the various effects of different mounting/placement strategies, materials, etc., but for now I couldn’t be happier. Every singel person who’s heard them was pretty much stunned to silence by what could be achieved with an exciter and piece of foam board.
I’d love to make a larger panel but it seems to 4×8 sheets of this material are much thinner. Is that the case, I just don’t know what to use.
Also, on your panels it looks like you have some kind of material around their edges. If so, what’s that all about?
Anyway, I must say that this is one of the most startling stereo projects I’ve ever heard of. Always wanted to hear this technology and I certainly was not disappointed!
Thanks again so much.
Hello Paul, glad to hear you are enjoying your magic panels! They really are unlike any other speaker I have listened to and it seems you may feel the same. Certainly not the perfect transducer, but to me, they sound the closest to “real”, live music.
I would like to work with you on building a larger pair of flat panels. I would join us on the PE TechTalk forum; you can reach me there. If you don’t want to post to the forum, you can exchange email addresses and go from there!
I did try a large panel 4×4 in wood and the resonances were too much at the lower ranges but its all about the crossovers points and tuning ping me if you want to chat
Sounds like a great project; is there a recommended thickness?
Hey Jim, I have been using mainly 1″ XPS but also 3/4″ on small panels. After trying even low grade EPS, I would build more 3/4″ XPS panels; even those in the 24″x32″ size range as I feel the 1″ XPS is over-damped.
If you can purchase a quality EPS foam panel, I would try that over XPS. Don’t get me wrong, I really enjoy XPS but feel the lighter and more resilient EPS *may* be a better panel material.
The low quality I’ve used is 3/4″ but closer to 5/8″. It has more panel noise XPS and, as a result, does not play as loud before panel noise becomes an issue. 1″ thick low grade EPS may fare better in this regard.
Just saw that your #1 pick for the exciter is out of stock and won’t be in until June! Do you know of another exciter that matches this one? I know in your write-up you mention your second pick is a “close” second. What exciter should a guy use without sacrificing any SQ if he cannot wait until June?? Thanks!
Hey JJ, the Dayton Audio DAEX32EP-4 Thruster is also a very nice sounding exciter and works on a wide variety of panel materials. They are also on sale at the moment. Whats not to like!!
Let us know how your build goes!
Okay, so we went ahead and did a quick build with the cheapest exciter you mentioned in your write up. Well, they sound really good. Exactly as you say…good…interesting…different. Can’t stop listening to them. A little bass shy. Question – is one of the improvements in moving to the Ultra exciter improved bass performance? Thanks! Now, back to listening…
YES jj !!! Glad your enjoying the panels. The Ultra’s will not go any deeper honestly; only a larger panel will provide deeper bass. I prefer pairing the panels with a subwoofer for better extension and *slam*. The Dayton Audio SUB-800 has worked very well for music at reasonable output levels. I would not hesitate trying one of the larger Dayton subs.
For me, the Ultra’s provided more detail… they are quieter with less panel noise. This, to me, is the reason for the improved detail. This improved detail comes, unfortunately, at the expense of a more rolled-off high frequency response due to the larger voice coil.
Preferences. I still prefer the Ultra but I do really like the DAEX25FHE-4 as well. Exciters are pretty inexpensive so fun to try different ones. 🙂
Looks interesting…. A couple detail questions … 1) It appears in the photos that you’ve eased all edges, front/back, but, less than half-round ? 2) What is the diameter of the “bowl” you used to draft the corners ? Different radius for different sized/ratio panels ? 3) In the forums there’s discussion about driver placement offsets… Is the “Understanding and Using Exciters” pamphlet information best practice? Thank you for your time.
Hello Mark,
I usually use a 1/2″ router bit to round the corners however for this particular panel, I used less of the bit and did not perfectly round the edges as I normally would as I wanted to try felt to help more smoothly terminate the panel edges and a more finished look. I was not as happy with the exciter initially used with the panel so I can not say whether the felt edge treatment was advantageous or not.
The bowl I used was about 8 inches in diameter.
For offsets, I normally follow the PE’s “Understanding and Using Exciters” 2/5 placement. For these square panels (not optimal), I moved the exciter up 1 inch to avoid equal dimension between the panels bottom and edge. This is a greater ratio than the “Monacor placement” where the exciter 1 position would be located at 4/9 X and 3/7 Y. Using this ratio, the exciter would be moved roughly 1/4″ off center for a 24″ x 24″ panel. Again, a smaller offset than the 1″ I used but the differences in the real world are very small between all 3 exciter locations I mentioned.
So, if you had to say what is the “best of the best” that you have tried so far, what would it be? Would the Ultra in the larger “Golden Ratio” panel be the best you have heard? One other question, is there much of a difference in sound between the 12″x14.5″ panels and the 2’x2’s? Thanks for enduring endless questions!
Hey jj, no worries about the questions… keep them coming.
You really can not make a claim as to which exciter is “Best” honestly. So much depends on panel material, how the panel is suspended or just the overall design and what you, the builder, is attempting to achieve (small panel integrated with a sub, full-range panel w/no EQ, etc.). Personal preferences also play a huge part as well. For instance, I listen to mainly listen to acoustic music so I am perfectly content listening to a higher powered/larger diameter vc exciter where are some prefer the better extension of a smaller exciter. Much to consider.
I really like the sound of the smaller panels. They seem cleaner and more clarity with less panel resonances as the signal leaves the panel more quickly.
The one thing I really like about about these DIY panels are that they are inexpensive and easy to build making it much more feasible to try a number of builds with different exciters. Its just plain fun!
Yes, flat panel transducers can be mesmerizing… which is why I finally succumbed and called those people up in White Bear Lake, Minnesota. Their website, by the way, has some wonderful articles concerning placement and mounting and semi-hand manufacturing, since that’s how they do it. magnepan.com
I’ve been wanting to create these on a larger scale for some installations for a while! I’ve made some smaller ones and loved them. a am thinking of essentially making free standing partition walls or “hollywood” flats and putting the panel on those about 5’x8′. I also have a few ideas about bring some bigger bass into the picture.
I’d love to talk some more about this stuff and maybe work with other like-minded people to find the way to get the best sound out of these. how can I find you on the forum?
I have ordered 4 of the DEAX 32-4 thrusters, simply because I want to play with this flat panel concept. I am going to set them up in my office as a conversation starter. My amp is only 8 ohm stable so I plan to wire these in series. With four exciters that gives me a lot of options. What are the pros and cons of 4 smaller panels vs 2 larger ones? I am even considering placing all 4 exciters on an entire 4’x8′ sheet. 🙂 I like the idea of an entire “wall” of music. I plan to hang these from the drop ceiling on my office (I am thinking rubber grommets in the “top” corners and suspending them from a wire) as I have few mounting options without drilling into concrete block. Any advice on hanging them and how that will impact the sound? I am also considering hanging these so they fire downward, a “ceiling” of sound.
Hi i have been looking for speakers to build for my new diy 6bq5 se stereo tub amp it will be only 5 watt per channel
what do you all think if these speakers will work with 5 watts?
Don,
I think your 5 watt tube amp would do great. I found the exciters take awhile to break in and really sound good. 20+ hrs. I use the Dayton DTA 1 and Lepai both 15w plenty.
Hi, I am a long time lover of DML louspeakers, I have built many models from strong carton to wood and so on, and I wont ever return to classic loudspeakers. My best choice is “carton honeycomb”
this said, you type “a sensation that the sound is coming from the back of the speaker, through the panel,”
Right! and the solution is very easy: listen from the other side…. LOL… no joke, you wil get a better hi-range…
have you listened to commercial models of DML speakers? I have a pair of TEAC / NXT speakers and a LOGITECH mm-28. Suprisingly, the smaller all-in-one mm-28 sounds better than the larger TEAC panels. I suspect the secret to getting the best sound out of exciters is panel material, placement of exciters and panel surround material. The commercial manufacturers have access to design software that is not avaliable to unlicensed DIYers like us. My plan is to use either of these models as midrange/fullrange? plus a large open-baffle (probably H-frame ) bass driver crossed over at between 100-250Hz. . I believe this will provide the best performance from DML technology without excessively large panels. Have you experimented with this type of FAST system?
At first I didnt want to believe this could work. It just defies common sense. The build out was easy, thanks to Rich and PE.
The sound? As mentioned previously, it places the performance in your living space. What surprised me was walking in and around the room, the sound seems to radiate and small panels fill a large room.
I settled on carton-honeycomb-standard shipping boxes at Office Depot. Treated both sides with a spray shellac. It gives the panel strength. Follow the 2/5 rule for driver placement, I settled on a size of 17x.5 by 18″. I tried the XPS material, but found the carton superior.
Whereas the XPS placed the sound more from behind the panel-the carton placed the sound at the panel-was more transparent…in other words, the material is critical as is the insulation supporting the panel. I didnt find it necessary to round the corners, keeping them square.
My frame is similiar to Rich’es design, raised the panel off the floor about 13-14″.
Regarding amplifiers, found the Dayton DTA 1 pure magic with the panels.
great tutorial, thanks!
I am looking to get some expanded low end range from something like this (musical not effect) in the 15-40hz range and the 10-20khz range, I bought the DAEX25X4-4, any ideas on implementation?
I’m interested in building the shipping box material with shellac. Is it just corrugated cardboard box material? Or, is it the special honeycomb cardboard they use for architectural scale model building? Should the shellac be applied to the small area that the driver will mount to? I have seen comments that care should be taken when installing the exciter. Anyone have any specific instructions?
I just wanted to find out the thickness of the pane used for the project. I could not find the same insulation at Home Depot in Canada.
Thank you,
David
Intriguing write-up, for sure. Do you have any idea how Acrylic would perform compared to EPS/XPS? Here is the reason that I’m asking: I was thinking that it would be awesome to have a few family photos printed onto acrylic, trim them to the “optimal size” (24″ x 32.5″), attach the exciters using the 2/5 3/5’s rule and suspend them from the ceiling. The 24″ x 36″ x 0.22″ acrylic photo prints are $170 each (at Costco – they may be cheaper elsewhere?). Add a $19 DAEX32U-4 Ultra Exciter, and you could have a beautiful pair of speakers (that would double as a terrific conversation starter) for about $400…
Hi,
Great project, I built a pair of these to use in my garden suspended from my decking.
2 things i wanted to check with you.
1: I couldn’t find the XPS at my local builders merchant, so i used this instead (Polyisocyanurate) https://products.enertherm.eu/index.php?/products/download/18/en/I
They feel pretty much the same as the XPS boards in terms of density. Can you see anything on the data sheet i provided a link to that will suggest they may not perform as well as XPS for this task. (they sound ok to me but i dont have an XPS panel to compare to)
2: I sprayed mine with plastikote spray paint, the finish is really nice, as a result I skipped the glue and water treatment stage. Do you think this will have any impact on the sound, what is the purpose of the glue and water treament, and is the spray paint finish going to achieve the same performance?
Many thanks
Hello Tom!
Thank you for the interest and happy you have built a set of panels. What a great application for a simple panel speaker. I did see a material very similar to this when I first started testing panels and if i recall, the foam was not as resilient as XPS or EPS and if you pushed your thumbnail into the core, it was more easily dented. Had an almost crumbly feel to it I believe. Now, did you keep the AL outer skin in place? That skin would be the biggest detriment to a good sounding flat panel. With this material being somewhat non-traditional for panel design, I am not sure what impact the Plastikote finish would have honestly but I can say you want the outer skin to be as thin and hard as possible to stiffen the panel. Purpose the water and PVA treatment: it takes the raw, sanded XPS panel from a soft, fuzzy and overly damped and absorbent panel to a more rigid and hard material that makes for a much better sounding panel. Panel material is THEE determining factor of a good sounding panel. Overall, I would not use that material (especially with the foil skins), but it sounds good to your ears, that is the only thing that matters. On a positive note XPS is cheap so if you are not be happy with the results, while it would be a bummer, it would be relatively easy to create another set of panels. One note, the PVA treatment is not all weather, so you would need to fine a replacement. Try to find as thin and hard a treatment as possible instead of the Plastikote found be my recommendation. This assumes the final treatment is thicker than normal paint and not hard. A little experimentation may be needed. Good luck with your panels!
So you think dying with ink is preferable to paint when I comes to sound quality? I am looking at doing some of these in a couple of weeks. I understand the edges should not be painted. I like the “golden ratio” idea as well.
Hi Rich, when you say black ink, any brand or product in particular?
Hi Rich,
Thanks very much for this write up! – I’m *really* looking forward to building some and also experimenting with variants of size and shape.
I read your response to Tom re: paint versus glue & ink & water mix. I was considering paint too, but that’s because I was thinking of creating an artistic design on top of the base coat of paint, so that the panel looked like a piece of art. Thinking about the resonance aspect though, I think using a design that was not uniform in overall paint thickness across the panel would introduce unwanted distortions in the audio played. If I used the glue as described, then the surface would be black so perhaps I could try white aquarelle pencil on top – very low mass compared with acrylic paint and thus might not affect the audio as much.
The other idea I had is have you tried a round design, with perhaps a 24 inch diameter? Or a regular hexagon? these could be fun to try out! – If I build these shapes, I’ll let you know how they sound relative to the rectangular panels (which I’ll build first).
One other question – have you tried using a hard setting resin? – there are some resins which allow thinning up to 50% with a thinner solution specifically paired with it so that a couple of light and even coats can be applied which harden over 24 to 48 hours to a very durable and rigid coating – might allow for some higher frequency responses..
Cheers, Rich.
A great method statement. I have 2 questions:
1- Do you have a wiring diagram for this project especially 2 panels per channel case?
2.-Can I use these DML speakers with my Yamaha receiver (100 W /channel @ 8 Ohms) together with my BOSE 901s ?
Thanks in advance
Thank you for sharing Rich. I have a notion to put an exciter in an acoustic guitar–then send my electric guitar through my effects board and a 5w tube amp head. (Meta, right?). This is an experiment to pipe a practice amp volume level through a speaker tuned to accentuate certain guitar frequencies.
Partially thrashed acoustics are a dime a dozen, and many have better resonance than any cabinet that I could build. This is my top contender to sneak into the sound hole and attach to the back board ~3-4 mm thick.
https://www.parts-express.com/dayton-audio-daex25x4-4-bullfrog-vented-disc-spider-25-mm-x-4-exciter-320-mm-cable-and-conn–295-242
Do you have any thoughts about my choice of exciter/transducer?
Should I skip the guitar and use an abandoned cello instead?
Keeping Portland Weird…
The size of a golden ratio would be 24 x 38.832. The golden number is 1.618.
I am excited to hear my new home made speakers! Couple of things though…
First I am wondering what if anything you did to fill the snap line cuts on the XPS rigid foam? I am assuming that they would hinder the transfer of sound waves through the entirety of the piece of foam. Secondly I found that the surface was very fragile after sanding so I decided that from now on I would cut the corners and round the edges with the sander prior to sanding the face. Even the slightest misstep would leave a deep scratch or gouge. BTW I am using the DAEX30HESF-4 exciter as my amp is 4 ohm. What size panel would you recommend? and where would the golden ratio be?
to make the xps panels stiffer, cover them front and back with standard fiberglass window screen material when you apply the glue. let it dry, then reapply a second coat of glue. this process increases the stiffness and tension load of the xps panel considerably and is used in structural panels for that reason.
epoxy a mounting point to the back of the driver and leave the panels unmolested and undampened!
I’ve been thinking about making something like this using the golden ratio. Does it make sense to make the panel the golden ratio, and also driver placement the golden ratio instead of 2/5 3/5 location? I think that may minimize copies of harmonics in vertical and horizontal axis. I’ve been thinking of getting a 4×8 sheet of foam, making the height 4 feet, and cutting the width to the 1/golden ratio. Then the driver will be placed in location where vertical and horizontal distances are divided again by the golden ratio. Does this make sense? I’m even wondering about rounding the corners via portions of 4 ellipses that meet the panel at the the x-y locations of the driver. I think this may further reduce multiple harmonics, because the as the angle is swept around the driver, the distance of the driver to the edge of the panel will grow and shrink smoothly with only 2 repeats for most distances. Perhaps this is hard to describe in text. I’ve been thinking of working out math for the shape, but haven’t gotten around to it yet.
VERY interesting ideas re: golden ratio driver positioning & asymmetrical elliptical corners.
Thanks for this brilliant project.
There appears to be some sort of fabric covering on the panel in the photo attached to this article.. If so what sort of covering is it?
In the article you state that the exciter should be mounted with the wiring tabs pointed to the inside. In this instance does inside mean the tabs should be pointing
Why is the import of the exciter tabs pointing one way or the other in the horizontal plane?
Is there a detriment to having the exciter tabs facing up or down in the vertical plane?
This is an old article but I’ll give it a try. What is the thickness of the panel? In the pics it appears to be 2″ but the only ones I can find are 1″. It doesn’t say in the article. Thanks
I may be wrong but the golden ratio of a 24 inch wide panel would make it 38.832 inches not the size you mentioned. 24 x 1.618 yields a length of approximately 38 and 7 eighths inches.
Getting ready to build a couple of panels 24 x 38, was wondering if there was an advantage to using 2 exciters on each panel to create an 8 ohm load for my amp. I would place the upper most using the 2/5, 3/5 rule, but where would I mount the second? Would it make more sense to make a second smaller panel?
Jim – There is a good YouTube video (great comparison of different materials for panels and some technical explanations) which ends with a look at his home theater set up. He uses two smaller panels of two different materials for the L and R channels.
https://youtu.be/zdkyGDqU7xA
I really want to try this. Anybody got a good source of XPS that works in the UK??
Thanks
Has anybody got a good source of XPS panels wider than 600mm in the UK?
Thanks
I am looking to build some DML’s using 2×2 or 2×4 project panels. I recently restored a 1×12 guitar cabinet and have some leftover fawn tolex – it’s beautiful! Would covering the panels with the tolex – I would use the glue i have leftover as well which is from mojotone – negatively impact the sound?
anyone experimented with decorating a DML? I have some fawn tolex that ‘d like to glue to a 2×4 panel but im wondering how it might affect the sound?
Rich. I’m going to build a pair of DML speakers. My house is a little different and black won’t work with the decor. I understand about coating the foam with water based glue, 50/50, but can it be replaced with just latex paint?
\Thansk
Ken
Hello Ken,
I am way too late in responding but responding just in case. I would not go with latex, I’m afraid that will dampen the panels too much especially inhibiting higher-frequencies. You could look into powder pigments and mix with the glue and water treatment. If looks are important (when are they not) I’d build a light-weight frame and fabric covering.
Best regards,
Rich
*I’m using a Dayton high efficiency 25mm exciter on a larger ceiling tile and a Dayton thruster on a smaller foam panel, one each for each “speaker”.
SOME OBSERVATIONS, QUESTIONS AND INSIGHTS FROM MY BUILD EXPERIENCE
*The smaller foam panel and smaller exciter are louder than the larger exciter mounted on a ceiling tile. Weird. I guess size really doesn’t matter after all.
* I wired each speaker in series on an old Kenwood receiver but found that I would need to be able to independently adjust the signal for the different output levels.
*Got a Yamaha A/V receiver and initially hooked up the larger panel/exciter combo as the fronts and the smaller exciter/panel as the rears so I could adjust each exciter as necessary. Smaller panels were still louder.
*Switched the larger panels from the front to the rear and moved the smaller panels up front.
*SO. MUCH. BETTER..
Since I didn’t use a control and made so many adjustments simultaneously, It’s impo0ssible to quantify how much of the sound improvement was due to moving the smaller speakers forward.
OTHER ADJUSTMENTS
*I painted my foam panels and the sound seems fine.
* You had mentioned that the surface of the speaker needs to be hard.
*Going to try shellac or lacquer over top of the Krylon paint. Super hard finishes and they dry in seconds.
*Cut the panels using the Golden Ratio. (1:618:1)
.
*Rounded the corners on the foam panels.
*Had one of the exciters pop off it’s foam panel. MAKE SURE THE PANELS ARE DUST FREE BEFORE ATTEMPTING TO ATTACH THE EXCITERS!!!
*To ensure proper adhesion I would think that your glue/water coating would make a great surface prep for the area where the exciters are going to be mounted. !!!EPOXY MELTS THE FOAM PANELS. SO DOES CLEAR COAT!!! WHY AM I YELLING???
*Getting some unwanted resonance from the ceiling tiles. Considering adding a light wooden frame or maybe change the position of the exciters.
Presumably, if you’re a music lover and you are reading this you are considering making your own custom panel speakers. DO IT!!! Not only are they a joy to listen to but they are a great conversation piece and if you play your cards right they’ll probably even get you laid.
Very good project! I am curious by what you mean by “ constant underlying, vibrating signature”. Does this refer to a buzzing or other distortion?
Hello Kermit,
The best way to explain it. Imagine that there was not an exciter playing music. And instead, we were able to move the panels in the same way, vibrating the panels, flexing the panels with low-frequency excursions (if even small in the case of DML panels) , etc. In this case, we would hear the panels with what I imagine is a crunching sound… the actual material flexing at various frequencies. DML panel materials have a sonic signature. I noticed this going between cardboard, treated cardboard, thin ply, untreated and treated XPS and EPS. You start to get a feel for how certain materials sound just based on their physical properties (hard vs soft, light vs heavy, the sound of just brushing your hand across the panels, etc.). My best explaination.
Rather than using black ink and wood glue to treat the Corning panels has anyone sprayed the panels with Plasti Dip spray coating? It’s a multi-purpose rubber coating.
Why do you have to sand off the glossy surface, and then brush on glue and water? Isn’t that just putting back on what you sanded off?
Hello Mark,
Different panel treatments produce a different sound. The unsanded panels sounded more hollow to me. Hard to explain and I did not listen to it very long and was unhappy with the material as is. Sanding off the skin produced a more open, lively sound but the sounded “fuzzy” to me… not a clear as when the panel is treated. I between can hear differences between 1 treatment of PVA/water and 3. More than 3 seems to dampen the panel too much for my taste. But if you read over posts on this project, some enjoy them even painted. If a sprayed a very light coat, I am sure it may have minimal effects. I tried it and the solvents can eat away at the XPS so you need to spray at a longer distance so the solvent evaporates (or nearly so) before reaching the panel. I hesitate to recommend this just for this reason. I always felt that building a light-weight frame and cloth covering is the best if you care about how it looks… it’s easy enough.
Kind regards,
Rich
Court should have approved the request to withdraw Riaz Rahee’s writ, in which case it would not have been possible for the unreat and p
Someone please answer the questions!!!
This is a great intro to the DML world, but I have a few suggestions.
1st- Please stop using 100 grit sandpaper. 220 is wonderful for shaping, gets the “rind” off very quickly, and doesn’t gouge and rip the panels the same way as low-grit paper.
2nd- There has to be an option of some kind that surface treats in white or some kind of opacity. Why PVA? We need some other surface treatment options. I am currently experimenting with diluted gesso (probably too rough) and acrylic paints to make DML’s presentable to anyone besides the Man Cave or Dorm Room markets.
3rd- Heavier panels can be used, but they need a big boy solution like the HDN-8 transducer, a point-source type that I’ve used to nice effect with 1/2″ plywood in Golden Ratio sizes. They also put out great amounts of power and even some nice lower freq’s, though I don’t have graphs yet to back up that claim.
Post # 60; epoxy does not melt any type of foam. Polyester resin does.
is there a preference on the exciters, i saw a few on PE and some are out of stock but still some available. Since this article was written (2016) are there more and newer options on the exciters that folks are preferring for their DML speakers. I would like to make a pair for my bedroom
Our reality is changing. Yes, it is and right in front of our eyes! We are shifting from the old, dying reality of duality and moving into the new reality of unity and oneness. This shift has been spoken of for thousands of years by indigenous peoples and now is showing up to those who have eyes to see and ears to hear.
There is a great divide that is taking place on our planet right now and it hurts our hearts. Yet we know that it is meant to play out. This gap, this divide, is growing between those who have awakened and those who chose not to awaken at this time. It is happening and we cannot stop it. So, what do we do? We have to turn our attention, our focus, to moving deeper into our chosen reality.
If we want to live in a New Reality, we will want to start doing it now and put our full focus there!
What about applying a wood veneer to the face of the foam panels? Perhaps finished with shellac? I’d like to dress up the look of them, but don’t want to compromise sound quality. Wondering if a veneer would take away from the “open” sound of the foam face – but also thinking the wood could add warmth and maybe achieve the goal of stiffening the panels that we’re trying for with the glue treatment. Any thoughts on how such a wood veneered foam panel would perform vs the glue method?
Thanks for pointing me at using the golden ratio! You mention a larger size as 24 x 32.5 and comment as that being the golden ratio. That is a ratio of 32.5/24 = 1.354 but what i find in the literature is that the golden ratio is 1.618. For a 20 inch panel the golden ratio height is the 32.5 inches you mentioned. for a 24 inch panel 38.83 is the golden ratio. and i guess i will try 16 inches x 25.9 inches since the 4×8 FOAMULAR at Home Depot is pre-scribed at 16″ and 24″ (center). I just realized that slit will affect the frequency response. I can’t make 8 2×2 boards without having slits so i will go with the smaller size. and your golden ratio suggestion is really helpful!
Thanks to Rich and everyone else who have provided useful information! There may be some confusion around the term golden ratio, which I like everyone else assumed to be 1.618 between length and width of the panel. According to a paper I read on the topic (Kuonon Li, 2010, A critical review of bending wave loudspeaker technology and implementation, p.53), NXT published a “golden ratio” of 0.9482, which maximizes the number of modes between 0-2000 Hz. The lower bound of modes is 1.00 (1100 modes at 2000Hz), and the upper bound is 0.99 (2400 modes at 2000Hz).
Another important ratio discussed in the paper concerns panel rigidity and mass, which affects SPL and frequency response.
With these ideas in mind, I plan to build 36″x34.2″ panels (WxH ratio of 0.95) with a rigid foam material freely suspended. I have read going as large as 48″ introduces some resonances that do not dissipate quickly, so hopefully this mid-size will be a good compromise between response and clarity.
Cory,
Were you successful in your build using the updated NXT Golden ratio?
I am building some 20 x 19 inch panels using the Golden File from the above mentioned article. I will keep you updated. Thank you
I’m looking to get started on this with the 20×19 dimensions this coming week. How did yours turn out?
very nice write up, the original youtube suggested one channel exciter be placed in the center and the other channel follow the 2/5 rule… He felt this would smooth out the dips and highs better… Did you use the center for both panels?
I plan to try to build a pair of 2’x2′ DML panels and suspend them from the ceiling of my makeshift home theater room for Dolby Atmos height speakers. Several questions:
Is this a stupid idea?
Will the DAEX32U-4 Ultra 32mm 40W 4 Ohm work with a Home Theater receiver such as an Onkyo 9.2?
In purchasing the exciter, should I use the 4 ohms or 8 ohms?
How many watts should they be?
Are Dayton Audio or PUI Audio components comparable?
Is there a good paint or paint mixture to use for acoustics?
Sorry about all the questions – I’m just learning about these speakers!
Thanks all for sharing the DML experiences. I am using Dayton exciter DAEX58FP onto Guitar and beatBox at the moment while waiting for my XPS board to be built. The Mid and high frequencies sound are better than my Polk Audio Monitor 10B Speaker on Bluetooth 5.1 Class D 2.1 amplifier. It sound like the performers are standing in front of you on DML speaker compared to box speaker. I attached following Youtube links on DML related articles for your reading. There are a lot of Youtube articles on DML testing but not many mentioned on corrugated or honeycomb card board so far. Would like to try it out once I got my corrugated and honeycomb cardboard ordered and treated with resin to harden the cardboard for better sound.
1) Is two exciter better than One?
https://www.youtube.com/watch?v=jaEUalvi3kg&t=3s&ab_channel=TypicalBen
2) Testing Viewer Suggestions on “The World’s Best Speakers” from Tech Ingredients –
https://www.youtube.com/watch?v=jaEUalvi3kg&t=3s&ab_channel=TypicalBen
3) Fantastic DIY Speakers for less than $30! – https://www.youtube.com/watch?v=zdkyGDqU7xA&ab_channel=TechIngredients
4) Speakers out of vintage guitars? Excitingly yes! – https://www.youtube.com/watch?v=eN5gihTm5lk&ab_channel=AndreiSocherel
Yes I need to know if the left and right speakers would require the placement of the exciters at the 2/5 x 3/5 on both or is one dead center?
So far as the placement question, my understanding (I believe correct, but take it with the correct amount of skepticism), is one is dead center while the other is offset for a specific reason … the placement effects where in the range of frequencies the sound doubles back at the edge, creating phase issues. The artifacts created by phase issues are unavoidable, but by having one panel with a dead center exciter and another offset, you create misaligned peaks and valleys, and in averaging these, get the equivalent of a flatter (and more accurate sounding) response. Conversely, if you have the same placement on both panels, likely the phase issues will be compounded; e.g. if your offset creates a boast at 3k to 3.2k, it will now do so on both panels, exaggerating the issue rather than compensating.
I built a pair of 2 ft by 2 ft by 1/4″ DML speakers out of Birch along with thruster exciters. When propped up on the carpeted floor against the stereo cabinet they sound fantastic. But when I mount them to the wall (free-hanging about 1 1/2 inches from the wall the sound hollow as if you were listening through a tube). Could this be because of the sound bouncing off the wall and interfering with the front of the panel. Anyone else experience this? Any possible solutions? I was thinking of 2 ft by 2 ft felt on the wall where the speakers are mounted, but not the optimum solution. Thanks in advance . . .
I added a 4 inch thick sound adsorbing panel between the wall and the back of the DML speaker. I made the panel out of denim insulation.
I have DMLs all ready to go but I need advice on placement. It would be in my 1 car garage and I have limited wall space to hang them. I have no knowledge of sound systems so please bear with me. Hre goes…Am I able to just hang them from the ceiling or do they need to be near a wall? If hung from the ceiling, how far into the room should they be? What height should they be? How far apart should they be? Should they be perpendicular to each other? Sorry for all the questions! I’m just trying to replace a home speaker so I’m not trying to achieve audiophile sound, I just don’t want to place them where they would sound terrible. Thank you!
Look at mine here: https://www.youtube.com/watch?v=5J9XfpohSiY I use software equalizer in debian and puppylinux when I play thru the PC. In my room, it is pretty bright sounding so I attenuated above 3K Hz, like it now.
You will get better highs if you don’t sand the area where the exciter is attached. Mark a circle around the exciter and sand to the line, but attach the exciter to the un-sanded area.
How do you suspend the panel? we are building a “picture frame” to suspend the dml panel in. the panel will be freefloating in the frame which the beneficiary want s to be secured to the wall. We have used rubber bands but those will age and dry out requiring changing. we are considering mono-filament (fishing line) but I am sure someone else has had this problem.
I have some heavy-ish exciters from Aliexpress. What’s the best method to secure to XPS where 3M tape isn’t up to the task ?
I’ll be buying some Daytons too but want to make use of the ones I already have.
Hi Cory,
How did your panel build using the modified golden ratio turn out? I built some carbon fiber composite panels based on various papers and information I discovered online. They are remarkable but have a few shortcomings. Would love to hear your assessment of the 36”x34.2” panels. My panels are ~23”x16”