
GRS 12SW-4HE
Designer:
Dean
Project Category:
Subwoofer
Project Level:
Advanced
Project Time:
20+ Hours
Project Cost:
$100-$500
Project Description:
This all started when my 15yr old beast of a commercial sub called it a life mid movie. I was much more active in DIY back in the day and did my best to reverse engineer it and discover its secrets while it was in its prime. Fortunately I was able to restore it to about 80% of its former capability but it got me thinking to use my DIY skills once more. The idea of building a cost effective partner sub using a 12” driver in a ported enclosure with custom equalization was born.
Design Goals:
Cost, size and performance were the primary goals with cost being first priority. I didn’t want some massive box sitting in the corner either and it must be able to really hit the low notes. My existing sub was capable of sending ripples through the sofa watching Fury so the new sub must be able to keep up.
With cost being a priority an etched in stone budget was set. Driver, amp, EQ, dampening material, ports, wood and paint must come in at or less than $350. Luckily I still had some gear from my DIY days and one of the items was a brand new in box Dayton SA240 plate amplifier. Now that the amp is decided that leaves $160 to cover the rest.
Driver Selection:
The design I wanted to attempt did have some stipulations on the driver. It needed to have a Fs in the low to mid 20’s, preferred a QTS under .45 with a relatively high BL and do all of this very inexpensively. Easy peasy right?
Finding a suitable driver which would perform well in a ported enclosure and stay within budget was almost impossible. Prices really went up since I last was DIYing!
The GRS 12SW-4HE popped up in a search and the price caught my eye so clicked on it for a deeper look. The specs looked promising for a SBB4 alignment and the box size lands within the SERF (spousal eye roll factor) range. I did some computer sims and it looked good. Driver was selected and left $100 to complete the build.
Enclosure Design:
After the driver arrived it was put through 16hrs playing a 20hz sine wave to loosen things up. I measured the T\S parameters multiple times using both LIMP and DATS to verify the results. Sadly all my measurements agreed with each other but none of them agreed with the published specs. The FS was close enough but the QTS was much higher and the BL was lower. This meant to keep the alignment a true SBB4 the box size increased dramatically to 4cuft. I wasn’t willing to go that large and settled on 3.1cuft gross and would address the response ripple in the equalizer.
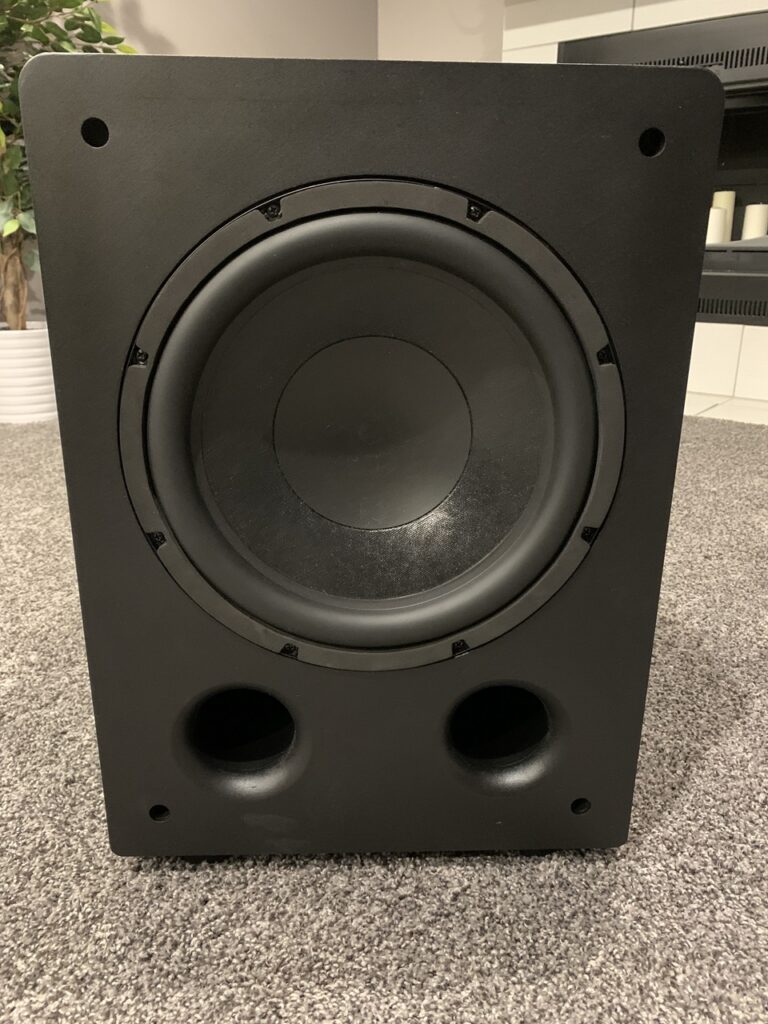
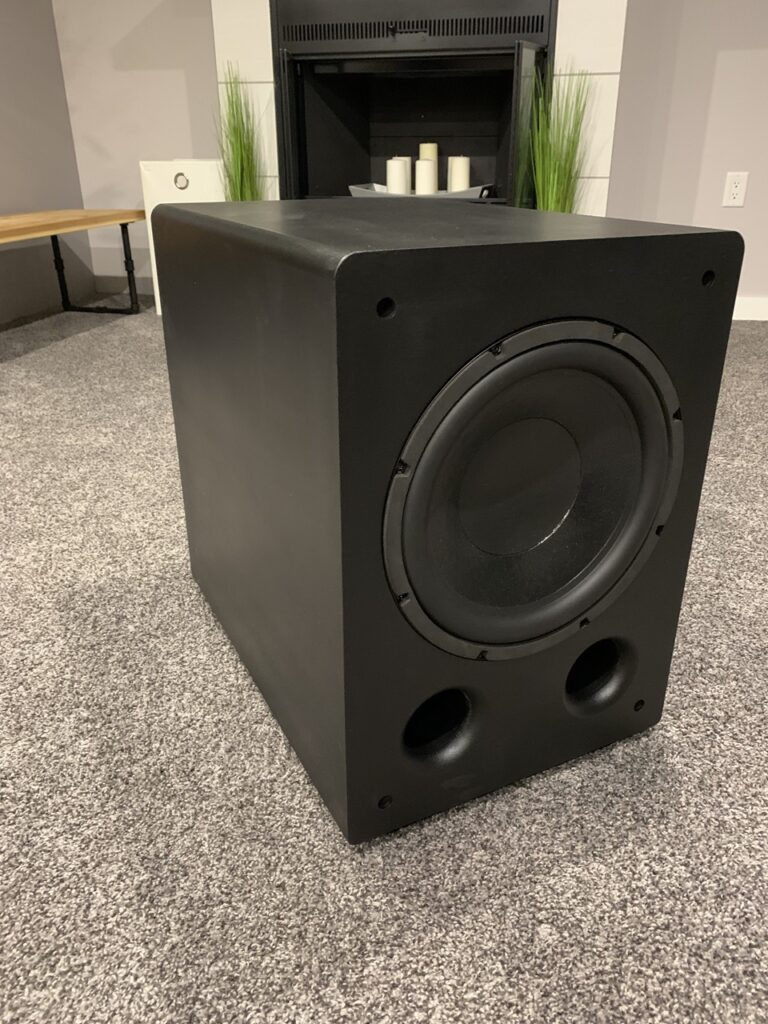
Final box exterior dimensions ended up at
22” depth
15” width
20.5” height
Using .75” material for walls and 1” baffle gives 3.13cuft gross. After amp, driver and port displacement I figured usable volume to be 2.9cuft
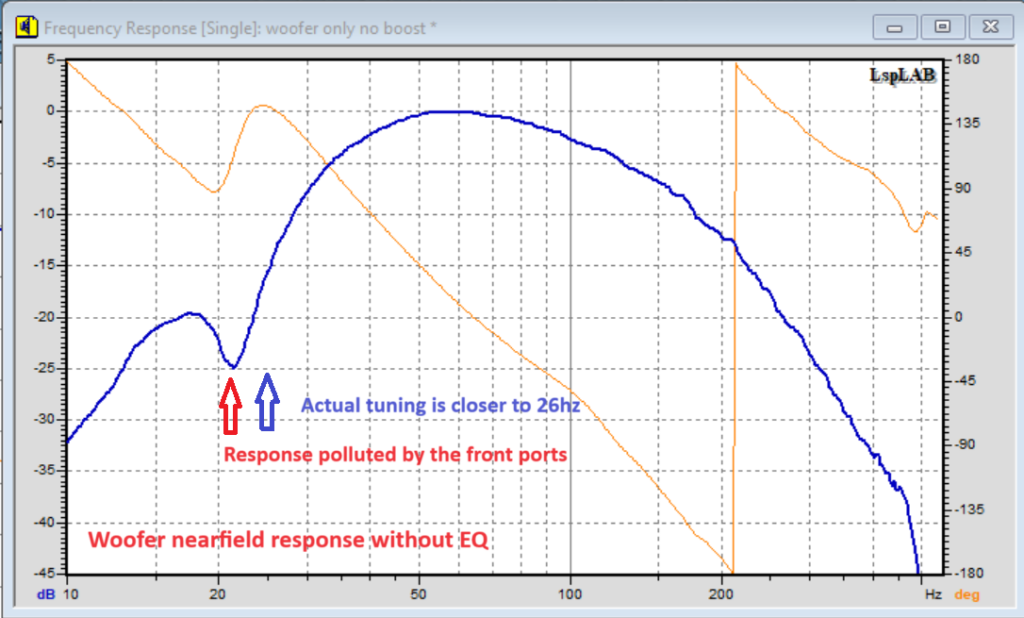
My goal was to keep the box tuning as if it was an SBB4 so that would be tuning to driver resonance which according to my measurements was 25hz.
The dual ports are 2.8” ID thin wall pvc downspout I found in the garage. Given the boost applied, at least 3” material should have been used. The downspout was free so done deal. I stuck with dual ports thinking I would run into port length issues but this turned out to not be the case. In hindsight I should have gone with 3 ports of the 2.8” material.
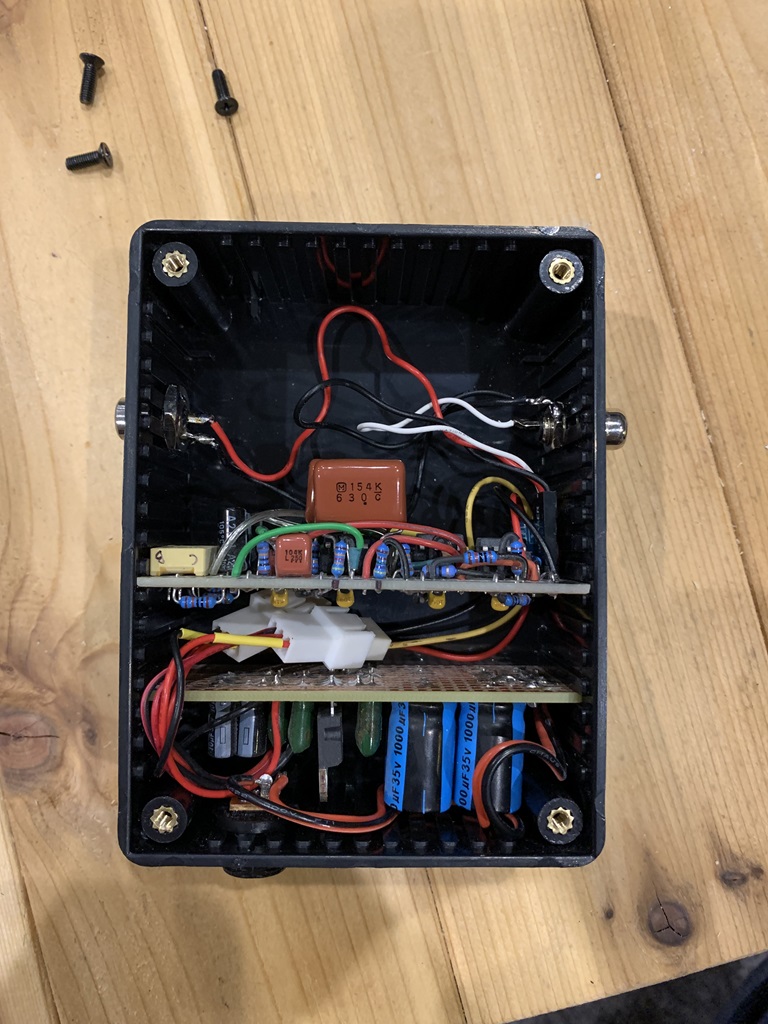
Crossover Design:
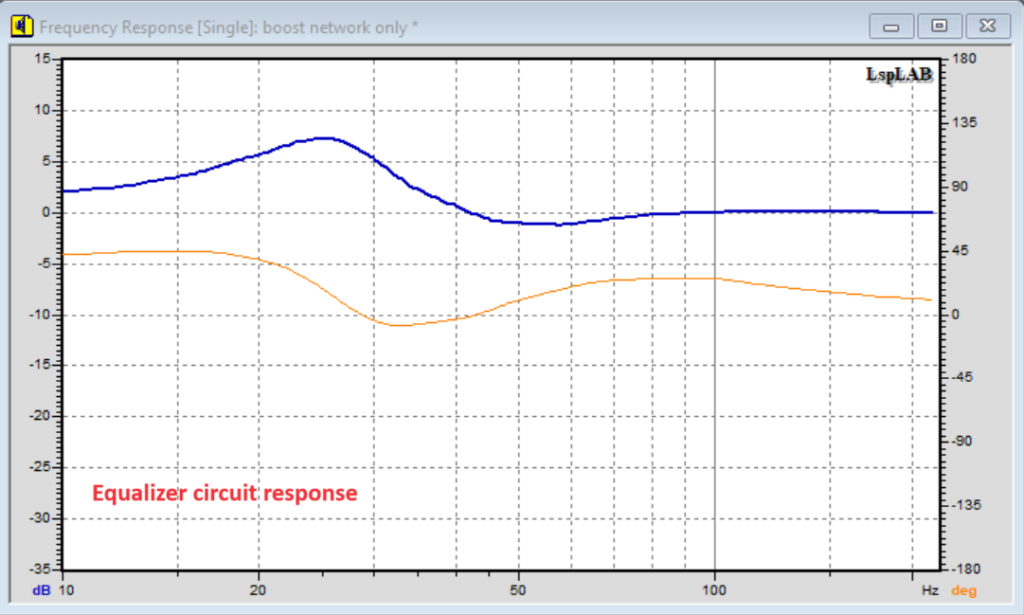
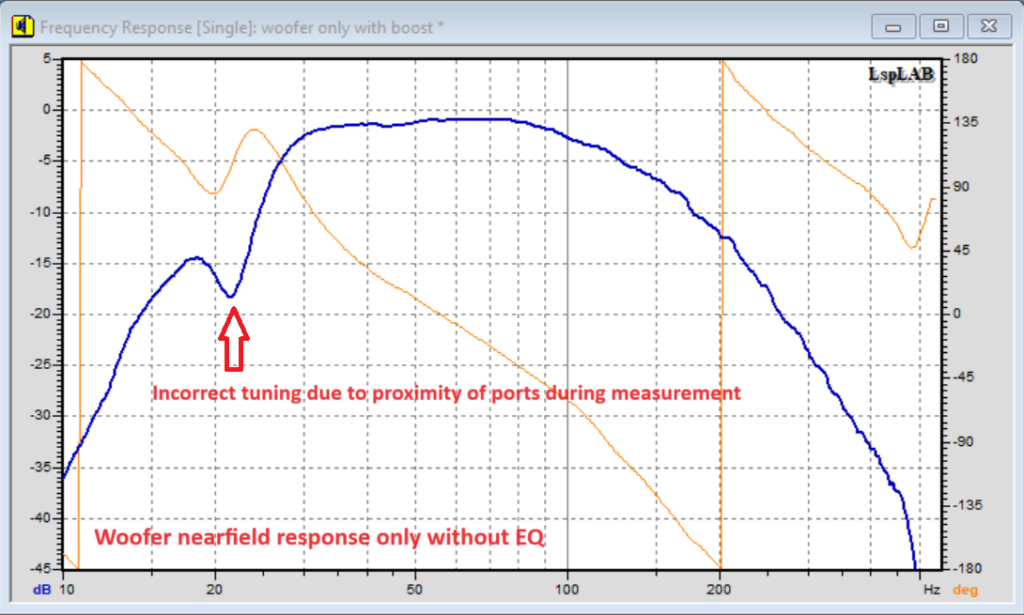
The heart of this project is the outboard equalizer circuit. Its tailor made to work with the natural roll off of the woofer in this exact enclosure with this exact tuning and provide a specific amount of boost over the exact frequency range I wanted. It was lots of computer modelling with trial and error to reach the final result. Given the undersize enclosure and the mistake I made tuning the box, the EQ was set to provide roughly 2db cut centered at 48hz with a Q of 1.2 and then rise rapidly starting around 38hz to provide 7.2db total boost at 25hz. I may have to revisit this after the driver has been tortured a little more.
By default the SA240 amplifier has a high pass filter which is flat to 30hz then rolls off slowly to -1.5db at 20hz and -3db at 13hz. This works quite well with my EQ circuit to provide just over 6.5db boost at 25hz then starts to roll off rather quickly to provide some protection for the driver below 15hz. The SA240 also has a built in current limiter which I feel is important when using any type of boost as part of the design.
Tips & Tricks:
This particular driver’s coil inductance causes it to have a natural roll off starting around 80hz. Couple this with my EQ and the low pass is misleading. To achieve a 80hz crossover to the main speakers, the processor or AV receiver needs to have its sub crossover setting closer to 100hz to compensate a little.
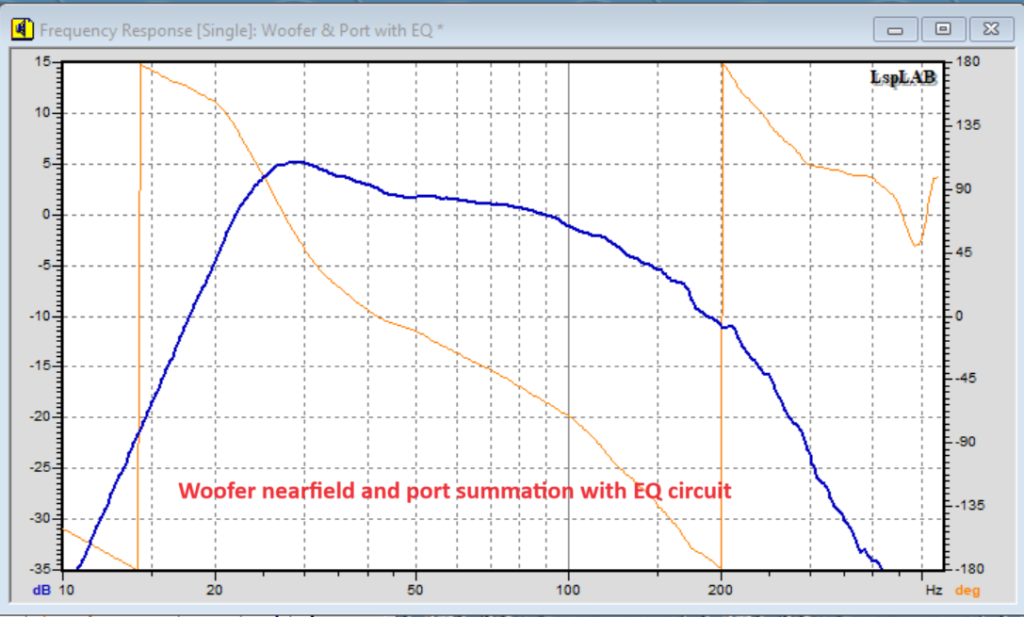
All measurements shown are with the amplifier’s crossover control set to maximum of 150hz.
All measurements were taken with the volume control set at the level where the sub integrates with the rest of the system, roughly the 10 o’clock position. These are not low level signal measurements.
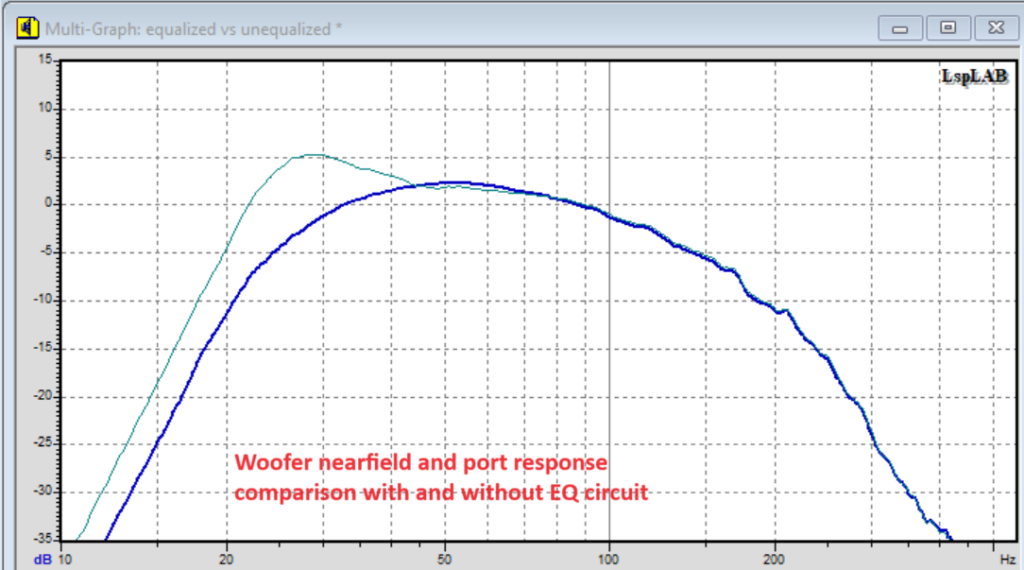
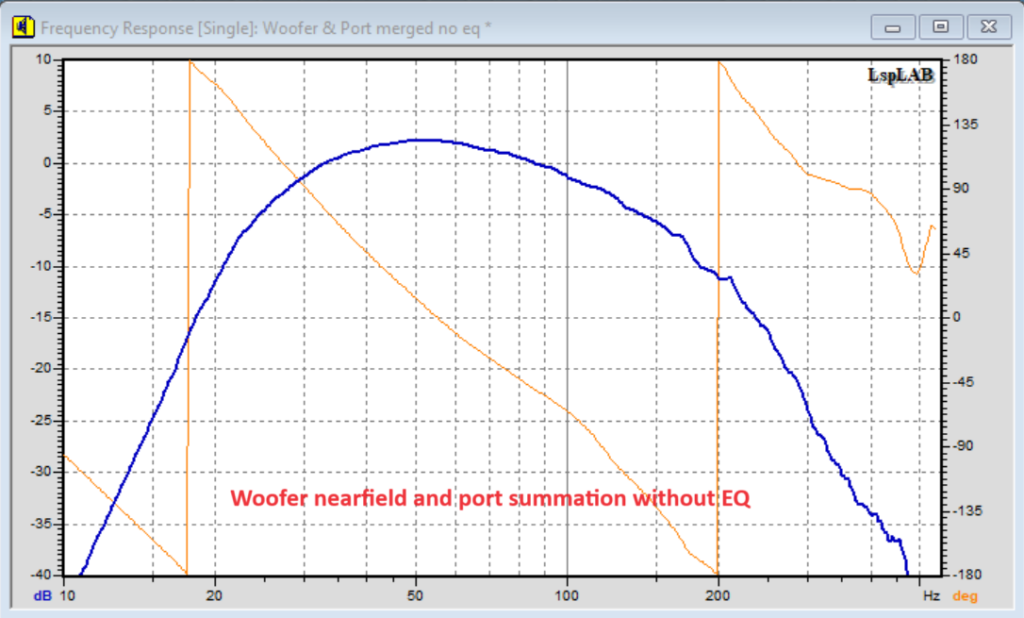
You may notice the dip in the measurements without port summation show the tuning closer to 22hz rather than 25.7hz calculated using impedance. This is due to the nearfield measurement technique with the ports so close to the driver and polluting the data. In reality the peak gain below 30hz is likely not that pronounced.
Conclusion:
The EQ was tedious to design but so necessary. I would have liked to try the DSP-LF or a plate amplifier with built in DSP. The desire to keep costs low won out and the analog EQ was much cheaper to construct.
Hard core audiophiles who raise their pinky fingers sipping tea will snub this design as boom box hogwash. It’s not. They do have some valid points, the enclosure is not fully optimized for the driver and the EQ circuit pushes group delay rather high. Like everything in life it’s a compromise. Movie lovers are probably already ordering parts to build their own and correct my mistakes. It really does punch harder you would think given the driver’s cost and being limited to only 240watts. This sub has no problem providing a visceral experience on its own. Pairing it with a partner reduces dead spots and they pressurize a 4500cuft room with ease. The eq works nicely to trim the excess ripple around 50hz to help eliminate the 1 note style bass you might expect.
Even with the undersized enclosure and the error made in box tuning I have zero complaints. For the dollars to performance, what you could buy for $350 in a commercial sub isn’t even in the same league. I plan to run it for a while as is then retest the driver to see if the specs changed enough to warrant building a new enclosure and re-tuning the EQ.
About the Designer:
I used to be an avid audio DIYer 10-15yrs ago. Loudspeaker engineering has always been a fascination and tried to learn about it as much as possible.
Project Parts List:
| Part# | Description | Qty. |
| 292-820 | GRS 12SW-4HE 12″ Paper Cone Rubber Surround High Excursion Subwoofer 4 Ohm | 1 |
| 300-803 | Dayton Audio SPA250 250 Watt Subwoofer Plate Amplifier | 1 |
What a pleasure and fun to read. I have already told some friends about the SERF parameter. It doesn’t apply just to speakers. My experience so far is a pair of speakers and subwoofer, using the manufacturer suggested alignments and off the shelf crossover. I used the supplied graphs to select the crossover point as well, staying back from a sudden spike and subsequent roll off. IMHO they sound pretty dang good, and the enclosures are terrible. I likely have builders bias.
2 things I’m trying to sort out.1) TS parameters. I understand SPL and power rating. I matched drivers partly according to spl, ensuring they were equal. Beyond that, is there any indication of performance from the TS parameters and graphs? Resources for interpreting? There are cheap drivers and expensive drivers that look the same on the graph. 2) Interpreting graphs for crossover design and tuning. Would one of the speaker books go into this?