Helium Soundbar


Designer:
Scott Sehlin
Project Category:
Home Theater
Project Level:
Intermediate
Project Time:
8-20 Hours
Project Cost:
$100 – $500
Project Description:
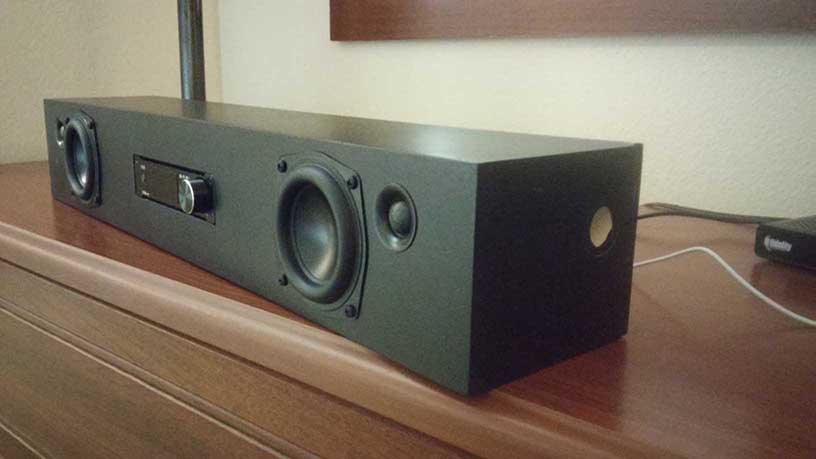
The Helium Soundbar is a DIY soundbar that features the SMSL Q5 Pro DAC/Amplifier, which has a great feature set for typical soundbar funcationality and a variation of the Helium Micromonitor design to give big sound in a small package.
Design Goals:
I wanted to build a soundbar with a height and depth of approximately 4″x4″ and a length of approximately 2 feet in order to create something that would work either hanging on the wall under large or small flatscreen TV’s or on a desktop hooked to a computer. I wanted the ability to add a subwoofer, but also wanted enough bass capability so that music or tv would still be somewhat enjoyable without a sub – a major step up from what is built into TV’s or monitors.
Driver Selection:
The size requirements eliminated most woofers from consideration. The Dayton ND-91 drivers work really well in the small boxes. Not only do they produce a lot of bass, but they also handle quite a bit of power before complaining – especially considering that it is a 3″ driver. I decided to go with the 8 ohm version (290-226) for this project to minimize the current demands on the small SMSL amplifier.
The Dayton ND16FA-6 (275-025) is a small, inexpensive tweeter that sounds good and has wide dispersion, which is desirable in a soundbar application for room-filling sound.
Enclosure Design:
The approximate dimensions of 4″x4″x24″ were chosen to be less than or equal to the width and mounting depth of most typical screen TV installations. The 4″ height would allow placement in front of some screens without obstructing the picture. The tweeters and woofers are placed close to the edges of the enclosure to maximize stereo separation. There are two solid braces on either side of the amplifier to isolate the woofer’s air space from each other and minimize any air leaks that might occur around the amplifier. Ports fire out the ends of the enclosure, which allows the use of simple, straight 3/4″ by 4″ PVC sections. The actual cabinet depth was extended to 4.75″, which allowed the connectors on the rear of the amplifier to be completely recessed into the rear surface of the enclosure.
Enclosure Assembly:
The enclosure was build using 1/2″ plywood. Plywood was chosen primarily to reduce weight relative to fiber board products. Enclosure construction was mostly straightforward. Four 4″ by 24″ pieces were cut to form the top, bottom, front and rear of the enclosure. Four 3″ by 4″ pieces were cut to form the ends of the enclosure and the two internal braces. The ND-91 requires a simple 3″ mounting hole and the ND-16 uses a 1.25″ hole, which fits just right with a little sanding. The rectangular cutouts for the amplifer would be a little challenging to get exactly right with normal tools, so a CNC router was used.
I decided to make the rear panel removable, so 1/4″ deep by 1/2″ wide rabbets were cut around the edges of the rear panel and in the areas where the braces intersect with the rear panel. The rabbets allow the rear panel to only add 1/4″ to the overall depth of the enclosure and create a more secure connection between the rear panel and the rest of the cabinet.. Weather stripping was used on the surfaces contacting the rear panel to eliminate leaks or the possibility of any noises caused by an imperfect fit.
Crossover Design:
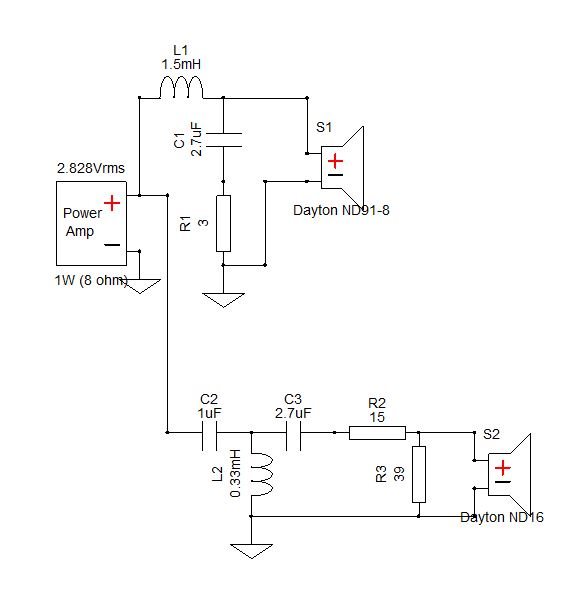
The crossover schematic is shown in a figure included in this writeup. The woofer has a 2nd order filter and the tweeter has a 3rd order filter with series and parallel resistors to match the tweeter and woofer sound pressure levels. These filters result in an approximately 4th order crossover at 5 kHz, which is well within the comfort zone for both of these drivers. The resulting response is +/- 3dB from the lowest point where my gated response measurement is accurate (about 300 Hz) to 20 kHz.
Conclusion:
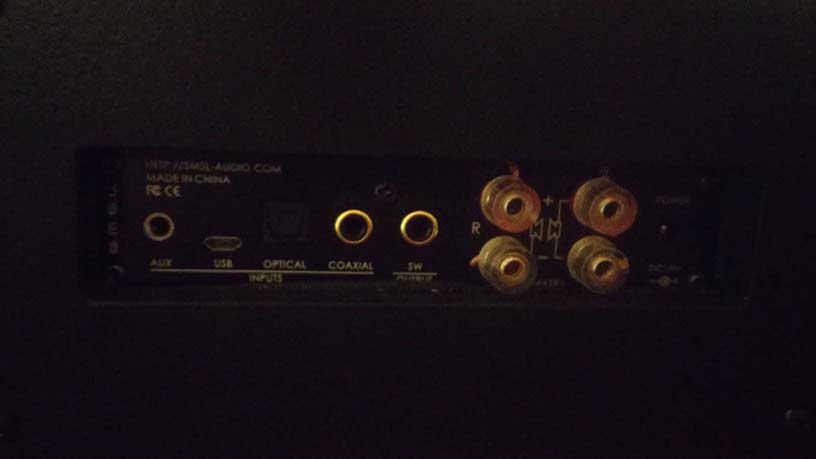
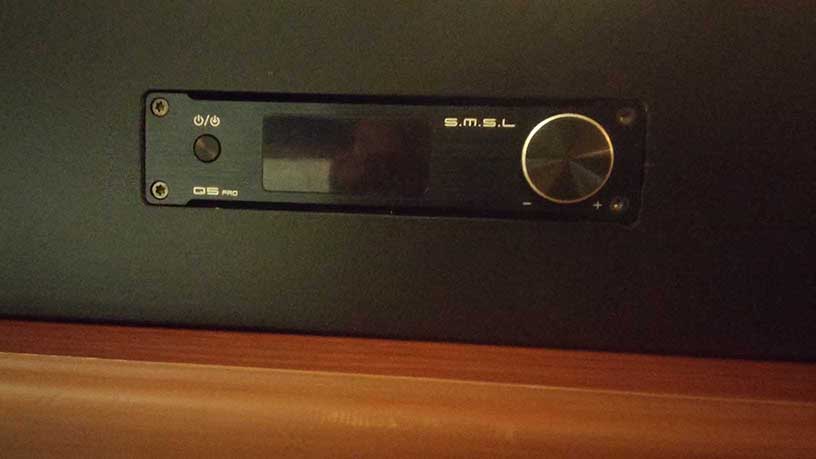
The overall sound is similar to the Helium Micromonitors – maybe a little bit deeper bass extension. The SMSL Q5 pro is really the ideal electronics package for this application. It has optical and coaxial digital inputs along with USB and analog inputs. Remote control and a subwoofer out are other key features. There is enough power to get solid volume out of the relatively inefficient ND-91’s. A bluetooth module can be added if desired to one of the inputs (in most cases, this would be hooked to the analog input). All-in-all, this will significantly outperform similarly priced and sized commercial soundbars and is not too difficult to build if you can make the rectangular cutouts for the front and rear of the amp or have them made.
About the Designer:
Scott is an Engineering Manager for a manufacturer of aerospace equipment. He has been designing and building speakers for over 12 years and was a 2015-2016 member of the Parts Express Speaker Building Design Team.
Project Parts List:
I was wondering about a sound bar and there you were. I have a love for electronics and have always wanted to learn more than the little I know, so I can appreciate those that do know and build on it. I have found the Parts Express people to be a bit snobbish to those who ask dumb questions, so I don’t ask any more. I just watch and try to learn what I can from others. I want to build a TV stand and integrate the sound bar into it, and add blue tooth for rear speakers, maybe a sub too. If anyone does build something like that and it costs less than a mid-priced Bose system, I’ll be reading (providing it’s not all show what you know jargon).
Your parts list shows one of everything except for the 2.7uF capacitor, which shows a quantity of 4. Should it be two of everything, and 4 of the 2.7uF capacitors? Also, would using a parts express KAB bluetooth amp board work with this setup? I want to make something low and sleek not for my TV, but for my kitchen, and if happens to be portable, too, that’s great. Thanks.
You are correct on the driver and crossover component quantities – should be 2 of everything except the 2.7 uF capacitor, which should by qty. 4. The KAB amps will work fine. I would be concerned that the KAB-215 might not have enough output power, but either the 230 or 250 should get the job done. The power supply might have to be external to the soundbar – it’s going to be a tight fit otherwise. The SMSL Q5 Pro uses a “wall wart” style supply.
Very cool!! I just bought a Q5 as well, and also planning to build a soundbar because it’s one of the few amps that’s compact, and has a decent remote.
I’m wondering if you’ve had issues with heat, especially since it’s inside an enclosure. I’ve read a few reviews/comments about it.
I assume that you hardwired the amp connections directly inside the box since the picture shows the back of the amp with nothing on the connections. COOL IDEA and thanks for the plans and the part numbers.
Another question- can you describe the ports on the side a little better? They are 3/4 by 4- do they therefore go 4 inches into the cabinet?
Intestesting. Maybe you guys could chime in and see what I’m trying to do here and tell me what you think might work???
https://www.avsforum.com/forum/155-diy-speakers-subs/1492307-soundbar-recessed-into-fireplace-mantle-needs-ideas-opinions-etc.html
Would the xover need to be redesigned if the single 8ohm ND91 was replaced with 2 x 4ohm ND91 in series?
I am overseas, so I would have to source parts away from PE. How important is it that the capacitors are rated 400v ? Would Dayton audio 250v make any difference?
Also I notice the 39ohm resistor on the schematic has been replaced on the shopping list by a 40ohm 10w 2% tolerance Dayton Audio Precision Audio Grade resistor. Would the use of a 39ohm 10w 5% Jantzen ceramic resistor make any difference at all?
Thanks in advance.
How important is it that the capacitors are rated 400v ? Would Dayton audio 250v make any difference?
Also I notice the 39ohm resistor on the schematic has been replaced on the shopping list by a 40ohm 10w 2% tolerance Dayton Audio Precision Audio Grade resistor. Would the use of a 39ohm 10w 5% Jantzen ceramic resistor make any difference at all?
Thanks in advance.
I have one of those obnoxiously big TVs. Can this design be extended to… oh… 48″ wide? perhaps make it a bit “shallower” to make up for internal volume?