
LINEHOPPER


Designer: Bill S. (4thtry)
Project Time: 20+ Hours
Project Complexity: Advanced
Project Cost: $500-$1000
Project Description
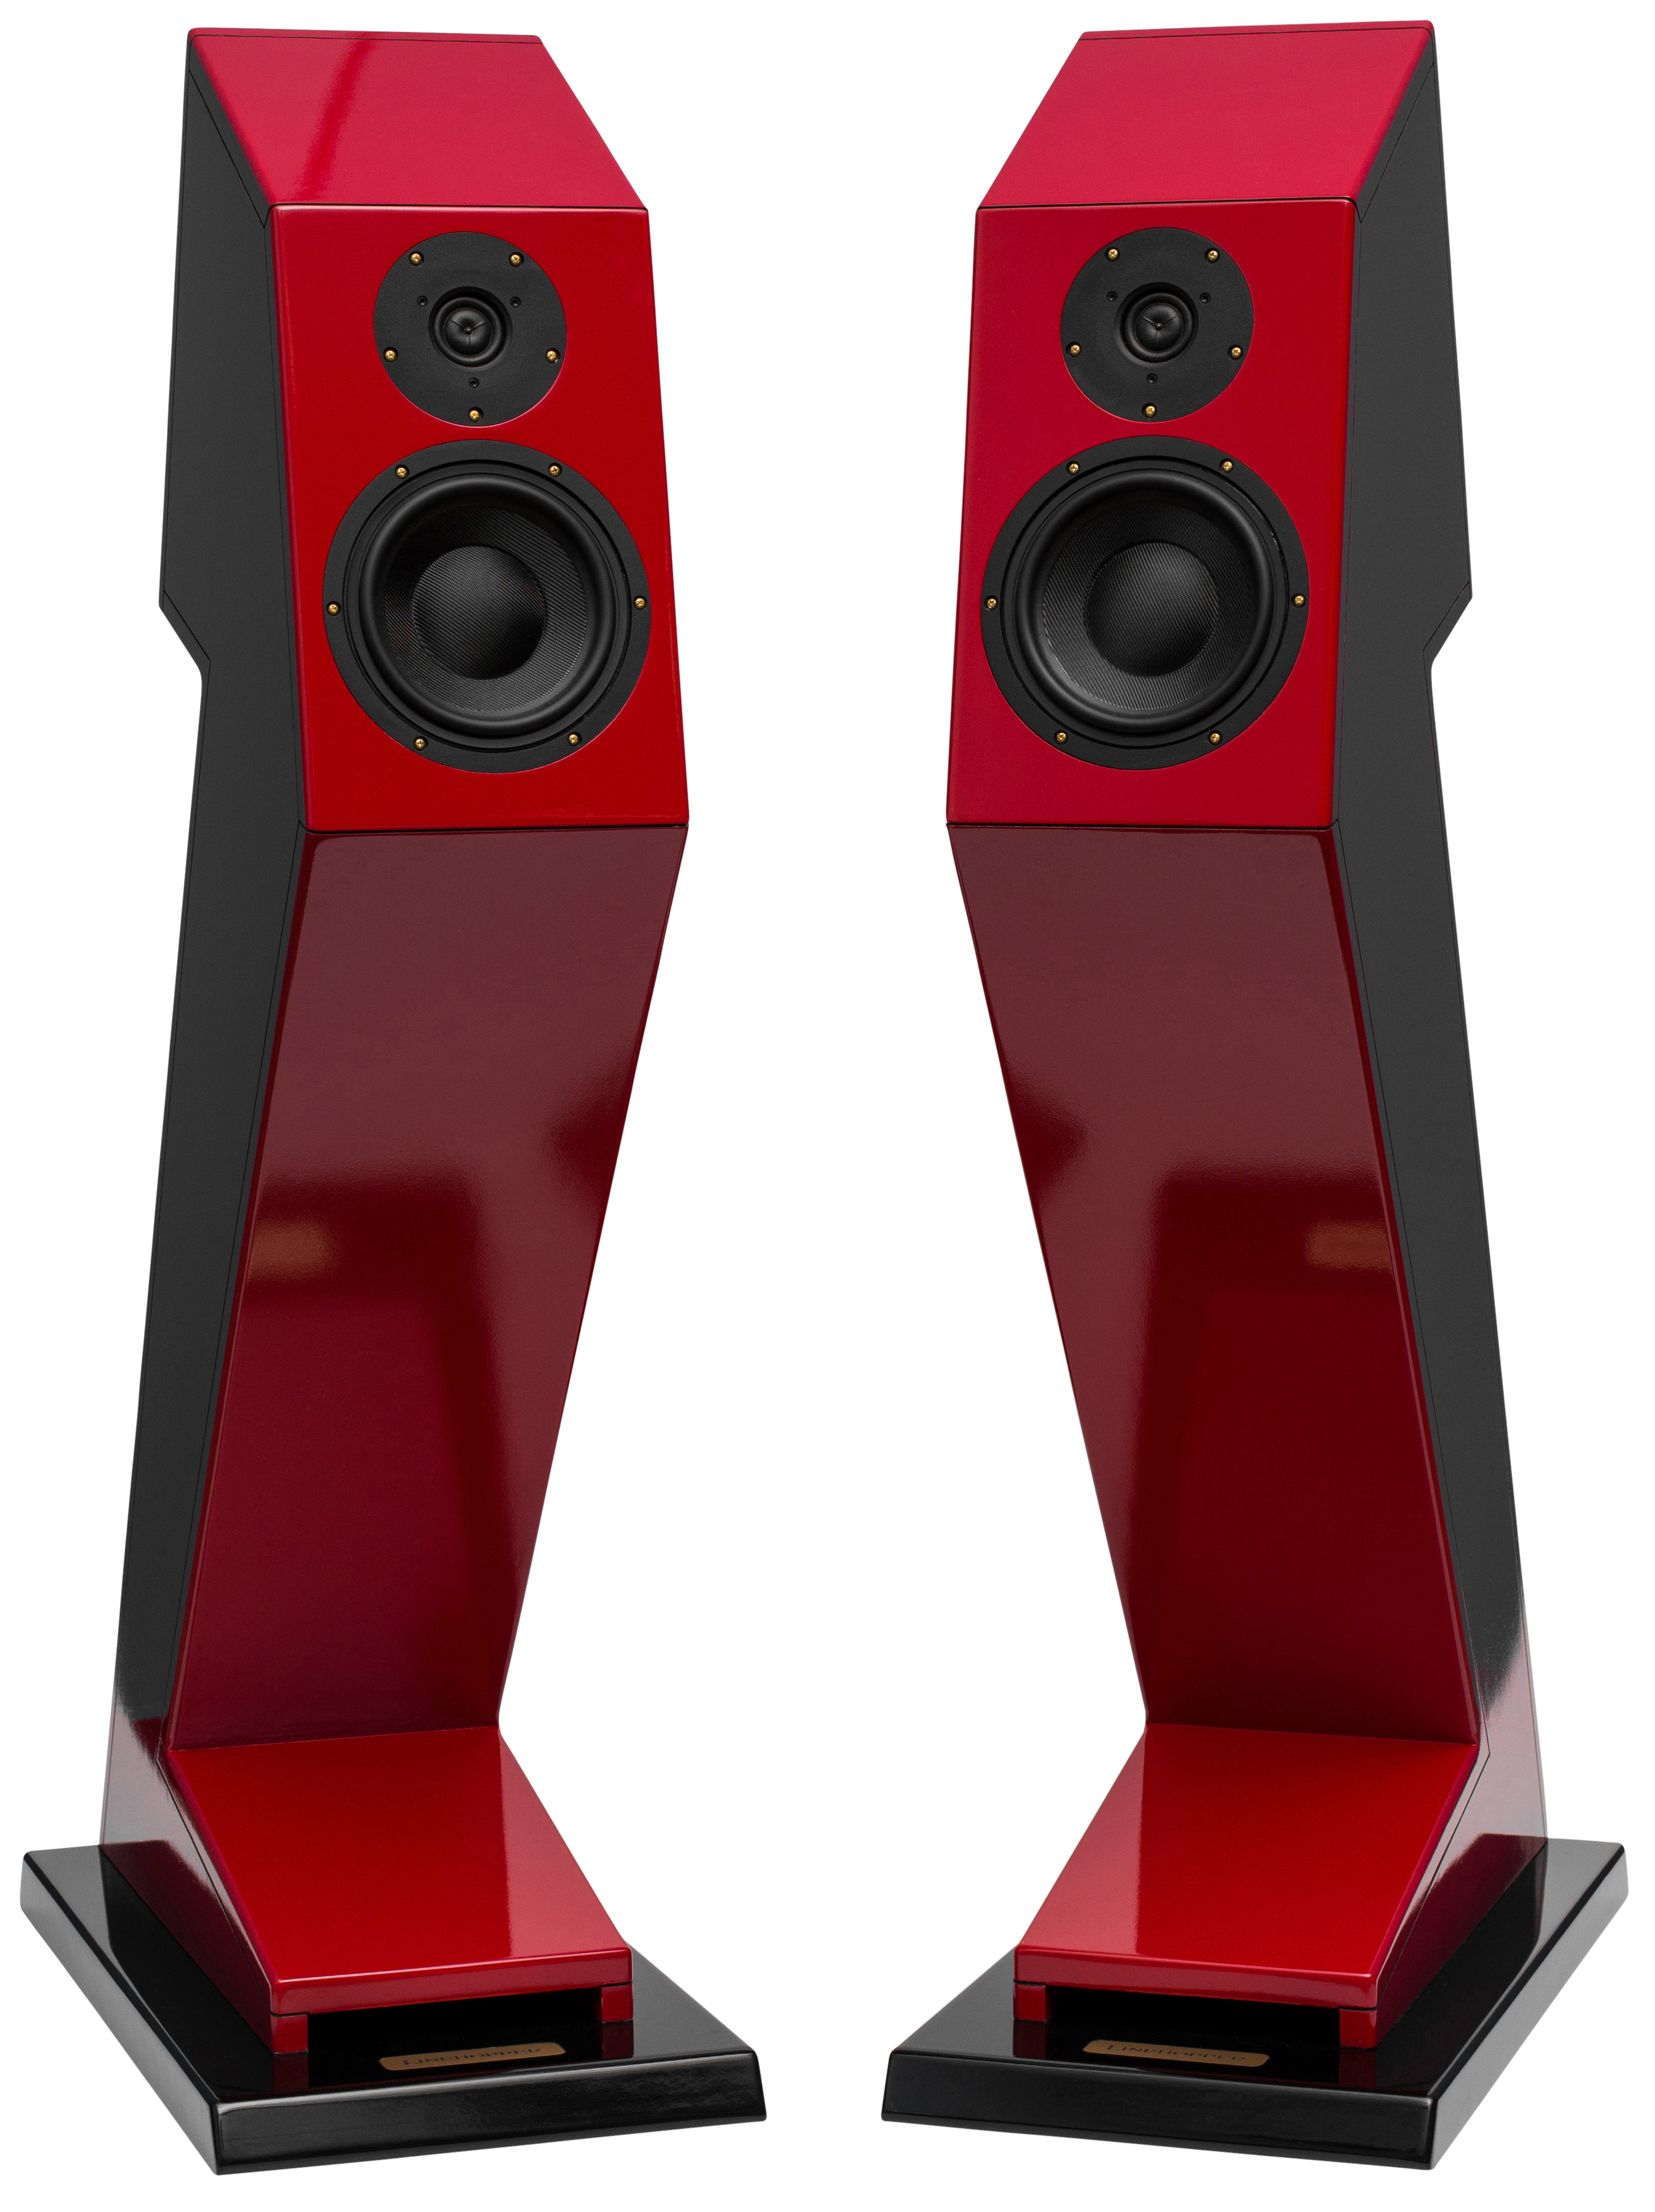
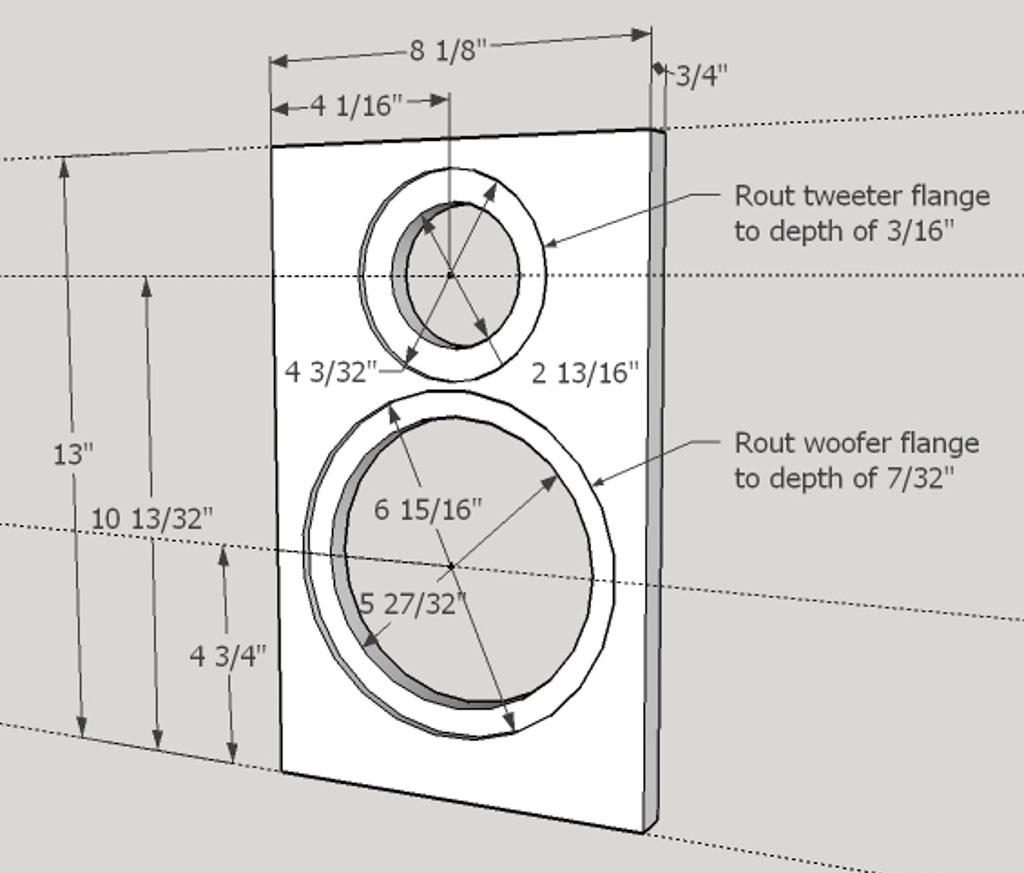
This is a small floor standing two way using the new Dayton Audio Esoteric ES180Ti-8 woofer and ES25Nd-4 tweeter. The woofer is loaded into a 59” long tapered transmission line with a 16:1 taper ratio and a 31Hz tuning frequency. The acoustic centers of the tweeter and woofer are aligned at the crossover frequency using a 10 degree sloped front baffle.
Design Goals
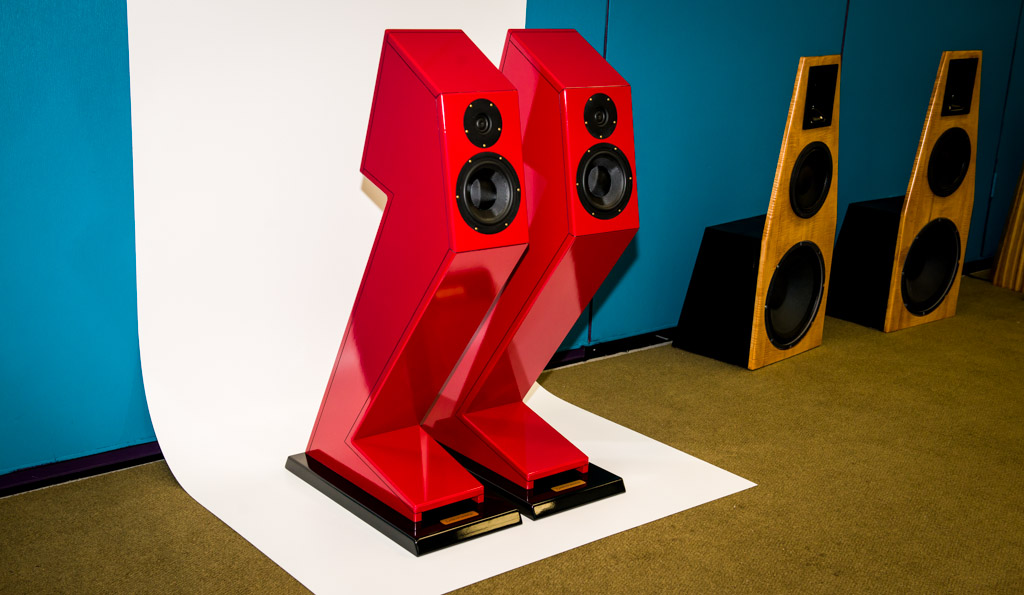
I prefer small, stand mounted speakers with small baffle surface areas because I think they image better than larger speakers with wider baffles. At the same time, I like the extended low frequency response made possible by larger cabinets. My solution to this dilemma was to create a larger cabinet with an unusual, “jack rabbit” type shape. By sloping the top and bottom sections away from the listener, I was able to effectively reduce the baffle area to that of a small bookshelf speaker on a stand.
PETT forum member “dcibel” commented that my speaker looked like it was going to hop away. I replied that, hopefully, it will not hop away before I have a chance to build & measure it!
Driver Selection
For my design, I selected the new Dayton ES180Ti-8 (295-397) and ES25Nd-4 (275-151) drivers. The woofer uses dual copper shorting rings, a large 3” voice coil on titanium former, and a specially woven glass fiber cone. The tweeter has a pinned center dome, a powerful neodymium magnet, and a very low free air resonance of approximately 600Hz. This allowed me to push the crossover down to a very low 1.65kHz without getting too close to the tweeter’s resonance.
Enclosure Design
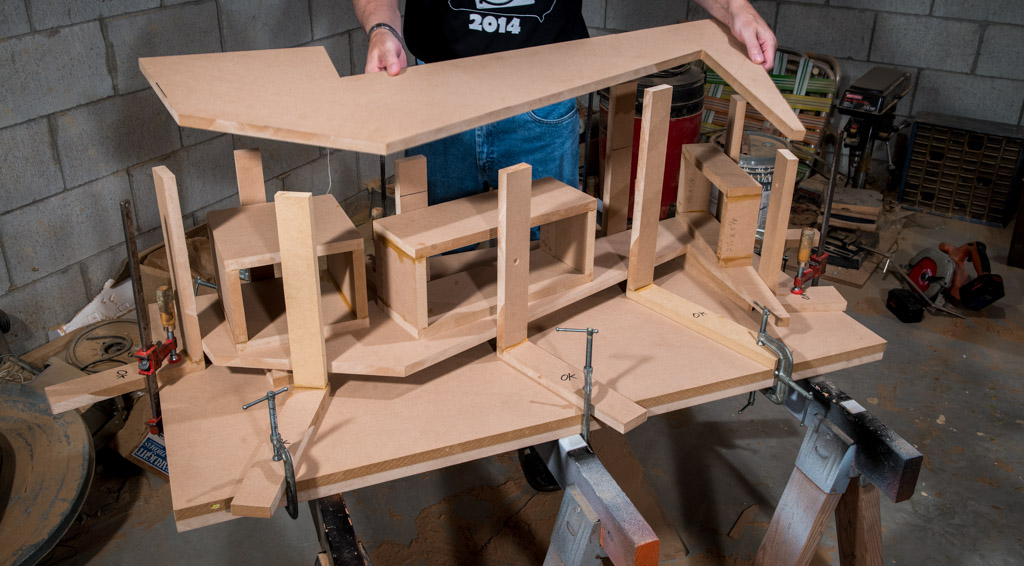
I used a CAD software package to layout the cabinet shape, creating a profile from a tapered transmission line that was 78 square inches at the beginning area and 5 square inches at the ending area (terminus). I then broke the tapered line into 4 sections and rotated them into the final profile. I sent my tentative sketches to Paul Kittinger and he manipulated and
manually re-drafted them into a final shape that produced the best overall low frequency response.
Enclosure Assembly
Total project time is best estimated at 200+ hours; not 20+ hours as indicated above! Because of all the custom cutting, alignment fixtures, template creation, etc., it took me over 2
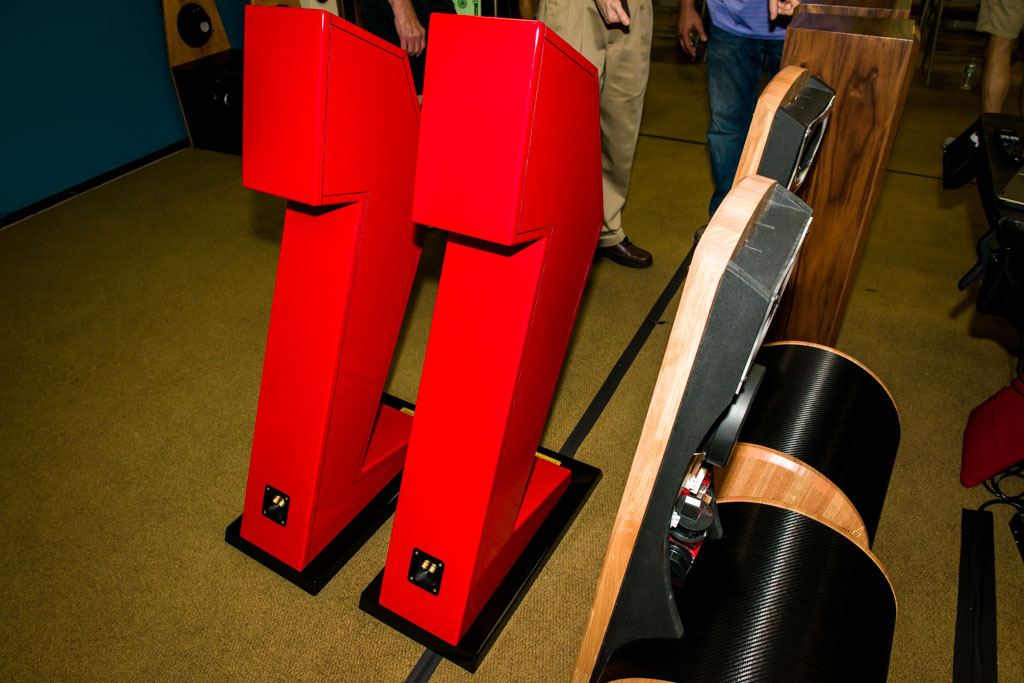
months alone, working roughly 4 hrs per day, just to create the basic shape of the raw MDF cabinets! Assembly required the creation of 14 custom fixtures and templates! It was a lot of work, but the final cabinets, when painted, have a very arresting, dynamic look to them, making all the time spent well worth the effort. Time consuming, yes; totally beyond reason, no!
I created a full-scale paper template of the profile from Paul’s drawings and used it to cut out the side panels with a circular saw. Then I aligned the side profile panels with a custom
alignment fixture and temporary separation boxes. Front, top, and back panels were then each custom cut using my table saw and compound sliding miter saw.
I glued everything together with clamps & yellow carpenter’s glue. No wood screws were used. I cut 1/16” wide by 1/16” deep shadow lines along all glue joints with my router using a 1/16” straight bit set to a depth of 1/16”. I used custom straight edges, stop blocks, and alignment gauges for each cut.
The finished cabinets were spray painted with 2 coats of oil based primer and then 3 coats of oil based high gloss enamel. I shot the paint at 70psi using a conventional spray gun. As a
final step, I hand painted the shadow lines flat black to create accent lines along the cabinet profile.
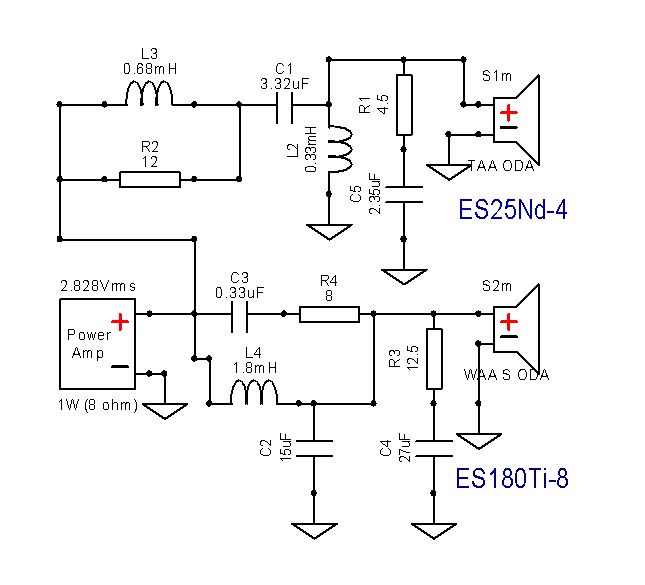
Crossover Design
I created the crossover using OmniMic, WT3, and Bill Waslo’s new Xsim crossover modeling program. I also had assistance in the form of several excellent tips and suggestions from PETT forum members Ben Shaffer and John Hollander.
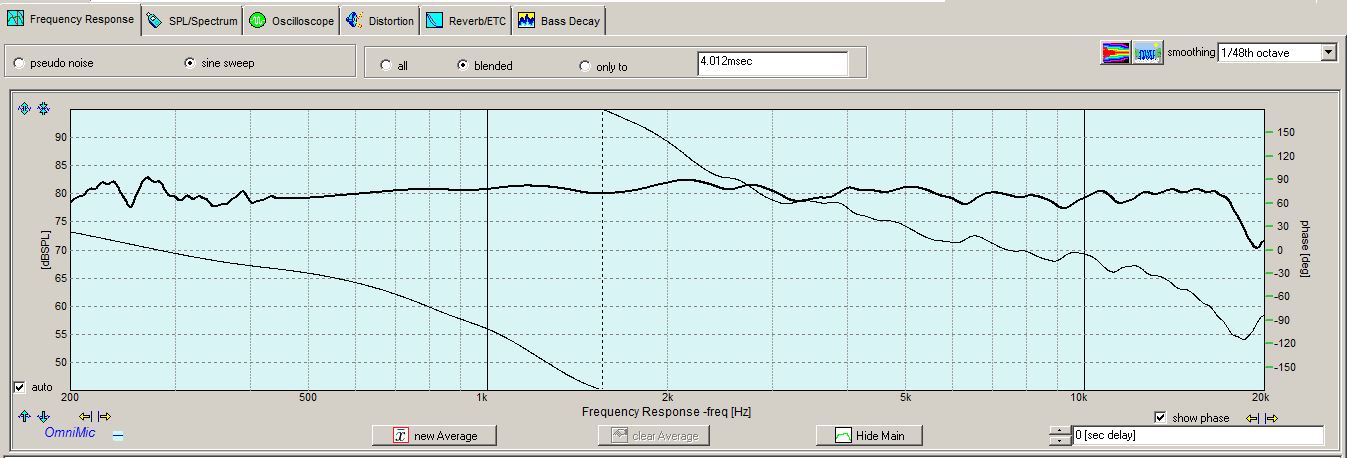
I chose a low crossover frequency of 1.65kHz to help suppress woofer break-up modes, reduce “beaming,” and improve stereo imaging. Also, the tweeter’s low Fs and high power handling ability helped to keep distortion in check at this low crossover point. Slopes are 12dB/octave electrical. Phase tracking throughout the crossover region looks good with a deep, sharp reverse polarity null.
To contour the tweeter’s frequency response, I used Ben’s recommended tweeter zobel together with a separate HF response shaping inductor across padding resistor R2. For the woofer, I knocked down the 3.5kHz breakup mode with a tank filter. And I further re-shaped a bulge in the 1khz region with a zobel network. The final filter components chosen provide roughly 3-5dB of baffle step compensation (BSC).
Conclusion
I measured both the on and off-axis frequency response of the final crossover with the speakers mounted in the final Linehopper cabinets. I also measured both on and off-axis response with the drivers and crossover mounted in a much smaller bookshelf sized cabinet using the same 8.125×13” baffle board dimensions. Aside from the lowest frequencies, the curves were almost identical. Not only did the final system measure just like a small speaker on a stand, it also tended to sound that way, projecting a very convincing stereo image. Finally, the cone materials used in these new drivers seem to produce a very clean, crisp sound quality that, to my ears, remind me of a much higher priced planar type system.
Tips & Tricks
PARTS LIST::
PART# DESCRIPTION QTY
275-151 Dayton Audio ES25Nd-4 Ring Done Tweeter 2
295-397 Dayton Audio ES180Ti-8 7” Woofer 2
260-285 Square Speaker Terminal 2
260-317 Acousta Stuf 1 lb bag 2
005-4.5 Mills 12W 4.5 ohm Non-inductive resistor 2
005-8 Mills 12W 8 ohm Non-inductive resistor 2
005-12.5 Mills 12W 12.5 ohm Non-inductive resistor 4
255-220 Jantzen 18 gauge 0.33mH inductor 2
255-414 Jantzen 15 gauge 0.68mH inductor 2
255-428 Jantzen 15 gauge 1.8mH inductor 2
027-112 Audyn 3.3 uF polypropylene capacitor 2
027-110 Audyn 2.2uF PP cap (2.35uf on schematic) 2
027-103 Audyn 0.33 uF polypropylene capacitor 2
027-432 Dayton 15.0 uF polypropylene capacitor 2
027-439 Dayton 27.0 uF polypropylene capacitor 2
About the Designer
I have been building speakers & amps, on & off, as a hobby, since 1974. I’ve created or modified roughly 26 speakers, amps, and other electronic devices over the span of the last 40 years. One of my very first speaker projects was a classic “A7″ horn type system that used a big 500Hz horn on the top and a 15” horn loaded woofer on the bottom. My brother Steve engineered and constructed the woofer horn while I cut out the big box panels. My other main hobby is photography. When attending speaker shows and events, I enjoy the challenge of using off-camera flash to create unique & interesting lighting effects across all the unique & interesting baffle boards & cabinet shapes that builders invent.
Project Parts List
|
Part # |
Description |
Qty |
|
275-151 |
2 |
|
|
295-397 |
2 |
|
|
260-285 |
Parts Express Square Speaker Terminal Cup 3-1/8″ Gold Banana Binding Post |
2 |
|
260-317 |
Acousta-Stuf Polyfill Speaker Cabinet Sound Damping Material 1 lb. Bag |
2 |
|
005-4.5 |
2 |
|
|
005-8 |
Dayton Audio UM10-22 10″ Ultimax DVC Subwoofer 2 ohms Per Co |
2 |
|
005-12.5 |
4 |
|
|
255-220 |
Jantzen Audio 0.33mH 18 AWG Air Core Inductor Crossover Coil |
2 |
|
255-414 |
Jantzen Audio 0.68mH 15 AWG Air Core Inductor Crossover Coil |
2 |
|
255-428 |
2 |
|
|
027-112 |
Audyn Cap Q4 3.3uF 400V MKP Metalized Polypropylene Foil Crossover Capacitor |
2 |
|
027-110 |
Audyn Cap Q4 2.2uF 400V MKP Metalized Polypropylene Foil Crossover Capacitor |
2 |
|
027-103 |
Audyn Cap Q4 0.33uF 400V MKP Metalized Polypropylene Foil Crossover Capacitor |
2 |
|
027-432 |
2 |
|
|
027-432 |
2 |
Just wonderful, so bold and thoughtful. Love it!
Stunning. What a creative mind you have!! Any chance of obtaining the plans-I would love to try a build. My only transmission build was a boring old Baily box
What an amazing set of speakers these not only are they aesthetically please but from what I’ve read they are sonically pleasing as well. I am also interested in building a pair, is there a way I could get at least the dimensions of them?
http://techtalk.parts-express.com/forum/tech-talk-forum/64101-linehopper-an-esoteric-build