MagnaCumLaude

Designer: Darren Kuzma
Project Time: 8-20 hours
Project Complexity: Professional
Project Cost: $500-$1000
Driver Selection
Since most of my specific goals for this project deal with power handling, excursion, and bass response, the woofer selection was my first area of concern. My first hunch was to follow the lead of the classic speakers and use 15″ woofers, but I didn’t like what that would do for me from an aesthetic standpoint. Trying to modernize the design somewhat, a dual woofer design seemed appropriate. In looking through the available options, the Dayton Shielded DVC woofers were a great choice because of their robust construction and ability to net an 8 ohm nominal load. Since the 12″ woofer only requires a slightly larger cabinet than the 10″ and is only marginally more expensive, I decided on a pair of the SD315-88 woofers per cabinet. I knew that the most limiting requirement in terms of mid range selection was the sensitivity issue, especially knowing it needed to play fairly low and also maintain an 8 ohm overall impedance. (Not many home audio cone based midranges or mid-woofers have real-world sensitivities that high.) An exception that I found was the Tang Band W6-789S 6-1/2″ shielded woofer, I tested and confirmed that it does indeed have a real-world sensitivity of about 91-92 dB. In addition it has a smooth and extended frequency response that would make crossover design easier. Since both my woofers and midrange ended up being shielded, I decided that I should carry this theme through to the tweeter selection. While magnetic shielding wasn’t one of my initial design goals, I figured it would be a nice extra bonus and add that much more versatility. Looking for a tweeter with high sensitivity, shielded construction, and a somewhat lively sound, this led me to the Dayton DC25TS-8 1″ Titanium dome tweeter.
Enclosure Design
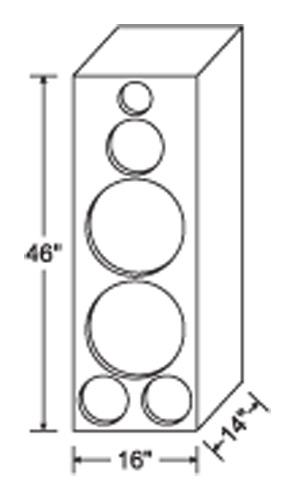
To meet my low end extension goal, I knew that I would need to use a ported enclosure for the woofers. For the maximum in low end extension, two of these woofers would need a very large eight or nine cubic foot enclosure. My concern was more about output and thump in the 35- 50 Hz range, so I decided to use a much smaller enclosure tuned to a higher frequency. I settled on shooting for roughly a 4 cu. ft. enclosure, tuned to 30 – 40 Hz. When it comes to trying to maximize power handling and bass output for a speaker like this, I find that tuning in the 30 – 35 Hz range provides the best results. Since the midrange driver I selected is a standard open-back woofer, it needs its own sub-enclosure. From an ease-of-construction standpoint, I decided that a 7″ internal square running from the front to the rear of the cabinet would be very simple and provide ample driver room. This yields about a .35 cu. ft. sealed enclosure for the midrange, which is sufficient to keep the resonance peak low in frequency and magnitude. The overall cabinet dimensions are 46″ tall, 16″ wide, and 14″ deep. Dual 3-3/4″ x 7-5/8″ ports provide a tuning of approximately 34 Hz.
Amplifier/Crossover Configuration
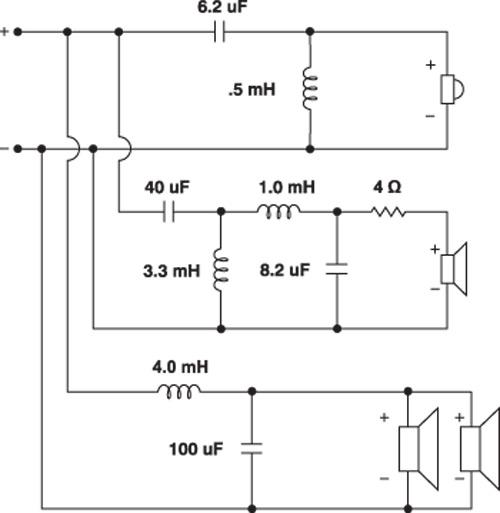
This speaker uses dual drivers for the woofer portion, but I decided to stick with a standard three-way design instead of a 3.5-way design. This was mostly due to the low crossover point, but also to keep the impedance at 8 ohms throughout the entire woofer region. In general, it becomes exponentially more difficult to design a crossover as more drivers are added. This is primarily due to the interactions between the high-pass and low-pass filters on the midrange drivers. One of the best ways to reduce the difficulties in this regard is to allow the midrange to cover a fairly wide frequency range. In this particular design, the midrange is playing from about 400 Hz to 3 kHz, which is almost three octaves and keeps the interactions to a minimum. Because each driver is being used well within its natural range, the acoustic crossover point and slopes stays fairly consistent with the predicted electrical models. The woofers use a second order low-pass filter, which creates a 12 dB/octave slope centered around 400 Hz. The midrange uses a second order high-pass filter, which electrically starts higher in frequency, but which eliminates a bit of a hump in the 600 Hz to 1.2 kHz region. The midrange low-pass is a second order filter at about 3 kHz, which again because of the naturally extended top end response yields roughly second order acoustic rolloff. The tweeter comes in at around 3 kHz with a standard second order filter. Reversing the polarity of the midrange created deep and well-defined nulls at the crossover points, indicating good phase coherency between drivers in the crossover regions. The padding resistor on the midrange driver is more to help shape the response than reducing the actual output of the driver. In reality the sensitivities of all three drivers is a near perfect match.
Enclosure Assembly
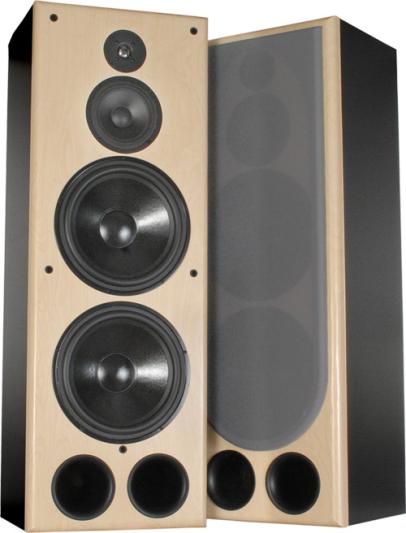
The enclosures for these speakers are constructed of 3/4″ MDF, and it takes almost two full sheets of material. The overall cabinet is a simple three-dimensional rectangle, with only a few extra construction features to add complexity. First is the midrange enclosure, which as I mentioned previously runs the full depth of the cabinet, so is essentially a hollow square tube. This was built separately and then installed as the front and rear panels were secured. Due to the 3/4″ roundover I planned on using along the front edges, I also added some secondary 3/4″ cleats to the front edges of the sides, top, and bottom. This provides extra joint strength and bracing of the front baffle. I cut some of my scrap material down to create cross bracing between the front, rear, and sides. The cabinet finish I chose was the Band-It melamine product, which I like because of its durability and attractive looks. The birch and black finishes would create a nice contrast between the front baffle and sides. However, for a speaker this size, the melamine can get quite costly and the iron-on application is quite time consuming. If I was building this without as much concern for the looks, I would use either peel-and-stick vinyl or a simple painted finish. As it was, wrapping the melamine around the front roundover was quite difficult and required a heat gun, iron, some precise trimming, and very hot hands. • Project Edit: The melamine used has been discontinued. A similar veneer has been substituted.
Conclusion
I would consider this project an astounding success in many terms. The speakers look sharp, sound great, and meet my initial design goals. They do indeed present a very high-fidelity sound that in most situations is comparable to many well-mannered modern bookshelf or two-way designs. The bass is clean, tight, not overemphasized, and only comes into play when called upon by the music. The overall impedance profile remains respectably flat, presenting a healthy 8 ohm or higher load. Underneath the facade of a demure hi-fispeaker is an impressive ability to play extremely loud. These speakers will easily handle 300 watts per channel and will produce PA-level output. Their full-range sound with strong bass down into the mid-30’s holds together well, even at extreme power levels. The clean sound makes these the kind of speakers that will slowly get turned up and up, regardless of how loud they’re already playing, until ultimately limited by the amplifier. In conclusion, these are the perfect speakers for a house party, backyard party, DJ setup, or any situation where high output, strong bass, and a clean sound are needed. And best of all, their ample cone displacement and excursion will allow them to easily handle a loudness button or other “extra bass” setting you may want to throw in for full party effect.
About The Designer
During the daytime, Darren Kuzma is a mild-mannered product manager, handling the everyday business of making sure Parts Express has the best speaker building offerings and the most in-depth information available. At night, the DIYer in him comes out, and he spends most of his time working on projects, fixing things around the house, cooking, and keeping up with the speaker building community. He’s been building speakers for many years, and says “I learned the most by talking to other speaker builders, reading, doing experiments, and by trial-and-error. There’s nothing like getting your hands dirty, that’s why they call it DIY!”
Project Parts List
|
Part # |
Description |
Qty |
|
264-852 |
1 |
|
|
295-490 |
1 |
|
|
275-055 |
1 |
|
|
266-922 |
1 |
|
|
260-515 |
1 |
|
|
260-480 |
1 |
|
|
260-367 |
1 |
|
|
260-337 |
1 |
|
|
260-317 |
1 |
|
|
260-314 |
1 |
|
|
261-612 |
1 |
|
|
260-031 |
1 |
|
|
255-276 |
1 |
|
|
255-250 |
1 |
|
|
255-230 |
1 |
|
|
091-1154 |
1 |
|
|
027-442 |
1 |
|
|
027-427 |
1 |
|
|
027-426 |
1 |
|
|
027-360 |
1 |
|
|
004-4 |
Dayton Audio DNR-4.0 4 Ohm 10W Precision Audio Grade Resisto |
1 |
Built these and used them as the PA for our wedding. Were plenty loud for 250 person wedding outside and now they serve as the mains for my home theater. These things are HEAVY (120lbs) but they are bullet-proof. They took the 280W from a QSC RMX 1450 amp like a champ, but are still articulate enough to do a great job establishing the front sound stage for my theater. Love these, and will be building a center channel version of them soon! Stay tuned!