Mini J Two-Way Bookshelf Speakers


Designer:
Dan Marx
Project Category:
Bookshelf Speakers
Project Level:
Beginner
Project Time:
1-8 Hours
Project Cost:
Under $100
Project Description:
This is a great beginner two-way speaker project that has the potential to provide big sound in a small package at a reasonable cost. The design uses inexpensive drivers and a simple 8-element crossover that works well with all music types. The speakers were originally designed for my teenage daughter as a birthday present and are meant to be used in a small bedroom for basic music listening. Though with that in mind, they exceeded my expectations in terms of sound quality, flatness, sound stage and bass response. So may I present, the Mini J Two-Way Speakers.
Design Goals:
The design goal was $100 two-way vented bookshelf speaker meant for all music types to be used in a small bedroom or living space. An enclosure that is small enough that can be made with leftover MDF from other projects. Weekend speaker project, can be built in one to two days. Little speaker design or woodworking skill required. Big sound in a small package. Simple passive crossover design. All components sourced from Parts Express.
Driver Selection:
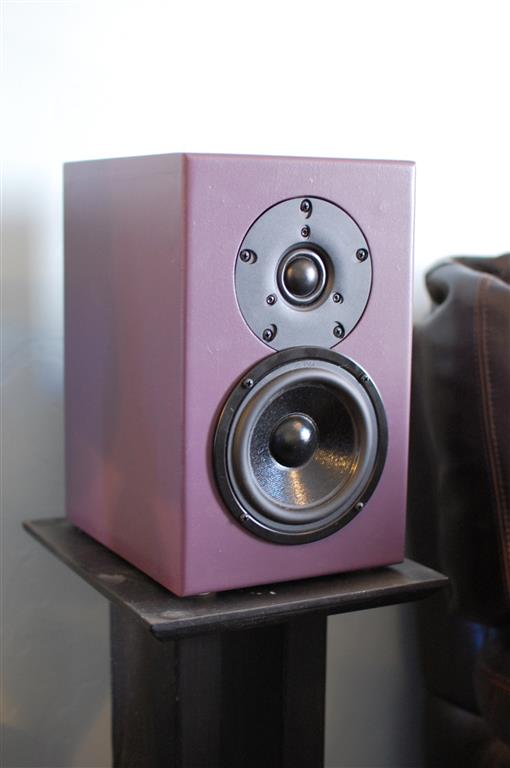
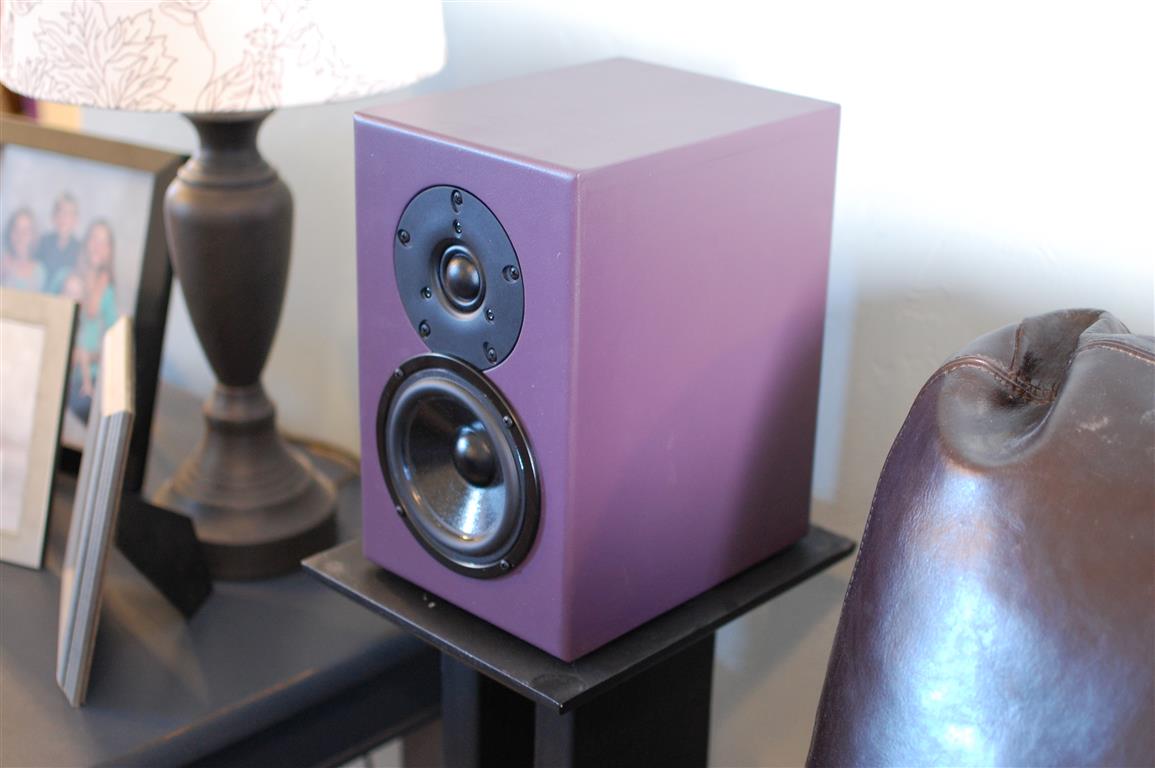
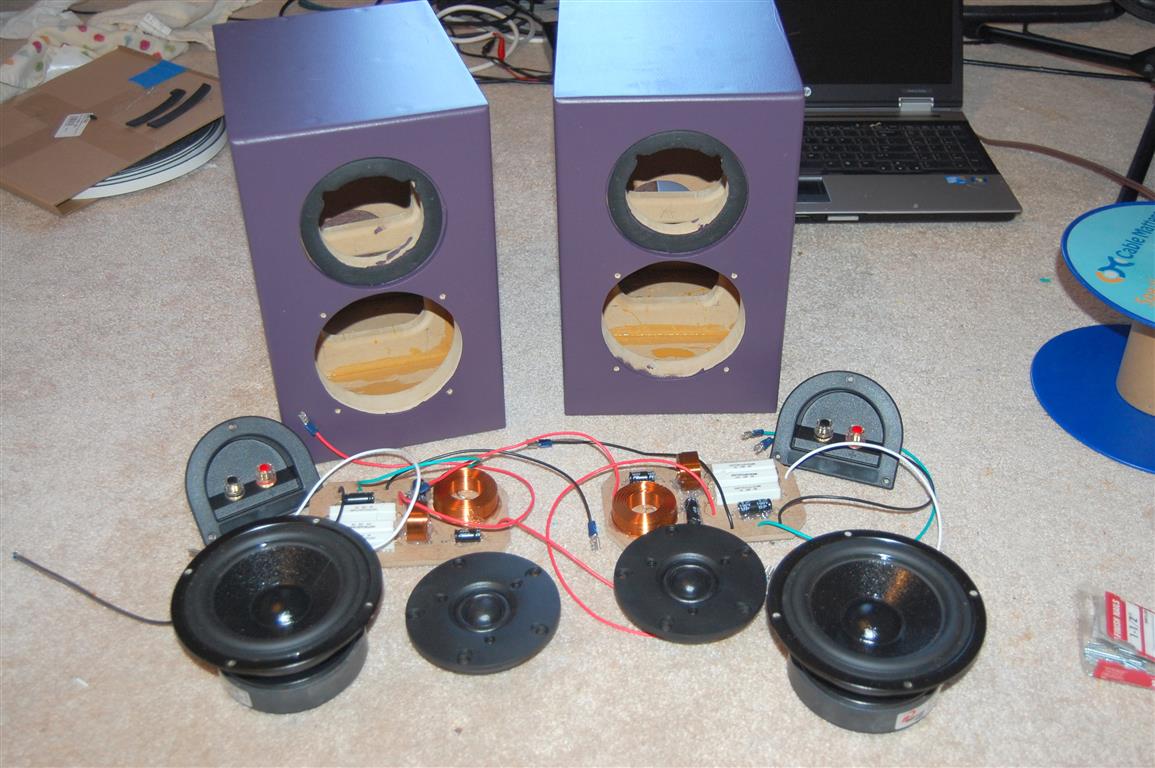
This speaker starts with a Dayton Audio Designer Series 5″ woofer and a 1″ Vifa soft dome tweeter. The DS series woofers from PE represent an excellent value, have a great look, and surprising bass response for a driver this small. Decent Xmax and a low fs make this little driver perform very well in a small cabinet size. The great upper frequency extension make crossing over to almost any tweeter a walk in the park. And for the tweeter I picked the Vifa DX25TG59-04 which has great power handling, low fs, and a smooth, flat response out to 20 kHz. It’s got a wide-roll surround around the dome and just has a great overall look to it.
Enclosure Design:
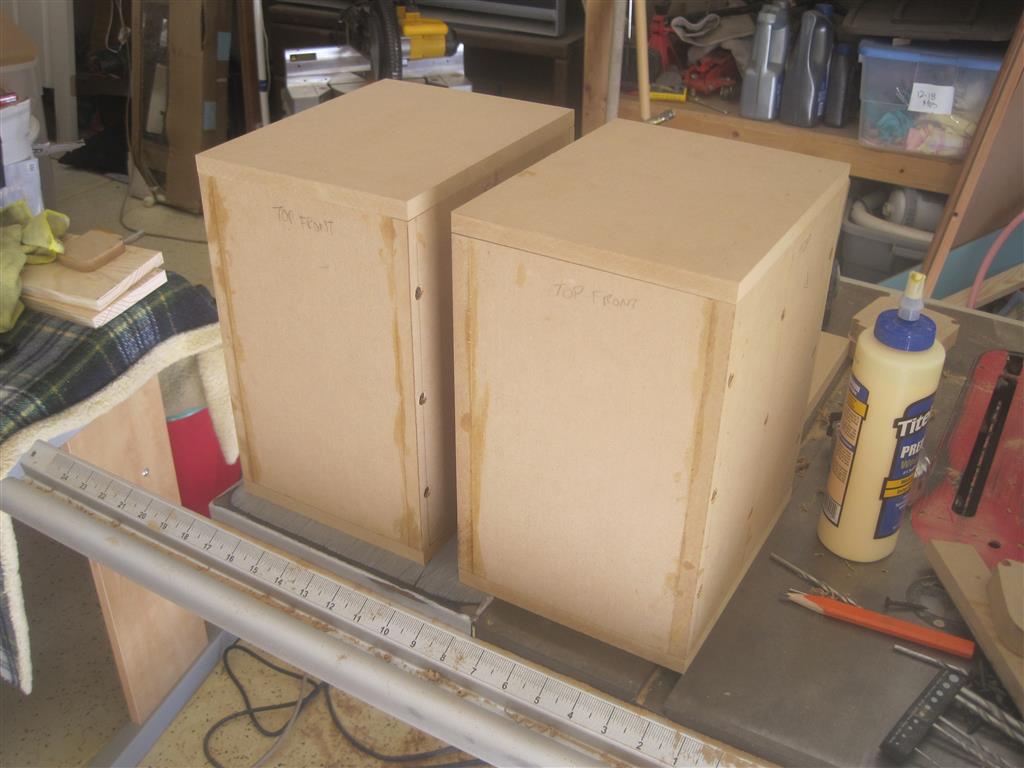
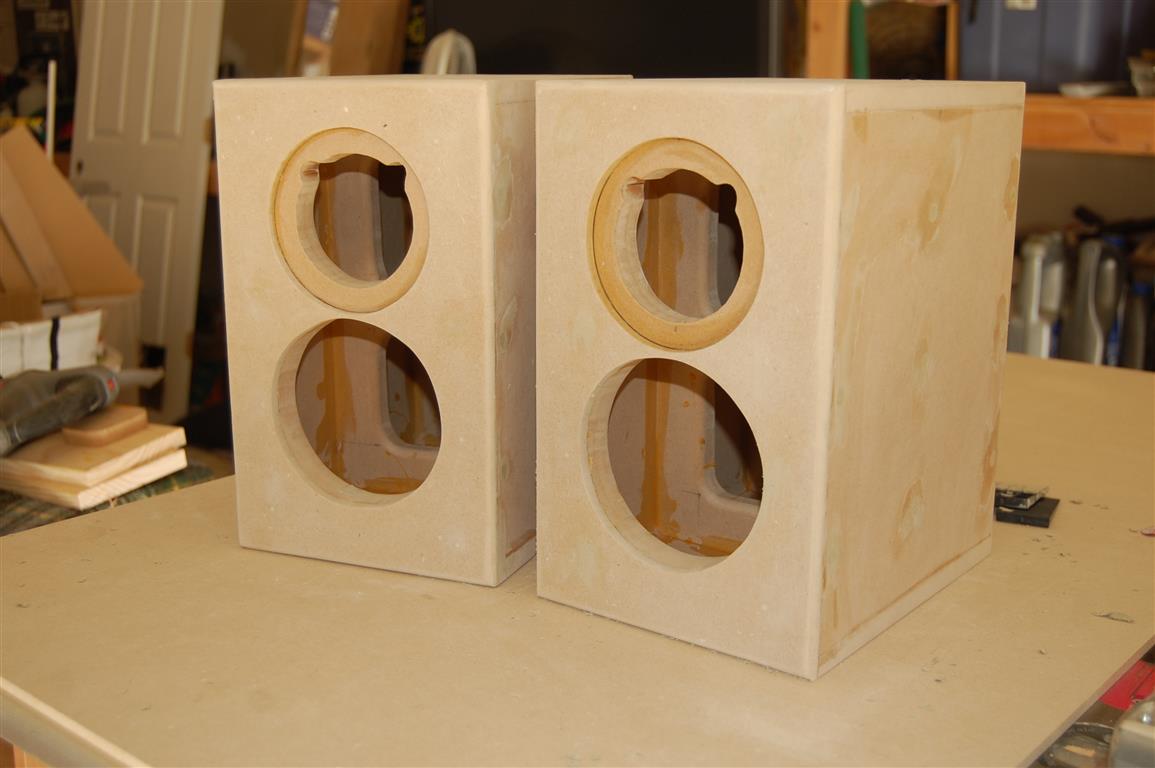
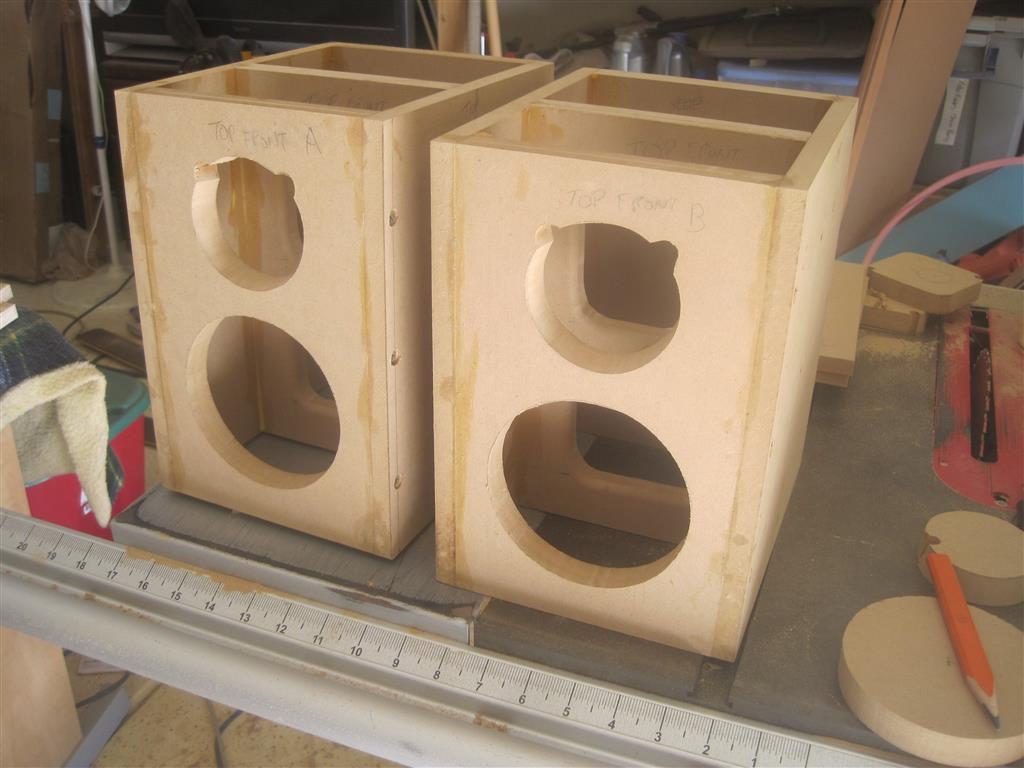
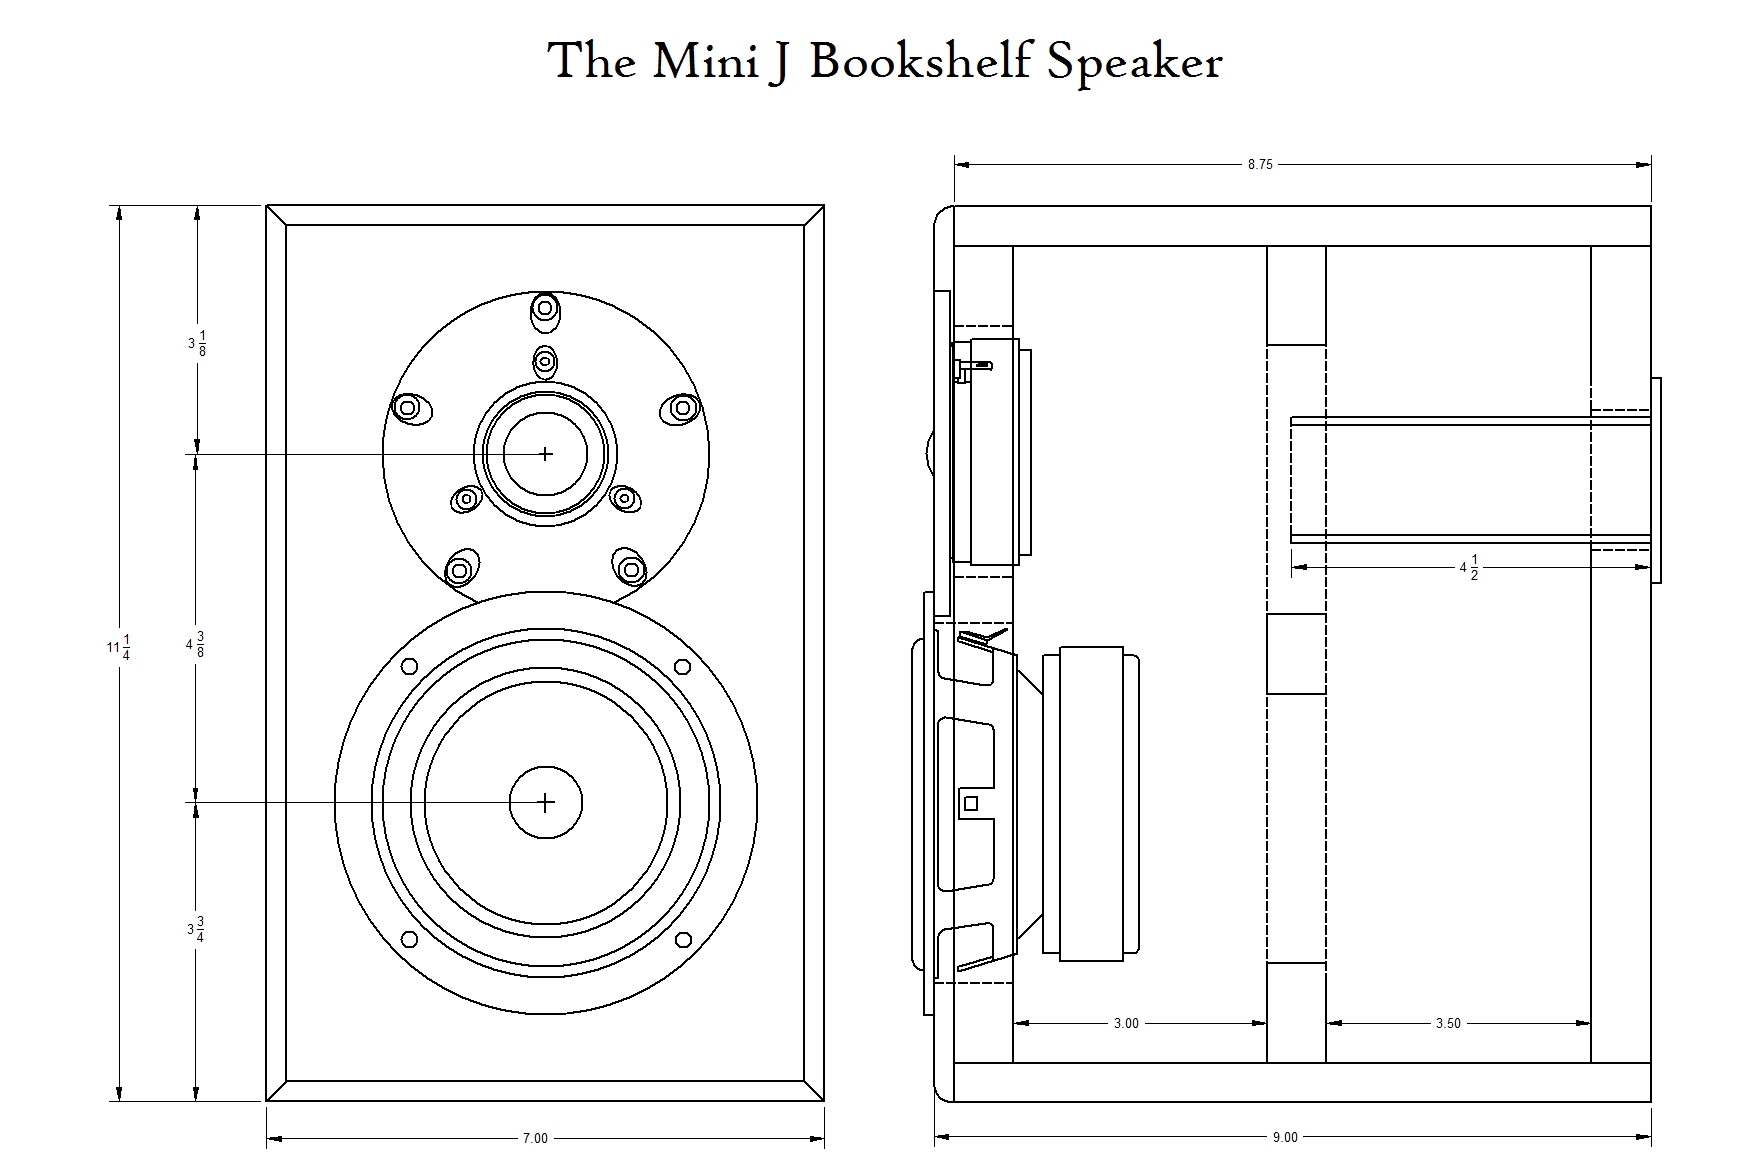
I drew up some initial plans and started tweaking the cabinet volume and shape until I came up with something I really liked. I used Unibox to model the speaker response and ended up going with the Standard Design model which yields an f3 of 59 Hz in a 5.4L cabinet tuned to 56 Hz with no hump or dip in the response. This requires an enclosure size of 11.25x7x9 (HxWxD) using a mixed panel thickness of 1/4″, 1/2″ and 3/4″ MDF. Parts Express had also recommended a similar enclosure volume but they also recommended specific dimensions that meet what’s called the Golden Ratio. So I gave it a shot and I intentionally made the height and width conform to this Golden Ratio which is 1.618:1. There’s some great reading about the Golden Ratio over on Wikipedia if you’re interesting in killing a few more minutes. Aesthetically the most pleasing rectangular shape to look at and quite possibly exhibits superior sonic properties t han other ratios. Hey, but I won’y get into that here. They look great to me and they sound fantastic too.
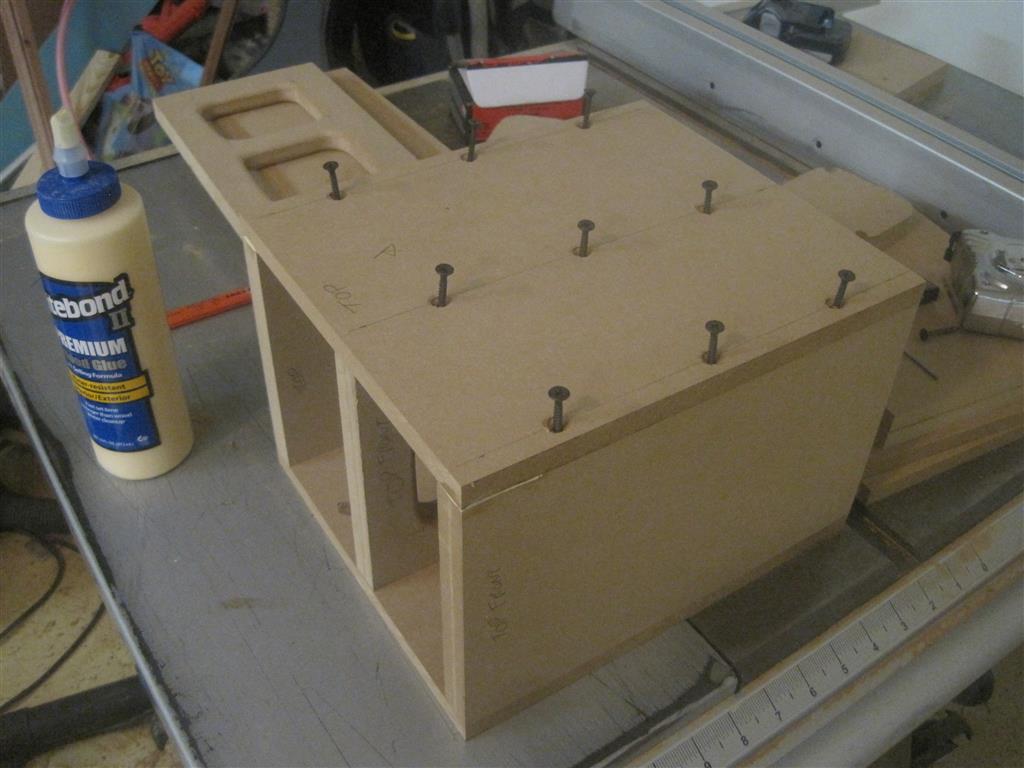
Enclosure Assembly:
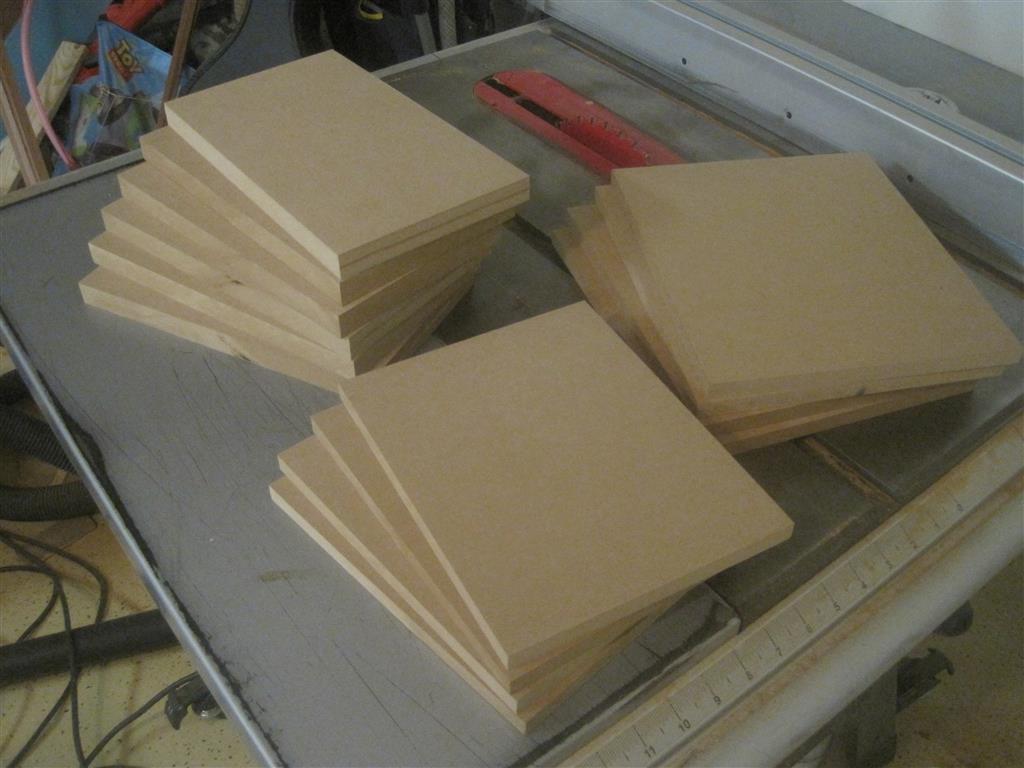
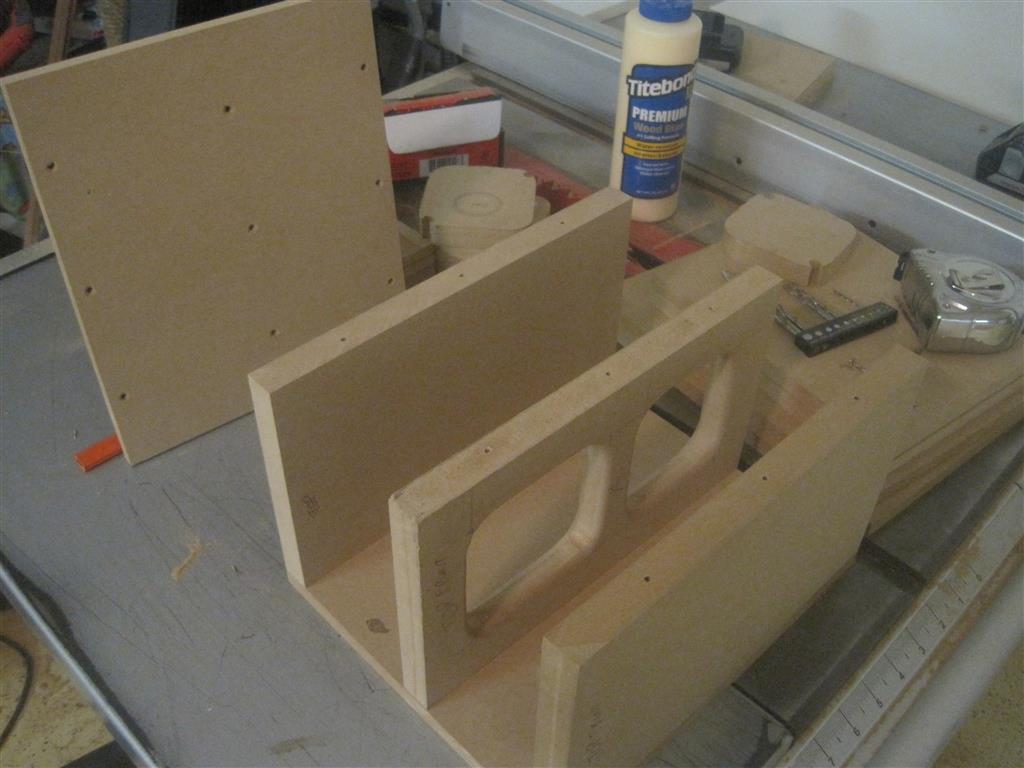
The cutsheet in this case is a little unique since I used various thicknesses of leftover MPF from other projects. The box design consists of (3) panels of 3/4″ MDF that make up the front, brace and back each piece being 6″x10.25″. The sides and top and made up of 1/2″ MDF which are cut at 8.75″x10.25″ (sides) and 8.75″x7″ (top/bottom). These cuts were a breeze on my table saw and were designed this way so as to allow the table saw to be set to each dimension only once and every cut made so that every cut that is dependent on a flush fit when assembled is exactly the same size, even if the saw isn’t cutting each piece at exactly the width it should. It doesn’t matter because all the pieces that fit together that require that dimension just end up being the same. The only cut that matters is the width of the top and bottom pieces which need to be cut to whatever the width of the front/brace/ba ck ended up being +1.0″. With a table saw, every cut comes out near perfect anyway but even if they didn’t, this design allows for a little slop in each cut while still providing a perfectly flush fit. The enclosure has a single internal window brace and is glued and screwed together with butt joints and drywall screws. Nothing too fancy needed here. The tweeter is flush-mounted using a second piece of 1/4″ MDF mounted on top of the front baffle. The woofer sits on top and looks great even without flush mounting due to the unique basket design of the Designer Series woofers. This also allowed me to mount the woofer and tweeter closer together so that the woofer baffle actually overlaps the tweeter baffle which aids in achieving a better “single point” dispersion response. The screws were puttied over in the end, sanded and the speakers painted in a medium dark plum-like purple color.
Crossover Design:
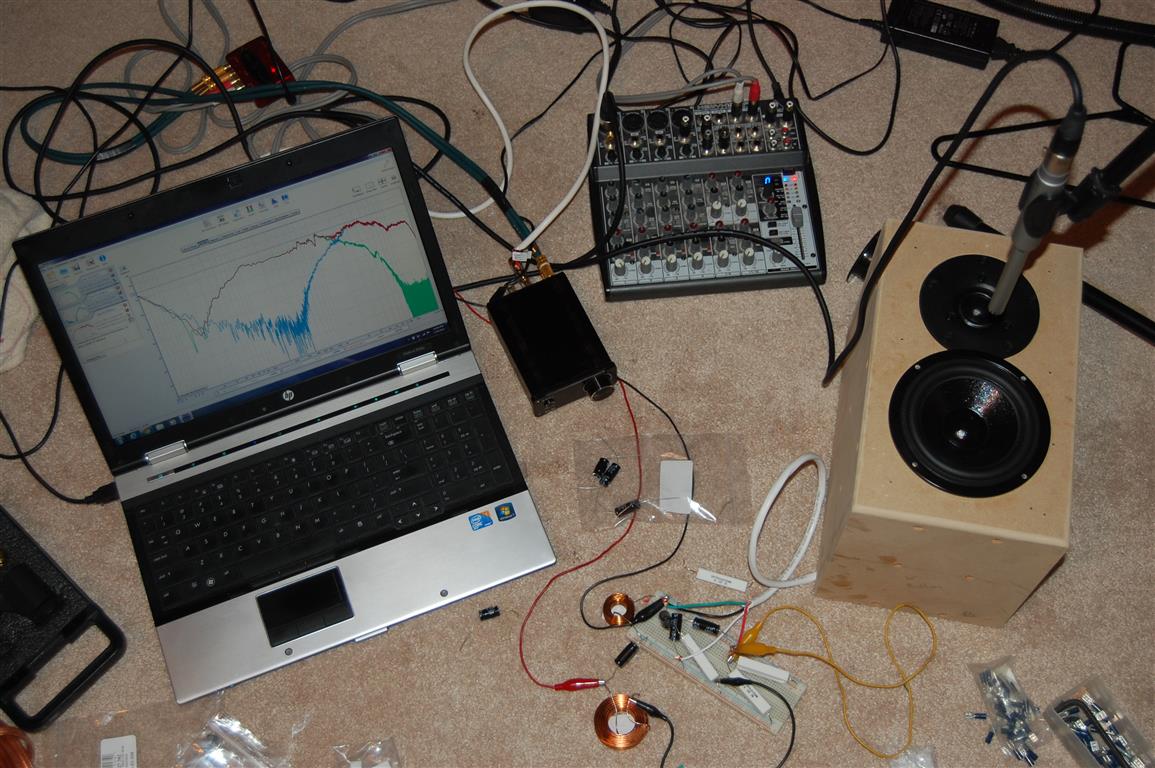
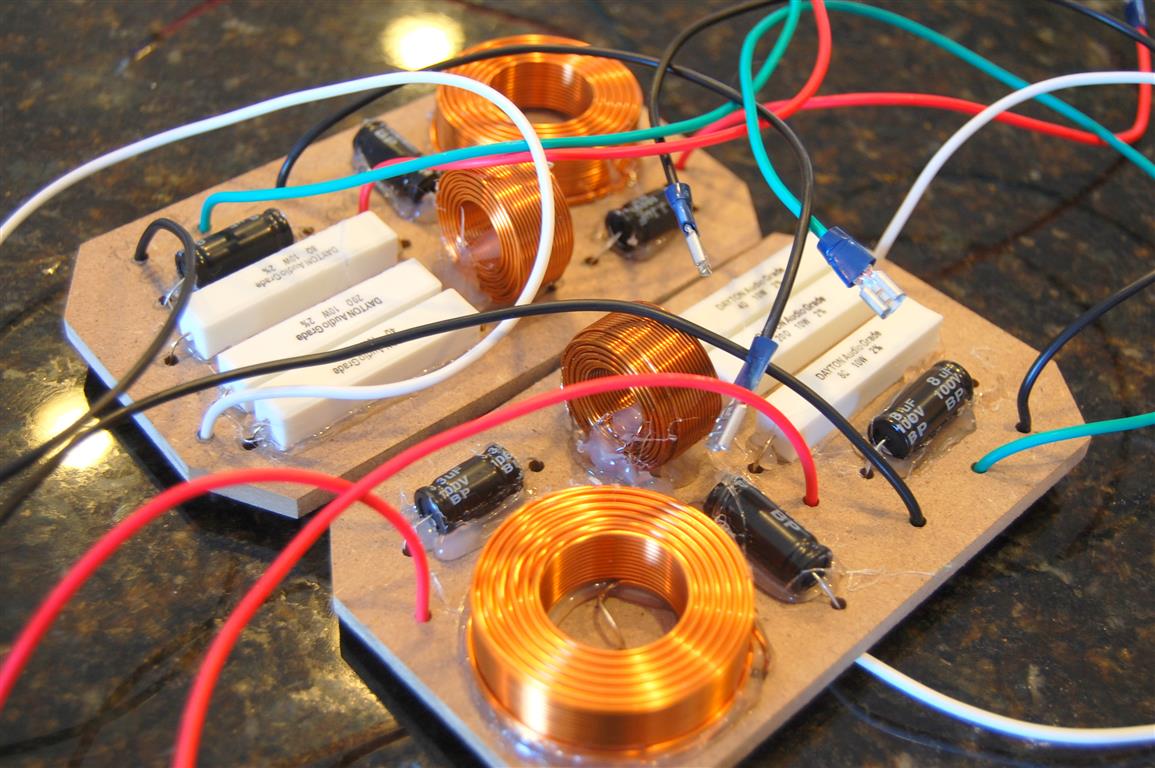
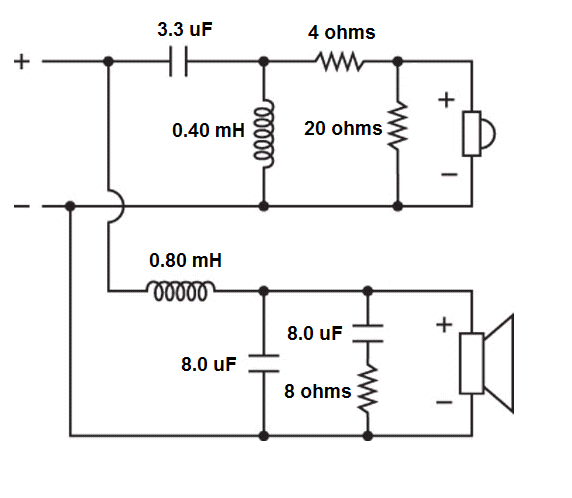
I love that PE provides FR and ZMA data for the Designer Series drivers because it’s makes is so easy to import into crossover designing tools such as Passive Crossover Designer. While the Vifa tweeter did not have raw data, I made good use of SPL Trace to create data from the datasheet by tracing the FR and ZMA plots into data files. I’ll try and be brief on the crossover design and my methods of doing crossover design because quite frankly it’s just that, my method, and I’m still tweaking and proving my method with each new speaker design. I’m not sure I’m there yet, but this is actually a big part of the fun of speaker building. I always shoot for the simplest crossover with the fewest elements to achieve the flattest FR and a decent impedance. I typically add a Zobel network to the woofer to flatten the impedance above fs which helps with the high-frequency roll-off. The woofer is a 12dB/octave set at about 2,700 Hz with a cap value that is about double the textbook design value. This provides a sharper roll-off without peaking just before cutoff. The tweeter also ended up being a 12 dB/octave but wired in phase with the woofer. The inductor in this case is also slightly tweaked to be lower than the textbook value which also increases the slope slightly and according to the simulation blends/sums well with the woofer on-axis. I also added a 4 ohm series resistor and a 20 ohm shunt resistor (aka L-pad) to pad the tweeter and match the overall level of the woofer. It also brings my impedance of the system up to around 8 ohms which is where I wanted it for an easy load to even the cheapest amps. I played around with tweeter balance quite a bit and am happy where it ended up, though the L-pad values could be tweaked to provide a brighter or mellow sound to your liking.
Tips & Tricks:
You can still flush-mount drivers even without a fancy router or router jig by gluing a sheet of 1/4″ MDF over the front baffle which is available at most big box stores.
Buy extra values of capacitors and resistors (and inductors if you can afford to do so) so you can tailor your crossover while listening to the speakers real time. I like to use a small breadboard to test different values and then use alligator leads to clip onto each part while I both listen and take measurement data. It’s great to be able to do rapid A/B comparisons (sort of like getting your eyes checked) and fine tuning what sounds the best to you ears.
Conclusion:
These speakers were a lot of fun to design and to build and I have enjoyed listening to them as often as I can. They have a very subtle and laid back presence to them and actually sound great with all types of music. Vocals sounds rich and warm and overall the speakers give off a bigger sound than they look. Bass is surprising for a speaker this small. Don’t let the low-cost drivers fool you into thinking they are cheap speakers because a well-built cabinet and a decent crossover with quality components tailored for these drivers can really make this setup shine.
About the Designer:
My name is Dan Marx and I’ve been designing and building speakers for over 25 years. And I’ve been purchasing products from Parts Express for about just as long. I’m an Electrical Engineer by trade and a DIY enthusiast by night. I’m married with 4 children and I love to play guitar and piano, I love writing music and watching movies and just spending time with my family and last but not least…designing and building speakers.
Project Parts List:
Hi
Could you contact me? 🙂
Mike
Nice design and write up. I may build it just for fun.
Finaly im about to build theese, with one exeption, i have a pair of xt25 on hand. Do you think they could work with your crossover but slightly different padding? Thnks!
Doing the build now. It’s really not difficult. Hope I like the way they sound. One point…. In building the crossovers you need 2 of the 8.0 uF capacitors for each cabinet not 1 as your parts list says. Thanks for the project plans.
Did the build according to the plan. 1st speaker done. I finished it in truck bed liner. Played it last night and it sounded GREAT with a Tannoy as the right channel powered by a Fisher KX-200. This is a good box. I’m going to make more for my family. Updated cost is over $100 but not by much. I’d post a photo but it seems I can’t