MP-3s

Designer: Anonymous 1
Project Time: 8-20 hours
Project Complexity: Professional
Project Cost: $500-$1000
Driver Selection
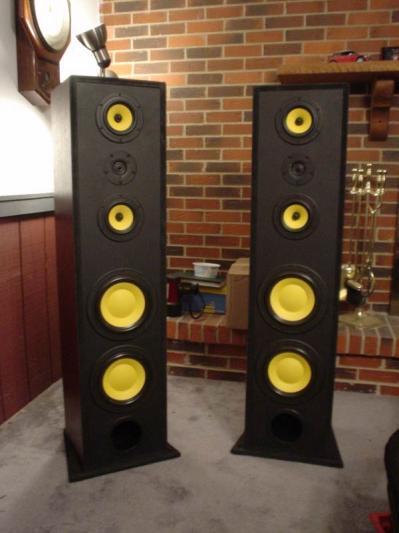
I first thought about an MTM design with 5 or 6 inch mid-basses, and a decent tweeter. Since I wasn’t looking for any typical teenage low-end, my woofer selection was basically anything Parts Express carried. I have used Peerless, Dayton and many other woofers before and was respectively familiar with their sound, but I wanted something new. Hi-Vi was next on my list; I had heard a lot of good feedback about their products from being on the phones as a Tech. From my experience actually hearing the F5 drivers in a setup a few months back, I decided they would do the job. Right about the time I was starting the crossover design; I was wandering through the Project Showcase and came across Vince’s VHT system. The standard D’Appolito design I originally thought of just got a little more complicated. The overall cabinet design he had was right up my alley as far as how much I wanted to do and how in-depth I wanted to get into it. Now that the overall design was in my head, the next things to choose were the tweeters. I needed something with a relatively low Fs but kept a high efficiency (around 92-93 dB). At first glance, the Vifa DX25TG-05-04 was pretty intimidating but after talking to Darren Kuzma about it for about 5 whopping minutes, I decided to try the XT25TG30-04 instead. With an Fs around 500Hz and a 91.5 dB sensitivity it looked awfully delicious, and best of all I hadn’t used it before. I chose the D8G’s. I had two reasons for doing this, 1: the surround on the D8G’s looks a little more treated and looks to be more immune to dry-rot than the 8.8’s, and 2: the overall appearance would be a lot better with all yellow cones offsetting the cherry vinyl I was planning on using.
Enclosure Design
As you know already, I was following Vince’s footprints on design. The cabinets were to be made of MDF with 1-1/2″ thick front baffles and enough internal bracing to support a house. When I was finished drawing these on AutoCAD, each cabinet would have 14 different pieces. Needless to say the cabinets were going to dwarf what he had, due to a vented design and duh, bigger drivers in general. Like I said, I was looking for clean sound that was as dynamic as possible, so for the mids and highs I went 100% sealed, with the crossover located in a chamber behind the upper portion of the cabinet. The woofers being cut off around 450Hz, I decided to go for that added low-end and use a vented design. This would also complement the overall cabinet size I was trying for (at almost 4 1/2′ feet tall, their not bookshelf speakers by any stretch of the imagination).
Amplifier/Crossover Configuration
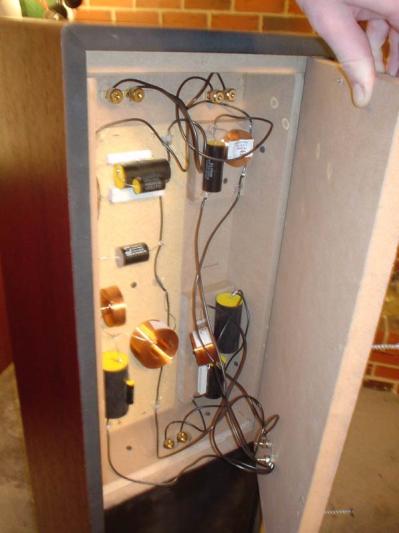
The crossovers are pretty basic, 2nd order all-pass filters on everything with a Zobel on the mids to clean up the upper range. I used all Dayton caps except a couple Solen, when we didn’t show any in stock. Coils were all Jantzen 18 gauge 200 watt, I figured if I ever needed that kind of wattage, I would never have the equipment for it anyway, har har. Everything turned out relatively flat, a couple peaks in the mid section but nothing over 2 dB.
Enclosure Assembly
This is where the fun begins. To date, the biggest speakers I had built were about 30 inches high, made with 5/8″ particle board and no bracing. So the thought “Am I biting off more than I can chew?” crossed my mind multiple times. I had recently purchased a Circle Jig because I was also going to be flush mounting my Vifa’s, something else I had never done and something that can be pretty difficult with just a saber saw. verall cabinet size was 51″ (including bases) x 12″ x 12″. The woofer chamber ended up being about 1.7 feet cubed for both, and the mid chamber ended up being smaller than planned ,but that didn’t affect much due to the 450Hz filter. The divider between the chambers was also 1-1/2″ thick and I placed two 3″ scraps in the lower section for added bracing. Everything was glued, sides were screwed with the least amount of screws possible, just to hold it in place while the glue dried overnight. After the spackle had dried and been sanded, everything was ready for paint. I used old PE catalogs to stand the cabs off the ground just enough to get underneath them as far as I needed, and everything was primed with two coats and sprayed with flat black enamel, again two coats. After the paint had dried it was down to adding vinyl, which I was nervous about doing, and installing everything. The vinyl went perfectly, after taking advise from Darren, and the speakers went smoothly with no problems. Everything was finished around 2:45 AM.
Conclusion
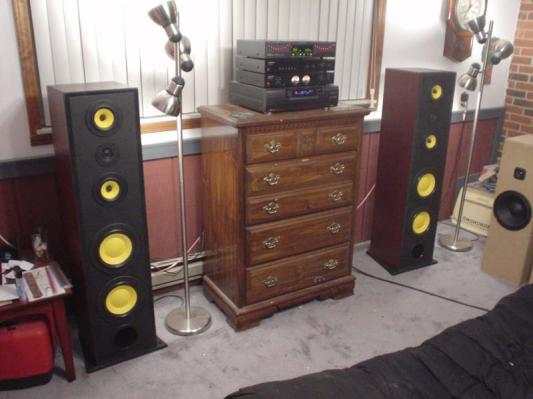
First impression – wow. I immediately knew I met my goal just after listening to one song. I had a live recorded David Crowder CD in my player running through my Audio Source Pre Amp and Amp Two setup (amateur, I know). I found myself turning around thinking there was someone behind me talking or singing. The detail is of something I’ve never heard before, from being able to hear people whisper to each other in the audience between songs or hearing David walk across the stage between others. I listen to music that I’ve listened to for years like I’ve never heard it before. It ended up taking about 3 months to complete and turned out not as simple as I planned, but I feel that it’s well worth the time and money I put into it. I would like to thank Vince, for the general design idea and my father who helped me with the overall construction of the cabinets. Without him these would be another project fed to the junkyard. • This project has been updated to the Millenium IIIs in the Project Showcase. For more info, please refer to that project.
Project Parts List
|
Part # |
Description |
Qty |
|
297-425 |
1 |
|
|
264-1016 |
1 |
|
|
297-435 |
1 |
+ There are no comments
Add yours