Precision Sound With Simple Classical Elegance
Designer: Attila
Project Time: 8-20 hours
Project Complexity: Amateur
Project Cost: $500-$1000
Driver Selection
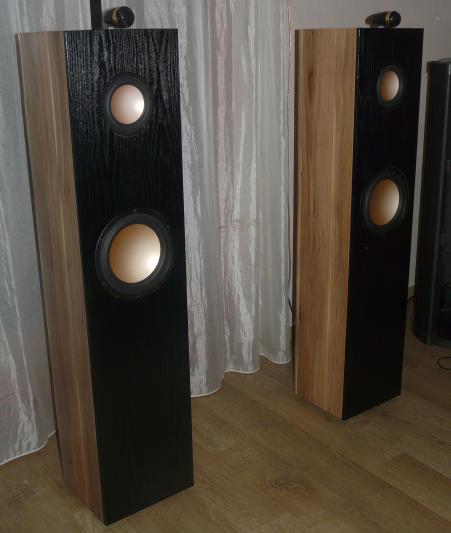
I was set for three-way design, and was looking for drivers that can deliver around 90db, with a flat response curve in the intended frequency range. All this within a reasonable budget. As I had no intention to use a grill on the front, they also needed to look good and have a color different from black. A number of HiVi Research drivers would fit this need. Finally I have opted for M8N as bass, M5a as mid-range and the TN28 as tweeters. This set have great frequency response overlaps, and I particularly liked that the TN28 can be placed on the top of the enclosure.
Enclosure Design
For simplicity, I have opted for a simple box design made out of 2.2cm MDF panels. The width was given by the bass driver size (set for 28 cm) . The height, I simply used the panel dimension ( 1m 22cm) to keep the cuts down. Preferring precision (have a vented sub anyway), I have chosen a closed design (both drivers having EBP between 50-90). With Qtc=0.707, I had 37.8L for the bass and 7.8L for the mid-range. This gave me the 20cm effective depth for the cabinet. In total I had three compartments: the bottom part with two bracers for the M8N, the top part with a vertical split for the M5a as well as the crossover network. The bracers were made out of two MDF pieces, in which I cut 9 identical 5cm diameter holes. I cut the back panel in two so there is access to the X-over if I needed to adjust it.
Amplifier/Crossover Configuration
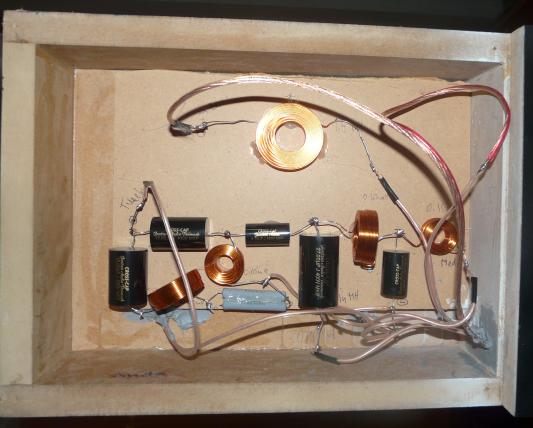
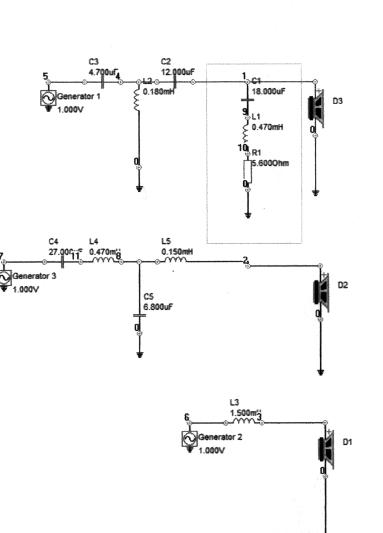
Not having sophisticated measuring equipment, other than my own ears, I have chosen a low risk solution. 1st Oder Butterworth for the low range crossed at 800Hz was an easy choice. Ideally I would have liked a 2nd order for the high range, but did not want to run into phase issues, so I went one up to have a 3rd oder Butterworth, crossed at 4000Hz. Just in case I have added a series Notch filter on the resonance frequency of the tweeter (1600Hz). For components, I have chosen Jantzen Audi for great quality at reasonable price. I have wired the network ready for bi-amp /bi-wire (as my new amplifier can be configured 5.1 bi-am or 7.1 normal).
Enclosure Assembly
The panels were simply glued together with minimal use of screws (only on the side panels) to avoid filling polishing work later. In general I could have avoided even these, but I do not have enough clamping devices to hold all the panels, so the screws simply speed up the assembly. I have used white glue, but chosen the rapid version meant for exterior use for better performance. The panel covering the X-over compartment was simple screwed in place with black screws. All assembly edges were filled with silicon to makes sure it’s airtight, though this is probably not necessary. The speaker holes were cut with router using a homemade jig, while the speaker terminal hole was cut with a jigsaw. The interior walls were padded with a layer of acoustic fibers, using spray glue. I have used copper speaker wires for the internal wiring). The cable leads were filled acrylic filler (better than silicon for your components, and holds longer). Finishing: I have aerosol painted the back panels with mat black. Initially I wanted glossy black painting in the front, but I quickly lost patience. I have found a great product from Germany (this is just about the only thing that you cannot buy from Parts Express for this project), called “d-c-fix” self-adhesive deco foil. I have used glossy back wood for the front and a nice natural wood for the side and top panels. These are easy to apply and frankly look really good. For precision work two people are recommended for this (excellent opportunity to involve family members with the project!).
Conclusion
The drivers need a 3-4 days warm-up (I just run my entire lossless collection more or less non-stop). After that I got what I was looking for: full bodied sound with high precision, making the experience very lively: instruments are extremely well defined, and you can even hear the orchestra turning the page of the partition, the guitar player sliding his hands, and the percussion flees like if it was in your room. The only downside is that I have discovered that I have some poor recordings in my collection, as with this speaker all issues (coughs, background noise, and low quality microphones in live records) are amplified.
About The Designer
Attila Aranyos is first time speaker builder. Having fascinated by both the world of electronics and woodworking, found the best of two worlds in speaker building.
Project Parts List
|
Part # |
Description |
Qty |
|
297-437 |
1 |
|
|
297-409 |
1 |
|
|
297-446 |
1 |
|
|
255-260 |
1 |
|
|
255-228 |
1 |
|
|
255-206 |
1 |
|
|
255-208 |
1 |
|
|
027-928 |
1 |
|
|
027-934 |
1 |
|
|
027-938 |
1 |
|
|
027-274 |
1 |
|
|
005-6 |
1 |
Hi, i’m starting with a project that include the hivi M5n as a woofer/mid woofer and the tn28 in a three way speaker.
Do you have the mesurement files of the hivi drivers?
Thank you