Robert & Curt’s UniCC


Designer: Robert
Project Time: 8-20 hours
Project Complexity: Hobbyist
Project Cost: $100-$500
Amplifier/Crossover Configuration
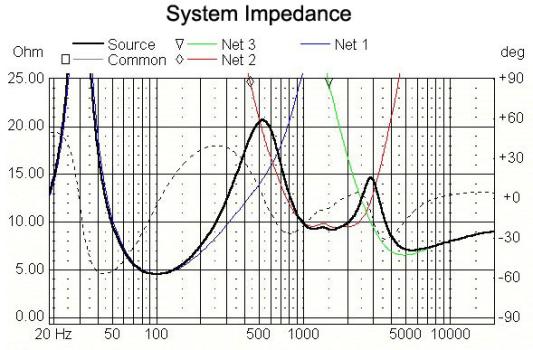
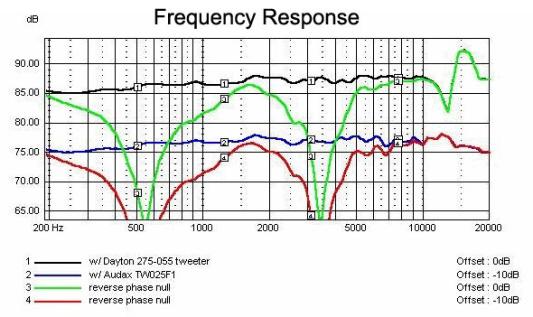
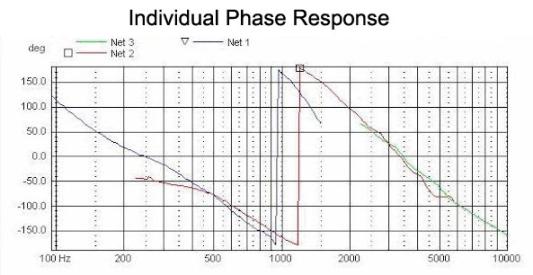
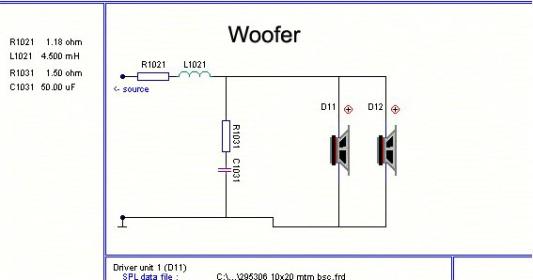
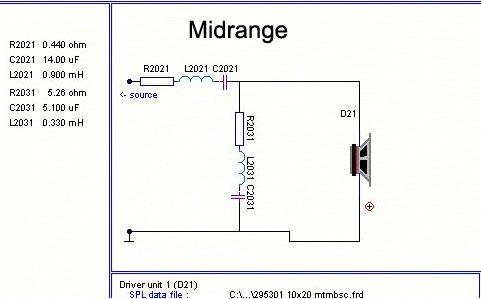
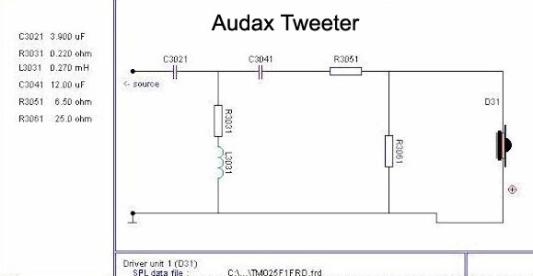
As suggested in the introduction, the Unified Center Channel is a design that can be used with many different main speakers. To help achieve a uniform timbre match between the center and front speakers, you have your choice of three different tweeters. The Dayton Titanium tweeter is great for matching the Dayton Budgets while the Dayton 1-1/8″ Shielded Silk dome tweeter option will work well with the DII’s and other 5-1/4″ Dayton MTM designs. Dayton Titanium and Audax TWO25F1 All the inductors are 18 gauge and the resistor directly adjacent to the inductor is its DCR. The one exception is R2031 in Net 2, which is a 5 ohm resistor + the inductor DCR of .26 ohm. L2021 in net 1 was deliberately spec’d to have the rather large DCR of 1.18 ohm. This raised the impedance minima at 100 Hz to be just below 5 ohms, and besides making this for all practical purposes an 8 ohm speaker, helps with the baffle step compensation. Changing to a lower DCR inductor will “add” roughly a dB of B.S.C., or adding a 1/2 to 1 ohm resistor in series will remove another dB or so. “Note that only the attenuation resistors R3051 and R3061 changed to 6.5 ohm and 25 ohm respectively to accommodate the Audax (TWO25F1) tweeter.” – Curt Dayton 1-1/8″ Shielded Dome The Shieldie option was modeled in LspCAD, based on the PE CLIO files. The only crossover changes made to replace the 270-055 metal dome with the 275-075 shieldie, was in the attenuation resistors R3051 and R3061. R3051 which was previously 4.5 ohms will now be 6.5 ohms, R3061 which was previously 10 ohms will now be 30 ohms. If you are retrofitting the Shieldie in place of the metal dome, minor adjustments to the physical tweeter cutout will be required as the shieldie rear chamber is 1/4″ wider than the metal dome, and the flange is 7/16″ larger in diameter.
Enclosure Assembly
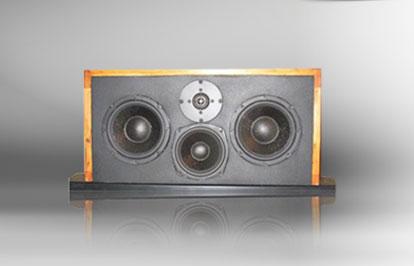
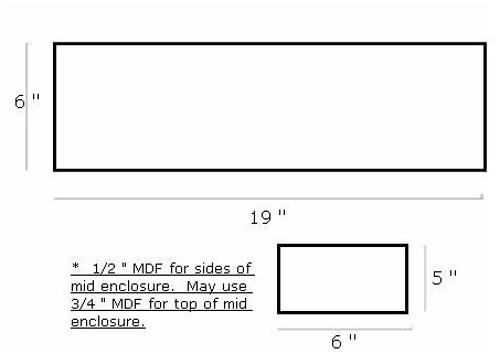
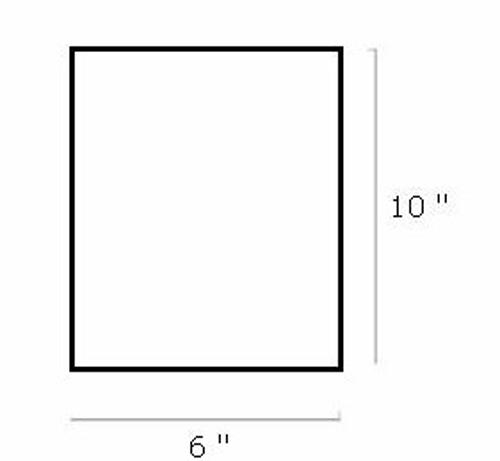
I used 3/4″ MDF for the exterior of the enclosure and 1/2″ MDF for the midrange sub-enclosure. The mid enclosure runs from the front baffle to the rear baffle, and braces the enclosure very well in the process. The tweeter/midrange pair are centered vertically and horizontally on the baffle. The 6-1/2″ drivers are centered vertically and 1″ in from the outer edge of the baffle. All drivers were flush-mounted. External dimensions of the enclosure are 20-1/2″ wide, 10″ high, and 7-3/4″ deep. An aperiodic vent was added to the midrange enclosure to increase it’s apparent volume. The vent is centered on the rear of the cabinet directly behind the midrange driver. The woofer portion of the enclosure is stuffed with about 50% pink fiberglass, and the mid enclosure is 100% with a small dab of dacron for contrast. A square of heavy felt was placed on the rear baffle directly behind each driver. Drivers are sealed with a small bead of “Mortite”-type rope caulk.
Conclusion
My first attempt at a crossover resulted in a harsh, hollow, blaring example. Curt C. came to the rescue offering to model a network based on the information I provided. If it wasn’t for him, this project wouldn’t be off the ground. Thanks Curt! Here is some correspondence between Curt and I discussing the sound qualities of his crossover. “I buttoned the enclosure up and hooked up the crossover. I LIKE it! It blends perfectly with my two Dayton Budget 5 1/4” MT’s. I was a little surprised that the bass was so tame compared to my attempt at a crossover. There is bass, but not what I expected. It is well controlled and actually not needed all that much on the center channel. My real concern was the mid and the tweeter. In my design the tweeter was harsh (you could definitely tell it was a metal dome), and the mid was blaring. In your design, they blend perfectly, no hint of harshness, and the mid is super clear and lends itself perfectly to dialogue. When I first turned them on, I put on “Shrek” DVD. I found myself trying to listen to the two main speakers, searching for sound because in the past they made up for the lack of clarity of the center channel I was using. I equalized the volume of all the speakers with the test tone, and found the new center a perfect match (I use the Large Speaker setting). Even at low levels it is clear and dynamic. In the past it always seemed like I had three separate speakers across the front area. Now, it is more like I have one speaker that puts out sound from the center and also sound comes from the left and right as needed. I hope this makes sense. Kim came home from work while I was testing the speaker. I said to come listen and tell me what you think. This is probably the best comment I can give you. She said, “It sounds so good that it makes the picture clearer”. I noticed the same thing. There is not straining to hear things and your attention goes to the screen.” Final Thoughts I’ve had a chance to do some A/B comparisons of the Dayton 3-way CC design and the Dayton Budget 2-ways. People may think the Dayton budgets are “bassy” because of their ability to go so low in a vented enclosure, but this is not really the case. They actually match very well with the sealed center channel. The timber match is perfect, with very articulate highs, mids, and bass– overall a very clear sound. The tweeter is not the least bit tinny or harsh as I’ve heard others say. Now, with the enclosure well sealed, stuffed and drivers sealed, the bass has tightened up and more solid and the mids are smoother. This is a very nice speaker and will really add to the listening enjoyment of those who own Dayton Budgets. Even though I disassembled my D3’s I bet this center channel would be a great match for those people who have always wanted to use their D3’s, BR-1’s or Dayton HT TM’s for HT. With the Dayton drivers, low component count and ease of cabinet design and great performance, I think this definitely fits into one of the best bang for the buck center channels around.
Project Parts List
|
Part # |
Description |
Qty |
|
295-306 |
1 |
|
|
295-301 |
1 |
|
|
275-055 |
1 |
|
|
255-282 |
1 |
|
|
004-1.5 |
Dayton Audio DNR-1.5 1.5 Ohm 10W Precision Audio Grade Resis |
1 |
|
027-352 |
1 |
|
|
027-418 |
1 |
|
|
255-246 |
1 |
|
|
027-430 |
1 |
|
|
027-414 |
1 |
|
|
004-5.1 |
Dayton Audio DNR-5.1 5.1 Ohm 10W Precision Audio Grade Resis |
1 |
|
027-423 |
1 |
|
|
255-220 |
1 |
|
|
027-548 |
1 |
|
|
255-216 |
1 |
|
|
004-6.5 |
Dayton Audio DNR-6.5 6.5 Ohm 10W Precision Audio Grade Resis |
1 |
|
004-30 |
1 |
Since the aperiodic vent is NLA at PE, what else can be used as a substitute for this design?
Nice speaker would like to know what changes to make to the tweeter crossover if I use the Dayton silk version. Think it would match better with my d3’s