SDSS 1.1 Single Driver Tube Speakers


Designer: Bryce Larson
Project Time: 1-8 Hours
Project Complexity: Amateur
Project Cost: Under $100
Driver Selection
The TB model # is W3-315. I have been told by several people that the paper cone drivers actually perform a little better and don’t have the harshness that the alum cone drivers do.
Enclosure Design
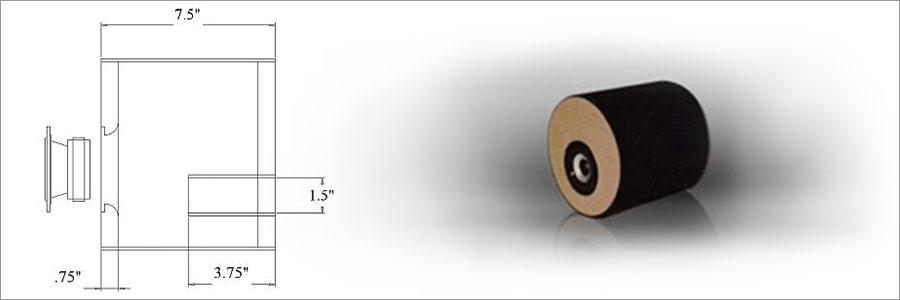
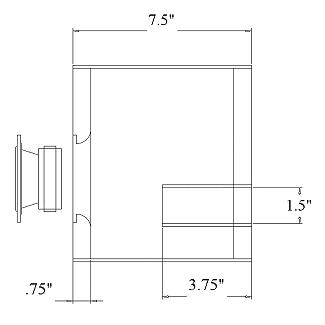
With specs in hand from the TB web site (I have no way of measuring currently) I began the cabinet modeling. I use WinISD to get me close – I find the interface nice and really quick to use. I ended up with a ported 300in^3 enclosure. this may be pushing the driver below what it likes to reproduce, but for the most part I keep these little guys crossed over well above the point where they begin to work too hard. I have a sealed sub that integrates well between 120 and 150 Hz (another submission, another time). The enclosure has a 1.5″x4″ vent – tuning the enclosure to about 73 Hz. The predicted response gets me to about 63 Hz @ -3dbl.
Enclosure Assembly
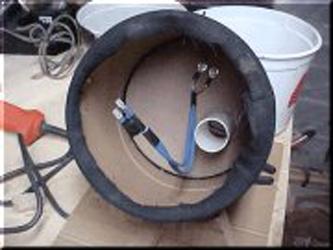
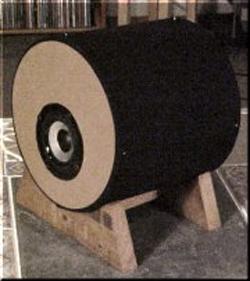
I used cardboard tube with an inside diameter of 8″ for the cabinet. You can find this at most building supply stores – however I got mine at a custom tube rolling place. That way I don’t have to deal with the wax coating that most sonotube has. The baffle and end cap are 3/4″ MDF (mostly because I have it laying around). The port is 1.5″ ID PVC. The interior wiring is CAT5. I used some thick stretchy black knit for the covering of the tube and left the MDF caps unfinished. I used binding posts that I scavenged from a set of Energy Veritas 1.8 cabinets – gold plated and very heavy duty. I built a simple stand from some pallet wood I had laying around. The design is pretty simple – most of the time in construction was spent on fitting the drivers to the front baffle. This is my ever-so-clean work area. I first flush mounted the drivers – this should help smooth the response slightly. Second I cut the hole for the driver – this is pretty straightforward with a fly-cutter (or circle-cutter). You can get these at your local hardware store – they’re a high speed steel blade on an arm out from a 1/4″ drill bit. The blade’s distance from the bit is adjustable. Throw this guy in a drill press and you get perfect circles. I have one that will cut up to 4″ holes – I use it for ports and small drivers. After the hole was cut I used a 1/2″ round off bit on the inside of the baffle to give the driver a little more clearance. It was a pretty tight fit and I was worried about the driver “breathing”. This still left the driver hitting where my spade connectors attached. So I spent a little time with my micro-carving set removing as little of the baffle as possible and still allowing the driver to fit well. The driver is offset from the center of the front baffle to help reduce standing waves inside the cabinet.
Conclusion
I call these speakers SDSS 1.1. It’s an acronym for Single Driver Stubby Speaker 1.1 – because they have only one driver and they look kinda stubby. These speakers are not top of the heap audiophile speakers – but as computer speakers or as in my case, as bedroom speakers they are fantastic. They image like crazy and perform incredibly well on vocals and acoustic music. The high end can be slightly harsh, but for human voices they are superb. I build this pair in about 2 1/2 hours and for under $20. That’s a good investment.
About The Designer
My name is Bryce Larson. I’m a 24 year old guy who has recently found the world of speaker design and building. My background is in Theatre Design and Technical Direction. This means that I have spent much of my life designing technically complicated things that also have to look good – and that I have a good background in sound and electronics – AND that I have access to a really good shop. When I found speaker design I realized that it was a perfect fit.
Project Parts List
|
Part # |
Description |
Qty |
|
264-811 |
1 |
+ There are no comments
Add yours