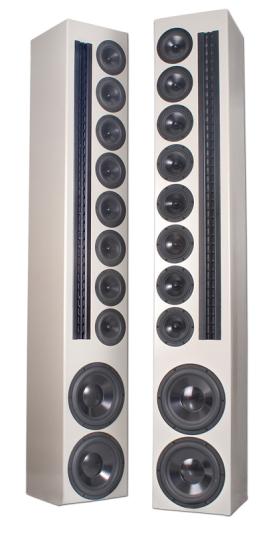
The Colossi
Designer: Darren Kuzma
Project Time: 20+ hours
Project Complexity: Professional
Project Cost: Over $1000
Driver Selection
As I’ve mentioned before, having clear goals in mind is critical for a successful speaker project, regardless of what type of goal it is. In this situation the main goal of the design was purely aesthetic: to create a speaker with great visual impact while at the same time showcasing the speaker building aspect of Parts Express’s business. Despite the aesthetic focus, I couldn’t help but infuse some legitimate Speaker Building principles into the design. Personally, I wouldn’t have been comfortable if the speakers weren’t at least somewhat technically correct and didn’t offer a high level of sonic performance. As such, I chose the drivers, their physical arrangement, and the enclosure size to produce real-world results.
Enclosure Design
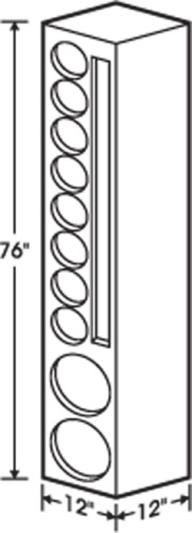
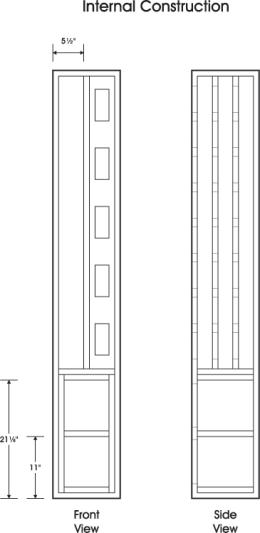
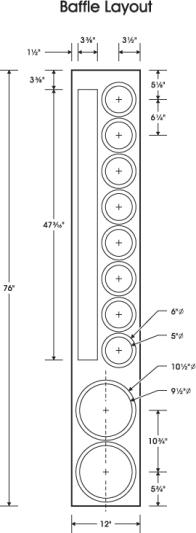
The overall enclosure design for this speaker is fairly straightforward; the external dimensions are 12″ wide, 12″ deep, by 76″ tall. This is separated into four distinct air chambers: one for the tweeter, one shared for the midbass drivers, and one for each subwoofer. Note that the 12″ width is definitely the absolute minimum that could be used for these drivers; I had to do some extra finagling to make everything fit. The subwoofers each have their own airspace, which runs approximately 23 inches up into the main cabinet and ends just below the midbass drivers. The walls for the subwoofer section are made of dual layers of 3/4″ MDF for rigidity. An internal partition separates the upper and lower woofer airspaces into roughly .45 cu. ft. net per woofer, which is ideal for the HO subwoofers. One important feature of this cabinet is a removable rear panel. I don’t normally do this on my speaker designs, but because of the rear mounting that the RD50 requires it is a must. Serviceability should always be kept in mind when designing any speaker-whether it is for the drivers or the crossovers. As such, the subenclosure for the RD50 is just wide enough to physically fit the steel housing, and runs the full depth of the cabinet for access through the removable rear panel. The other half of the upper cabinet is a single large enclosure that the midbasses share. The net volume for all of the woofers is about 1.35 cu. ft., or about .17 cu. ft. per woofer. This is sufficient for an overall Q of .7 for the midbasses, with an F3 of about 95 Hz.
Amplifier/Crossover Configuration
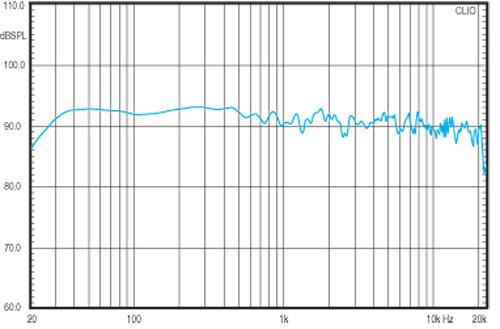
From the outset of this design, I anticipated using some sort of active crossover and a tri-amplified configuration. This is pretty much a necessity for this sort of speaker, which combines vastly different driver sensitivities. The best active crossover/processor for this design would be the Behringer DCX2496, which is an amazing piece of electronic equipment and will do just about any processing that you can imagine, including 48 dB/octave crossovers, delay, parametric EQ, and other sound-shaping filters. Unfortunately, this unit was unavailable while I was finalizing this design, so instead I used the Behringer CX3400 three-way analog crossover with the Behringer Feedback Destroyer Pro as a parametric EQ. Thanks to the high-quality drivers with plenty of acoustic overlap, there is a great amount of flexibility in the choice of crossover points. With the benefit of the active approach, it is very easy to dial in the crossover and EQ that works best in your room and for your personal taste. I found that crossover points of about 80 Hz and 1.2 kHz worked very well with this system. While the crossover point to the ribbon can be pushed lower if desired, I found that for maximum output and the greatest clarity, this higher crossover point produced better results. Some amount of equalization on the BG ribbon is a must in this design, and I found I needed to add about a 10 dB notch around 5 kHz, and also needed to boost the output towards 15 kHz. Much of this unevenness in the output of the ribbon is due to the diffraction along the edge of the cabinet. Otherwise, EQ’ing was minimal, and mostly to overcome room effects such as floor reflections and low frequency standing waves.
Enclosure Assembly
The overall construction of these speakers is similar to what you would find in any other speaker system. The biggest challenge is the physical unwieldiness of the panels and the overall size and weight of the cabinets. With all of the bracing and double-wall portions of the cabinet, I ended up needing three 4′ x 8′ sheets of MDF for the two speakers. I started the construction with the subwoofer portion of the cabinet, and built it as if it was its own enclosure. It measures 10-1/2″ by 10-1/2″ by 23″ with 1-1/2″ thick ends; the rest of the cabinet was built around this to create the 1-1/2″ walls on the subwoofer. Above the subwoofer section, a 3/4″ divider separates the cabinets into left and right air chambers, one for the midbasses and one for the tweeter. Since the tweeter does not play low enough to produce significant cabinet vibrations, no bracing was used in its airspace. The midbass portion was heavily braced with two sets of perforated vertical braces connecting the central divider to the exterior cabinet wall. All joinery was done with biscuits and glue, with some strategic air brads used in the bracing. The leading cabinet edges and top were eased with a 3/8″ roundover bit. It was my first time trying to seal the MDF end grain with diluted Elmer’s White Glue, and I was pleased with the results. When it came time to paint, I was able to get good coverage on the end grain without needing excessive coats. For the finish, I wanted a simple, clean look, and decided that a gray paint would complement the drivers best. The paint is a Sherwin Williams ProClassic Waterborne Interior Latex Semi-Gloss Enamel, which I had tinted Passive Gray. This was thinned slightly and applied with a HVLP sprayer over two coats of primer. About 4 thin coats of paint later, I was very impressed by the even coverage and deep lustre of the paint, especially considering that it was waterborne and dried fairly quickly.
Conclusion
From an aesthetic standpoint, I think the design was very successful, as it has seemed to garner quite a bit of interest in the speaker building community. I have received numerous emails asking about the details of the design. With the standard three-way crossover and EQ confi guration, the design pretty much needs to be tweaked to each individual’s taste. When the Behringer DCX2496 comes back into stock, I will try to make the EQ/crossover settings available on the website, which can be downloaded directly into the processor. The biggest strength of these speakers is their ability to play very loudly and with great dynamics. Considering I drove each speaker with a total of about 1400 watts and I was still not reaching the limits of the drivers, this speaks well for their dynamic ability. Most importantly, this type of design can be created with any number of different possible drivers, and is a good example that anything is possible with DIY speaker building. The future of active crossovers and processors bodes well for those who want to build their own unique and creative designs.
About The Designer
During the daytime, Darren Kuzma is a mild-mannered product manager, handling the everyday business of making sure Parts Express has the best speaker building offerings and the most in-depth information available. At night, the DIYer in him comes out, and he spends most of his time working on projects, fixing things around the house, cooking, and keeping up with the speaker building community. He’s been building speakers for many years, and says “I learned the most by talking to other speaker builders, reading, doing experiments, and by trial-and-error. There’s nothing like getting your hands dirty, that’s why they call it DIY!”
Project Parts List
|
Part # |
Description |
Qty |
|
295-462 |
1 |
|
|
301-960 |
1 |
|
|
264-702 |
1 |
|
|
248-668 |
1 |
|
|
245-868 |
1 |
Sorry for this mega late reply.
I saw these speakers a long time ago on a old Parts Express catalog cover and always thought…WOW what an magnificent looking set of speakers they were, pretty much drooled staring at the pictures of them. I cant imagine how they sounded must have been incredible, I love loud clear music that covers the entire sound spectrum from top to bottom. But I am not near skilled enough like the outstanding speaker builders here are, to ever tackle such a killer project. At least I finally found the project plans though, who knows maybe some day if I have the funds I could hire someone with the skills to build a pair of these monsters. Fantastic work.