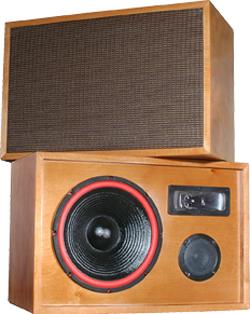
The Golden Boys
Designer: Darren Kuzma
Project Time: 8-20 hours
Project Complexity: Professional
Project Cost: $100-$500
Driver Selection
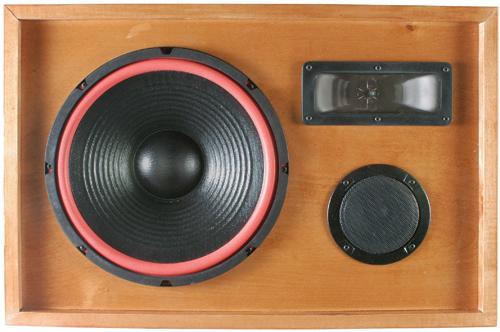
The majority of my driver selection decisions on this project were dictated by my goal to keep the cost as low as possible. In addition, I knew that I needed a relatively large woofer to achieve the desired output levels, aesthetic appeal, and bass requirements. I also kept in mind that I frequently see questions on the Tech Talk discussion board about Goldwood speakers, and the lack of information about them. So, by using them in a project, I hoped to get a better handle on the capabilities and performance of some of their drivers. The woofer that was chosen for this project is a buyout 12″ Goldwood woofer, the GW-1220/8R. I chose this driver primarily for its very low cost, and secondarily for it’s red foam surround, which would match my retro design theme quite well. An alternative to this woofer would be the Pismo Series 12″ woofer, GW-212/8, which will provide slightly stronger bass thanks to its stronger motor and higher sensitivity. The crossover design can remain unchanged for this substitution. As a midrange, the Goldwood GM-65/8 provided the flattest frequency response of any of the sealed-back midranges I tested, and has a healthy power-handling capability. Since I was using a relatively small midrange, I knew that I did not need a tweeter that played exceptionally low. In keeping with the durability theme, the Goldwood GT-1025 piezo mid/tweeter was chosen for its good top end extension and relatively flat frequency response. Despite being called a mid/tweeter, it has a better top-end extension than many other piezo drivers.
Enclosure Design
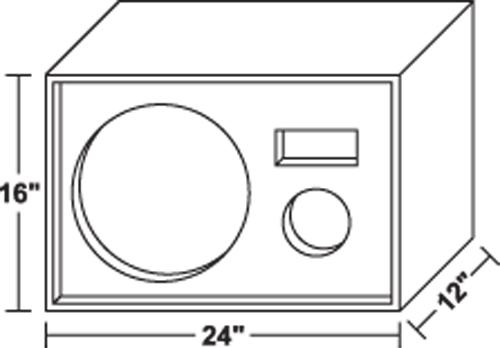
Since we are using a woofer that has a very high Q, we are in a situation where there is no “optimum” enclosure per se’. High Q woofers should be used in sealed enclosures, and the larger the enclosure, the lower the system Q will be. But, it will never drop below the Q of the driver in free air, so at some point we have to draw the line on the enclosure volume due to practical size limits. In this case, I decided to use a 2.0 cu. ft internal volume for the woofer, which translates into a 16″ tall, 24″ wide, and 12″ deep cabinet. Even fully stuffed, this enclosure still leaves the system Q very high, so a larger enclosure could be used if desired. The midrange and tweeter are both fully sealed, so they can simply be dropped into cutouts in the baffle. I want to point out that the horizontal orientation of the speaker is not critical to the design. This speaker could just as easily be oriented vertically with the drivers aligned down the center of the speaker. As a true garage speaker, the horizontal orientation worked better for my application. But, a vertical orientation would place the acoustic centers of the drivers closer together, and may yield slightly better integration between the three.
Amplifier/Crossover Configuration
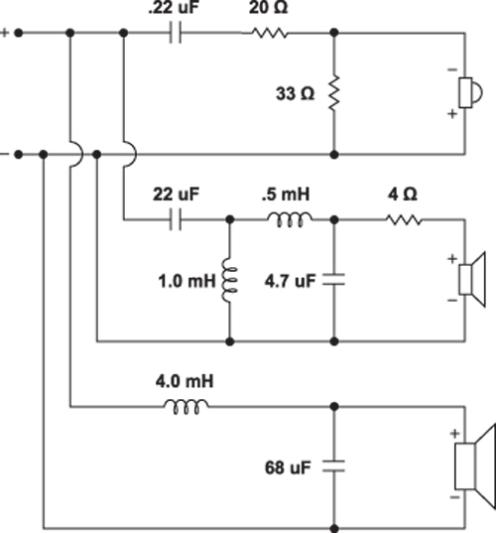
When working with lower-cost drivers, the crossover design is often more difficult than it would be with pricier drivers. Flaws in the drivers must be compensated for, and at the same time an effort must be continuously made to keep the number of components and cost as low as possible. I struggled with the crossover design for quite some time, trying many different topologies to get the desired performance without excess components. In the end, I was able to start with a somewhat more complex crossover, and then carefully eliminate components that were not critical to the design. The crossover on the woofer portion is a straightforward second order low-pass filter. Initially I used a conjugate network to contour the upper end response, but found that it was not necessary to the overall design, and could be compensated for by adjusting the shunt capacitor value. The upper-end cutoff of the woofer is at about 500 Hz. The midrange takes over from 500 Hz through about 6,000 Hz, and uses second order high-pass and low-pass filters. A 4 ohm padding resistor reduces the output by several dB, while propping up the impedance throughout the midrange. The piezo tweeter uses a .22 uF capacitor in addition to a fixed L-pad. In this case, the presence of the two resistors is critical to the functioning of the tweeter crossover; without the shunt resistor the high-pass filter would not function correctly. In true vintage style, a variable L-pad could be substituted in place of the fixed resistors if desired.
Enclosure Assembly
Since these are low-cost speakers, and will most likely be used where the looks are not important, I expect that most people will build them with whatever materials they happen to have lying around the workshop. Plywood, MDF, or particleboard would all work equally well. Construction can be done with simple butt joints, glue, screws, staples, or whatever fastening method is most convenient. The cabinets can of course be left unfi nished, given a clear-coat, or painted. The look that I was going for with my rendition of the design was a vintage, retro look. The cabinet main panels are birchfaced plywood; the corners were mitered to eliminate as much end grain as possible. The leading edges of the plywood were covered with birch edge banding to eliminate all end grain and to provide the look of being built from solid wood. The finish is a pecan stain with a gloss polyurethane clear coat. The vintage oxblood with gold stripe grill cloth by itself was too transparent to provide the look that I was going for, so I needed to layer it on top of standard brown grill cloth. The cabinet can be finished in many different ways, either to match your television or room decor. Since my television is essentially black, I decided to try the Band-It iron-on black Melamine. Instructions for application are included on the packaging, and I found that using kraft paper between the Melamine and iron worked the best. The Melamine appears to be able to take the full heat of an iron without any problem, so work slowly and steadily to make sure that the hot-melt glue fully melts. Apply the Melamine to one panel at a time, and once you have secured the trim with a knife or edge trimmer, work your way around all sides until complete.
Conclusion
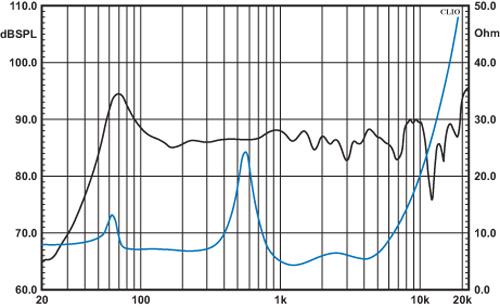
Cosmetically, these speakers have a somewhat cool, vintage look; most people that have seen them have been enamored of the style. The size, while somewhat large for a typical living room, is perfect for a garage or workshop. Considering the design goal was to keep the cost as low as possible, these speakers perform quite well. The drivers, crossover components, and terminals can be bought for less than $75.00 for the pair. Add to this about $20.00 for a 4′ x 8′ sheet of wood, and you can build a complete pair of speakers for under $100.00. When you consider that there are many woofers by themselves that cost more than this, it is even more impressive! Sonically, these speakers deliver the punchy bass and extension that I was looking for. The bass peaks at about 70 Hz, and then output drops off quickly, but this helps protect the woofers from overexcursion and provides great party “thump” without bothering the neighbors. For the best bass response, the speakers will benefit greatly from being placed in a corner or up against a wall or ceiling. The top-end extension of the piezo tweeter is good, and is not excessively shrill or harsh on most musical passages. The speakers do lack the refinement of more costly designs, but they are free from massive midrange peaks and shrill highs that normally plague this type of speaker. All in all, they are very listenable speakers, and with an old high-powered receiver will fill large garages or workshops with plenty of good music.
About The Designer
During the daytime, Darren Kuzma is a mild-mannered product manager, handling the everyday business of making sure Parts Express has the best speaker building offerings and the most in-depth information available. At night, the DIYer in him comes out, and he spends most of his time working on projects, fixing things around the house, cooking, and keeping up with the speaker building community. He’s been building speakers for many years, and says “I learned the most by talking to other speaker builders, reading, doing experiments, and by trial-and-error. There’s nothing like getting your hands dirty, that’s why they call it DIY!”
Project Parts List
|
Part # |
Description |
Qty |
|
290-338 |
1 |
|
|
280-105 |
1 |
|
|
280-062 |
1 |
|
|
266-562 |
1 |
|
|
255-048 |
1 |
|
|
255-036 |
1 |
|
|
027-402 |
1 |
|
|
027-356 |
1 |
|
|
027-348 |
1 |
|
|
027-332 |
1 |
|
|
016-4 |
1 |
|
|
016-33 |
1 |
|
|
016-20 |
1 |
Darren, is the polarity of the piezo tweeter in the crossover diagram reversed on purpose. I’m trying to incorporate a piezo in a design and need something to calm it down…way too harsh. Thanks for posting! Robert
Forgot to check the notification box…saw that the post was older…hope you’re still on.
The original design called for a 12″ woofer that is no longer available. The original design text recommends the Pismo series which is still relatively low cost yet you guys have upsized the woofer to a 15″ woofer that costs about 3 times as much and would not fit in the 16″ wide cabinet design shown if the panel thickness exceeded 1/2″…perhaps you should either show an alternative design with the 15″ woofer or, preferably, quit trying to sell over $150 worth of woofers where the balance of the components typically cost around $30 as this doesn’t seem balanced for the original intent of the design as a low cost garage speaker.
The GW-1220/8R has been discontinued.
The proper replacement is the GW-212/8.