
The Standards


Designer:
Kerry Armes
Project Category:
Tower Speakers
Project Level:
Beginner
Project Time:
8-20 Hours
Project Cost:
$100 – $500
Project Description:
The Standards are a high performance to dollar floor standing speaker. The name comes from two things. First, I wanted to do a finish on these cabs like my favorite guitars, Gibson Les Paul Standards. Second, these are going to be my new reference speaker (until I build something better!).
Design Goals:
I wanted to create a budget oriented, full-range tower with high-end sound. My goal was to keep parts close to $300 before cabinets. Parts-Express knock-down cabinets would be used for my design, but you can always build a cabinet using the same dimensions on your own.
Driver Selection:
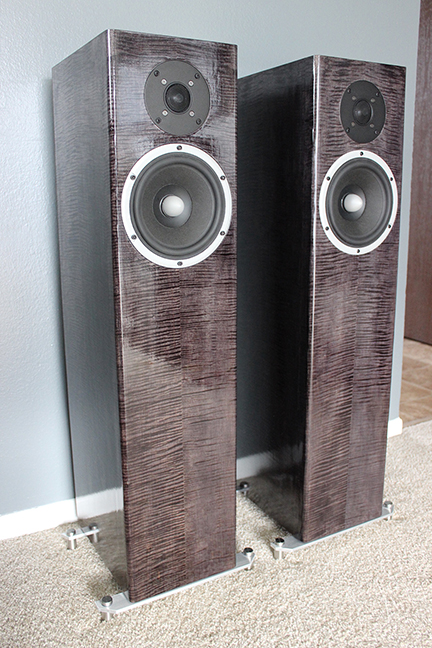
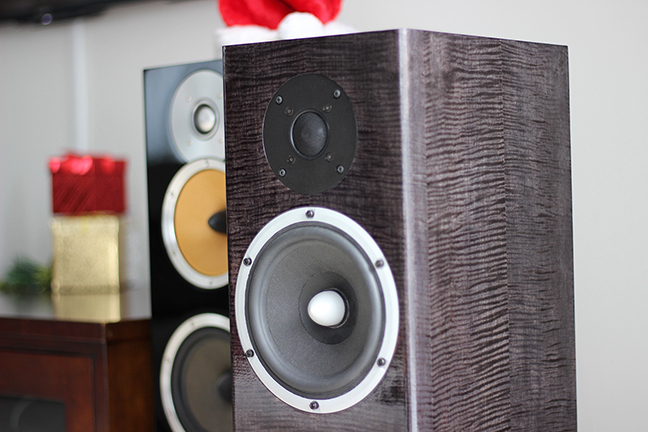
I’ve long eyed the Peerless HDS Exclusive woofers from Parts-Express. They have some additional copper in the motor over the standard HDS line that lowers midrange distortion even further. The silver frame and phase plug make them fairly attractive and they provide a lot of performance without being too crazy on the price. For tweeters, I chose to go with a long time favorite, RS28A. There are no other tweeters that PE carries around that price point that can beat it. I chose the aluminum model over the silk dome RS28F because I personally prefer the sound of metal tweeters.
Enclosure Design:
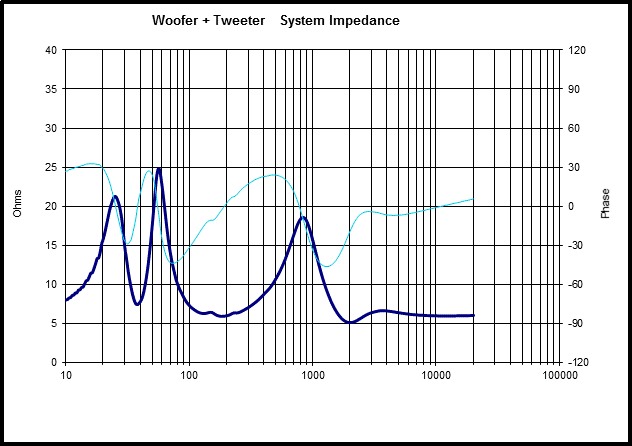
The enclosure is the Parts Express 1.16 cu ft knockdown cabinet. Both drivers were centered horizontally on the baffle with the tweeter located 3” down from the top edge and the woofer 9-5/16” down from the top edge. I used a 3” diameter port that was roughly 9.5” long to tune the enclosure to around 38 Hz. I used a PVC elbow for my port and recessed it about ¼” into the back cabinet. After measuring the impedance, I didn’t need to add any additional length to the elbow I bought to reach my tuning frequency. You can get away with a shorter port if you go with a 2.5” diameter port, but the hardware stores around here didn’t carry 2.5” PVC. If you go with a 2” port, you run the risk of running into some port noise. You might be ok if you go with the 2” Precision Port from Parts-Express, but you will need to calculate your own lengths if you change the port diameter.
Enclosure Assembly:
Using the CNC cut cabinets makes for fairly quick assembly in most cases. My only minor snags were 1) not having enough clamps, which led to a few edges that needed to be filled with wood filler or sanded before veneering, and 2) I had to cut one of the braces to make room for the port. I used the cut pieces in place around the brace to add keep some of the support on the lower end of the cabinet.
I lined the cabinet with two layers of roofing asphalt, 2) I had to cut one of the braces to make room for the port. I used the cut pieces in place around the brace to add keep some of the support on the lower end of the cabinet.
I lined the cabinet with two layers of flashing tape (a roofing material you can pick up at a hardware store) for some damping to the cabinet walls and then covered that with a layer of denim insulation around the driver and leftover eggcrate foam I had lying around the port. I also added a layer of the denim insulation on the bottom of the cabinet over the crossover. You want to make sure you don’t pack too much in the cabinet, as it will lower the port output too much and affect the bass.
After the cabinets were together, I filled any seems and veneered the cabinet using Heat Lock glue and the iron on method. I used figured maple veneer and finished it with Trans Tint black dye and water based polyurethane. I decided to try something interesting for the base for these, but it didn’t work out as well as I had hoped. I bought some aluminum sign standoffs and aluminum bar stock on eBay and decided I was going to make my own outriggers. The bar stock I cut using a jig saw with a metal blade, but I couldn’t get my cuts as straight as I wanted with the jigsaw so I’m not completely happy with the results. I also had an issue where my drill bit must have slid some and didn’t notice, so one of my holes didn’t like up where I wanted it to for the standoffs. The aluminum is much easier to do this on than wood, so be careful if you are using a standard drill and not a drill press.
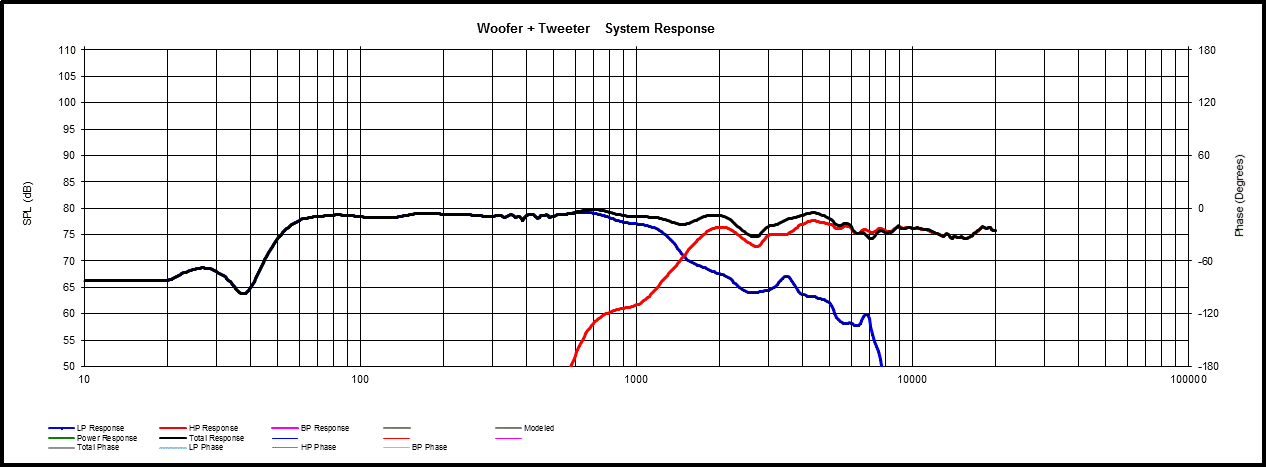
Crossover Design:
I designed the crossover using measurements from Dayton Audio’s DATS and Omnimic software/hardware packages and Jeff Bagby’s Passive Crossover Designer Excel spreadsheet. The crossover was a fairly straight forward damped 2nd order electrical/acoustical on the woofer and 3rd order electrical/acoustical on the tweeter. I used all poly caps in this one to make sure I didn’t have any degradation of the sound from NPE caps on these drivers. My RS28A tweeters measured lower than specified sensitivity, so I only used 2.4 Ohms of padding. I would highly suggest if you build this to buy a few more resistors in .5 or 1 ohm increments up to 5 ohms or so for the tweeter and add resistance to your personal preference. If you end up with a normal sensitivity level, you’ll want more resistance or your speakers will sound bright.
Tips & Tricks:
Using the premade cabinets makes things fairly straightforward on cabinet construction. Just make sure to take your time and get everything lined up as best as possible. Finishing, I learned a few lessons. Using the black dye on the maple, there were a few spots where the glue had seeped through in the productions process on the seams of the veneer as it came, not ones that I cut. This led to a few spots that wouldn’t take the dye. I had to go back and touch these up with a black permanent marker before finishing. I also tried to wrap one continuous piece of veneer around the face and two sides of the cabinet. I wouldn’t try doing this again without using veneer softener. I had a couple problems doing it without, which led to some slight cracking and some bubbling of the veneer in a couple spots close to the round overs.
Conclusion:
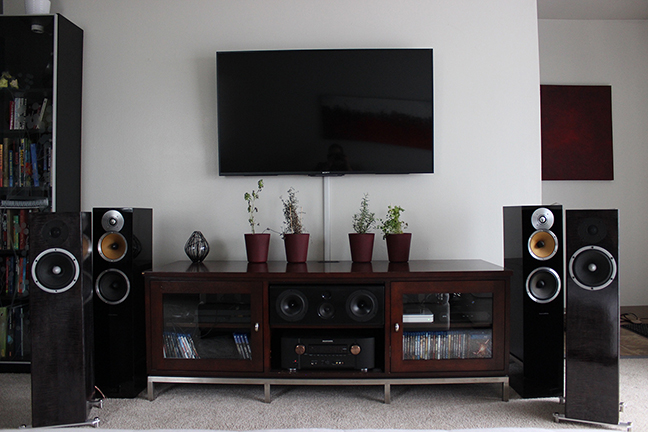
Even though I was using a knockdown cabinet, I wanted to stretch myself a bit on it and try some new techniques. Using dye and working with aluminum were both things I was trying for the first time. Overall, it worked out OK, but could have been better finish wise. Sound wise, these are everything I was hoping for. The bass on these drivers is pretty impressive for being only a 6.5” woofer and would be satisfying for most people without a sub. Everything is very clean and the low distortion drivers really let all the subtle details of the music shine through. They image well, and they have much better dynamics than I expected out of 6.5” 2-way design.
About the Designer:
Kerry recently separated from the U.S. Navy after serving 8 years as a nuclear submarine officer. In his time with the Navy, he picked up a significant amount of experience in acoustic and electrical theory. Today, he works as a Project Manager in Ann Arbor, MI. Kerry has been a long time speaker and DIY addict, beginning with car audio in the ’90s. While other kids were trying to get the most “boom” from their cars, Kerry was installing and tweaking his system for maximum sound quality. Kerry got into DIY crossover design in 2012. Since then, he has designed and built around 2 dozen speakers. Kerry focuses on using high quality, low distortion drivers with wide overlap to get the best sound while minimizing the complexity of a crossover. He looks for unique drivers that offer specific benefits for a chosen design to use in a way that maximizes the positive traits and minimizes the negatives. Kerry recently started a website with instru ctional videos to help other DIY builders learn the basics of crossover design and speaker measurement techniques.
Project Parts List:
I like the ghost black finish. One way to deal with the excess glue is to inspect the woo under a black light–before finishing. Congratulations.
Interesting idea. I’d never thought about trying that.