The Syphons


Designer: Darren Kuzma
Project Time: 8-20 hours
Project Complexity: Hobbyist
Project Cost: $500-$1000
Driver Selection
When a speaker designer is focusing on aesthetics as much as the acoustic performance of a speaker, the driver selection must be done hand-in-hand with the physical design. Before knowing the specifics of the enclosure design, I did know that I wanted the speakers to be somewhat tall and slender. For what I consider a slender speaker, I knew the woofer size would be limited to 7″ or less. To create a greater sense of height, I knew I wanted to do a tweeter-midrange-dual-woofer (TMWW) design. Not only would this help visually, but the three-way design would also give me more flexibility in cabinet shape and placement of the drivers. I don’t think it is any secret that I am a fan of the Dayton Reference Series drivers. The new RS52 dome midrange is one of the few of that series that I have not used, so I figured this would be an excellent chance to give it a try. Since the RS52 uses a neodymium motor structure, it inherently acts as a shielded driver, so flanking it with a pair of RS180S-8’s and an RS28S seemed a natural choice. The result would be stout TMWW that would be very robust and great for home theater use.
Enclosure Design
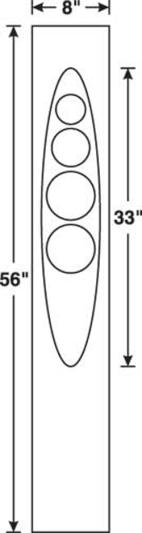
As discussed in the goals section of this article, I was attempting to create a speaker with a somewhat unique look and design, but that kept to a more-or-less standard layout and driver configuration. I spent a lot of time drawing various enclosure shapes and designs, evaluating them for uniqueness and practicality. I didn’t want to design something that was near-impossible to fabricate, nor that required overly expensive materials or tools. The design I settled on I call “Cantilevered Cylinder with Scoop.” The foundation of this design is a basic cylinder, with a “slice” taken out of it. The football-shaped baffle creates an interesting set of curves and lines, while the rearward slant adds a graceful touch and prevents the speakers from being too industrial looking. Metal legs serve a dual purpose of supporting the cantilever and allowing clearance for a downward-firing port. The final dimensions of the speaker cylinder itself are 8-3/4″ diameter by 56″ in length. A 10 degree rearward sweep plus 2″ tall legs yields a final height of 57″. The gross internal volume of the cabinet without the scoop, port, or internal bracing is approximately 1.6 cu. ft. With the 3″ x 8″ down-firing port, the net usable volume seen by the drivers is roughly 1.1 cu. ft.
Amplifier/Crossover Configuration
As I mentioned earlier, this project was conceptualized as a three-way design. The crossover points that I finally settled on were 550 Hz and 2.5 kHz. These points allow both the midrange and tweeter to operate fairly stress-free. The crossover slopes are second order, though as you can see it took quite a few components to hit these acoustic slopes, especially on the midrange. The woofer crossover is straightforward enough due to the low crossover point, and the second order electrical filter does indeed produce a second order acoustic roll-off. The midrange however, is another story. Second order electrical filters provide the majority of the filtering, but these are supported by a resonance notch filter on the low end and an impedance compensation network on the high end. In addition, a high-frequency trap of sorts is added on the shunt leg of the low-pass filter, which helps to tame the large breakup peak around 10 kHz. A padding resistor is also included to reduce the output by a decibel or two, but it also helps keep the impedance from dipping too low. The tweeter uses a second order filter, a slight bit of padding, and an impedance compensation circuit to help flatten the response. I found the impedance compensation circuit to also help keep the top octave from drooping quite as much. I will mention that the net impedance of these speakers is reasonably low, and these speakers definitely qualify as 4 ohm speakers. On the positive side, the speakers may only dip below 3 ohms for a brief range, so shouldn’t be hard to drive with a 4 ohm stable amplifier.
Enclosure Assembly
I will start off by saying that I don’t really expect anyone to replicate this speaker exactly, but the construction approach is actually not too hard to execute, and could be used with other systems. The basic cylinder was built out of standard 8″ nominal cardboard concrete forms, available at either home supply stores or from commercial concrete suppliers. For the best sonic performance, the walls should be as thick as possible, but the principal can work even with thinner walled tubes. To create rigidity for the cabinet as a whole, I created a rib-like structure on the inside of the cardboard tube. The ribs were 1-1/2″ wide by 3/4″ thick, running the entire length of the tube, with 12 ribs per cabinet. These ribs were attached to the cardboard with polyurethane glue. On the inside, the ribs were supported by a series of wooden rings that fit snugly and were glued tangentially to all of the ribs. The result was a stiff skeleton similar to the construction used on ships or canoes. To create the scoops, I first built a jig out of 1/2″ PVC pipe, which was tensioned to create the scoop profile. This profile was traced carefully onto the cylinders, wherein the lines on the cylinders were cut freehand with a reciprocating saw. The curved baffle was constructed out of three laminations of 1/4″ plywood. Each lamination was applied and secured before the next was attached. The baffle was applied oversized, with final trimming coming from a reciprocating saw, handsaw, and sanding block. Since much of the final shaping was done by hand, it took several passes of sanding and body filler to finish things up. Since I was unable to obtain thick-walled tubes due to time constraints, I had to apply some extra reinforcement to the tube walls. After the ribs were in place and the scoop was cut, I mixed up a gallon of epoxy resin, and poured half into each cabinet. I carefully spread the resin and rotated the cylinders to cover the entire insides of the cabinets with resin. Once hard, this created a hard shell that was rigid even between the ribs. The finish on these speakers is a Formica brand brushed aluminum-look laminate. It is not a true metallic laminate, but merely a silver-colored laminate with a texture that is somewhat brushed looking. Does it look like real brushed aluminum? No. But, it does look somewhat more aluminum-like than standard gray laminate. From my research, there are several true metallic laminates available, but they are quite costly and cannot be curved very much, if at all. The laminate was applied with contact cement and trimmed by router, laminate trimmer, and a hand file.
Conclusion
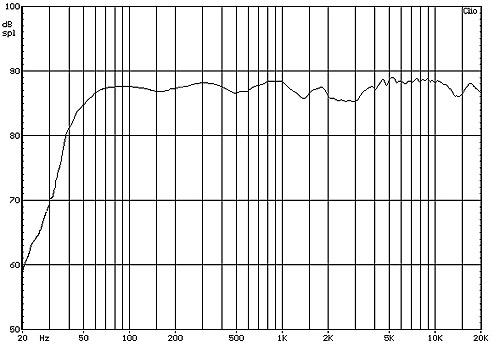
From a construction and design standpoint, these speakers are sonically indistinguishable from any typical box speaker I have heard. So, in that regard I would consider these speakers a success. In my mind, while I do like unique designs, if they are done at the expense of good sound, then that presents a problem. One of my goals of this project was to give the RS52 a try, and I am very happy that I did. The midrange performance of these speakers is especially sweet, in a way that only a dome midrange can do. It blends extremely well with the other aluminum-cone drivers, and the transition from driver to driver is seamless. It did take a fairly involved crossover to implement this driver, but this is partially due to the targeted second order slopes. I have a feeling that shooting for a fourth order slope may actually require fewer components-on the midrange at least. I would describe the overall sound of these speakers as laid-back and clean. I paid careful attention to the voicing of the upper midrange region, with the hopes of creating a very smooth sounding and non-fatiguing speaker. I believe I succeeded in this from my listening sessions, and my voicing preference can be seen as a bit of an upper midrange droop in the measurements. All in all, this is the type of speaker that is difficult to find any faults with. I am tempted to build a second pair as a conventional tower; I think as a demure 8″ wide, wood-veneered mini-tower, these speakers would be very sweet sounding and tough to beat.
About The Designer
Darren Kuzma has been a speaker building enthusiast for many years, and enjoys creating speakers that are unique and out-of-the-ordinary. His designs combine solid technical design principles with creative shapes, colors, and materials. When asked how he learned about the hobby he said “I’ve learned the most by talking to other speaker builders, reading, doing experiments, and by trial-and-error. There’s nothing like getting your hands dirty, that’s why they call it DIY!”
Project Parts List
|
Part # |
Description |
Qty |
|
295-364 |
1 |
|
|
285-020 |
1 |
|
|
1 |
||
|
268-328 |
1 |
|
|
268-322 |
1 |
|
|
268-320 |
1 |
|
|
255-430 |
1 |
|
|
255-268 |
1 |
|
|
255-250 |
1 |
|
|
255-238 |
1 |
|
|
255-230 |
1 |
|
|
255-202 |
1 |
|
|
255-198 |
1 |
|
|
027-443 |
1 |
|
|
027-440 |
1 |
|
|
027-430 |
1 |
|
|
027-421 |
1 |
|
|
027-418 |
1 |
|
|
027-360 |
1 |
|
|
005-.5 |
1 |
|
|
004-4 |
Dayton Audio DNR-4.0 4 Ohm 10W Precision Audio Grade Resisto |
1 |
|
004-3 |
Dayton Audio DNR-3.0 3 Ohm 10W Precision Audio Grade Resisto |
1 |
|
004-20 |
Dayton Audio DNR-20 20 Ohm 10W Precision Audio Grade Resisto |
1 |
i want to buy all of the crossover parts email me a complete list please
My thoughts are Darren has kicked up the DIY field of true high end fabrication, by not only designing top notch, well thought speaker designs. But also making dreams (come true) possible, for all of us lucky enough to be living within internet time. My hat goes off to a person that not only had the drive and dedicated mindset, to bring affordable true high end speaker sound, in to the center. With a line of speakers we average Joe’s, could get our hands on. To quench our thirst for that sound. We audio buff’s dream about! And that big side effect of putting PE on the map. Might I add if music be our food of love, Play on brother Darren