UX3
Designer:
Dan Poinsett
Project Category:
Bookshelf Speakers
Project Level:
Intermediate
Project Time:
8-20 Hours
Project Cost:
$500 – $1,000
Project Description:
UX3 is a compact stand-mount 2-way loudspeaker utilizing a 7″ woofer and a large format ribbon tweeter.
Design Goals:
My design goals with this project were to build a compact high end speaker with high output potential
Driver Selection:
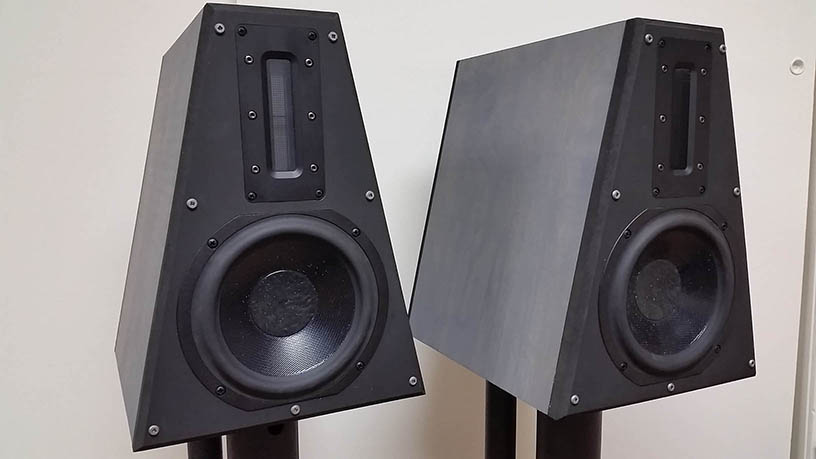
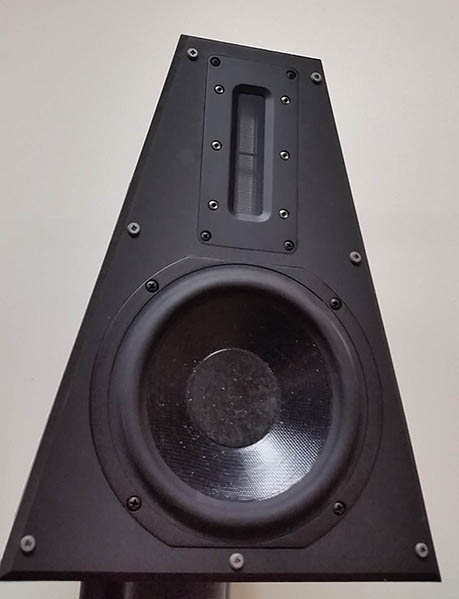
I chose the Fountek Neo X 3.0 ribbon tweeter because I wanted to use a ribbon tweeter, but needed one robust enough to cross to a 7″ woofer in a high output design. This tweeter seemed to have good reviews and has a relatively large diaphragm so I gave it a try.
The Usher 8836AC was chosen due to it’s wonderful reputation and truncated frame, allowing closer placement to and better visual cohesion with the Fountek tweeter.
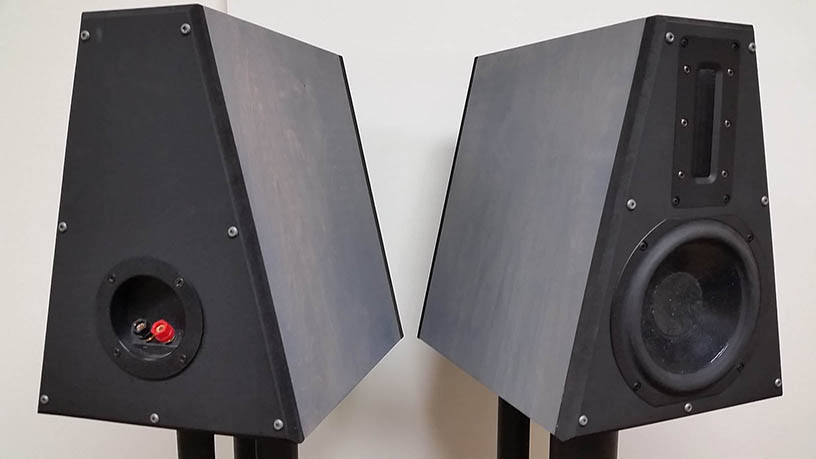
The shape of these drivers allowed me to install them both on a very svelte trapezoidal baffle.
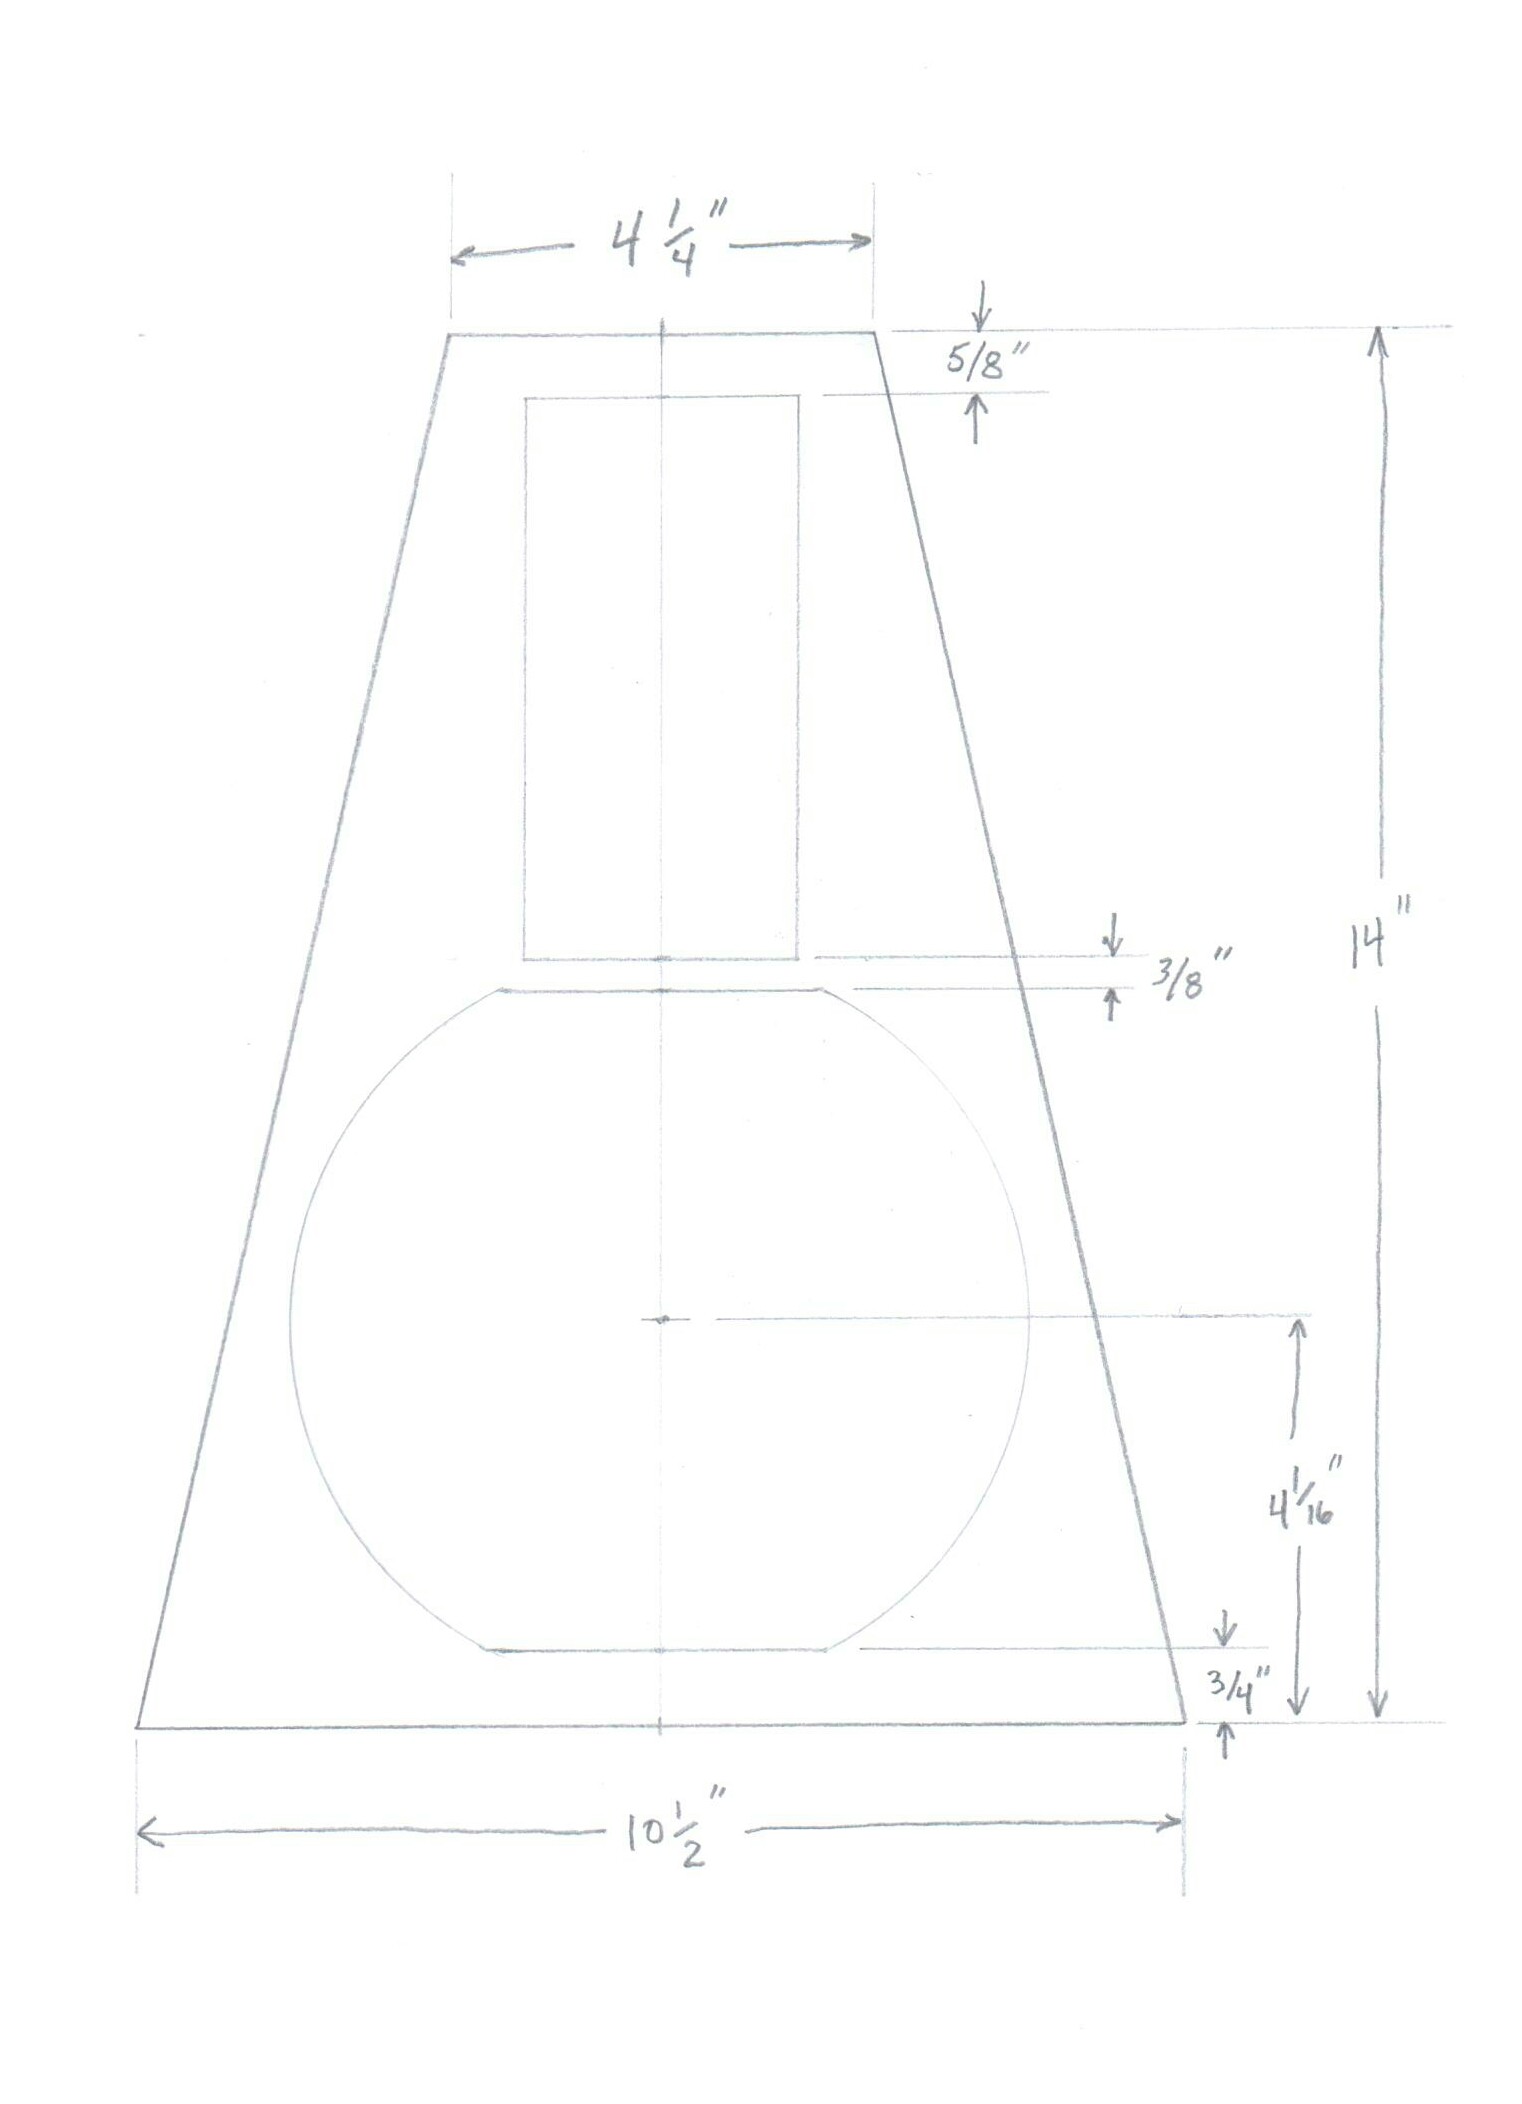
Enclosure Design:
The enclosure design was straightforward in that it is a simple sealed box of approximately 1/2 cubic foot. The angles of the enclosure are a little more complex than usual though, as are the recesses for the drivers.
The enclosure is a trapezoidal prism, 14″ tall, 13.5″ deep, and increases from 4.25″ wide at the top to 10.5″ at the bottom (external dimensions). I used 18mm Baltic Birch for the top, bottom and sides and 3/4″ MDF for the front and real baffles. A single trapezoidal brace joins the two sides from the top of the enclosure to about the middle. I lined the enclosure with 3.5″ thick fiberglass, which filled about 75% of the internal volume. Measured F3 is about 48Hz and the Qtc is about 0.9 which gives a very full, warm bass.
Enclosure Assembly:
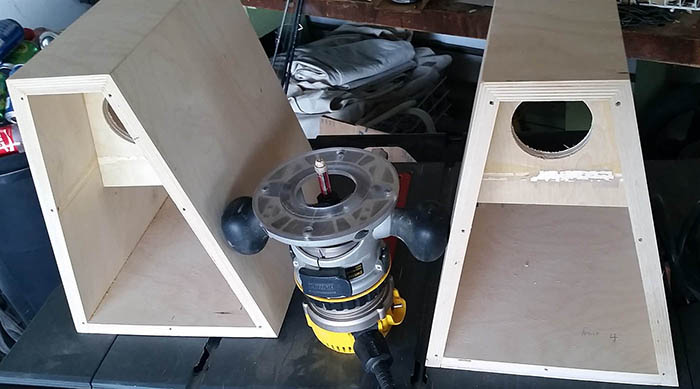
I used miter joints to join the top panel to the 2 sides, but used butt joints to join the bottom panel to the 2 sides because I wasn’t comfortable using a miter on the sub-90 degree angle at the bottom of the trapezoid. Once the top, bottom and sides were glued with wood glue, I cut the front and rear MDF baffles oversized and trimmed them to size. I then cut 45 degree chamfers around the baffle edges.
I made router guides of particle board for the non-circular recesses required by both woofer and tweeter. After cutting the through holes for the drivers, I clamped the guides in place and cut the recesses. The nice thing about using a guide is if the opening is too small, you can shift the guide over a hair and remove a little more material.
I will admit laziness on the finish, even though it doesn’t look too bad. I used a grey stain on the Baltic Birch and flat black spray paint on the baffles. This shape enclosure is quite attractive and would actually look very nice with a quality finish, but that wasn’t in the cards this time around.
Crossover Design:
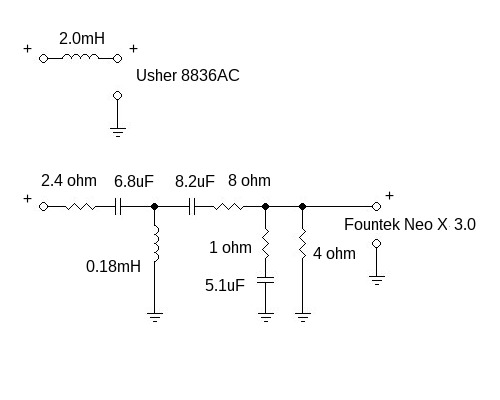
The crossover turned out to be quite a dichotomy of complexity and simplicity. I knew I wanted to cross the drivers higher than normal for a 7″ 2-way to allow the ribbon to perform at higher output levels, so I began playing with woofer lowpass frequencies at about 3kHz. After a lot of simulations, I found that the most well behaved roll off in that vicinity was to be had with a single inductor and nothing else. The value I settled on was 2.0mH to get the right integration with the tweeter.
The tweeter on the other hand was very difficult. It has a natural rise of about 8dB on each end of its passband, leaving a deep valley that I had to level the response to. In the end, an aggressive 3rd order electrical highpass took care of the low end peak and an aggressive zobel tamed the upper peak. Three resistors provided the padding and kept the other elements at reasonable values, leaving the total parts count at 8. This is more than I usually like to have on a single driver, but it was absolutely necessary in this case and since there is only one coil, the overall cost remains pretty low.
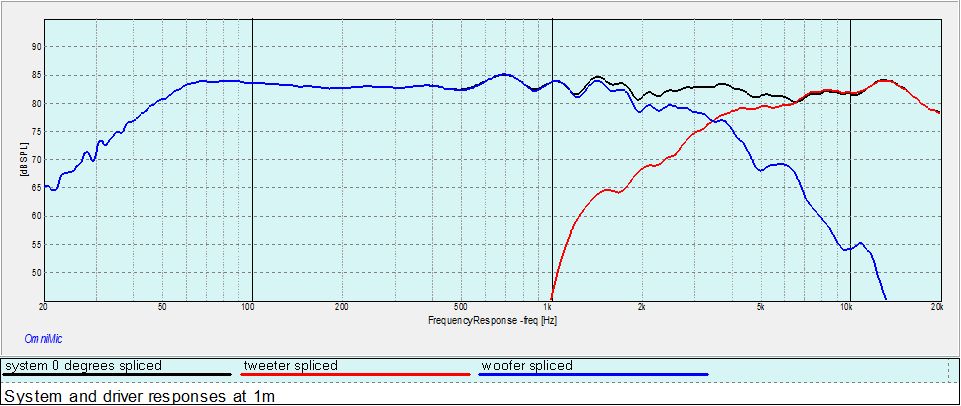
The crossover topology ended up being asymmetrical 3rd/4th order acoustic at about 3.4kHz. This allows the tweeter to be pushed very hard without strain and did not affect the power response too poorly as can be inferred from the off axis plots in the graph above.
Tips & Tricks:
The 2.4 ohm tweeter in front of the tweeter xo can be altered to raise or lower the tweeter level without altering the transfer function (other than a static gain/loss). At 2 ohms, the on axis FR is actually a little flatter, but I found it to be a little bright in my listening space and 2.4 ohms brought it right in line. I suggest ordering a 2 ohm and a 2.7 ohm along with the 2.4 ohm for experimentation.
http://www.ohio.edu/people/schneidw/audio/routing_truncated_recesses.html
This tutorial, posted by fellow PETT member williamrschneider is the best method (and best documented) I have seen for creating guides to recess straight edged drivers. Both the woofer and tweeter in UX3 were recessed perfectly using this method.
Conclusion:
This project was a lot of fun to build and is very satisfying to listen to.
The Fountek tweeter is detailed and delicate and worth the added trouble in the crossover. I’m hearing details in music I never noticed before and not in the sterile way that detailed sometimes comes across as. The sound is very dynamic as well without the least bit of strain at higher level than I care to listen. With an inherent 95dB sensitivity (even more with the peaks at each passband extreme) and crossed at 3.4kHz, these large format ribbons are producing a very large sound with very little energy input. This format does have its disadvantages as well, however. Vertical dispersion is poor and the comb filtering induced by a necessarily large CTC distance and a highish xo point exacerbates this weakness as you move above the listening axis. The difference between standing and sitting is not subtle. If they cannot be placed on stands tall enough to elevate the tweeters to ear level, then they should be tilted back slightly to accommodate.
The Usher woofer is a beast and one I wish I would have tried sooner. It provides prodigious amounts of bass in this small enclosure and sooooo smoooooth. It exceeds xmax gracefully and keeps on going. The midrange it produces is no slouch either and blends seamlessly with the delicate tweeter, but that bass! I keep playing one bass heavy track after the next, trying to find its limits and loving what I’m hearing. I will admit that the 0.9 Qtc is giving me a little boost down low AND helping to control the cone, but still! That bass is sweet!
Overall the combination of extra sweet, delicate highs and smooth, pounding bass is one that is very fun to listen to. These drivers deserve their reputations and price tags and this is about as small a package you could combine them in.
About the Designer:
I have been building speakers for over 20 years and I am a member of the PE Speaker Building Design Team.
Parts Used:
+ There are no comments
Add yours