Zirconium
Designer:
Scott Sehlin
Project Category:
Bookshelf Speakers
Project Level:
Intermediate
Project Time:
8-20 Hours
Project Cost:
$100 – $500
Project Description:
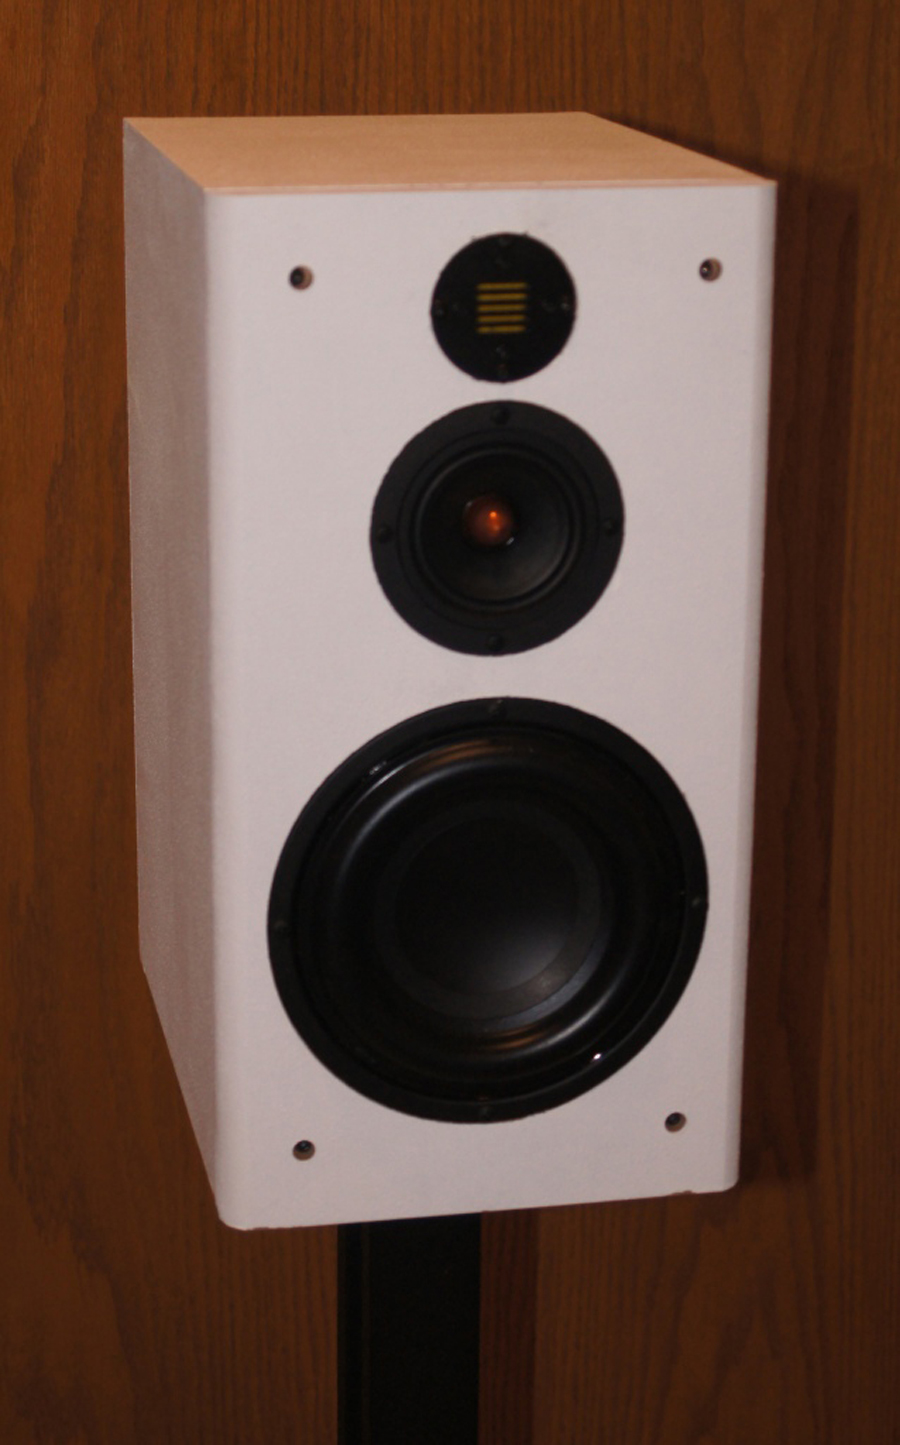
Zirconium is a full range 3-way monitor with extended lows, detailed mids and extended highs. When designing a monitor, a primary decision is whether to go with a woofer, mid and tweeter or just woofer and tweeter to cover the audible frequency range. There are some woofers that can deliver extended low frequency response and low distortion, detailed midrange performance and some tweeters that can extend low enough to integrate with them, but those drivers tend to be either very expensive or somewhat limited at meeting one or more of those requirements. A three way allows for drivers that do one thing very well, which can typically be had at a better price point. The downside of a three way monitor is increased complexity in blending the drivers response and often the need to construct a separate enclosure for the midrange.
Design Goals:
The primary design goal was to get full range, low distortion performance out of the 0.56 cu. ft. Knock Down Cabinets for under $500. The project uses knock down cabinets and relatively simple driver mounting to help make this project accessible to those with intermediate level speaker building skills. My Hafnium project met some of these same objectives, but there were a couple of things I wanted to improve on.
1. Hafnium can play 30 Hz in its small enclosure, but can’t be played very loud when there is a lot of deep bass content. This can be solved with a high pass filter set at 30-40 Hz, but few modern receivers and amplifiers include this feature.
2. The mids and highs on Hafnium are smooth and open sounding, but are lacking the detail resolution of the best designs I have heard.
Driver Selection:
The goal for the woofer was something that would give extension to at least 30 Hz and be able to play reasonably loud without distorting. The Tang Band W6-1139SIF fills the bill perfectly, and can play 6 dB louder than the woofer used in Hafnium before reaching its excursion limits. For the tweeter, the goal was extended and detailed highs at a reasonable price. A number of manufacturers, including Parts Express with the B652-Air, are looking to air-motion tweeters (AMT’s). The Dayton Audio AMT Mini-8 is an affordable AMT tweeter and great for this project, but has limited response below 5 kHz. The Tang Band subwoofer is best used at or below 300 Hz, so the midrange in this design needs to cover a wide range. The Dayton Audio PS95-8 was designed as a full range driver, has a shorting ring and hard paper cone, and costs less than $25, so this looks like a winner.
Enclosure Design:
The 0.56 cu. ft. flat pack enclosure is a ready made solution. I decided to double up the front baffle for extra rigidity and to make the outer baffle removable for ease of assembly and maintenance if needed. The drivers are centered on the baffle with the port in the rear of the enclosure.
Enclosure Assembly:
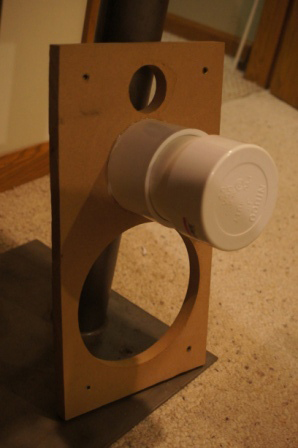
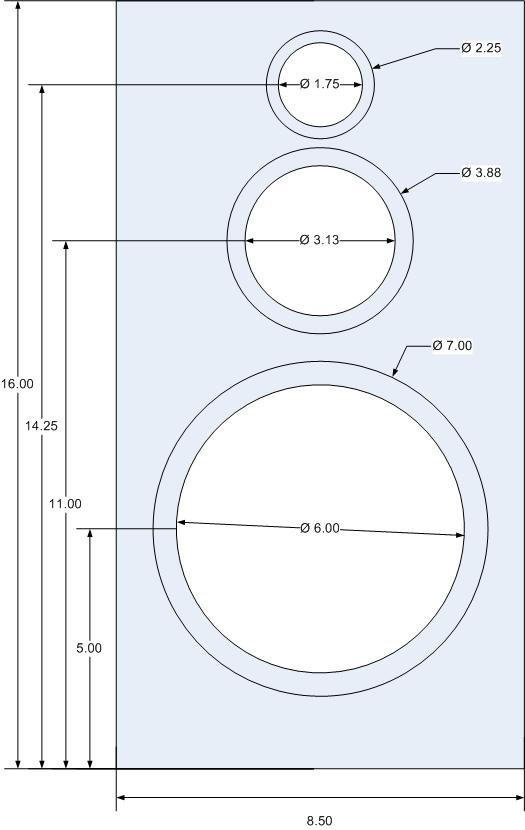
The enclosure assembly started by assembling the flat pack enclosure, leaving the front baffle off. I then cut out a piece of 3/4″ MDF slightly oversized for the front baffle with woofer mid and tweeter openings of 7″, 4″ and 2″ diameter respectively.
Holes were drilled and threaded inserts were installed in the 4 corners of the 3/4″ mdf sheet approximately 1″ down and in from each corner. The midrange enclosure consists of 3″ pvc coupling, which snugly fits in the 4″ hole, a section of 3″ pvc pipe, and a 3″ pvc end cap. These are readily available at most hardware or home improvement stores.
That baffle was then glued to the front of the assembled cabinet and the sides of the baffle were trimmed to match the rest of the cabinet using a router and flush trim bit.
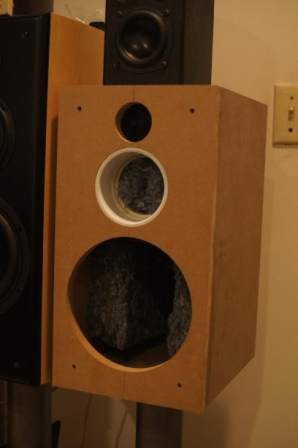
The baffle that came with the flat pack was used for the outer baffle. Holes for the drivers and recesses for the frames were cut using the dimensions published by Parts Express and shown in the baffle layout diagram.
Holes and countersinks were drilled into the corners, so that the outer and inner baffle could be attached via screws into the threaded inserts. Before attaching, the inner baffle was covered with 1/8″ craft foam sheeting to ensure no leaks or rattles between the two baffles.
The port starts with a press-fit 1.5″ by 4″ flared port sold by Parts Express. The port is extended to 8″ with a primitive but effective means of a 4″ section of cardboard paper towel tubing (which happens to be 1.5″ diameter) and duct tape.
The enclosure was finished with 3 coats of white Duratex.
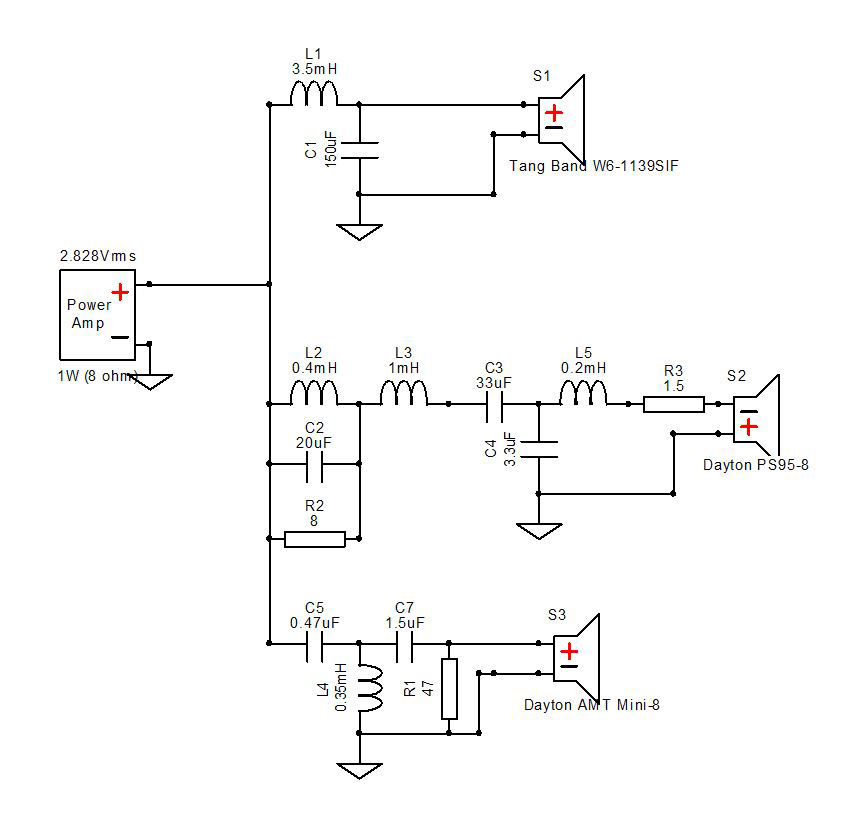
Crossover Design:
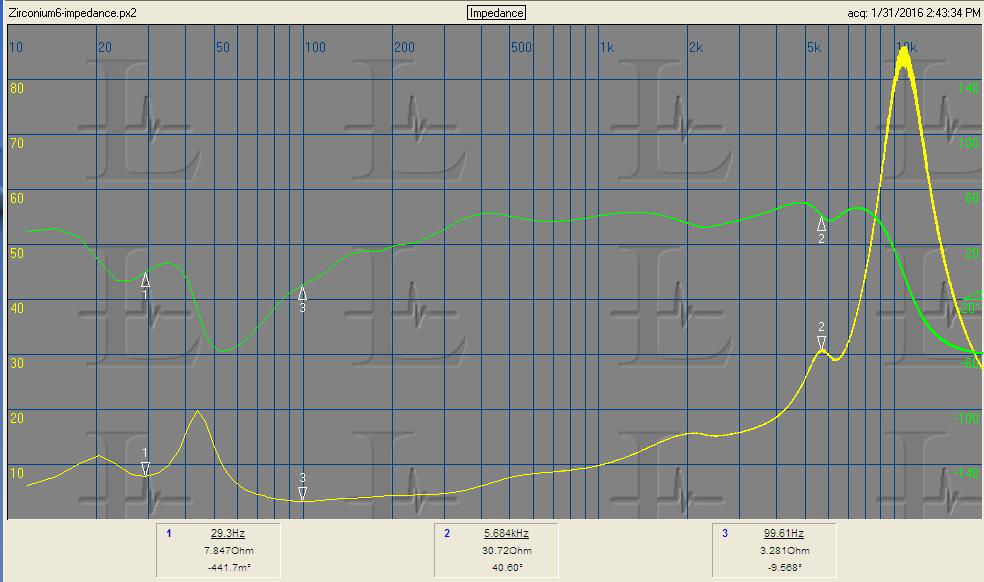
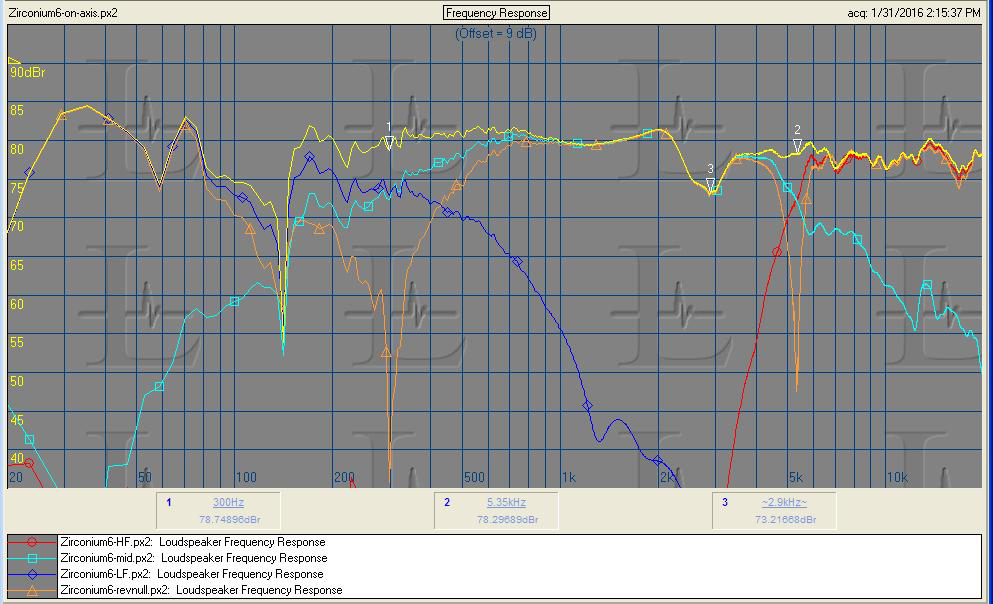
The woofer low pass is a simple second order filter that gives a second order acoustic slope with a crossover point of 300 Hz. The tweeter high pass is a 3rd order electrical filter which gives an approximate 4th order acoustic slope with a crossover point of 5.35 kHz. The midrange filter is more complex, with a first order high pass to integrate with the woofer at 300 Hz, a third order low pass to integrate with the tweeter at 5.25 kHz. The polarity of the midrange is inverted relative to the woofer and tweeter. A parallel notch filter is included in the midrange circuit in order to deal with a peak and dip combination in the 2-3 kHz range. This peak and dip is shown in the manufacturer’s response file and was observed in 4 samples of the PS95-8 that I measured, so I believe that the notch filter will be effective for at least the current production run of PS95’s
Conclusion:
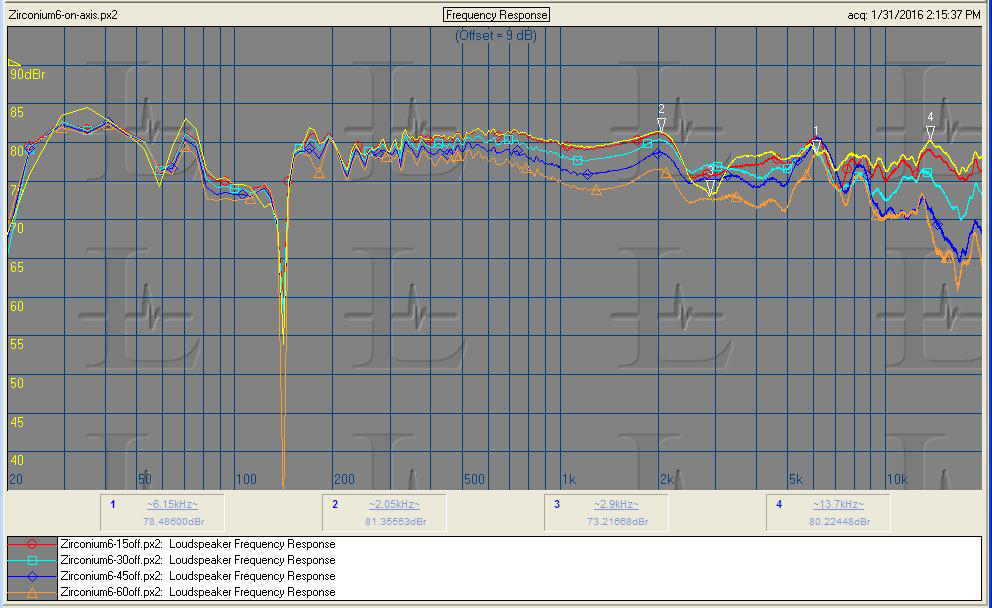
After a series of measurements and fine tuning by ear, I arrived at a response that is a couple of dB lower in the treble than in the bass or midrange. The tonal balance is similar to that of speakers that measure essentially flat, which underscores the importance of off axis response. The AMT Mini-8 has stronger off axis response than a typical 1″ dome tweeter and has some peaks in the off axis response, and this has to be accounted for in the design. The dip centered around 2.9 kHz largely flattens out off-axis, so it only has a minimal impact on sound.
Overall, this speaker has a very extended response for a bookshelf sized monitor and a neutral tonal balance with the detail resolution I was hoping for. This is not the simplest speaker to build, but may be worth the effort for those who are willing to go a step beyond a simple flat pack project.
About the Designer:
Scott’s interests in music and science have had him dabbling in home audio for about 40 years, building speakers for about half of that time. He is an Engineering Manager for an aerospace equipment manufacturer and a member of the Parts Express Speaker Building Design Team.
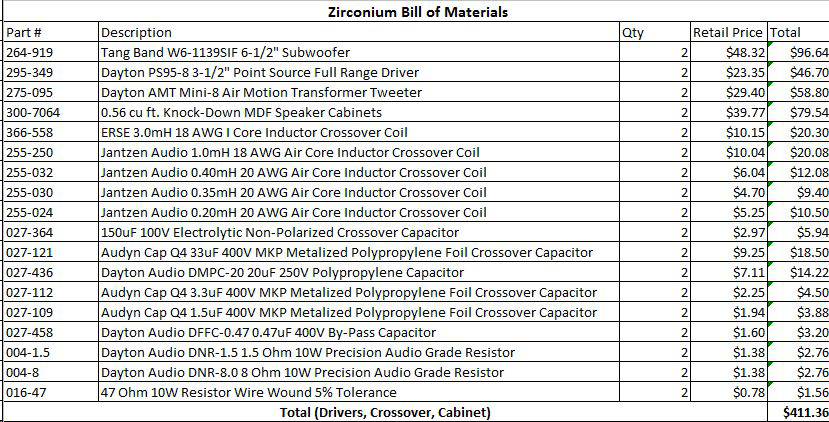
Project Parts List
Nice design! I’ve been tinkering with speaker designs for a while, but still consider myself a student, always learning.
Having said that….. I’m not trying to be critical, but I am very curious… why not use the ruler flat RS-100P ($33.20) instead of dealing with the peaks & dips of the PS95 ($23.35) via the Notch filter ($14.53)? The PS95 plus notch filter adds to $37.88. Using the better behaved RS-100P would eliminate the need for the notch filter. That would simplify the design, decrease the cost, and probably lead to smoother freq. response in the 2 to 4kHz range.
Your thoughts?
P.S. – Don’t beat me up, I’m just trying to understand the myriad tradeoffs that a designer considers when creating a new speaker. While my suggestion seems to make sense, someone with more experience and deeper knowledge may provide valuable insight that invalidates my assumptions.
Thanks.
I apologize for not seeing your post sooner. This is a perfectly good question. OM is largely correct that a key motivation for choosing the PS95 over the RS100P is off axis response. There was also some subjective listening tests of small, full range drivers on another forum that suggested that the PS95 might be the better sounding driver even though the RS100P measures better.
If I really wanted smooth, I would have stayed with the Vifa TC9FD18-8 that I used in the Hafnium. I wanted to see if I could push the envelope a little here in terms of detail and wide dispersion, and I thought the PS95 would be a little better in that regard.
MR, my guess probably a better off axis response.
I’m considering building this, but will use my own MDF. Can you provide details on your port, which part number? Any other details? Thanks!
The port is 260-402. I used duct tape and a 2″ section of a cardboard paper towel roll to extend the port length from 4″ to 6″. The paper towel roll is very nearly the same diameter as the port. I placed the port as close to the top of the cabinet as possible on the back wall (centered horizontally). If one doesn’t do that, the port will interfere with the midrange enclosure.
Well, I ended up making these and they did not disappoint! Very crisp, clear detailed highs and sold lows considering the relatively small size.
In the end, I made them with all parts listed except adjusted the box size a little bit (keeping the same volume the and using MDF for the midrange enclosure) and used plumbing pipe for the port, with a 90 deg. elbow to aid in internal packaging.
My original plan for the project was to tri-amp each of the speakers and use a DSP-based crossover, which I successfully completed but the cheap 100W class D amplifiers I used from eBay were not up to the task. Just did not have punch. I find that these need quite a bit of real power in order to get high volume levels, which they can certainly reach! So, now I’m using the crossovers as designed by the designer and an old school Yamaha amp.
[…] based on design by Scott Sehlin Parts Express Project Page with […]
Some photos of my build of these speakers:
http://allsystemstech.ca/main/2016/07/19/zirconium-3-way-monitor-speakers/
Thanks for the great project Scott.
Scott, I can’t believe it has been over a year since I’ve built myself a set of these speakers. I listen to them almost every day, and they still impress me. The clarity of the AMT tweeters and the depth of bass that is possible makes you think there’s a dedicated subwoofer. Love them so much and hope that others get the chance to enjoy building and listening to these too.
The BOM lists a 3mH inductor but the crossover specifies a 3.5mH inductor. Which would be the correct one? Also is it critical for it to be an Iron core?
Clarification to my previous question, is the DCR important?